2011 MERCEDES-BENZ E-CLASS CABRIOLET window
[x] Cancel search: windowPage 90 of 353
Opening and closing with the key
Important safet ynotes G
WARNING
Make sure nobody can be trapped or injured
by movin gparts such as the soft-top linkage
or soft-top compartment cover when opening
or closing the soft top.
If there is arisk of entrapment ,immediately
release the %or& button on the key.
The soft-top mechanism stops immediately.
Opening and closing i
The key must be close to the driver's door
handle.
X Point the tip of the key at the driver's door
handle.
X To open: press and hold the %button
on the key until the soft top is fully opened.
The Top in operation message appears
in the multifunction display. The seat ven-
tilation is switched on. The rear side win-
dows open.
X To close: press and hold the &button
on the key until the soft top is fully closed.
The Top in operation message appears
in the multifunction display. The soft top
and the side windows close. Closing the soft top manually
If the soft top cannot be closed automatically,
chec kthe following points:
R Is the boot separator engaged
(Y page 92)?
R Are the head restraintsont he rear bench
seats extended?
R Is the boot lid closed?
R Is the on-board voltage sufficient?
Start the engine if necessary.
If automatic operation still does not work, the
soft top can be closed manually.
This work must be performed by two persons. i
Closing the soft top manually is acom-
plex, technically demanding process which
requires agreat deal of force. Only close
the soft top manually in extreme emergen-
cies. In these situations, it is better to get
in touch with aqualified specialist work-
shop, e.g. aMercedes-Ben zService
Centre. G
WARNING
Remove wristwatches and any jewellery such
as rings or bracelets .You could otherwise get
caught, injured and damage the vehicle.
Always grip the soft top at the indicated grip-
ping points when closing the soft top man-
ually.Y ou could otherwise be injured.
X Depress the parking brake.
X Open the side windows.
X Lower the head restraint s(automatically
(Y page 103) or manually (Y page 103)).
X Remove the key from the ignition lock.
X Open the boot.
X Take the two straps out of the vehicle tool
kit (Y page 295).
X Take the hex-socket wrench out of the
Owner's Manual walleta nd keepitwith
you. X
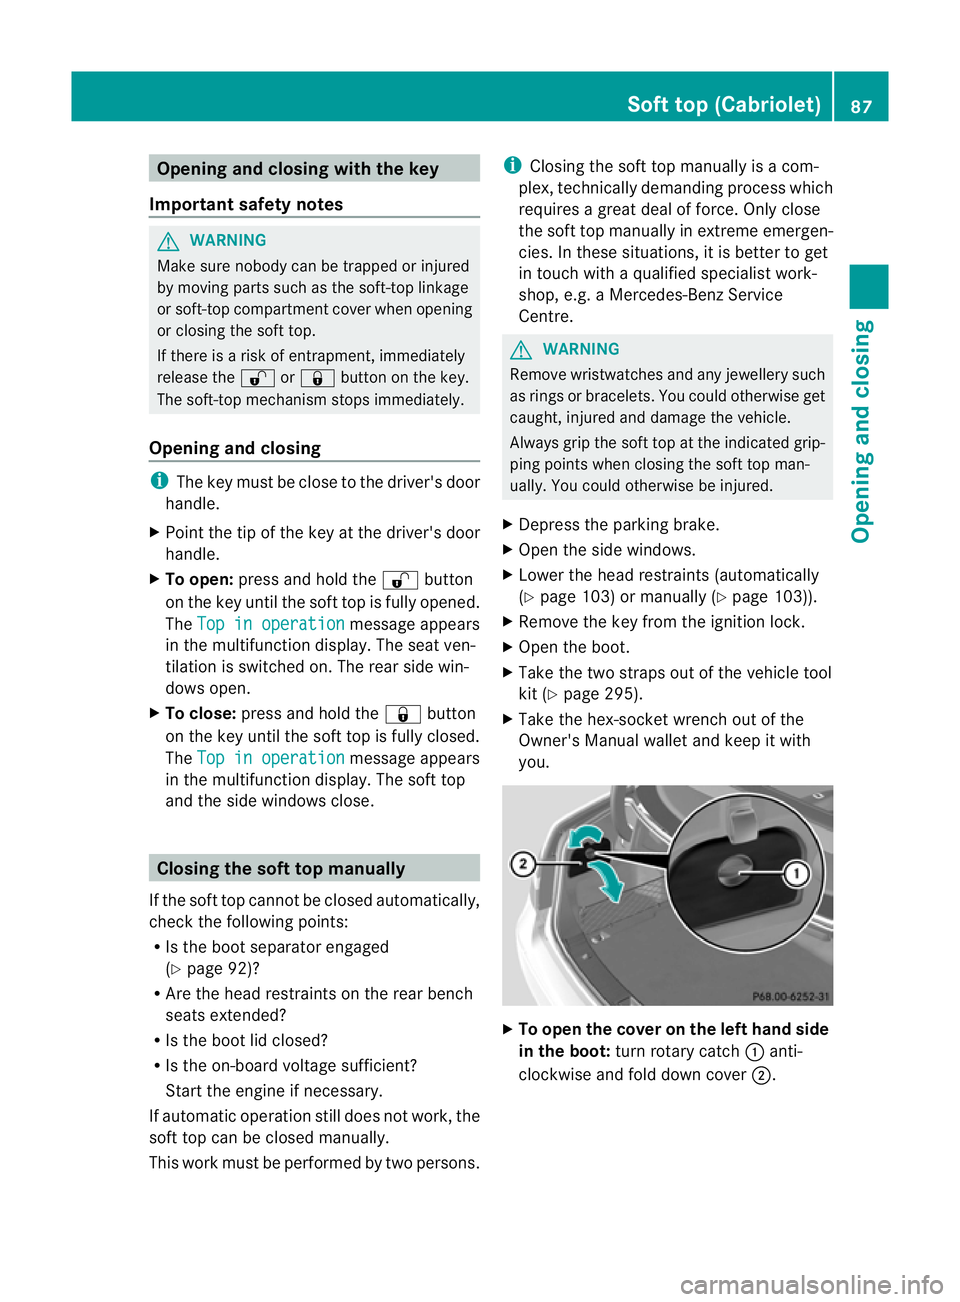
To ope nthe cove ronthe left hand side
in the boot: turn rotary catch :anti-
clockwise and fold down cover ;. Soft top (Cabriolet)
87Opening and closing Z
Page 100 of 353

G
WARNING
The glass in the panorama sunroof could
brea kinana ccident. If yo uare not wearing a
sea tbelt, there is arisk that you could be
thrown through the opening in the event of the
vehicle overturning .Therefore, always wear a
seat belt to reduce the risk of injuries.
! Only open the panorama sliding sunroof
if it is free of snow and ice. Otherwise, mal-
functions may occur.
Do not allow anything to protrude from the
sliding sunroof. Otherwise, the seals could
be damaged.
i Resonance noises can occur in addition
to the usuala irflow noises when the sliding
sunroof is open. They are caused by minor
pressure fluctuations in the vehicle interior.
Change the position of the sliding sunroof
or open aside window slightly to reduce or
eliminate these noises. Operating the panoramas
liding sun-
roof
Opening and closing Overhead control panel
:
To raise
; Opening
= To close/lower
X Turn the key to position 1or 2in the ignition
lock.
X Push or pull the 3switch in the corre-
sponding direction. i
If you press the 3switch beyond the
point of resistance, an automatic opening/
closing process is started in the corre-
sponding direction. You can stop automatic
operation by pressing again.
Rain closing feature When the key is in position
0in the ignition
lock or is removed, the panorama sliding sun-
roof closes automatically:
R if it starts to rain
R at extreme outside temperatures
R after six hours
R if there is amalfunction in the power supply
The panorama sliding sunroof remains raised
at the rear in order to allow ventilation of the
vehicle interior.
i If the panorama sliding sunroof is obstruc-
ted when being closed by the rain closing
feature, it opens again slightly. The rain
closing feature is then deactivated.
The panorama sliding sunroof does not close
if:
R it is raised at the rear.
R it is blocked.
R no rain is falling on the area of the wind-
screen being monitored by the rain sensor
(e.g. because the vehicle is under abridge
or in acarport). Operating the roller sunblind for the
panoramas
liding sunroof
General notes The roller sunblin
dshields the vehicle interior
from sunlight. The roller sunblin dcan only be
opened and close dwhen the panorama slid-
ing sunroof is closed. G
WARNING
Make sure that nobody can becom etrapped
as you open or close the roller sunblind. Sliding sunroof
97Opening and closing Z
Page 109 of 353
Switching the seat heating on/off
Switching on/off G
WARNING
Repeatedly settingt he seat heating to level
3 may result in excessive seat temperatures.
The health of passengers that have limited
temperature sensitivity or alimited ability to
react to excessively high temperatures may
be affected or they may even suffer burn-like
injuries. Therefore, do not use seat heating
level 3repeatedly.
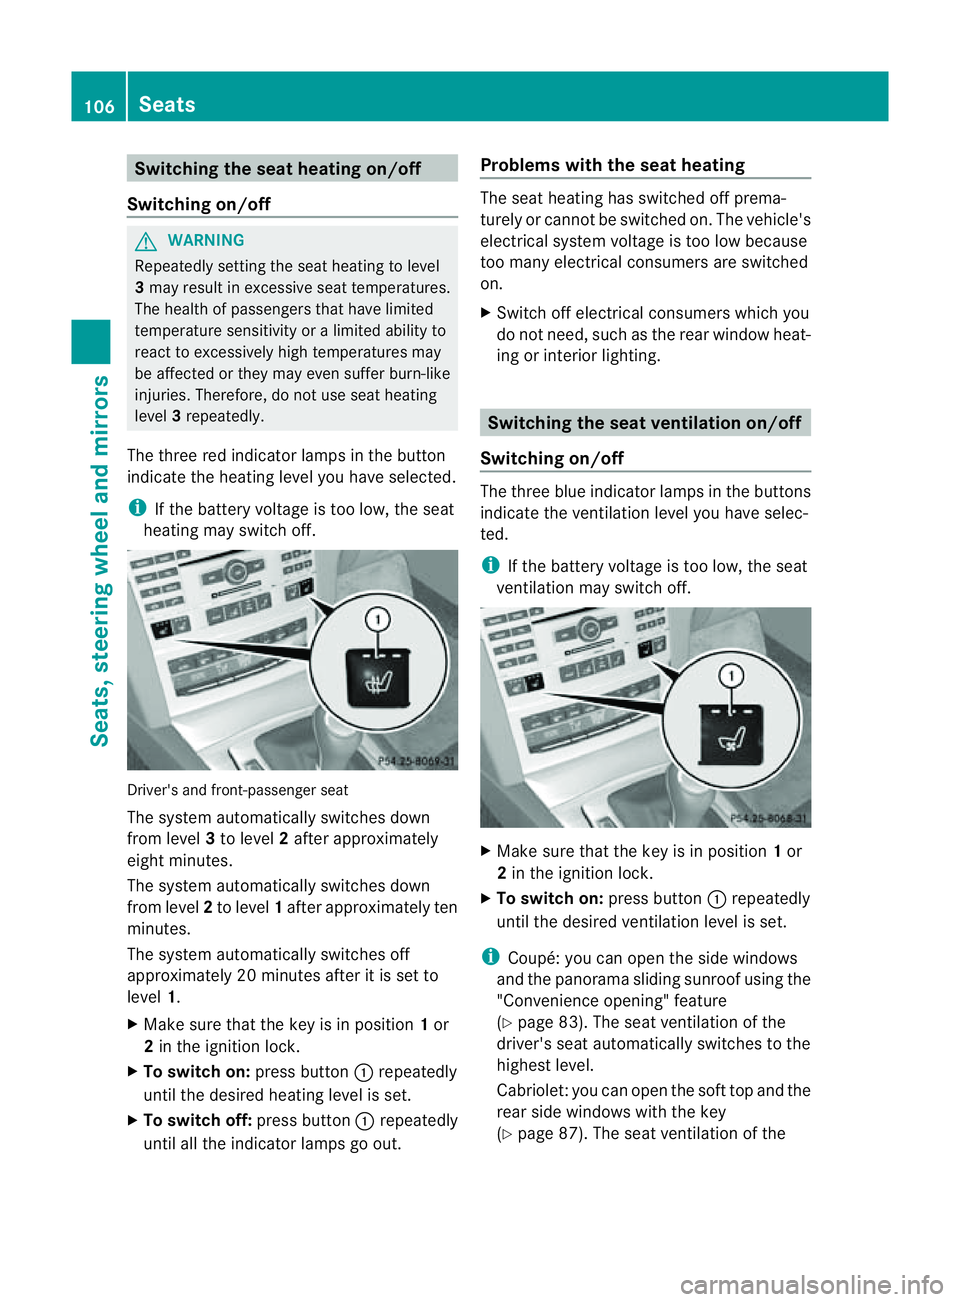
The three red indicator lamps in the button
indicate the heating level you have selected.
i If the battery voltage is too low, the seat
heating may switch off. Driver's and front-passenger seat
The system automatically switches down
from level 3to level 2after approximately
eight minutes.
The system automatically switches down
from level 2to level 1after approximately ten
minutes.
The system automatically switches off
approximately 20 minutes after it is set to
level 1.
X Make sure that the key is in position 1or
2 in the ignition lock.
X To switch on: press button:repeatedly
until the desired heating level is set.
X To switch off: press button:repeatedly
until all the indicator lamps go out. Problems with the seat heating The seat heating has switched off prema-
turely or cannot be switched on. The vehicle's
electrical system voltage is too low because
too many electrical consumers are switched
on.
X
Switch off electrical consumers which you
do not need, such as the rear window heat-
ing or interior lighting. Switching the seat ventilation on/off
Switching on/off The three blue indicator lamps in the buttons
indicate the ventilation level you have selec-
ted.
i
If the battery voltage is too low, the seat
ventilation may switch off. X
Make sure that the key is in position 1or
2 in the ignition lock.
X To switch on: press button:repeatedly
until the desired ventilation level is set.
i Coupé: you can open the side windows
and the panorama sliding sunroof using the
"Convenience opening" feature
(Y page 83). The seat ventilation of the
driver's seat automatically switches to the
highest level.
Cabriolet: you can open the soft top and the
rear side windows with the key
(Y page 87). The seat ventilation of the 106
SeatsSeats, steering wheela
nd mirrors
Page 110 of 353
driver'
sseat automatically switches to the
highest level.
X To switch off: press button:repeatedly
until all the indicator lamps go out.
Problems with the seat ventilation The seat ventilation has switched off prema-
turely or cannot be switched on. The vehicle's
electrical system voltage is too low because
too many electrical consumers are switched
on.
X Switc hoff electrical consumers which you
do not need, such as the rear window heat-
ing or interior lighting. AIRSCARF (Cabriolet)
Switching on/off G
WARNING
Very hot air can flow out of the AIRSCARF
vent sint he head restraint swhen AIRSCARF
is in operation .This can cause burns on unpro-
tected skin near the AIRSCARF vents.L ower
the heating output in good time, when neces-
sary.
The AIRSCARF function warms the head and
neck area of vehicle occupants with warm air.
The warm air flows out of the holes in the head
restraints.
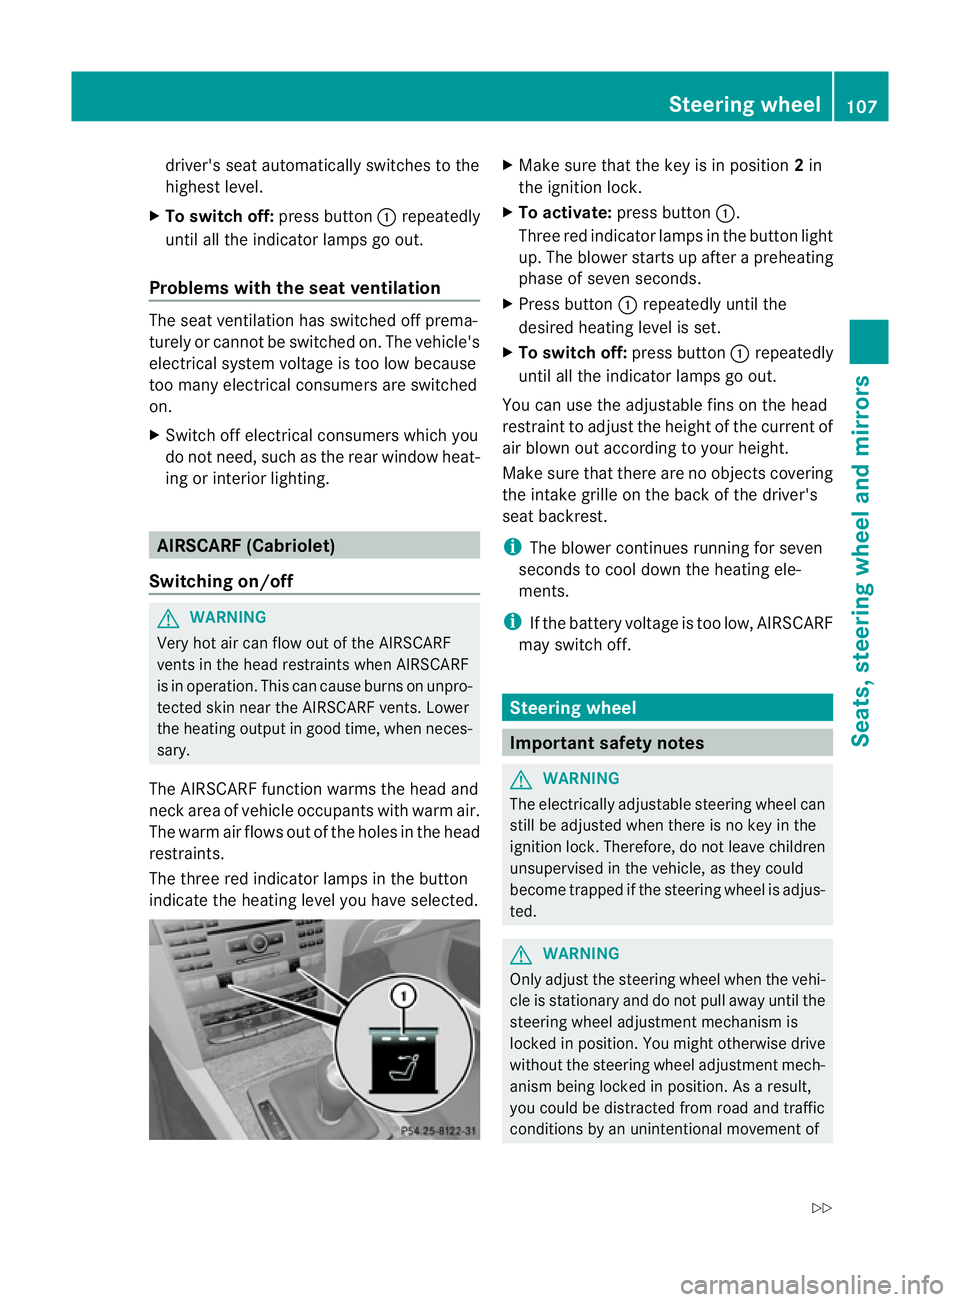
The three red indicator lamps in the button
indicate the heating level you have selected. X
Make sure that the key is in position 2in
the ignition lock.
X To activate: press button :.
Three red indicator lamps in the button light
up. The blower starts up after apreheating
phase of seven seconds.
X Press button :repeatedly until the
desired heating level is set.
X To switch off: press button:repeatedly
until all the indicator lamps go out.
You can use the adjustable fins on the head
restraint to adjust the height of the current of
air blown out according to your height.
Make sure that there are no objectsc overing
the intake grille on the back of the driver's
seat backrest.
i The blower continues running for seven
seconds to cool down the heating ele-
ments.
i If the battery voltage is too low, AIRSCARF
may switch off. Steering wheel
Important safety notes
G
WARNING
The electrically adjustable steering wheel can
still be adjusted when there is no key in the
ignition lock. Therefore, do not leave children
unsupervised in the vehicle, as they could
become trapped if the steering wheel is adjus-
ted. G
WARNING
Only adjust the steering wheel when the vehi-
cle is stationary and do not pull away until the
steering wheel adjustment mechanism is
locked in position. You might otherwise drive
without the steering wheel adjustment mech-
anism being locked in position. As aresult,
you could be distracted from road and traffic
conditions by an unintentional movement of Steering wheel
107Seats, steering wheela nd mirrors
Z
Page 112 of 353

thereb
yunintentionall yactivate the EASY-
ENTRY/EXIT featur eand become trapped.
Positio nofthe steering whee lwhent he
EASY-ENTRY/EXI Tfeatur eisactive The steerin
gwheel tilts upwards if you:
R remove the key from the ignition lock
R open the driver's door and the key is in
position 0or 1in the ignition lock
i The steerin gwheel only moves upwards if
it has not already reached the upper end
stop.
If you insert the key into the ignition lock with
the driver's door closed, the steerin gwheel is
automatically moved to the previously set
position.
Position of the steering wheel for driv-
ing The steerin
gwheel is moved to the previously
set position if:
R the driver's door is closed
R you insert the key into the ignition lock
or
R you press the Start/Stop button onceon
vehicles with KEYLESS-GO.
If you close the driver's door with the key
inserted into the ignition lock, the steering
wheel is automatically moved to the previ-
ously set position.
The last position of the steerin gwheel is
stored after each manual setting or when you
stor ethe setting with the memory function
(Y page 112).
Crash-responsive EASY-EXIT feature If the crash-responsive EASY-EXIT feature is
triggered in an accident ,the steerin gcolumn
will move upwards when the driver's door is
opened. This occurs irrespective of the posi-
tion of the key in the ignition lock. This makes
it easier to exit the vehicle and rescue the
occupants. The crash-responsive EASY-EXIT feature is
only operational if the EASY-EXIT/ENTRY fea-
ture is activated in the on-board computer. Mirrors
Rear-view mirror
Rear-view mirror (manual anti-dazzle) X
Anti-dazzle mode: flick anti-dazzle
switch :forwards or back. Exterior mirrors
Adjusting the exterior mirrors G
WARNING
The exterior mirrors reduce the size of the
image. Objects are actually closer than they
appear. You could misjudge the distanc efrom
vehicles driving behind and cause an acci-
dent ,e.g. when changin glane. For this rea-
son ,makes ure of th eactual distanc efromt he
vehicle driving behin dbyglancingovery our
shoulder.
The convex exterior mirrors provide alarger
field of vision.
The exterior mirrors are automatically heated
if the rear window heating is switched on and
the outside temperature is low. Mirrors
109Seats, steering wheel and mirrors Z
Page 131 of 353
Useful information
i This Owner's Manual describes all models
and all standard and optional equipment
available to your vehicle at the time of pub-
lication of the Owner's Manual. Country-
specific deviation sare possible. Please
not ethat your vehicle may not be equipped
with all feature sdescribed. This also
applies to safety-relevan tsystems and
functions.
i Pleas ereadt he information on qualified
specialist workshop s(Ypage 22). Overview of climat
econtro lsystems Important safet
ynotes G
WARNING
Observ ethe setting srecommended on the
following pages. Otherwise ,the windows
could mist up. This may obstruct your view of
the traffic situation and, as aresult ,you may
cause an accident.
THERMATIC/THERMOTRONIC automatic cli-
mate control controls the temperature and
the humidit yofthe vehicle interior and filters
out undesirable substances fro mthe air.
THERMATIC/THERMOTRONIC automatic cli-
mate control is only operational when the
engine is running. 12
i Ventilate the vehicle for abrief period
during warm weather, e.g. using the con-
venience opening feature (Y page 83). This
will speed up the cooling process and the
desired vehicle interior temperature will be
reached more quickly.
i The integrated filter can filter out most
particles of dust and completely filters out
pollen. Aclogged filter reduces the amount
of air supplied to the vehicle interior .For
this reason, you should always observe the interval for replacing the filter, which is
specified in the Servic
eBooklet .Asit
depends on environmental conditions, e.g.
heavy air pollution, the interval may be
shorter than stated in the Service Booklet.
i It is possible that the residualh eat func-
tion may be activated automaticallyanh our
after the key is removed. The vehicle is then
ventilated for 30 minutes to dry the air-
conditioning system.
12 THERMOTRONIC automatic climate control: the residualh eat function can only be activated/deactivated
when the ignition is switched off. 128
Overview of climatec
ontrol systemsClimatecontrol
Page 132 of 353
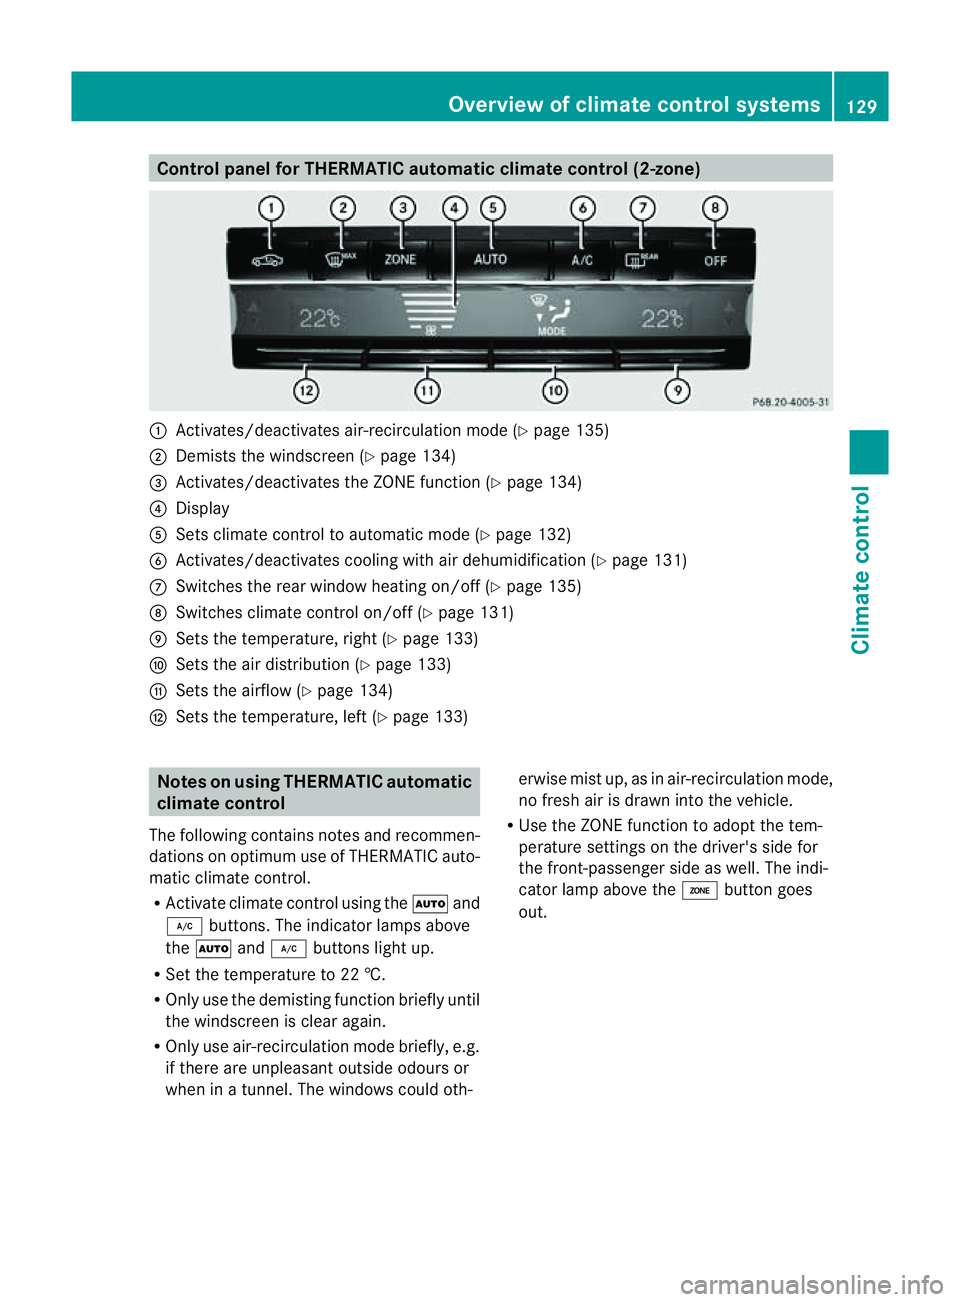
Control panel for THERMATIC automatic climat
econtrol (2-zone) :
Activates/deactivate sair-recirculation mod e(Ypage 135)
; Demists th ewindscree n(Ypage 134)
= Activates/deactivate sthe ZONE function (Y page 134)
? Display
A Setsclimate control to automatic mod e(Ypage 132)
B Activates/deactivates coolin gwith air dehumidification ( Ypage 131)
C Switches the rear window heatin gon/off (Y page 135)
D Switches climate control on/off (Y page 131)
E Setsthe temperature, right (Y page 133)
F Setsthe air distribution (Y page 133)
G Setsthe airflow (Y page 134)
H Setsthe temperature, left (Y page 133)Notes on using THERMATIC automatic
climate control
The followin gcontain snotes and recommen-
dation sonoptimum use of THERMATI Cauto-
matic climate control.
R Activate climate control using the Ãand
¿ buttons .The indicator lamps above
the à and¿ buttons light up.
R Set the temperature to 22 †.
R Only use the demisting function briefly until
the windscreen is clear again.
R Only use air-recirculation mode briefly, e.g.
if there are unpleasant outside odours or
when in atunnel. The windows could oth- erwise mist up, as in air-recirculation mode,
no fresh air is drawn into the vehicle.
R Use the ZONE function to adopt the tem-
perature settings on the driver's side for
the front-passenger side as well. The indi-
cator lamp above the ábutton goes
out. Overview of climate control systems
129Climatecontrol Z
Page 133 of 353
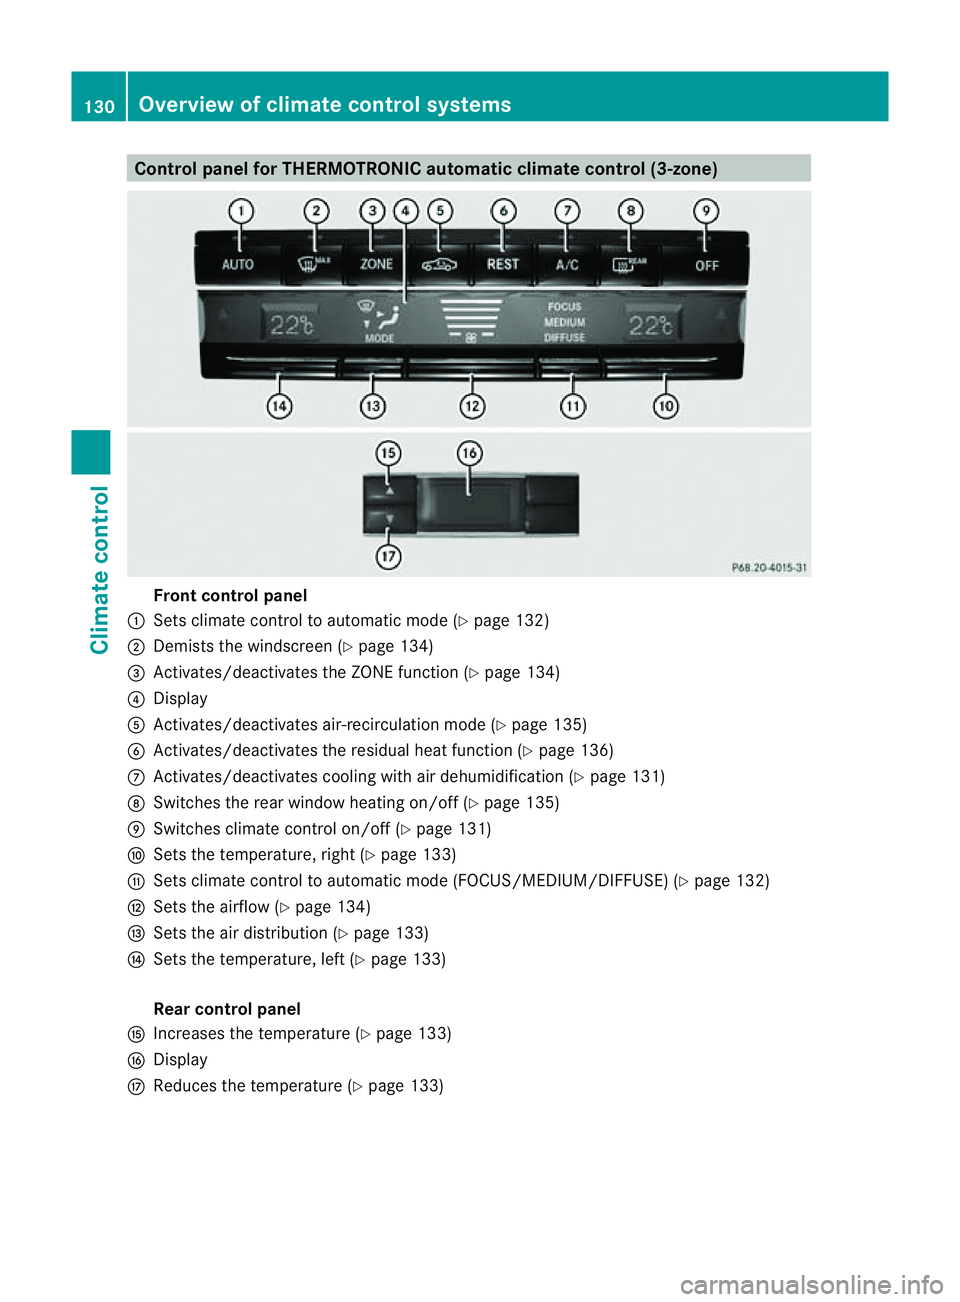
Control panel for THERMOTRONIC automatic climat
econtrol (3-zone) Fron
tcontrol panel
: Setsclimate control to automatic mode (Y page 132)
; Demist sthe windscreen (Y page 134)
= Activates/deactivates th eZONE function (Y page 134)
? Display
A Activates/deactivates air-recirculatio nmode (Y page 135)
B Activates/deactivates the residual heat function (Y page 136)
C Activates/deactivates cooling with air dehumidification ( Ypage 131)
D Switches the rear window heating on/off( Ypage 135)
E Switches climat econtro lon/off (Y page 131)
F Setsthe temperature, right (Y page 133)
G Setsclimat econtro ltoautomatic mode (FOCUS/MEDIUM/DIFFUSE )(Y page 132)
H Setsthe airflow (Y page 134)
I Setsthe air distribution (Y page 133)
J Setsthe temperature, left (Y page 133)
Rear control panel
K Increases the temperature (Y page 133)
L Display
M Reduces the temperature ( Ypage 133) 130
Overview of climat
econtrol systemsClimat econtrol