2011 MERCEDES-BENZ E-CLASS CABRIOLET warning
[x] Cancel search: warningPage 270 of 353
X
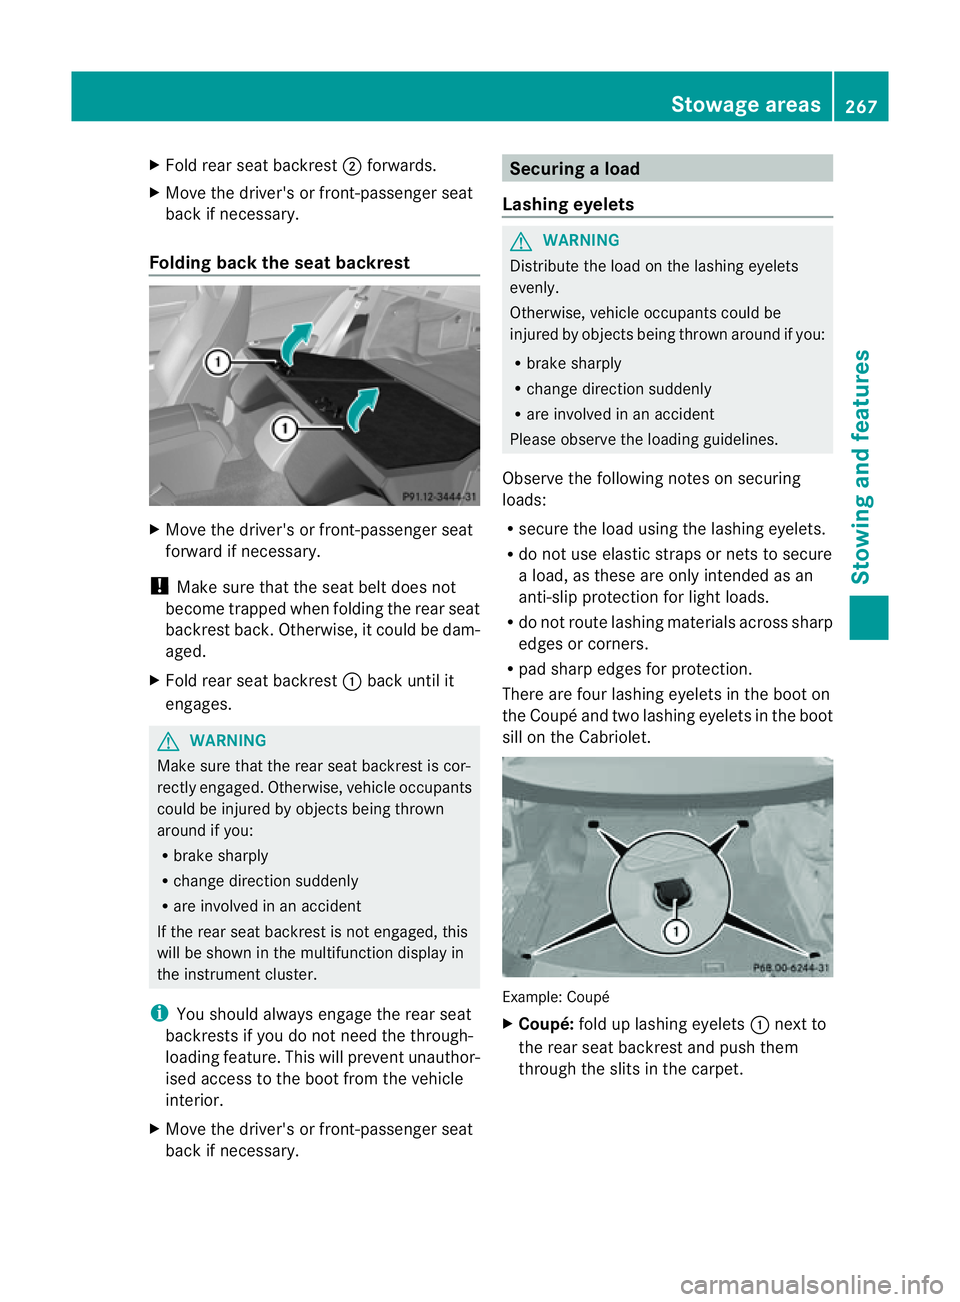
Fold rea rseat backrest ;forwards.
X Move the driver's or front-passenger seat
back if necessary.
Folding back the seat backrest X
Move the driver's or front-passenger seat
forward if necessary.
! Make sure that the seat belt does not
become trapped when folding the rear seat
backrest back. Otherwise, it could be dam-
aged.
X Fold rear seat backrest :back until it
engages. G
WARNING
Make sure that the rear seat backrest is cor-
rectly engaged. Otherwise, vehicle occupants
could be injured by objects being thrown
around if you:
R brake sharply
R change direction suddenly
R are involved in an accident
If the rear seat backrest is not engaged, this
will be shown in the multifunction display in
the instrument cluster.
i You should alway sengage the rear seat
backrests if you do not need the through-
loading feature. This will preven tunauthor-
ised access to the boot from the vehicle
interior.
X Mov ethe driver's or front-passenger seat
back if necessary. Securin
gaload
Lashing eyelets G
WARNING
Distribut ethe load on th elashin geyelets
evenly.
Otherwise, vehicle occupant scould be
injured by object sbein gthrown aroun difyou:
R brak esharply
R change directio nsuddenly
R are involve dinanaccident
Pleas eobserv ethe loadin gguidelines.
Observ ethe followin gnotes on securing
loads:
R secure th eload usin gthe lashin geyelets.
R do no tuse elastic straps or nets to secure
al oad, as these are only intended as an
anti-slip protection for light loads.
R do not route lashing materials across sharp
edges or corners.
R pad sharp edges for protection.
There are four lashing eyelets in the boot on
the Coupéa nd two lashing eyelets in the boot
sill on the Cabriolet. Example: Coupé
X
Coupé: fold up lashing eyelets :next to
the rear seat backrest and push them
through the slits in the carpet. Stowage areas
267Stowingand features Z
Page 271 of 353
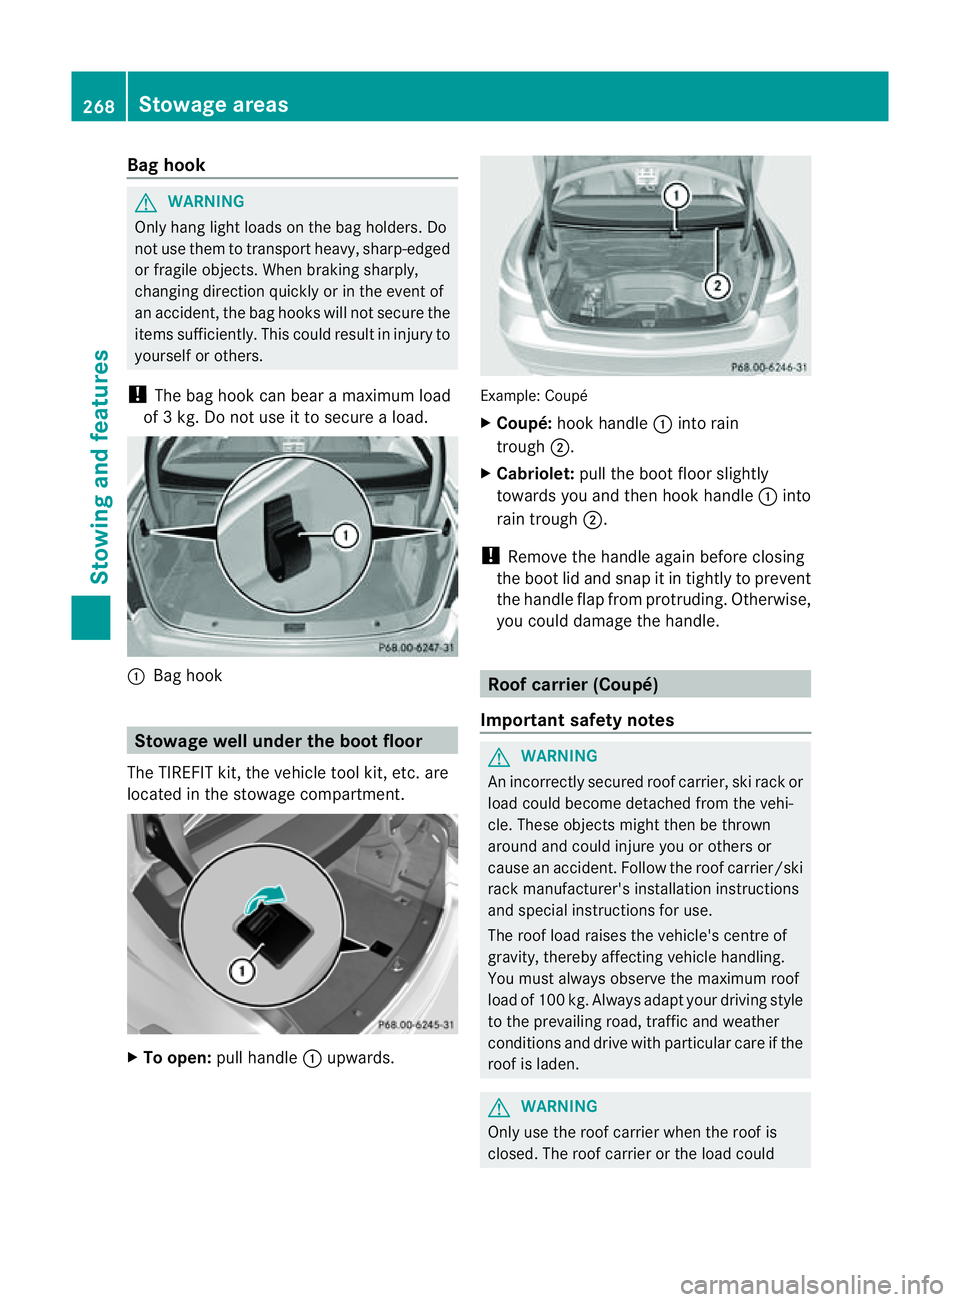
Bag hook
G
WARNING
Onl yhanglight load sonthe bagholders. Do
not us ethem to transport heavy ,sharp-edged
or fragile objects. Whe nbraking sharply,
changing directio nquickly or in the event of
an accident, the bag hooks willn ot secure the
items sufficiently. This could resul tininjury to
yoursel forothers.
! Theb aghoo kcan bear amaximum load
of 3k g.Do no tuse it to secure aload. :
Bag hook Stowage well under th
eboot floor
The TIREFI Tkit,t he vehicle tool kit ,etc. are
locate dinthe stowage compartment. X
To open: pull handle :upwards. Example: Coupé
X
Coupé: hook handle :into rain
trough ;.
X Cabriolet: pull the boot floo rslightly
towards you and the nhook handle :into
rain trough ;.
! Remove the handle again before closing
the boot lid and snap it in tightly to prevent
the handle flap from protruding. Otherwise,
you could damage the handle. Roof carrier (Coupé)
Important safety notes G
WARNING
An incorrectly secured roof carrier, ski rack or
load could become detached from the vehi-
cle. These object smight then be thrown
around and could injure you or others or
cause an accident .Follow the roof carrier/ski
rack manufacturer' sinstallation instructions
and special instructions for use.
The roof load raises the vehicle's centre of
gravity, thereby affecting vehicle handling.
You must alwayso bserve the maximum roof
load of 100 kg. Always adapt your driving style
to the prevailing road, traffic and weather
conditions and drive with particular care if the
roof is laden. G
WARNING
Only use the roof carrier when the roof is
closed. The roof carrier or the load could 268
Stowage areasStowing and features
Page 272 of 353
endanger the occupant
softhe vehicle when
the roof is open.
! Mercedes-Benz recommends that you
only use roof carriers that have been tested
and approved for Mercedes-Benz vehicles.
This helps to preven tdamage to th evehi-
cle.
Positio nthe load on the roof carrier in such
aw ay that the vehicle will not sustain dam-
age even when it is in motion.
Depending on the vehicle equipment,
ensure that when the roof carrier is fitted
you can:
R open the panorama sliding sunroof fully
R open the boot lid fully
! To avoid damaging or scratching the cov-
ers, do not use metallic or hard objectsto
open them.
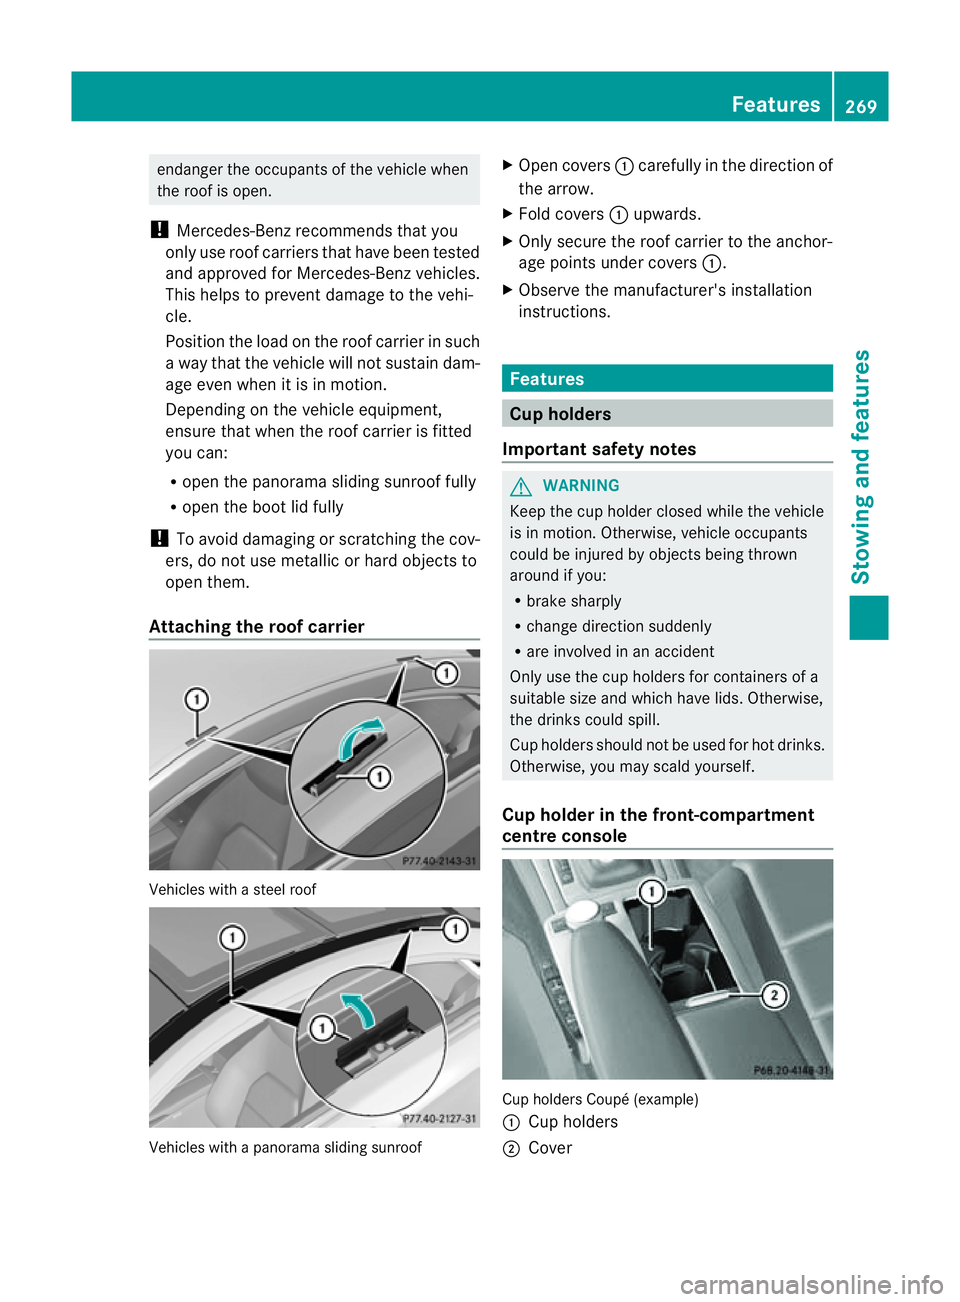
Attaching the roof carrier Vehicles with
asteel roof Vehicles with
apanorama sliding sunroof X
Open covers :carefully in the direction of
the arrow.
X Fold covers :upwards.
X Only secure the roof carrier to the anchor-
age points under covers :.
X Observe the manufacturer's installation
instructions. Features
Cup holders
Important safety notes G
WARNING
Keep the cup holder closed while the vehicle
is in motion. Otherwise, vehicle occupants
could be injured by objectsb eing thrown
around if you:
R brake sharply
R change direction suddenly
R are involved in an accident
Only use the cup holders for container sofa
suitable size and which have lids. Otherwise,
the drink scould spill.
Cup holders should not be used for hot drinks.
Otherwise, you may scald yourself.
Cup holder in the front-compartment
centre console Cup holders Coupé (example)
:
Cup holders
; Cover Features
269Stowing and features Z
Page 273 of 353
X
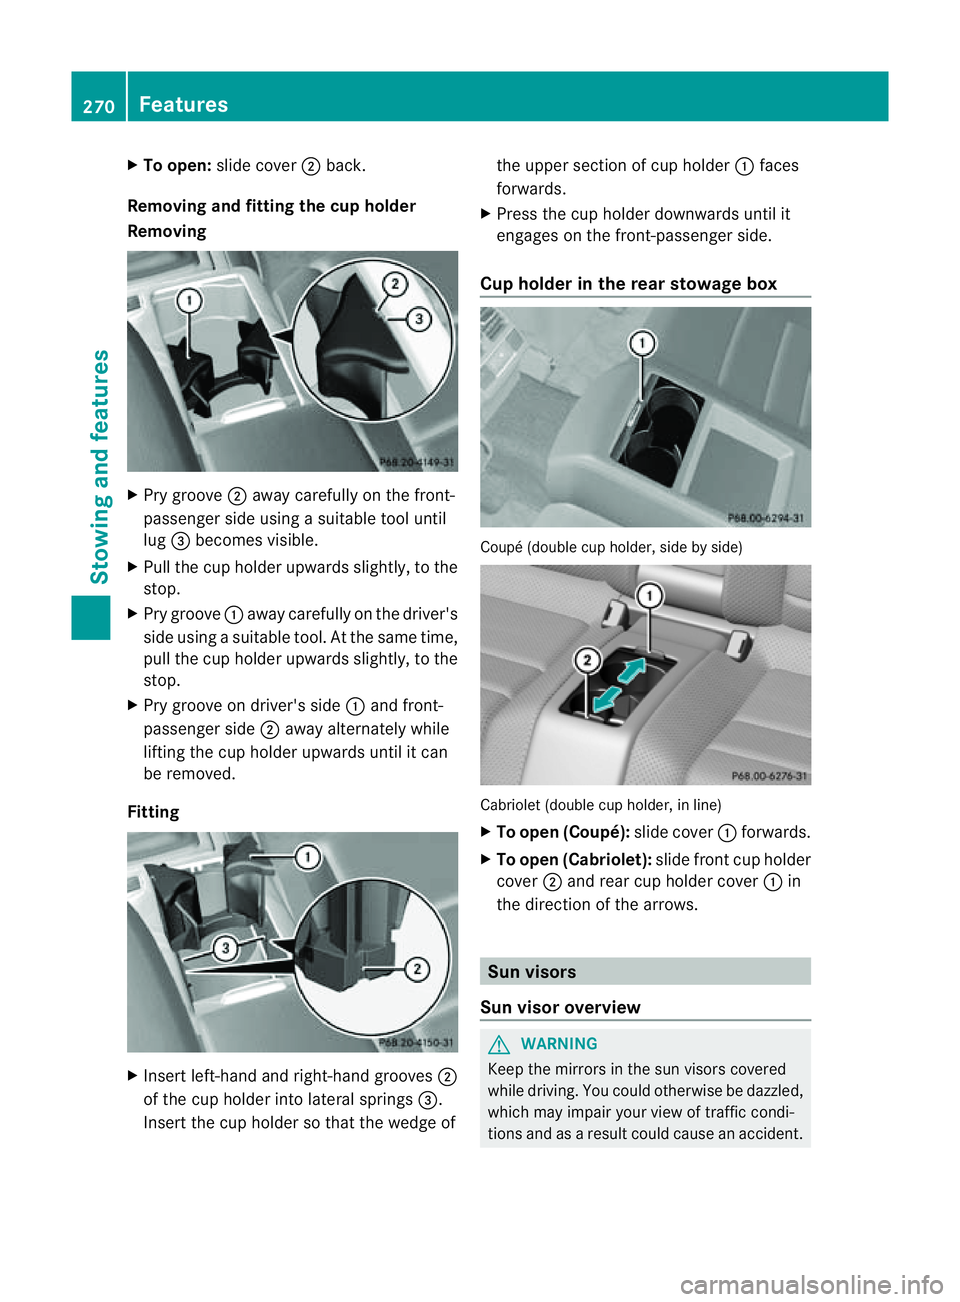
To open: slidecover ;back.
Removing and fitting the cu pholder
Removing X
Pry groove ;away carefull yonthe front-
passenge rside using asuitable too luntil
lug =becomes visible.
X Pull the cup holder upwards slightly, to the
stop.
X Pry groove :away carefully on the driver's
side using asuitable tool. At the same time,
pull the cup holder upwards slightly, to the
stop.
X Pry groove on driver's side :and front-
passenger side ;away alternately while
lifting the cup holder upwards until it can
be removed.
Fitting X
Insert left-han dand right-han dgrooves ;
of the cup holder int olateral springs =.
Insert the cup holder so that the wedge of the upper section of cup holder
:faces
forwards.
X Press the cup holder downwards until it
engages on the front-passenger side.
Cup holder in th erears towage box Coupé (double cup holder
,side by side) Cabriolet (double cup holder
,inline)
X To open (Coupé): slide cover:forwards.
X To open (Cabriolet): slide front cup holder
cover ;and rear cup holder cover :in
the direction of the arrows. Sun visors
Sun visor overview G
WARNING
Keep the mirrors in the sun visor scovered
while driving. You could otherwise be dazzled,
which may impair your view of traffic condi-
tion sand as aresult could cause an accident. 270
FeaturesStowing and features
Page 275 of 353
X
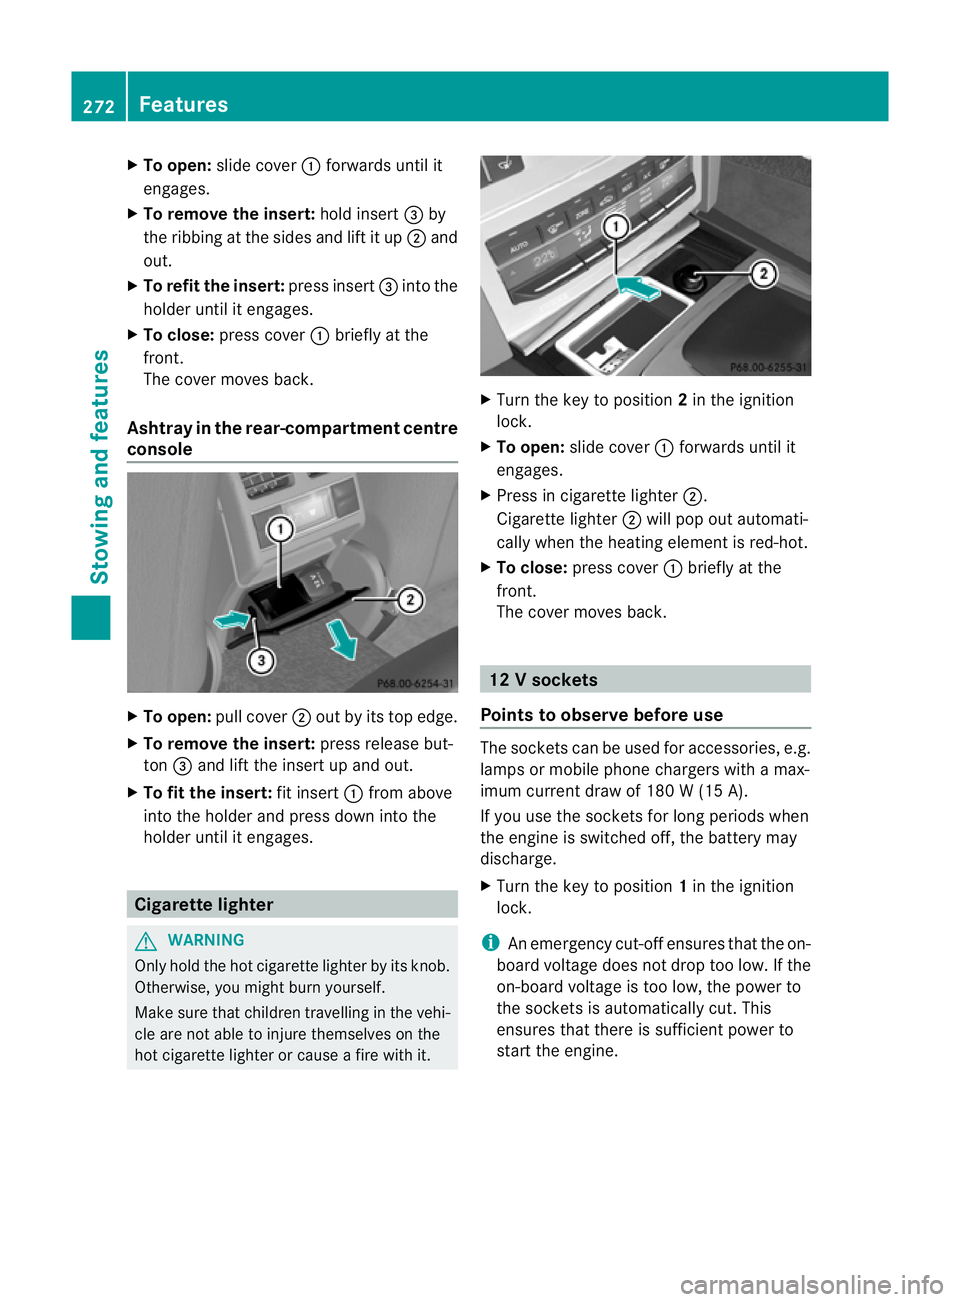
To open: slidecover :forwards unti lit
engages.
X To remove the insert: holdinsert =by
the ribbing at the side sand lift it up ;and
out.
X To refi tthe insert: press insert =into the
holder until it engages.
X To close: press cover :briefly at the
front.
The cover moves back.
Ashtray in the rear-compartment centre
console X
To open: pullcover ;out by its top edge.
X To remove the insert: press release but-
ton =and lift the insert up and out.
X To fit the insert: fit insert:from above
into the holder and press dow ninto the
holde runtil it engages. Cigarette lighter
G
WARNING
Onl yholdt he hot cigarette lighte rbyitsknob.
Otherwise ,you might burn yourself.
Mak esuret hatc hildren travellin ginthevehi-
cle are no table to injure themselves on the
hot cigarette lighter or cause afire with it. X
Turn the key to position 2in the ignition
lock.
X To open: slide cover :forwards until it
engages.
X Press in cigarette lighter ;.
Cigarett elighter ;will pop out automati-
cally when the heating element is red-hot.
X To close: press cover :briefly at the
front.
The cover moves back. 12
Vsockets
Point stoo bserve befor euse The socket
scan be used for accessories ,e.g.
lamps or mobile phon echargers with amax-
imum curren tdraw of 18 0W(15 A).
If you use th esocket sfor lon gperiods when
th ee ngine is switche doff,t he battery may
discharge.
X Turn the key to position 1in the ignition
lock.
i An emergency cut-offe nsures thatthe on-
board voltage does not drop too low. If the
on-board voltage is too low, the power to
the socketsisa utomatically cut. This
ensures that there is sufficient power to
start the engine. 272
FeaturesStowing and features
Page 276 of 353
Socket in the glove compartment
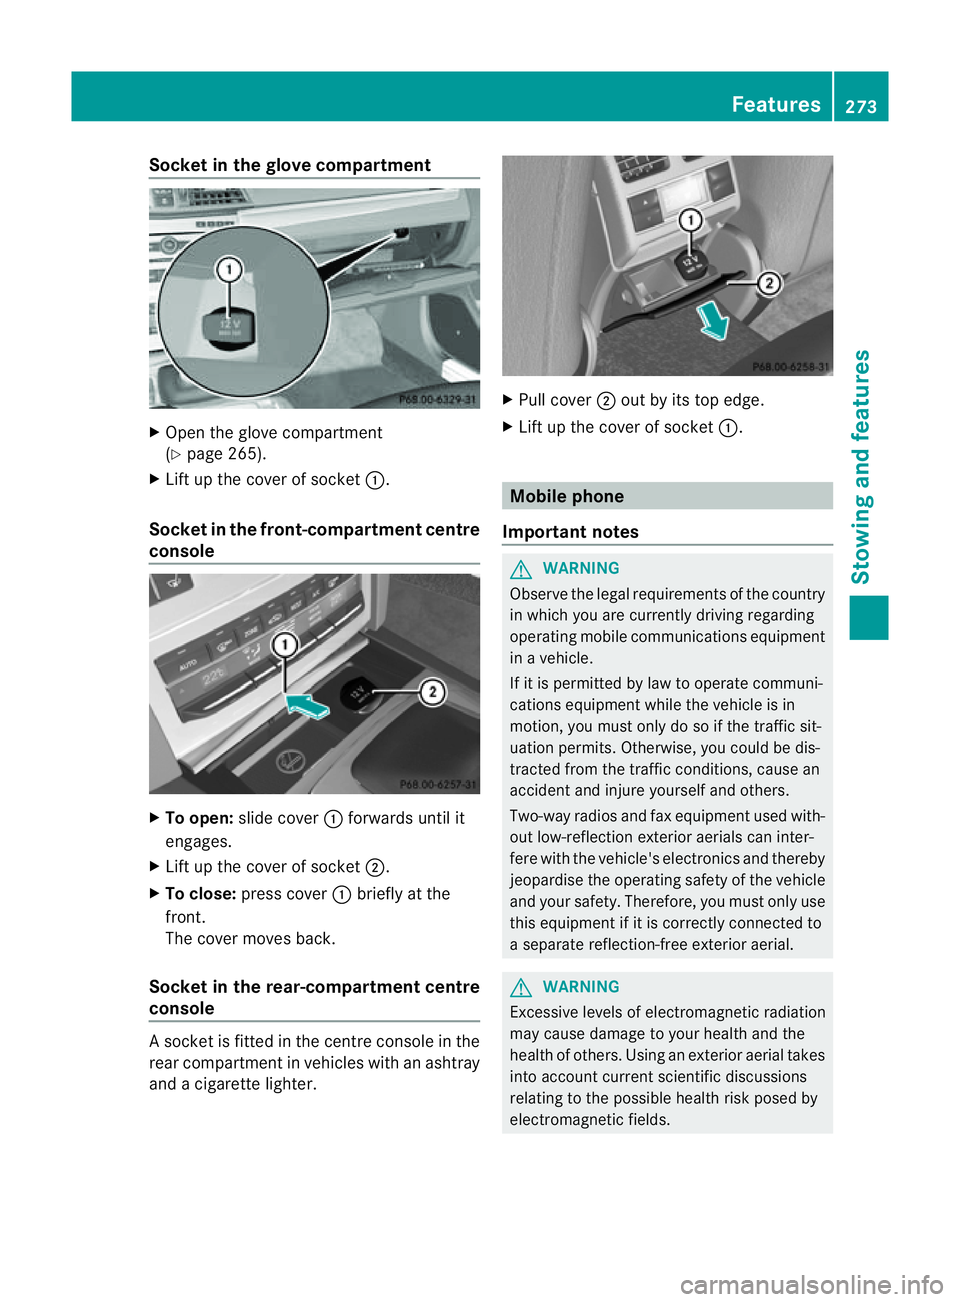
X
Open the glove compartment
(Y page 265).
X Lift up the cover of socket :.
Socket in the front-compartment centre
console X
To open: slide cover :forwards until it
engages.
X Lift up the cover of socket ;.
X To close: press cover :briefly at the
front.
The cover moves back.
Socket in the rear-compartment centre
console As
ocket is fitted in the centre console in the
rear compartment in vehicles with an ashtray
and acigarett elighter. X
Pull cover ;out by its top edge.
X Lift up the cover of socket :. Mobile phone
Important notes G
WARNING
Observe the legal requirements of the country
in which you are currently driving regarding
operating mobile communications equipment
in av ehicle.
If it is permitted by law to operate communi-
cations equipment while the vehicle is in
motion ,you must only do so if the traffic sit-
uation permits. Otherwise, you could be dis-
tracted from the traffic conditions, cause an
accident and injure yourself and others.
Two-way radios and fax equipment used with-
out low-reflection exterior aerials can inter-
fere with the vehicle's electronics and thereby
jeopardise the operating safety of the vehicle
and your safety. Therefore, you must only use
this equipment if it is correctly connected to
as eparate reflection-free exterior aerial. G
WARNING
Excessive levels of electromagnetic radiation
may cause damage to your health and the
health of others. Using an exterior aerial takes
into account current scientific discussions
relating to the possible health risk posed by
electromagnetic fields. Features
273Stowing and features Z
Page 278 of 353

X
To fold the bracket up: press button:.
X To fold the bracket down: press the
bracket down and allo wittoengage. Garag
edooro pener
Important safety notes The HomeLink
®
garage door opene rintegra-
ted in the rear-view mirror allows yo utooper-
ate up to thre edifferent door and gate sys-
tems.
i The garage door opene risonly available
for certain countries. Observe the legal
requirements in each country.
The HomeLink ®
garage door opener is
compatible with most European garage and
gate opener drives. More information on
HomeLink ®
and/or compatible products is
available from:
R any Mercedes-Benz Service Centre
R the HomeLink ®
hotline
(0) 08000 466 354 65 (free of charge) or
+49 (0) 6838 907 277 (charges apply)
R on the Internet at:
http://www.homelink.com
Programming the integrated garage
door opener in the rear-view mirror Programming
G
WARNING
Only press the transmitter button on the inte-
grated garage door opener if there are no per- sons or objects present within the sweep of
the garage door. Persons could otherwise be
injured as the door moves. Integrated garage door opener in the rear-view mir-
ror (example: Coupé)
Garaged oor remote control Ais not part of
this integrated garage door opener.
i To achieve the best results, insert new
batteries in garage door remote control
A before programming.
X Before programming for the first time, clear
the memory of the integrated garage door
opener (Y page 277).
X Turn the key to position 2in the ignition
lock.
X Press and hold one of transmitter but-
tons ;to? on the integrated garage door
opener.
After ashort time, indicator lamp :starts
flashing yellow.
i Indicator lamp :flashes yellow immedi-
ately the first time that the transmitter but-
ton is programmed. If this transmitter but-
ton has already been programmed, indica-
tor lamp :only starts flashing yellow after
10 seconds have elapsed.
X Release the transmitter button.
X Point transmitter button Bof garage door
remote control Atowards the transmitter
buttons on the rear-view mirror at adis-
tance of 5to20c m.
i The required distance between garage
door remote control Aand the integrated Features
275Stowingand features Z
Page 281 of 353
Frequencies for th
egarage door opener The radio typ
eapproval number and th efrequency range for th egarag edoor opener can be
foun dont heInternet at: http://www.mercedes-benz.de/betriebsanleitung. Floorma
tonthedriver's side G
WARNING
Mak esure that there is sufficien tclearance
around the pedals when floormats are used,
and that the floormats are properly secured.
The floormats must be correctly secured at all
times using retainer sand press-studs.
Before you drive off ,chec kthe floormats and
secure if necessary. Afloormat which is not
properly secured can slip and, thereby, inter-
fere with the movemen tofthe pedals.
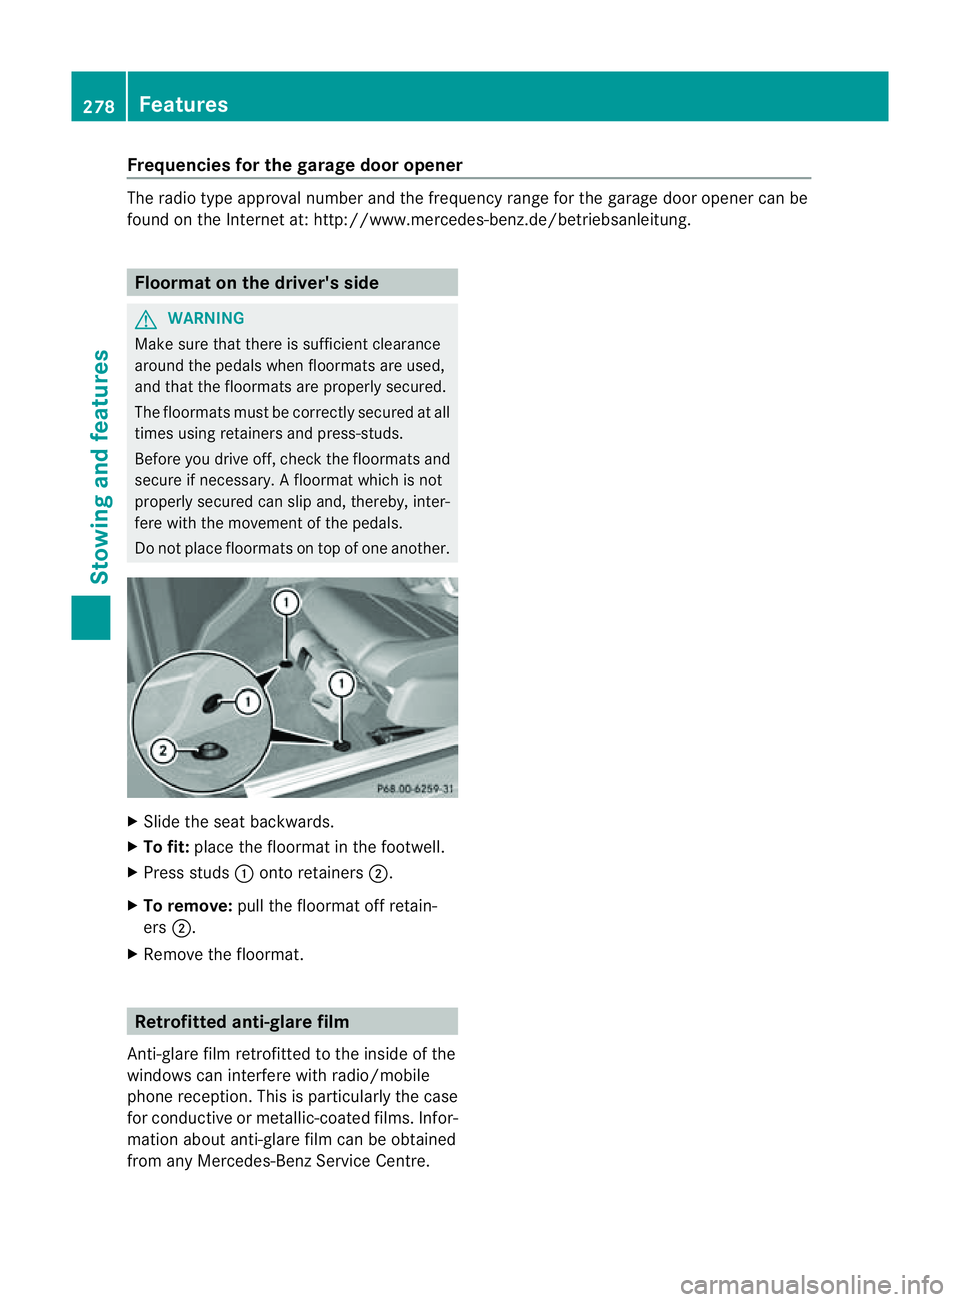
Do not place floormats on top of one another. X
Slide the seat backwards.
X To fit: place the floormat in the footwell.
X Press studs :onto retainers ;.
X To remove: pull the floormat off retain-
ers ;.
X Remove the floormat. Retrofitted anti-glaref
ilm
Anti-glare film retrofitted to the inside of the
windows can interferew ith radio/mobile
phone reception. This is particularly the case
for conductive or metallic-coated films. Infor-
mation about anti-glare film can be obtained
from any Mercedes-Ben zService Centre. 278
FeaturesStowing and features