2011 MERCEDES-BENZ E-CLASS CABRIOLET engine
[x] Cancel search: enginePage 216 of 353
!
Do not drive in the overrevving range.
Doing so will damage the engine.
The fuel supplyisi nterrupted to protect the
engine when the red band is reached. Outside temperatured
isplay
The outside temperature displayisint he mul-
tifunction display( Ypage 214). G
WARNING
At temperatures just above freezing point, the
street may be icy, especiallyinw ooded areas
or on bridges. If you do not adapty our driving
style to the conditions, the vehicle could skid.
For this reason, adapt your driving style and
speed to the weather conditions.
Changes in the outside temperature are dis-
playeda fterashort delay. Speedometer with segments
The segment sinthe speedometer indicate
which speed range is available.
Cruise control (Y page 169) activated:
The segment slight up from the stored speed
to the maximum speed.
Variable SPEEDTRONIC (Y page 180) activa-
ted:
The segment slight up from the start of the
scale to the selected limit speed.
DISTRONIC PLUS (Y page 171) activated:
One or two segment sinthe set speed range
light up.
DISTRONIC PLUS detect savehicle in front:
The segment sbetween the speed of the vehi-
cle in front and the stored speed light up. Operating the on-board computer
Overview The on-board computer is activated as soon
as you turn the key to position
1in the ignition
lock.
You can control the multifunction display and
the settings in the on-board computer using
the button sonthe multifunction steering
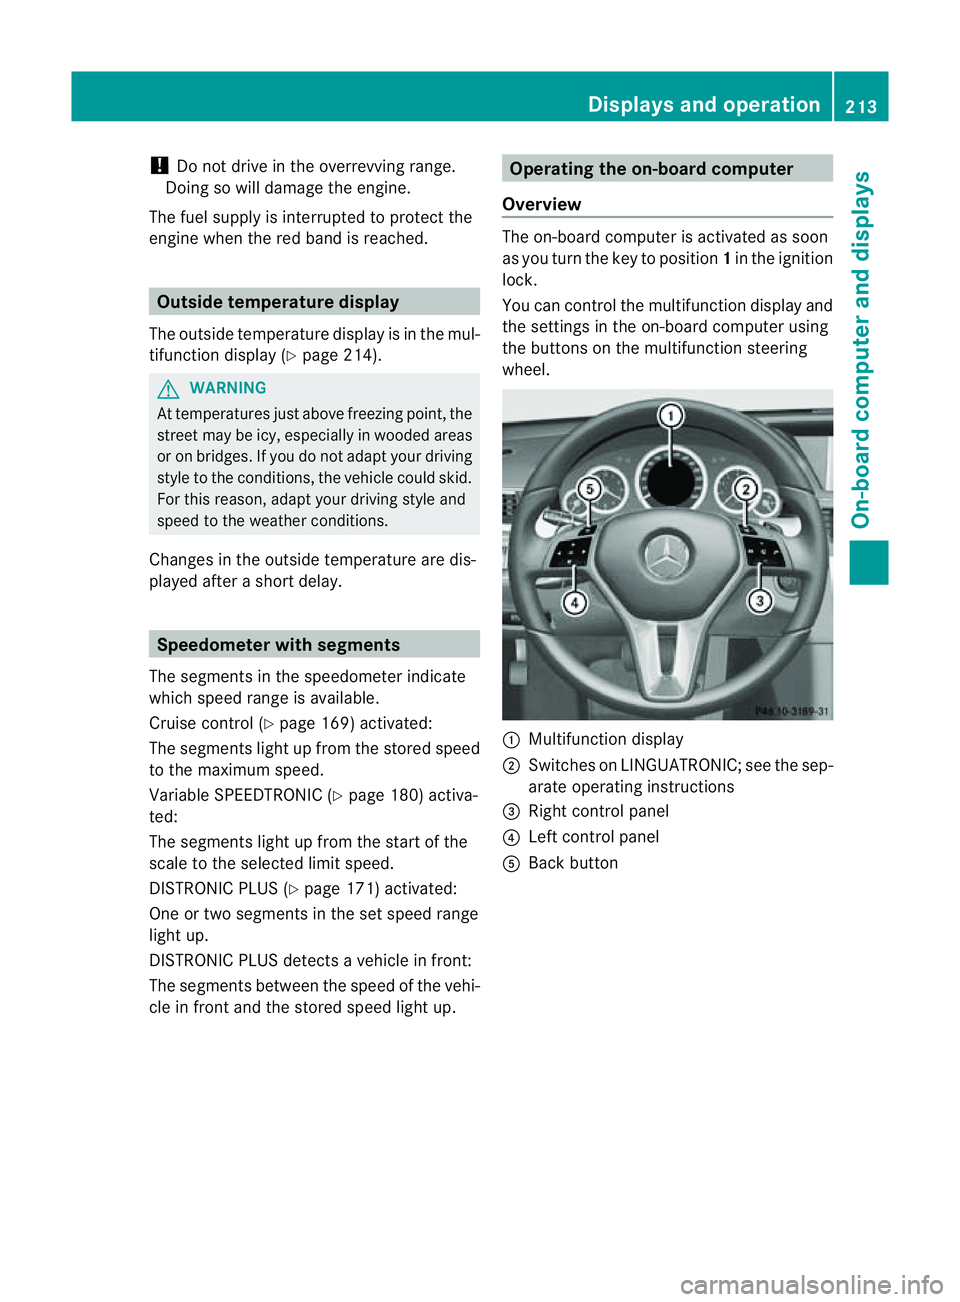
wheel. :
Multifunction display
; Switches on LINGUATRONIC; see the sep-
arate operating instructions
= Right control panel
? Left control panel
A Back button Displays and operation
213On-board computer and displays Z
Page 226 of 353
X
Press =or; on the steerin gwheel
to select the Assist. menu.
X Press 9or: to select Speed Lim.
Asst. .
X Press a.
The multifunction display shows Speed
Limit Assist.
X Press :.
The curren tselection is displayed.
X To activate or deactivate: pressa.
If Speed Limit Assist is operational and the
message function is activated, the multifunc-
tion display shows the Äsymbol when the
ignition is switched on.
Showing the distance display This function is only available with DIS-
TRONIC PLUS.
X Press =or; on the steering wheel
to select the Assist. menu.
X Press the 9or: button to select
Distanc edisplay .
X Press a.
The DISTRONIC PLUS distanc edisplay
(Y page 178)a ppears in the multifunction
display.
Deactivating/activating ESP ®G
WARNING
If the ä warning lamp in the instrument
cluster flashes, proceed as follows:
R do not deactivat eESP®
under any circum-
stances.
R only depress the accelerator pedal as far as
necessary when pulling away.
R adapt your driving style to suit the prevail-
ing road and weather conditions.
Otherwise, the vehicle could skid.
ESP ®
cannot reduce the risk of an acciden tif
you drive to ofast. ESP ®
canno toverride the
laws of physics. Fo
rfurther information about ESP ®
,s ee
(Y page 64).
X Start th eengine.
X Press =or; on thesteerin gwheel
to select the Assist. menu.
X Press the 9or: buttontos elect
ESP .
X Press the abutton.
X To deactivate: pressaagain.
The å warning lamp in the instrument
cluster comes on. G
WARNING
If the å warning lamp in the instrument
cluster lights up when the engine is running,
ESP ®
is deactivated or is unavailabl edue to a
malfunction. The risk that your vehicle may
start to skid then increases in certain situa-
tions.
Always adapt your driving style to the prevail-
ing road and weather conditions.
X To activate: pressaagain.
The å warning lamp in the instrument
cluster goes out.
Activating/deactivating the PRE-SAFE ®
Brake PRE-SAFE
®
Brake is only available in vehicles
with DISTRONIC PLUS.
X Press =or; on the steerin gwheel
to select the Assist. menu.
X Press 9or: to select PreSafe Brake .
X Press the abutton.
The current selection is displayed.
X To activate/deactivate: pressa
again.
When PRE-SAFE ®
Brake (Y page 66) is acti-
vated, the multifunction display shows the
Ä symbol as long as the HOLD function is
not activated (Y page 184). Menus and submenus
223On-board computer and displays Z
Page 229 of 353
Time/date
Thi
ssubmenu is onl yavailable on vehicles
with Audio 20.
In the Time/date submenu, yo
ucan se tthe
time and date.
Your vehicle could have the following audio
equipment:
A: Audio 20
B: Audio 50 APS
C: COMAND APS
X Refer to the separate operating instruc-
tions to find out which audios ystem is fit-
ted in your vehicle.
Depending on the audios ystem, the time and
date are received from GPS satellites and
cannot be set using the on-board computer
(see the following table). A B C
Setting using the on-board com-
puter X
Automatic GPS satellite recep-
tion X X
Setting the time zone once; see
the separate operating instruc-
tions X X
X
Press the =or; button on the steer-
ing wheel to select the Settings menu.
X Press the :or9 button to select the
Time/Date submenu.
X Press the abutton to confirm.
X Press the :or9 button to select
Time: or
Date: .
The current time or date set is displayed.
X Press ato change the setting.
X Press the =or; button to select the
displayy ou want to change: hour, minute,
day, month, year.
X Press the :or9 button to set the
selected display.
X Press the abutton to store the entry. Lights Switching the daytime driving lights on/
off
If you have activated the
Day lights func-
tion and the light switch is set to Ã,the
daytime driving lights are automatically
switched on during daylight hours when the
engine is running. When it is dark, the side
lamps and the dipped-beamh eadlamps are
also switched on automatically.
X Switc hoff the engine.
X Press the =or; button on the steer-
ing wheel to select the Settings menu.
X Press the :or9 button to select the
Light submenu.
X Press the abutton to confirm.
X Press the :or9 button to select the
Day lights function.
If the Day lights have been switched on,
the coneofl ight and the Wsymbol in
the multifunction display are shown in red.
X Press the abutton to save the setting.
Activating/deactivating the Intelligent
Light System
If you activat ethe Intell. Light Sys. function
,you activat ethe following functions:
R motorway mode
R activ elight function
R cornering light function
R extended range foglamps
X Press the =or; button on the steer-
ing wheel to select the Settings menu.
X Press the :or9 button to select the
Light submenu.
X Press the abutton to confirm.
X Press :or9 to select the Intell. Light Sys. function.
If the Intell. Light Sys. function has
been switched on, the coneofl ight and the
L symbol in the multifunction display
are shown in red.
X Press the abutton to save the setting. 226
Menus and submenusOn-boar
dcomputer and displays
Page 230 of 353

If you set the dipped-bea
mheadlamps for
driving on the right/left (Y page 227), the
multifunction display shows the Systeminoperative display message under the
image of the vehicle for the Intell. Light
Sys. function in the
Light submenu.
Setting the dipped-beam headlampsf or
driving on the right/left
This function is only available on vehicles with
the Intelligent Light System.
You can use this function to switch between
symmetrical beam and asymmetrical dipped
beam (Y page 114).
If you set the dipped-beam headlamps for
driving on the right/left, then motorway
mode and the extended range foglamps are
not available.
X Press the =or; button on the steer-
ing wheel to select the Settings menu.
X Press the :or9 button to select the
Light submenu.
X Press the abutton to confirm.
X Press :or9 to select the Dipped beams Setting for: function.
You will see the selected setting: Right-side traffic or
Left-side traffic .
X Press the abutton to save the setting.
When you change the setting, conversion
does not take place until the nextt ime the
vehicle is stationary.
You can also have the dipped-beam head-
lamps set for drivin gonthe right/lef tata
qualified specialist workshop, e.g. a
Mercedes-Ben zServic eCentre.
Switching Adaptive Highbeam Assist on/
off
X Press the =or; button on the steer-
ing wheel to selec tthe Settings menu.
X Press the :or9 button to select the
Light submenu.
X Press the abutton to confirm. X
Press :or9 to select the Adapt. main beam function.
If the Adapt. main beam function has
been switched on, the cone of light and the
_ symbol in the multifunction display
are shown in red.
X Press the abutton to save the setting.
Activating/deactivating the surround
lighting and exterior lighting delayed
switch-off
If you have activated the Surround light‐ ing function and the light switch is in the
à position,
R the exterior lighting remains on for another
40 seconds after you unlock the vehicle
using the key.
The exterior lighting switches off when you
open the driver’s door.
R the exterior lighting remains on for another
15 seconds after closing the doors when it
is dark.
If the engine is switched off and then none
of the doors are opened, or if an open door
is not closed, the exterior lighting goes out
after 60 seconds.
If you activate the Surround lighting func-
tion, the following light up depending on the
vehicle's equipment:
R the side lamps
R the foglamps
R the daytime driving lights
R the surround lighting in the exterior mirrors
X Press the =or; button on the steer-
ing wheel to select the Settings menu.
X Press the :or9 button to select the
Light submenu.
X Press the abutton to confirm.
X Press the :or9 button to select the
Surround lighting function.
When the Surround lighting function is
activated, the light cone and the area Menus and submenus
227On-board computer and displays Z
Page 231 of 353
aroun
dthe vehicle are displayed in red in
th em ultifunction display.
X Press the abuttontos ave th esetting.
Deactivating delayed switch-off of th eexte-
rior lighting temporarily:
X Before leaving th evehicle ,turn th ekeyto
position 0in th eignition lock.
X Turn th ekeyto position 2in th eignition
loc ka nd back to position 0.
The exterio rlighting delayed switch-off is
deactivated.
Delayed switch-off of the exterior lighting is
reactivated the nex ttim ey ou start the
engine.
Activating/deactivating th einterior light-
ing delayed switch-off
If you activat ethe Light. delay function,
the interior lighting remain sonfor 20 sec-
onds after you remove the key fro mthe igni-
tion lock.
X Press the =or; button on the steer-
ing wheel to selec tthe Settings menu.
X Press the :or9 button to select the
Light submenu.
X Press the abutton to confirm.
X Press the :or9 button to select the
Light. delay function.
When the Light. delay function is acti-
vated, the vehicle interior is displayed in
red in the multifunction display.
X Press the abutton to save the setting.
Vehicle Setting permanent SPEEDTRONIC
You can set permanent SPEEDTRONIC
(Y page 183) using the Limit speed (win‐ter tyres) function.
X Press the =or; button on the steer-
ing wheel to select the Settings menu.
X Press the :or9 button to select the
Vehicle submenu. X
Press the abutton to confirm.
X Press :or9 to select the Limit speed (winter tyres): function.
You will see the current setting.
X Press the abutton to confirm.
X Press :or9 to adjust permanent
SPEEDTRONIC in increments of 10
(240 km/h to
160 km/h ). The
Off setting
switches permanent SPEEDTRONIC off.
X Press the abutton to store the entry.
Switching the automatic locking feature
on/off
If you select the Automatic door lock func-
tion, the vehicle is centrally locked above a
speed of around 15 km/h.
i For further information on the automatic
locking feature, see (Y page 78).
X Press the =or; button on the steer-
ing wheel to select the Settings menu.
X Press the :or9 button to select the
Vehicle submenu.
X Press the abutton to confirm.
X Press the :or9 button to select the
Automatic door lock function.
When the Automatic door locks func-
tion is activated, the vehicle doors are dis-
played in red in the multifunction display.
X Press the abutton to save the setting.
Activating/deactivating the acoustic
locking confirmation
If you activate the Acoustic Lock function,
an audible signal sounds when the vehicle is
locked or unlocked. When unlocking, the sig-
nal sounds once. When locking, it sounds
three times.
X Press the =or; button on the steer-
ing wheel to select the Settings menu.
X Press the :or9 button to select the
Vehicle submenu.
X Press the abutton to confirm. 228
Menus and submenusOn-board computer and displays
Page 238 of 353

Display messages Possible causes/consequences and
M Solutions
J
Brake immediately Am
alfunction has occurred while th eHOLDf unction or DIS-
TRONIC PLU Sisactive.
or
Vehicles wit hmanual transmission: wit hthe HOLD function acti-
vated, you hav eeither:
R opened th edriver's doo rand released the sea tbelt or
R switched off the engin eor
R opened the bonnet
At one may also sound at regular intervals. The toneb ecomes
louder if you attempt to lock the vehicle.
You cannot start the engine.
X Paying attention to the traffic situation, immediately depress the
brake pedal firmly and hold until the display message disap-
pears.
X Prevent the vehicle from rolling away before you leave it
(Y page 301).
You can restart the engine. J
Check brake fluid
level G
Risk of accident
There is insufficient brake fluid in the brake fluid reservoir. In addi-
tion, the red Jwarning lamp in the instrument cluster lights
up and awarning tone sounds.
X Pullo ver and stop the vehicl esafel yass oon as possible,p aying
attention to road and traffic conditions. Do not continue driving
under any circumstances.
X Apply the parking brake.
X Consult aqualified specialist workshop.
X Do not top up the brake fluid. This does not correct the error. #
Check brake wear The brake pads/linings have reache
dtheir wearl imit.
X Visit aqualified specialist workshop. PRE-SAFE
inoperative See
Owner's Man. G
Risk of injury
Important function sofPRE-SAFE ®
have failed .All other occupant
safet ysystems, e.g. airbags, remain available.
X Visit aqualified specialist workshop immediately. Display messages
235On-board computer and displays Z
Page 239 of 353

Display messages Possible causes/consequences and
M Solutions
PRE-SAFE
Functions cur‐
rently limited See
Owner'
sManual G
Risk of accident
PRE-SAFE ®
Brake is temporarily inoperative if:
R theD ISTR ONIC PLU Scover in th eradiato rgrille is dirty.
R thes ensor sinthebumpers are dirty.
R itsf unction is impaire ddue to heav yrain or snow.
R ther ada rsensor system is temporarily inoperative, e.g. due to
electromagnetic radiation emitted by nearby TV or radio sta-
tion soro ther sources of electromagnetic radiation.
R the system is outside the operatin gtemperature range.
R the on-board voltage is too low.
PRE-SAFE ®
Brak eiso perational again and the display message
disappears if:
R the dirt (e.g. slush) drops away while the vehicle is in motion.
R the system detects that the sensor sare fully available again.
R the system is within the operatin gtemperature range.
If the display message continues to be displayed:
X Clean the DISTRONIC PLUS cover in the radiator grille
(Y page 290).
X Clean the bumpers (Y page 290).
X Restart the engine.
X Wait until the batter yissufficiently charged. PRE-SAFE
Functions limited
See Owner's Manual G
Risk of accident
PRE-SAFE ®
Brak eisf aulty. BASP LUS or the distance warning sig-
nal may also have failed.
X Visit aqualified specialist workshop. A
Malfunction Con‐
sult workshop G
Risk of injury
Cabriolet: the roll bars are defective.
X Visit aqualified specialist workshop immediately. ü If the symbola
ppears in the multifunction display,as eat belt
tongue has been clipped intoar ear seat belt buckle.
For further information on the status indicator for the rear seat
belts: (Y page 49). 236
Display messagesOn-boar
dcomputer and displays
Page 245 of 353
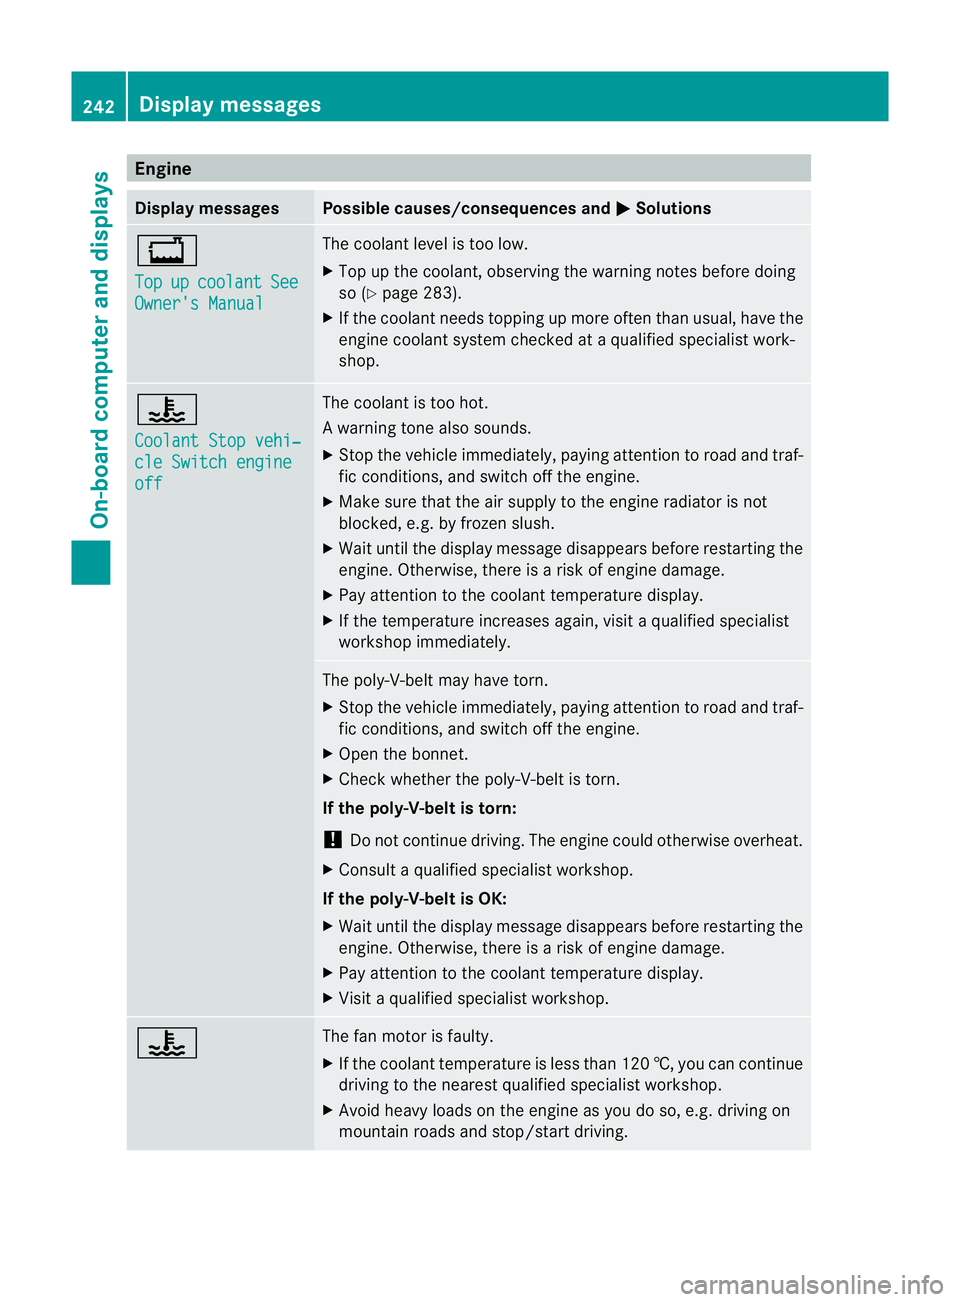
Engine
Display messages Possible causes/consequences and
M Solutions
+
Top
up coolant See
Owner'
sManual The coolant leve
listoolow.
X Top up th ecoolant ,observing th ewarning note sbefore doing
so (Y page 283).
X If th ecoolant needs toppin gupmoreo ften than usual, have the
engin ecoolant system checked at aqualifie dspecialist work-
shop. ?
Coolan
tStopv ehi‐ cle Switch engine
off The coolant is to
ohot.
Aw arning tone also sounds.
X Stop th evehicle immediately, payin gattentio ntoroad and traf-
fic conditions, and switch off the engine.
X Make sure that the air supply to the engine radiator is not
blocked, e.g. by frozen slush.
X Wait until the display message disappears before restarting the
engine. Otherwise, there is arisk of engine damage.
X Pay attention to the coolant temperature display.
X If the temperature increases again, visit aqualified specialist
workshop immediately. The poly-V-belt may have torn.
X
Stop the vehicle immediately, paying attention to road and traf-
fic conditions, and switch off the engine.
X Open the bonnet.
X Check whether the poly-V-belt is torn.
If the poly-V-belt is torn:
! Do not continue driving. The engine could otherwise overheat.
X Consult aqualified specialist workshop.
If the poly-V-belt is OK:
X Wait until the display message disappears before restarting the
engine. Otherwise, there is arisk of engine damage.
X Pay attention to the coolant temperature display.
X Visit aqualified specialist workshop. ? The fan motor is faulty.
X
If the coolant temperature is less than 120 †, you can continue
driving to the nearest qualified specialist workshop.
X Avoid heavy loads on the engine as you do so, e.g. driving on
mountain roads and stop/start driving. 242
Display messagesOn-board computer and displays