2011 MERCEDES-BENZ CLS tire size
[x] Cancel search: tire sizePage 210 of 308
Treadwear indicators
Narrow bands, sometimes called “wear bars”
that
show across the tread of a tire when only
1 / 16 in (1.6 mm) of tread remains.
Uniform Tire Quality Grading Standards A tire information system that provides
consumers with ratings for a tire’s traction,
temperature and treadwear. Ratings are
determined by tire manufacturers using U.S.
government testing procedures. The ratings
are molded into the sidewall of the tire.
Vehicle maximum load on the tire
Load on an individual tire that is determined
by distributing to each axle its share of the
maximum
loaded vehicle weight and dividing
it by two. Winter driving
General information
Have
your vehicle winterized at an authorized
Mercedes-Benz Center. Winter tires
G
Warning!
Winter tires with a tread depth of less than
1 / 6 in (4 mm) must be replaced. They are no
longer suitable for winter operation. G
Warning!
If you use your spare wheel when winter tires
are fitted on the other wheels, be aware that
the
difference in tire characteristics may very
well impair turning stability and that overall
driving stability may be reduced. Adapt your
driving style accordingly.
Have the spare wheel replaced by a regular
road wheel with a winter tire at the nearest
authorized Mercedes-Benz Center. Always use winter tires at temperatures
below 45‡ (7†) and whenever wintry road
conditions prevail. Not all M+S rated tires
provide special winter performance. Make
sure the tires you use show the mountain/
snowflakeimarking on the tire sidewall.
These tires meet specific snow traction
performance requirements of the Rubber
Manufacturers Association (RMA) and the
Rubber Association of Canada (RAC) and
have been designed specifically for use in
snow conditions. Use of winter tires is the
only way to achieve the maximum
effectiveness of your vehicle’s driving safety
systems such as the ABS and the ESP
®
in
winter operation.
For safe handling, make sure all mounted
winter tires are of the same make and have
the same tread design.
For information on winter tires for your
vehicle model, see the “Technical data”
section ( Y page 291).
Always
observe the speed rating of the winter
tires installed on your vehicle. Snow chains
! When driving with snow chains, always
select the raised level of the vehicle level
control. Other settings may result in
damage to your vehicle.
! Some tire sizes do not leave adequate
clearance for snow chains. To help avoid
serious damage to your vehicle or tires,
make sure the use of snow chains is
permissible as specified in the “Technical
data” section of this Operator’s Manual.
Snow chains should only be driven on snow-
covered roads at speeds not to exceed
30 mph (50 km/h)
. Remove chains as soon
as possible when driving on roads without
snow. 208
Winter driving
Operation
219_AKB; 4; 54, en-US
d2ureepe,
Version: 2.11.8.1 2009-05-11T16:21:02+02:00 - Seite 208
Page 261 of 308
Tires
Problem
Possible causes/consequences and
X Solutionsh
USA only:
Combination
low
tire pressure
telltale/TPMS
malfunction
telltale for the
TPMS
illuminates
continuously.
Canada only:
Low tire
pressure telltale
for the
Advanced TPMS
illuminates
continuously. The TPMS (USA only) or Advanced TPMS (Canada only) detects a
loss of pressure in at least one tire.
X
Carefully bring the vehicle to a halt, avoiding abrupt steering and
braking maneuvers. Observe the traffic situation around you.
X Read and observe messages in the multifunction display
(Y page 228).
If the tire inflation pressure in the respective tire(s) has (have) been
corrected, the combination low tire pressure/TPMS malfunction
telltale goes out after a few minutes of driving. h
USA only:
Combination
low
tire pressure
telltale/TPMS
malfunction
telltale for the
TPMS flashes 60
seconds and
then stays
illuminated. There is a malfunction in the TPMS.
X
Read and observe messages in the multifunction display
(Y page 228).
X Have the TPMS checked at an authorized Mercedes-Benz
Center.
After the malfunction has been remedied, the combination low tire
pressure/TPMS
malfunction telltale goes out after a few minutes
of driving. G
Warning!
Each tire, including the spare (if provided),
should be checked at least once a month
when cold and inflated to the inflation
pressure recommended by the vehicle
manufacturer on the Tire and Loading
Information placard on the driver’s door B-
pillar
or the tire inflation pressure label on the
inside of the fuel filler flap. If your vehicle has
tires of a different size than the size indicated
on the Tire and Loading Information placard
or the tire inflation pressure label, you should
determine the proper tire inflation pressure
for those tires. As an added safety feature, your vehicle has
been
equipped with a tire pressure monitoring
system (TPMS) that illuminates a low tire
pressure telltale when one or more of your
tires are significantly underinflated.
Accordingly, when the low tire pressure
telltale illuminates, you should stop and check
your tires as soon as possible, and inflate
them to the proper pressure. Driving on a
significantly underinflated tire causes the tire
to overheat and can lead to tire failure.
Underinflation also reduces fuel efficiency
and tire tread life, and may affect the vehicle’s
handling and stopping ability. Please note that What to do if …
259
Practical hints
219_AKB; 4; 54, en-US
d2ureepe, Version: 2.11.8.1 2009-05-11T16:21:02+02:00 - Seite 259 Z
Page 274 of 308
Open doors only when conditions are safe
to do so.
X Have any passenger exit the vehicle at a
safe distance from the roadway. Open
doors only when conditions are safe to do
so. Mounting the spare wheel
Introduction X
Prepare the vehicle as described
(Y page 271).
X Take the following out of the vehicle:
R
spare wheel
R jack
R vehicle tool kit
R wheel wrench
R electric air pump (required for vehicles
with spare wheel with collapsible tire
only)
For information on where to find the
respective items, see “Where will I find ...?”
(Y page 224) and ( Y page 226).
i Vehicles without spare wheel are not
factory-equipped with the tools required for
a wheel change such as a jack or a wheel
wrench. Some tools required for a wheel
change are specific to your vehicle.
Contact an authorized Mercedes-Benz
Center to obtain the tools approved for
your vehicle. This section describes the
wheel change using the tools approved and
recommended for your vehicle.
Removing tensioning straps from spare
wheel
This description applies to vehicles with 19"
spare wheel with collapsible tire only.
A 19" spare wheel with collapsible tire has
two tensioning straps on it that must be
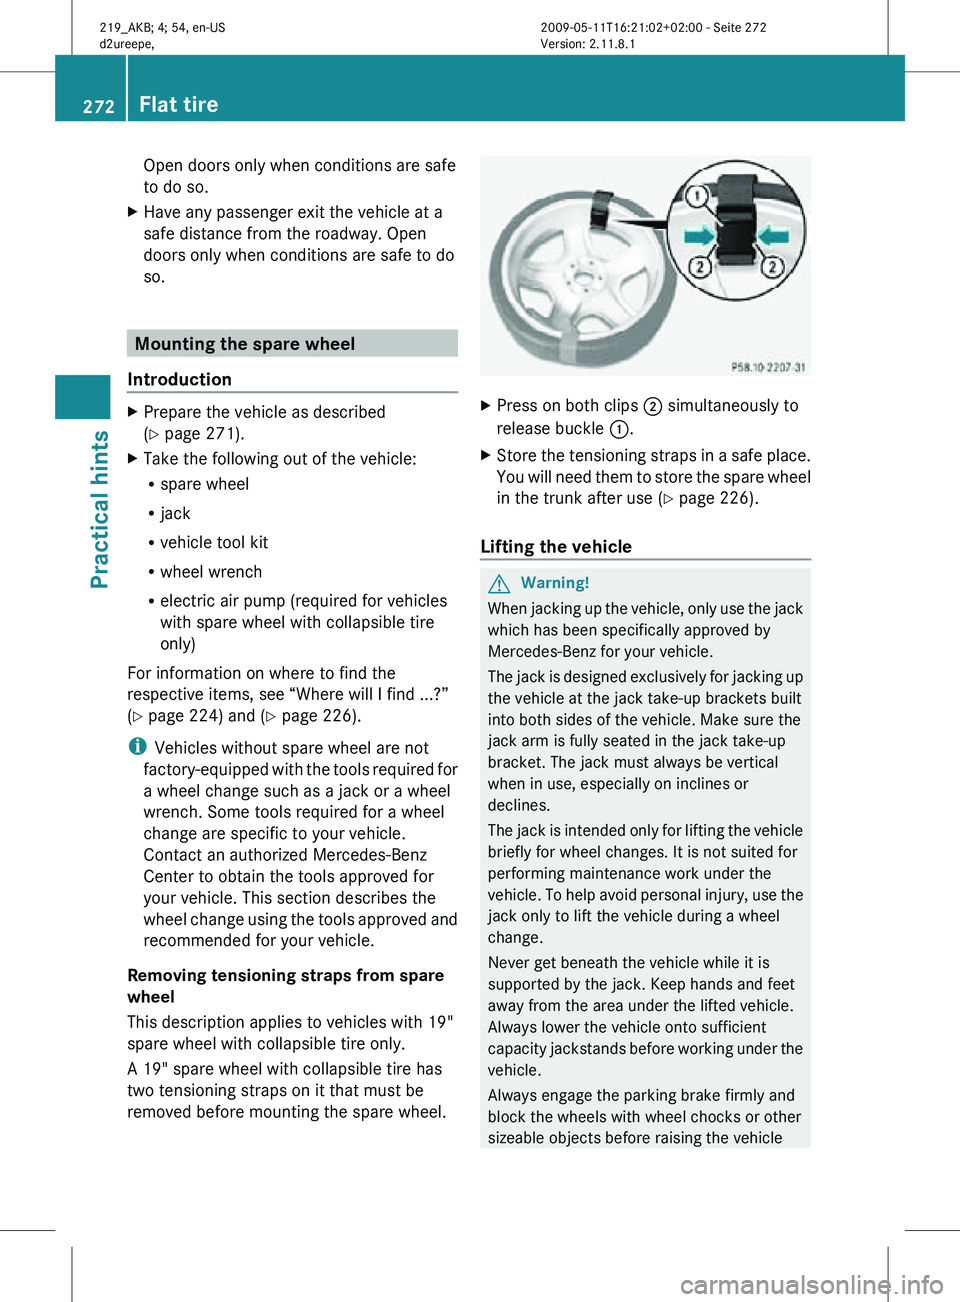
removed before mounting the spare wheel. X
Press on both clips ; simultaneously to
release buckle :.
X Store the tensioning straps in a safe place.
You will need them to store the spare wheel
in the trunk after use (Y page 226).
Lifting the vehicle G
Warning!
When jacking up the vehicle, only use the jack
which has been specifically approved by
Mercedes-Benz for your vehicle.
The jack is designed exclusively for jacking up
the vehicle at the jack take-up brackets built
into both sides of the vehicle. Make sure the
jack arm is fully seated in the jack take-up
bracket. The jack must always be vertical
when in use, especially on inclines or
declines.
The jack is intended only for lifting the vehicle
briefly for wheel changes. It is not suited for
performing maintenance work under the
vehicle. To help avoid personal injury, use the
jack only to lift the vehicle during a wheel
change.
Never get beneath the vehicle while it is
supported by the jack. Keep hands and feet
away from the area under the lifted vehicle.
Always lower the vehicle onto sufficient
capacity jackstands before working under the
vehicle.
Always engage the parking brake firmly and
block the wheels with wheel chocks or other
sizeable objects before raising the vehicle 272
Flat tirePractical hints
219_AKB; 4; 54, en-US
d2ureepe,
Version: 2.11.8.1 2009-05-11T16:21:02+02:00 - Seite 272
Page 275 of 308
with the jack. Do not disengage the parking
brake while the vehicle is raised.
Make sure that the ground on which the
vehicle is standing and where you place the
jack is solid, level and not slippery. If
necessary, use a large underlay. On slippery
surfaces, such as tiled floors, you should use
a non-slip underlay, for example a rubber mat.
Do not use wooden blocks or similar objects
to support the jack. Otherwise the jack may
not be able to achieve its load-bearing
capacity if it is not at its full height.
Never start the engine when the vehicle is
raised.
Also observe the notes on the jack.
X Prevent the vehicle from rolling away by
blocking wheels with wheel chocks or other
sizeable objects.
When your vehicle is equipped with a wheel
chock, it is included with the vehicle tool kit
(Y page 224). For information on setting up
the collapsible wheel chock, see
(Y page 225).
When changing a wheel on a level surface:
X Place a wheel chock or other sizeable
object in front of and another wheel chock
or other sizeable object behind the wheel
that is diagonally opposite to the wheel
being changed.
Always try lifting the vehicle using the jack on
a level surface. However, should
circumstances require you to do so on a hill:
X Place wheel chocks or other sizeable
objects on the downhill side in front of both
wheels on the side opposite to the side on
which the wheel is to be changed. G
Warning!
Only jack up the vehicle on level ground or on
slight inclines/declines. Otherwise, the
vehicle could fall off the jack and injure you or
others. X
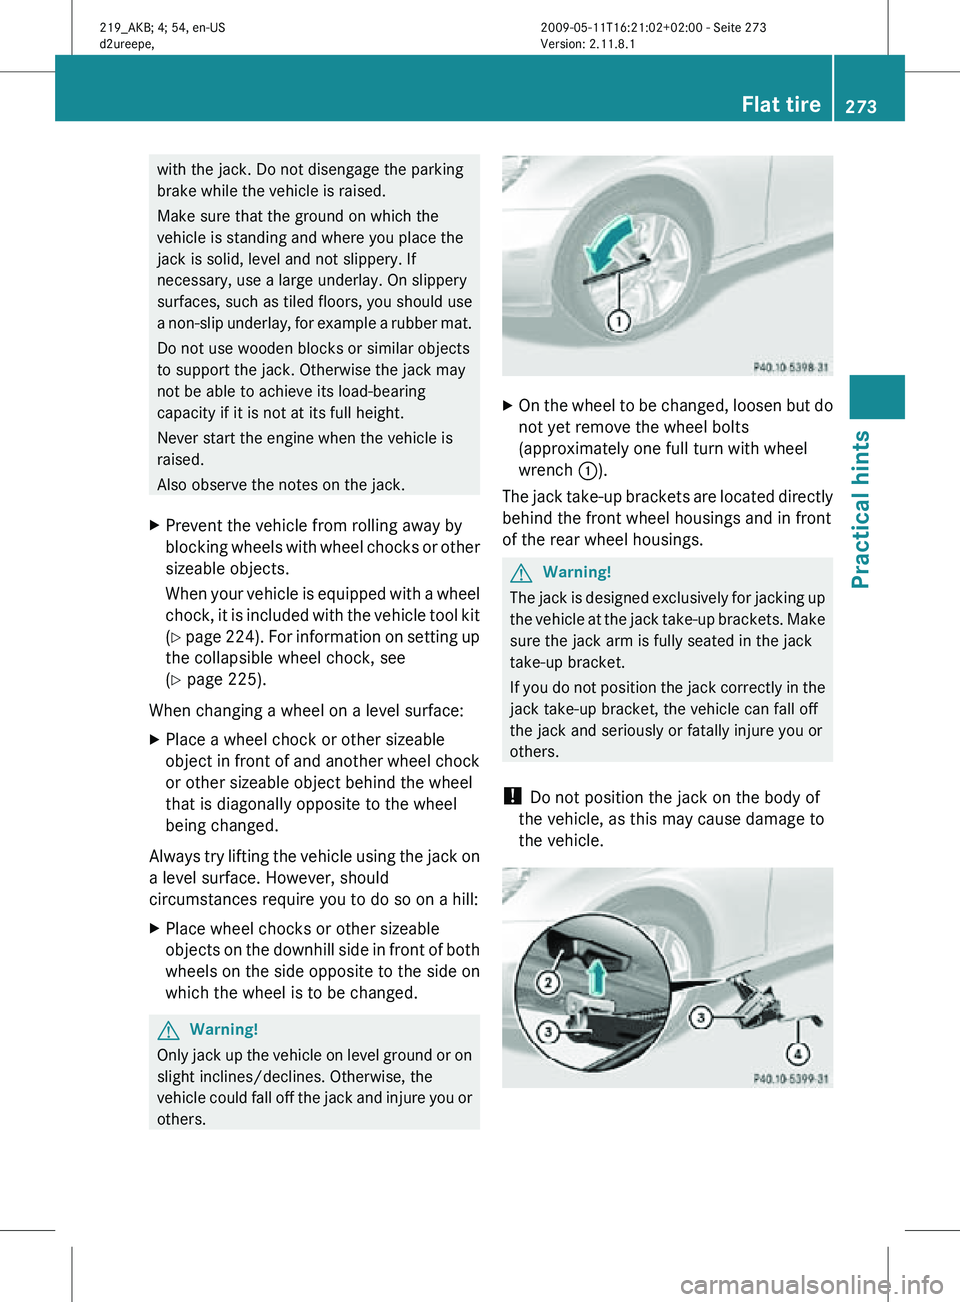
On the wheel to be changed, loosen but do
not yet remove the wheel bolts
(approximately one full turn with wheel
wrench :).
The jack take-up brackets are located directly
behind the front wheel housings and in front
of the rear wheel housings. G
Warning!
The jack is designed exclusively for jacking up
the vehicle at the jack take-up brackets. Make
sure the jack arm is fully seated in the jack
take-up bracket.
If you do not position the jack correctly in the
jack take-up bracket, the vehicle can fall off
the jack and seriously or fatally injure you or
others.
! Do not position the jack on the body of
the vehicle, as this may cause damage to
the vehicle. Flat tire
273Practical hints
219_AKB; 4; 54, en-US
d2ureepe, Version: 2.11.8.1 2009-05-11T16:21:02+02:00 - Seite 273 Z
Page 279 of 308
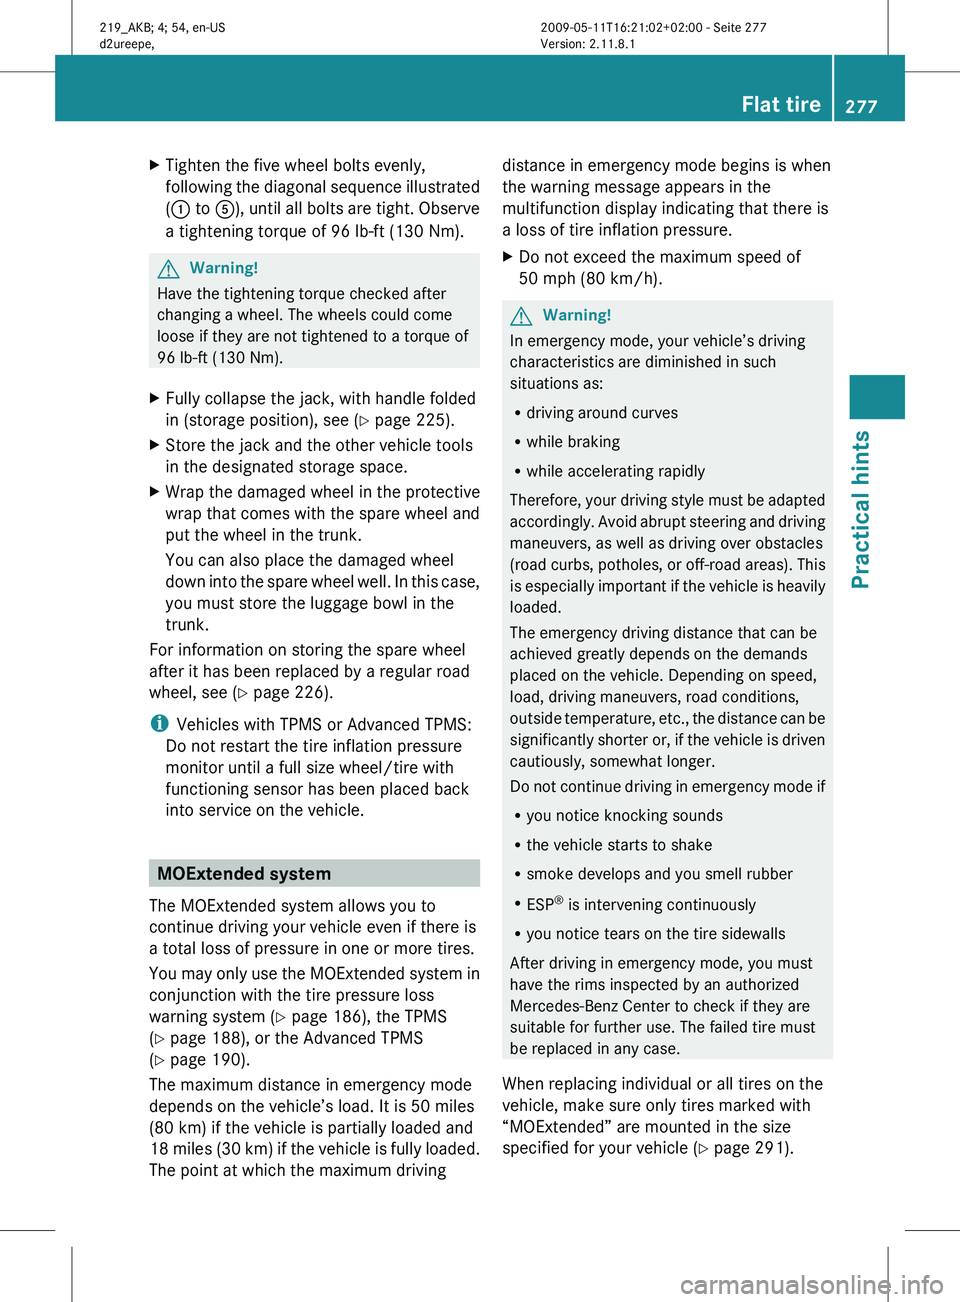
X
Tighten the five wheel bolts evenly,
following
the diagonal sequence illustrated
(: to A), until all bolts are tight. Observe
a tightening torque of 96 lb-ft (130 Nm). G
Warning!
Have the tightening torque checked after
changing a wheel. The wheels could come
loose if they are not tightened to a torque of
96 lb-ft (130 Nm).
X Fully collapse the jack, with handle folded
in (storage position), see
(Y page 225).
X Store the jack and the other vehicle tools
in the designated storage space.
X Wrap the damaged wheel in the protective
wrap
that comes with the spare wheel and
put the wheel in the trunk.
You can also place the damaged wheel
down into the spare wheel well. In this case,
you must store the luggage bowl in the
trunk.
For information on storing the spare wheel
after it has been replaced by a regular road
wheel, see
(Y page 226).
i Vehicles with TPMS or Advanced TPMS:
Do not restart the tire inflation pressure
monitor until a full size wheel/tire with
functioning sensor has been placed back
into service on the vehicle. MOExtended system
The MOExtended system allows you to
continue driving your vehicle even if there is
a total loss of pressure in one or more tires.
You
may only use the MOExtended system in
conjunction with the tire pressure loss
warning system ( Y page 186), the TPMS
(Y page 188), or the Advanced TPMS
(Y page 190).
The maximum distance in emergency mode
depends on the vehicle’s load. It is 50 miles
(80 km) if the vehicle is partially loaded and
18 miles (30 km) if the vehicle is fully loaded.
The point at which the maximum driving distance in emergency mode begins is when
the warning message appears in the
multifunction display indicating that there is
a loss of tire inflation pressure.
X
Do not exceed the maximum speed of
50 mph (80 km/h
). G
Warning!
In emergency mode, your vehicle’s driving
characteristics are diminished in such
situations as:
R driving around curves
R while braking
R while accelerating rapidly
Therefore,
your driving style must be adapted
accordingly. Avoid abrupt steering and driving
maneuvers, as well as driving over obstacles
(road curbs, potholes, or off-road areas). This
is especially important if the vehicle is heavily
loaded.
The emergency driving distance that can be
achieved greatly depends on the demands
placed on the vehicle. Depending on speed,
load, driving maneuvers, road conditions,
outside temperature, etc., the distance can be
significantly shorter or, if the vehicle is driven
cautiously, somewhat longer.
Do not continue driving in emergency mode if
R you notice knocking sounds
R the vehicle starts to shake
R smoke develops and you smell rubber
R ESP ®
is intervening continuously
R you notice tears on the tire sidewalls
After driving in emergency mode, you must
have the rims inspected by an authorized
Mercedes-Benz Center to check if they are
suitable for further use. The failed tire must
be replaced in any case.
When replacing individual or all tires on the
vehicle, make sure only tires marked with
“MOExtended” are mounted in the size
specified for your vehicle ( Y page 291). Flat tire
277
Practical hints
219_AKB; 4; 54, en-US
d2ureepe, Version: 2.11.8.1 2009-05-11T16:21:02+02:00 - Seite 277 Z
Page 294 of 308

is not covered by the Mercedes-Benz
Limited Warranty.
For information on driving with MOExtended
tires, see the “Practical hints” section
(Y page 277).
! Using tires other than those approved by
Mercedes-Benz can have detrimental
effects, such as
R poor handling characteristics
R increased noise
R increased fuel consumption
Moreover, tires and rims not approved by
Mercedes-Benz may, under load, exhibit
dimensional variations and different tire
deformation characteristics that could
cause them to come into contact with the
vehicle body or axle parts. Damage to the
tires or the vehicle may be the result.
i Further information on tires and rims is
available
at any authorized Mercedes-Benz
Center. The Tire and Loading Information
placard with the recommended tire
inflation pressures for cold tires is located
on the driver’s door B-pillar. Supplemental
tire inflation pressure information for
driving at high speeds or for vehicle loads
less than the maximum loaded vehicle
condition can be found on the tire inflation
pressure label. The tire inflation pressure
label is located on the inside of the fuel filler
flap. The tire inflation pressure should be
checked regularly and should only be
adjusted on cold tires. Follow tire
manufacturer’s maintenance
recommendation included with the vehicle.
For information on recommended tire
inflation pressure and supplemental tire
inflation pressure information for special
driving situations, see ( Y page 183). i
Please keep in mind that the vehicle must
be equipped
Rwith wheels of identical dimensions on
each axle (left and right)
R with tires of identical characteristics all
around, i.e. summer tires, winter tires,
all-season tires, or MOExtended tires etc.
i The following pages also list the approved
rim and tire sizes for equipping your vehicle
with winter tires. Winter tires are not
available as standard or optional factory
equipment, but can be purchased from an
authorized Mercedes-Benz Center.
Equipping your vehicle with winter tires
approved for your vehicle model may
require the purchase of rims of the
recommended size for use with these
winter tires. This depends on vehicle model
and the standard or optional factory-
equipped wheel rim/tire configuration on
your vehicle. For more information contact
an authorized Mercedes-Benz Center. 292
Rims and tires
Technical data
219_AKB; 4; 54, en-US
d2ureepe,
Version: 2.11.8.1 2009-05-11T16:21:02+02:00 - Seite 292
Page 295 of 308
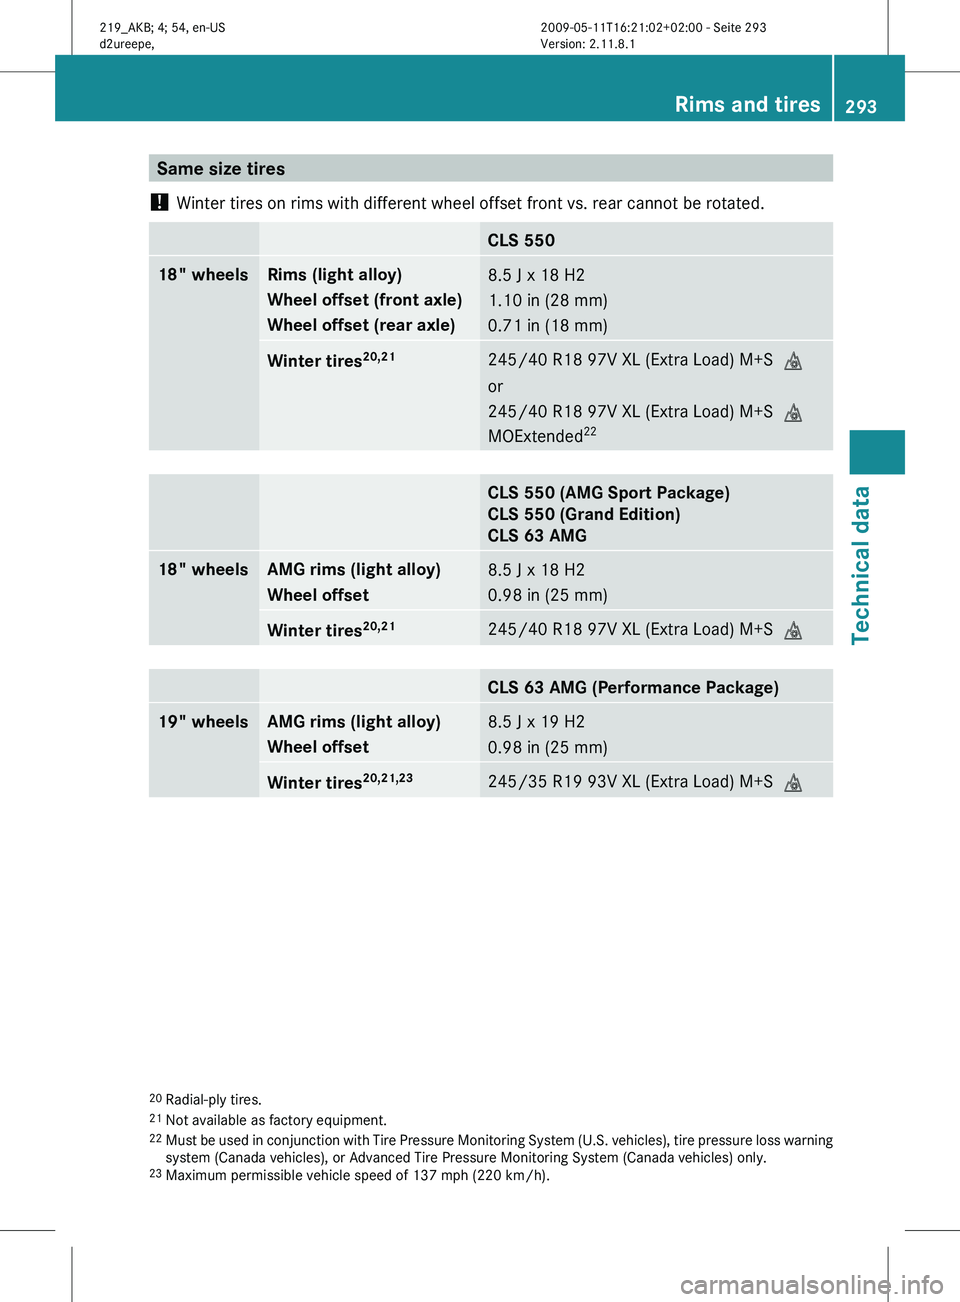
Same size tires
! Winter tires on rims with different wheel offset front vs. rear cannot be rotated. CLS 550
18" wheels Rims (light alloy)
Wheel offset (front axle)
Wheel offset (rear axle)
8.5 J x 18 H2
1.10 in (28 mm)
0.71 in (18 mm)
Winter tires
20,21 245/40 R18 97V XL (Extra Load) M+S
i
or
245/40 R18 97V XL (Extra Load)
M+Si
MOExtended 22 CLS 550 (AMG Sport Package)
CLS 550 (Grand Edition)
CLS 63 AMG
18" wheels AMG rims (light alloy)
Wheel offset
8.5 J x 18 H2
0.98 in (25 mm)
Winter tires
20,21 245/40 R18 97V XL (Extra Load) M+S
i CLS 63 AMG (Performance Package)
19" wheels AMG rims (light alloy)
Wheel offset
8.5 J x 19 H2
0.98 in (25 mm)
Winter tires
20,21,23 245/35 R19 93V XL (Extra Load) M+S
i20
Radial-ply tires.
21 Not available as factory equipment.
22 Must
be used in conjunction with Tire Pressure Monitoring System (U.S. vehicles), tire pressure loss warning
system (Canada vehicles), or Advanced Tire Pressure Monitoring System (Canada vehicles) only.
23 Maximum permissible vehicle speed of 137 mph (220 km/h). Rims and tires
293
Technical data
219_AKB; 4; 54, en-US
d2ureepe, Version: 2.11.8.1 2009-05-11T16:21:02+02:00 - Seite 293 Z
Page 296 of 308
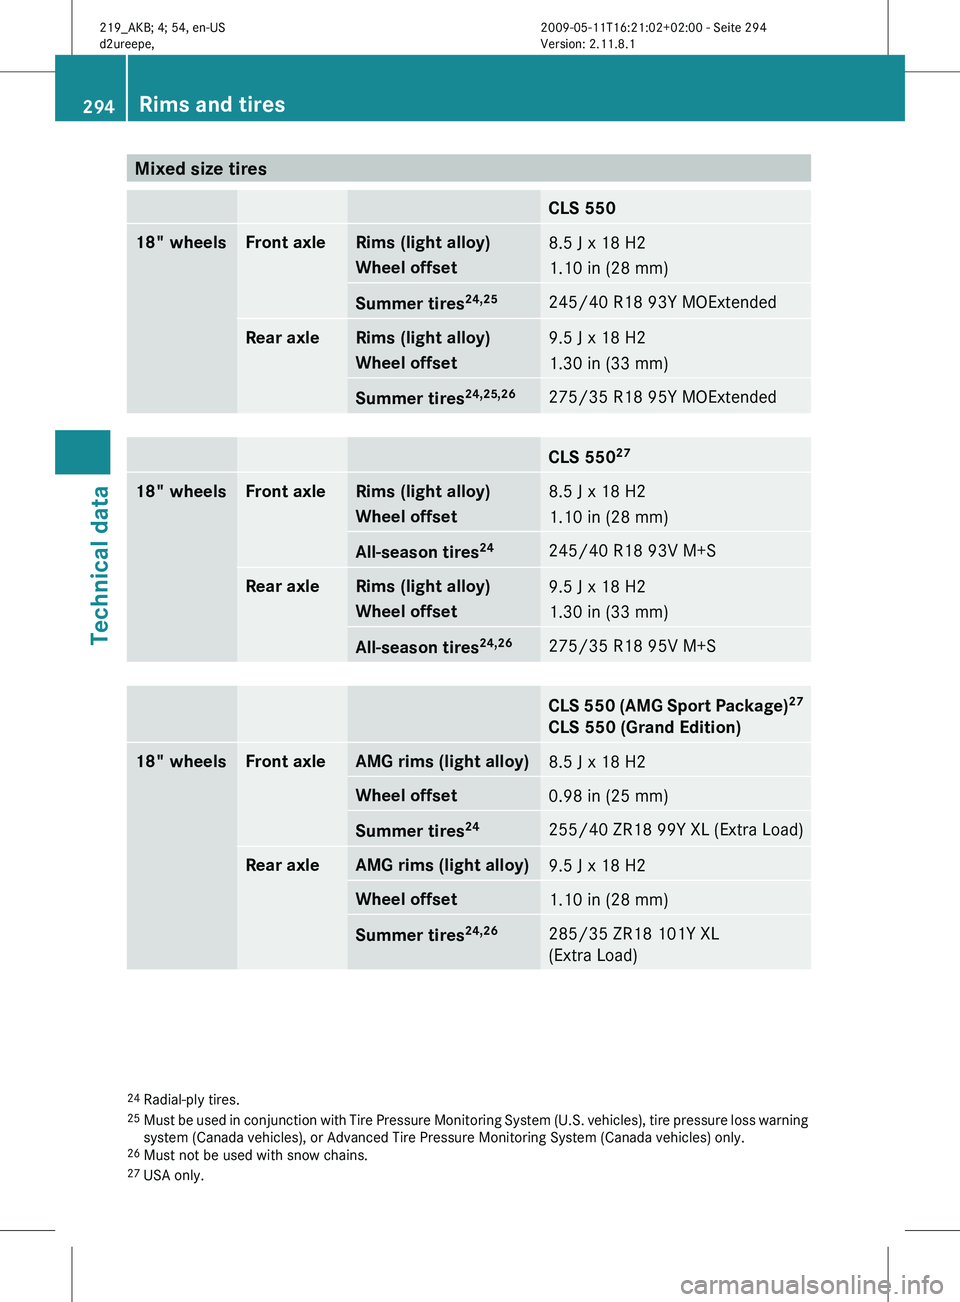
Mixed size tires
CLS 550
18" wheels Front axle Rims (light alloy)
Wheel offset
8.5 J x 18 H2
1.10 in (28 mm)
Summer tires
24,25 245/40 R18 93Y MOExtended
Rear axle Rims (light alloy)
Wheel offset
9.5 J x 18 H2
1.30 in (33 mm)
Summer tires
24,25,26 275/35 R18 95Y MOExtended
CLS 550
27 18" wheels Front axle Rims (light alloy)
Wheel offset
8.5 J x 18 H2
1.10 in (28 mm)
All-season tires
24 245/40 R18 93V M+S
Rear axle Rims (light alloy)
Wheel offset
9.5 J x 18 H2
1.30 in (33 mm)
All-season tires
24,26 275/35 R18 95V M+S
CLS 550 (AMG Sport Package)
27
CLS 550 (Grand Edition) 18" wheels Front axle AMG rims (light alloy)
8.5 J x 18 H2
Wheel offset
0.98 in (25 mm)
Summer tires
24 255/40 ZR18 99Y XL (Extra Load)
Rear axle AMG rims (light alloy)
9.5 J x 18 H2
Wheel offset
1.10 in (28 mm)
Summer tires
24,26 285/35 ZR18 101Y XL
(Extra Load)
24
Radial-ply tires.
25 Must
be used in conjunction with Tire Pressure Monitoring System (U.S. vehicles), tire pressure loss warning
system (Canada vehicles), or Advanced Tire Pressure Monitoring System (Canada vehicles) only.
26 Must not be used with snow chains.
27 USA only. 294
Rims and tires
Technical data
219_AKB; 4; 54, en-US
d2ureepe,
Version: 2.11.8.1 2009-05-11T16:21:02+02:00 - Seite 294