2011 MERCEDES-BENZ CLS run flat
[x] Cancel search: run flatPage 179 of 308

Mercedes-Benz Center to have the fuel
system drained completely.
! To prevent damage to the catalytic
converters, only use premium unleaded
gasoline in this vehicle.
Any noticeable irregularities in engine
operation should be repaired promptly.
Otherwise, excessive unburned fuel may
reach the catalytic converter, causing it to
overheat and potentially start a fire.
i Only use premium unleaded gasoline with
a minimum Posted Octane Rating of 91
(average of 96 RON/86 MON).
Information on gasoline quality can
normally be found on the fuel pump. Please
contact gas station personnel in case
labels on the pump cannot be found.
For more information on gasoline, see
“Premium unleaded gasoline”
(Y page 299), see “Fuel requirements”
(Y page 299), or contact an authorized
Mercedes-Benz Center, or visit
www.mbusa.com (USA only).
Locking/unlocking the vehicle with the
SmartKey or KEYLESS-GO automatically
locks/unlocks the fuel filler flap.
i In case the central locking system does
not release the fuel filler flap, see “Fuel filler
flap” (Y page 263).
The fuel filler flap is located on the right-hand
side of the vehicle towards the rear. X
Turn off the engine. i
Leaving the engine running and the fuel
filler cap open can cause the yellow fuel
tank reserve warning lamp to flash and the
malfunction indicator lamp = (USA
only) or ; (Canada only) to illuminate.
For more information, see also “Practical
hints” (Y page 257).
X Remove the SmartKey from the starter
switch.
KEYLESS-GO: Open the driver’s door. This
puts the starter switch in position 0, same
as with the SmartKey removed from the
starter switch. The driver’s door then can
be closed again.
X Opening: Press fuel filler flap : at the
point indicated by the arrow.
X Turn fuel filler cap ; counterclockwise.
X Take off fuel filler cap ;.
X Place fuel filler cap ; in direction of arrow
into holder =.
X Fully insert filler nozzle unit and refuel.
X Only fill your tank until the filler nozzle unit
cuts out – do not top off or overfill .
X Closing: Turn fuel filler cap ; clockwise
until it audibly engages.
i Close the fuel filler flap before locking the
vehicle. Otherwise the flap locking pin will
prevent closing the fuel filler flap.
X Close fuel filler flap :. Check regularly and before a long trip
For information on quantities and
requirements of operating agents, see “Fuels,
coolants, lubricants, etc.” (Y page 296).
Check the following:
R Engine oil level ( Y page 179)
R Tire inflation pressure ( Y page 185)
R Coolant level ( Y page 180)
R Vehicle lighting ( Y page 266) At the gas station
177Operation
219_AKB; 4; 54, en-US
d2ureepe, Version: 2.11.8.1 2009-05-11T16:21:02+02:00 - Seite 177 Z
Page 189 of 308
Each tire, including the spare, should be
checked at least once a month when cold.
Inflate the tires to the recommended tire
inflation pressure as specified on
R
the
Tire and Loading Information placard on
the driver’s door B-pillar
or
R the tire inflation pressure label located on
the inside of the fuel filler flap
i The recommended tire inflation pressures
for your vehicle can be found on
R the Tire and Loading Information placard
located on the driver’s door B-pillar
(Y page 193)
R the tire inflation pressure label on the
inside of the fuel filler flap
The tire inflation pressures are not listed in
the Operator’s Manual. G
Warning!
The tire pressure loss warning system does
not
provide a warning for wrongly selected tire
inflation pressures. Always adjust tire
inflation pressure according to the Tire and
Loading Information placard on the driver’s
door B-pillar or on the tire inflation pressure
label located on the inside of the fuel filler flap.
The tire pressure loss warning system does
not replace regular checks of the tire inflation
pressures since a gradual pressure loss in
more than one tire cannot be detected by the
tire pressure loss warning system.
The tire pressure loss warning system is not
able to issue a warning due to a sudden
dramatic loss of tire inflation pressure (e.g.
tire blowout caused by a foreign object). In
this case bring the vehicle to a halt by carefully
applying the brakes and avoiding abrupt
steering maneuvers. Restarting the tire pressure loss warning
system
The tire pressure loss warning system must
be restarted in the following situations:
R
after you have changed the tire inflation
pressure
R after
you have replaced the wheels or tires
R after you have installed new wheels or tires
X Using the Tire and Loading Information
placard on the driver’s door
B-pillar or, if
available, the tire inflation pressure label on
the inside of the fuel filler flap, make sure
the tire inflation pressure of all four tires is
correct. G
Warning!
The tire pressure loss warning system can
only
warn you in a reliable manner if you have
set the correct tire inflation pressures for
each tire.
If an incorrect tire inflation pressure was set,
the system will monitor the pressure
according to the incorrect value.
X Switch on the ignition.
X Make sure the standard display appears in
the multifunction display
(Y page 112).
X Press button * or & on the
multifunction steering wheel repeatedly
until the following message appears in the
multifunction display:
Run Flat Indicator
Active
Menu: R-Button
X Press the reset button (Y page 109).
The following message will appear in the
multifunction display:
Restart
Run Flat Indicator?
X If you wish to confirm: Press button
W.
The following message will appear in the
multifunction display:
Run Flat Indicator
Restarted Tires and wheels
187
Operation
219_AKB; 4; 54, en-US
d2ureepe, Version: 2.11.8.1 2009-05-11T16:21:02+02:00 - Seite 187 Z
Page 212 of 308
Driving instructions
Drive sensibly – save fuel
To save fuel you should:
R Keep tires at the recommended inflation
pressures.
R Remove unnecessary loads.
R Remove roof rack when not in use.
R Allow engine to warm up under low load
use.
R Avoid frequent acceleration and
deceleration.
R Have all maintenance work performed at
the intervals specified in the Maintenance
Booklet and as required by the
Maintenance system. Contact an
authorized Mercedes-Benz Center.
Fuel
consumption is also increased by driving
in cold weather, in stop-and-go traffic, on
short trips and in mountainous areas. Drinking and driving
G
Warning!
Drinking and driving and/or taking drugs and
driving are very dangerous combinations.
Even a small amount of alcohol or drugs can
affect your reflexes, perceptions and
judgment.
The possibility of a serious or even fatal
accident
are greatly increased when you drink
or take drugs and drive.
Do not drink or take drugs and drive or allow
anyone to drive who has been drinking or
taking drugs. Pedals
G
Warning!
Make sure absolutely no objects are
obstructing the pedals’ range of movement.
Keep the driver’s footwell clear of all obstacles. If there are any floormats or
carpets in the footwell, make sure that the
pedals still have sufficient clearance.
During sudden driving or braking maneuvers,
the objects could get caught between the
pedals. You could then no longer brake or
accelerate. This could lead to accidents and
injury.
Power assistance
G
Warning!
There is no power assistance for the steering
and
the brake when the engine is not running.
Steering and braking requires significantly
more effort and you could lose control of the
vehicle and cause an accident as a result.
Do not turn off the engine while the vehicle is
in motion. Brakes
Downhill grades !
When driving down long and steep
grades, relieve the load on the brakes by
shifting into a lower gear to use the
engine’s
braking power. This helps prevent
overheating of the brakes and reduces
wear.
When using the engine’s braking power, a
drive wheel may not spin for an extended
period of time, e.g. on slippery road
surfaces. This may cause serious damage
to the drivetrain which is not covered by the
Mercedes-Benz Limited Warranty.
Continuous or hard braking G
Warning!
Resting your foot on the brake pedal will
cause excessive and premature wear of the
brake pads. 210
Driving instructions
Operation
219_AKB; 4; 54, en-US
d2ureepe,
Version: 2.11.8.1 2009-05-11T16:21:02+02:00 - Seite 210
Page 228 of 308
Before placing the jack back into the vehicle
tool kit:
X
Fully collapse the jack.
X Fold in the crank handle (storage position). Spare wheel
G
Observe Safety notes, see page 271.
The spare wheel is located in the space
underneath the trunk floor.
X Removing: Open the trunk (Y page 71).
X Lift the trunk floor using the floor handle.
X Engage the floor handle on the upper trunk
lip.
! To prevent damage, always disengage the
floor handle from the upper trunk lip and
lower the trunk floor before closing the
trunk.
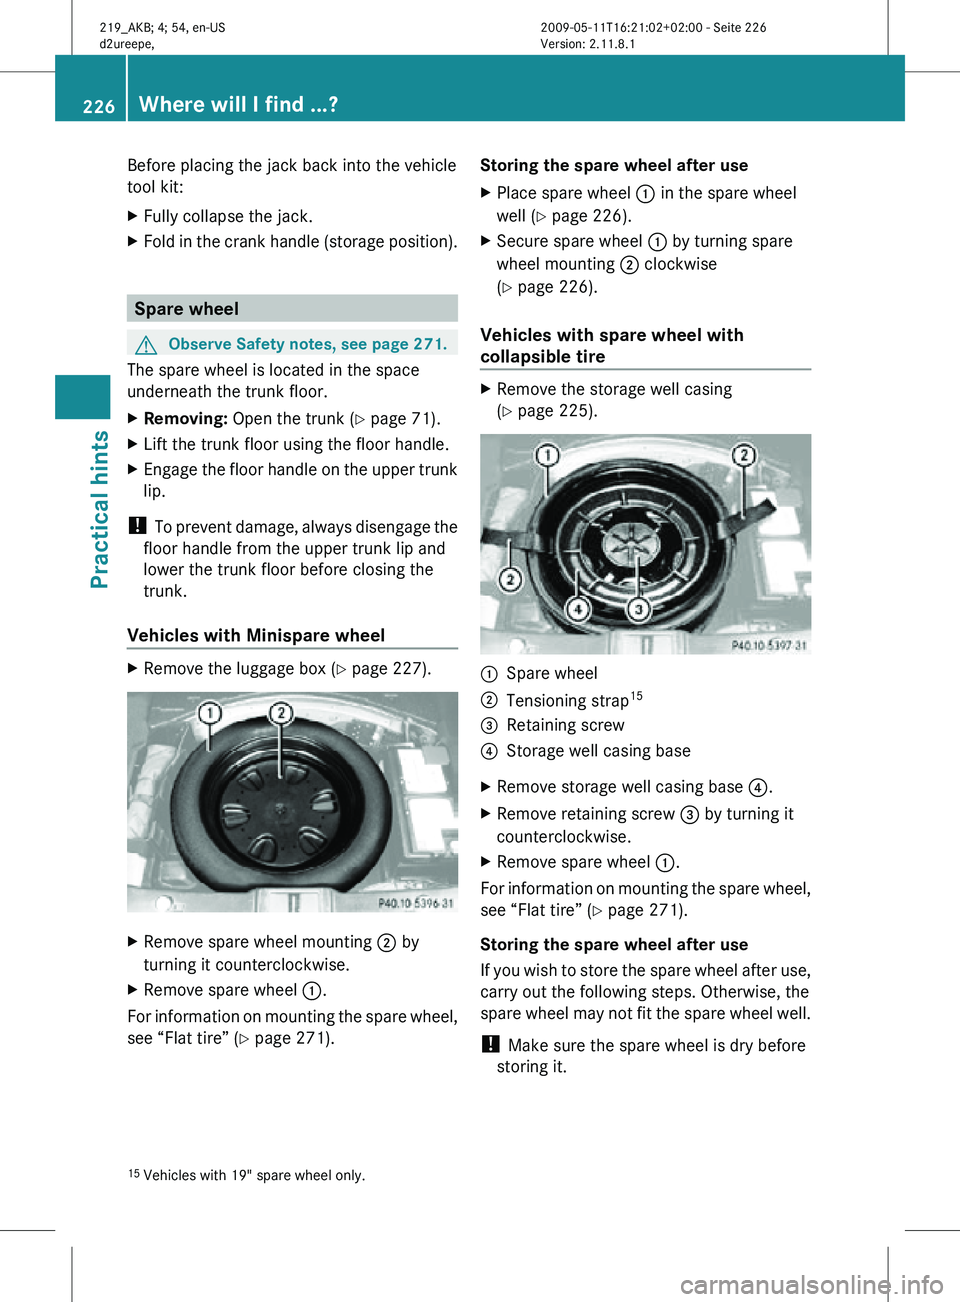
Vehicles with Minispare wheel X
Remove the luggage box ( Y page 227).X
Remove spare wheel mounting ; by
turning it counterclockwise.
X Remove spare wheel :.
For information on mounting the spare wheel,
see “Flat tire” ( Y page 271). Storing the spare wheel after use
X
Place spare wheel : in the spare wheel
well (Y page 226).
X Secure spare wheel : by turning spare
wheel mounting ; clockwise
(Y page 226).
Vehicles with spare wheel with
collapsible tire X
Remove the storage well casing
(Y page 225). :
Spare wheel
; Tensioning strap 15
= Retaining screw
? Storage well casing base
X Remove storage well casing base ?.
X Remove retaining screw = by turning it
counterclockwise.
X Remove spare wheel :.
For information on mounting the spare wheel,
see “Flat tire” ( Y page 271).
Storing the spare wheel after use
If you wish to store the spare wheel after use,
carry out the following steps. Otherwise, the
spare wheel may not fit the spare wheel well.
! Make sure the spare wheel is dry before
storing it.
15 Vehicles with 19" spare wheel only. 226
Where will I find ...?Practical hints
219_AKB; 4; 54, en-US
d2ureepe,
Version: 2.11.8.1 2009-05-11T16:21:02+02:00 - Seite 226
Page 229 of 308
X
Unscrew the valve cap from the valve of the
collapsible tire.
X Unscrew the valve insert from the valve
using the valve extractor integrated in the
valve cap.
X Allow the air to escape.
i It may take a few minutes for the
collapsible tire to deflate completely.
X Screw the valve insert back into the valve.
X Screw the valve cap back onto the valve.
i Vehicles with 19" spare wheel only:
Before placing the spare wheel in the spare
wheel well fasten tensioning straps, see
“Compressing the collapsible tire”
(Y page 227).
X Place spare wheel : into the spare wheel
well (Y page 226).
X Secure spare wheel : by turning retaining
screw = clockwise (Y page 226).
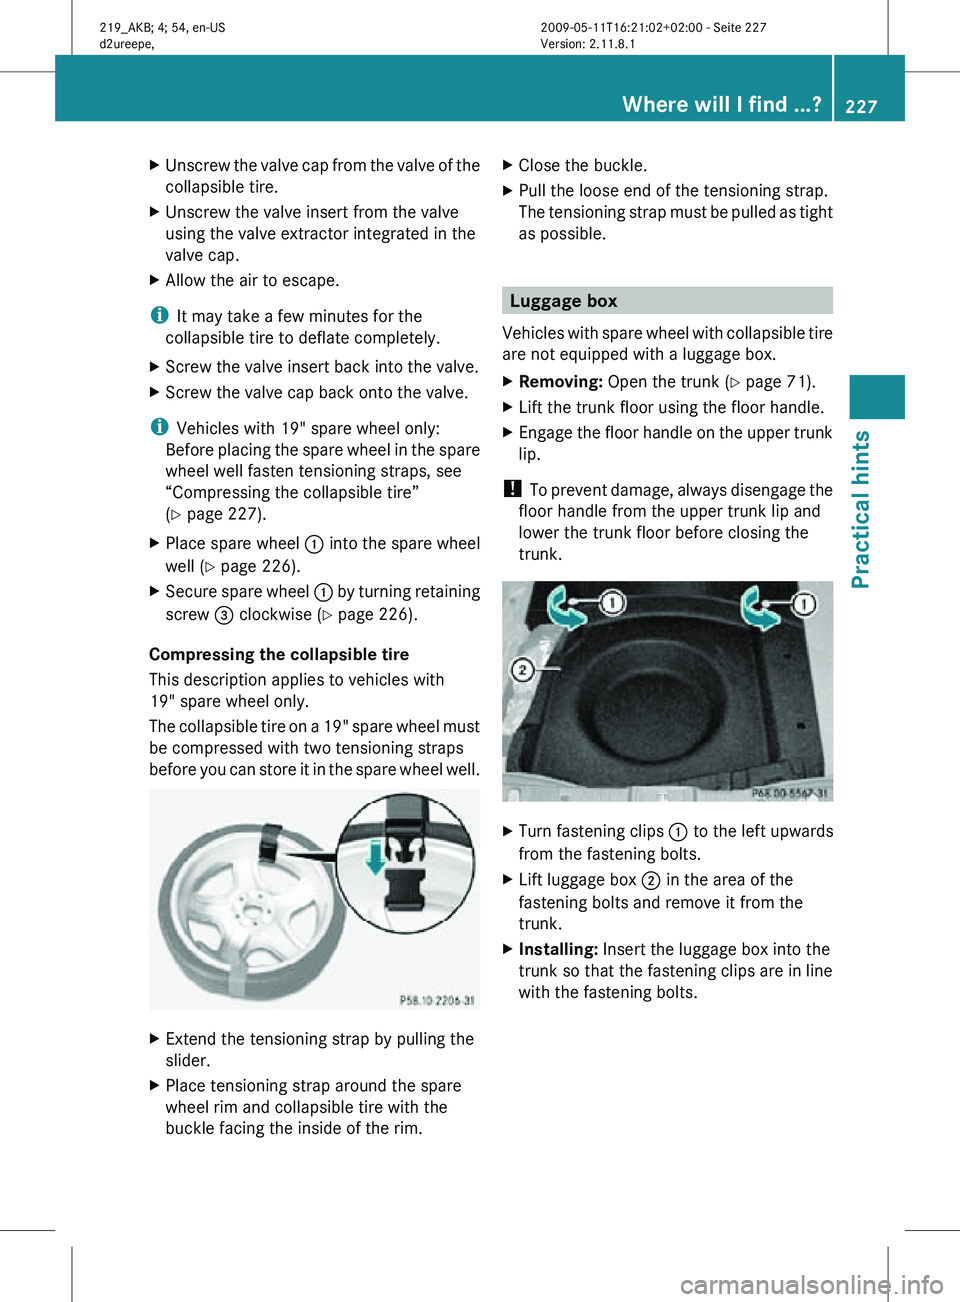
Compressing the collapsible tire
This description applies to vehicles with
19" spare wheel only.
The collapsible tire on a 19" spare wheel must
be compressed with two tensioning straps
before you can store it in the spare wheel well. X
Extend the tensioning strap by pulling the
slider.
X Place tensioning strap around the spare
wheel rim and collapsible tire with the
buckle facing the inside of the rim. X
Close the buckle.
X Pull the loose end of the tensioning strap.
The tensioning strap must be pulled as tight
as possible. Luggage box
Vehicles with spare wheel with collapsible tire
are not equipped with a luggage box.
X Removing: Open the trunk (Y page 71).
X Lift the trunk floor using the floor handle.
X Engage the floor handle on the upper trunk
lip.
! To prevent damage, always disengage the
floor handle from the upper trunk lip and
lower the trunk floor before closing the
trunk. X
Turn fastening clips : to the left upwards
from the fastening bolts.
X Lift luggage box ; in the area of the
fastening bolts and remove it from the
trunk.
X Installing: Insert the luggage box into the
trunk so that the fastening clips are in line
with the fastening bolts. Where will I find ...?
227Practical hints
219_AKB; 4; 54, en-US
d2ureepe, Version: 2.11.8.1 2009-05-11T16:21:02+02:00 - Seite 227 Z
Page 237 of 308
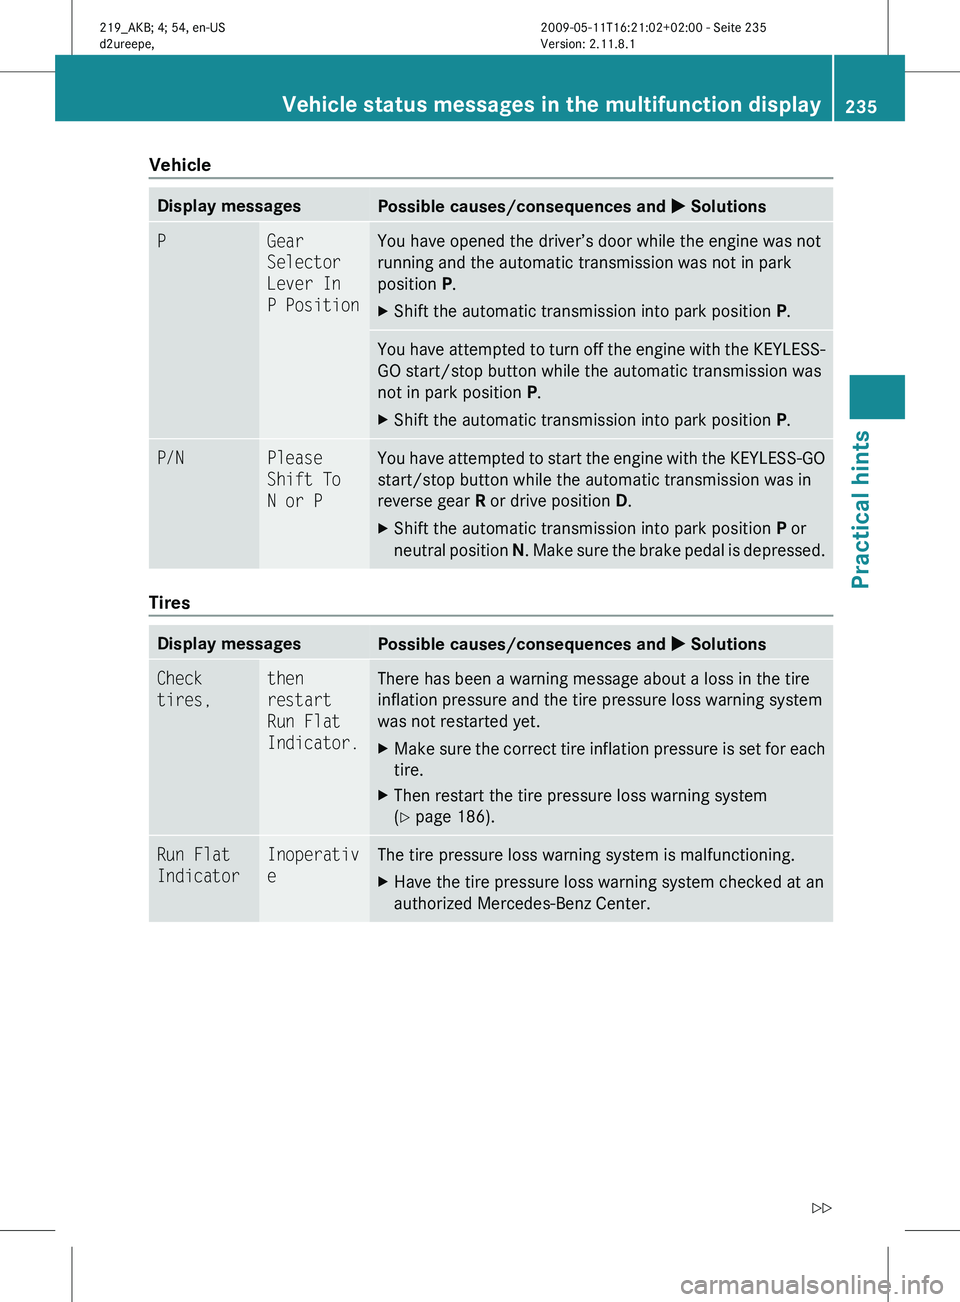
Vehicle
Display messages
Possible causes/consequences and
X SolutionsP Gear
Selector
Lever In
P Position You have opened the driver’s door while the engine was not
running and the automatic transmission was not in park
position P.
X
Shift the automatic transmission into park position P.You have attempted to turn off the engine with the KEYLESS-
GO start/stop button while the automatic transmission was
not in park position
P.
X Shift the automatic transmission into park position P.P/N Please
Shift To
N or P You have attempted to start the engine with the KEYLESS-GO
start/stop button while the automatic transmission was in
reverse gear
R or drive position D.
X Shift the automatic transmission into park position P or
neutral position N. Make sure the brake pedal is depressed. Tires
Display messages
Possible causes/consequences and
X SolutionsCheck
tires, then
restart
Run Flat
Indicator. There has been a warning message about a loss in the tire
inflation pressure and the tire pressure loss warning system
was not restarted yet.
X
Make sure the correct tire inflation pressure is set for each
tire.
X Then restart the tire pressure loss warning system
(Y page 186). Run Flat
Indicator Inoperativ
e The tire pressure loss warning system is malfunctioning.
X
Have the tire pressure loss warning system checked at an
authorized Mercedes-Benz Center. Vehicle status messages in the multifunction display
235
Practical hints
219_AKB; 4; 54, en-US
d2ureepe,Version: 2.11.8.1 2009-05-11T16:21:02+02:00 - Seite 235 Z
Page 265 of 308
X
Insert mechanical key ; into the driver’s
door lock.
X Turn mechanical key ; clockwise to
position 1.
The driver’s door is locked.
X Turn mechanical key ; back and remove
it from the driver’s door lock.
i This procedure does not arm the anti-
theft alarm system, nor does it lock the fuel
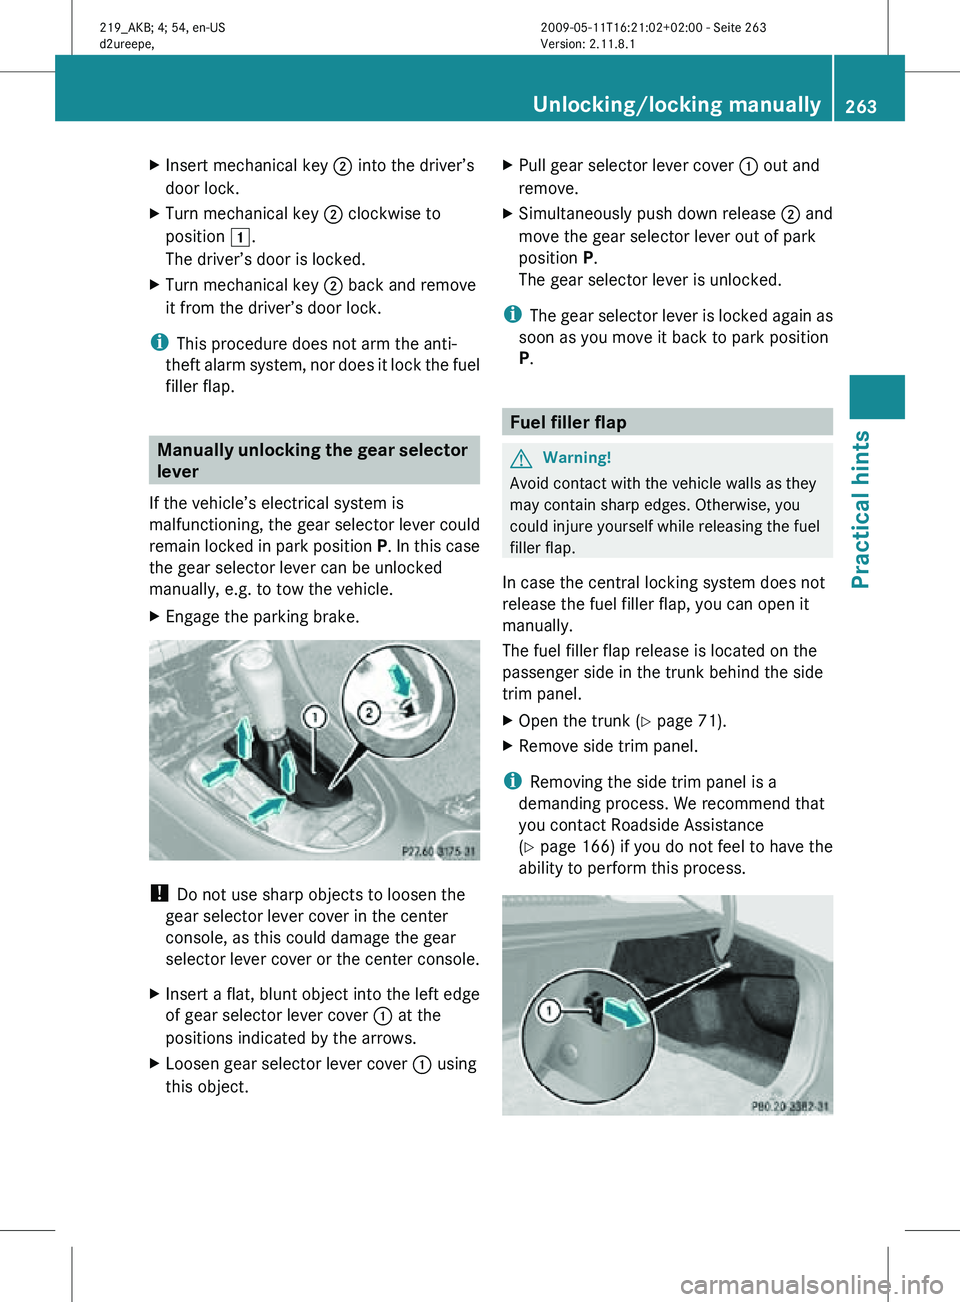
filler flap. Manually unlocking the gear selector
lever
If the vehicle’s electrical system is
malfunctioning, the gear selector lever could
remain locked in park position P. In this case
the gear selector lever can be unlocked
manually, e.g. to tow the vehicle.
X Engage the parking brake. !
Do not use sharp objects to loosen the
gear selector lever cover in the center
console, as this could damage the gear
selector lever cover or the center console.
X Insert a flat, blunt object into the left edge
of gear selector lever cover : at the
positions indicated by the arrows.
X Loosen gear selector lever cover : using
this object. X
Pull gear selector lever cover : out and
remove.
X Simultaneously push down release ; and
move the gear selector lever out of park
position P.
The gear selector lever is unlocked.
i The gear selector lever is locked again as
soon as you move it back to park position
P. Fuel filler flap
G
Warning!
Avoid contact with the vehicle walls as they
may contain sharp edges. Otherwise, you
could injure yourself while releasing the fuel
filler flap.
In case the central locking system does not
release the fuel filler flap, you can open it
manually.
The fuel filler flap release is located on the
passenger side in the trunk behind the side
trim panel.
X Open the trunk (Y page 71).
X Remove side trim panel.
i Removing the side trim panel is a
demanding process. We recommend that
you contact Roadside Assistance
(Y page 166) if you do not feel to have the
ability to perform this process. Unlocking/locking manually
263Practical hints
219_AKB; 4; 54, en-US
d2ureepe, Version: 2.11.8.1 2009-05-11T16:21:02+02:00 - Seite 263 Z
Page 274 of 308
Open doors only when conditions are safe
to do so.
X Have any passenger exit the vehicle at a
safe distance from the roadway. Open
doors only when conditions are safe to do
so. Mounting the spare wheel
Introduction X
Prepare the vehicle as described
(Y page 271).
X Take the following out of the vehicle:
R
spare wheel
R jack
R vehicle tool kit
R wheel wrench
R electric air pump (required for vehicles
with spare wheel with collapsible tire
only)
For information on where to find the
respective items, see “Where will I find ...?”
(Y page 224) and ( Y page 226).
i Vehicles without spare wheel are not
factory-equipped with the tools required for
a wheel change such as a jack or a wheel
wrench. Some tools required for a wheel
change are specific to your vehicle.
Contact an authorized Mercedes-Benz
Center to obtain the tools approved for
your vehicle. This section describes the
wheel change using the tools approved and
recommended for your vehicle.
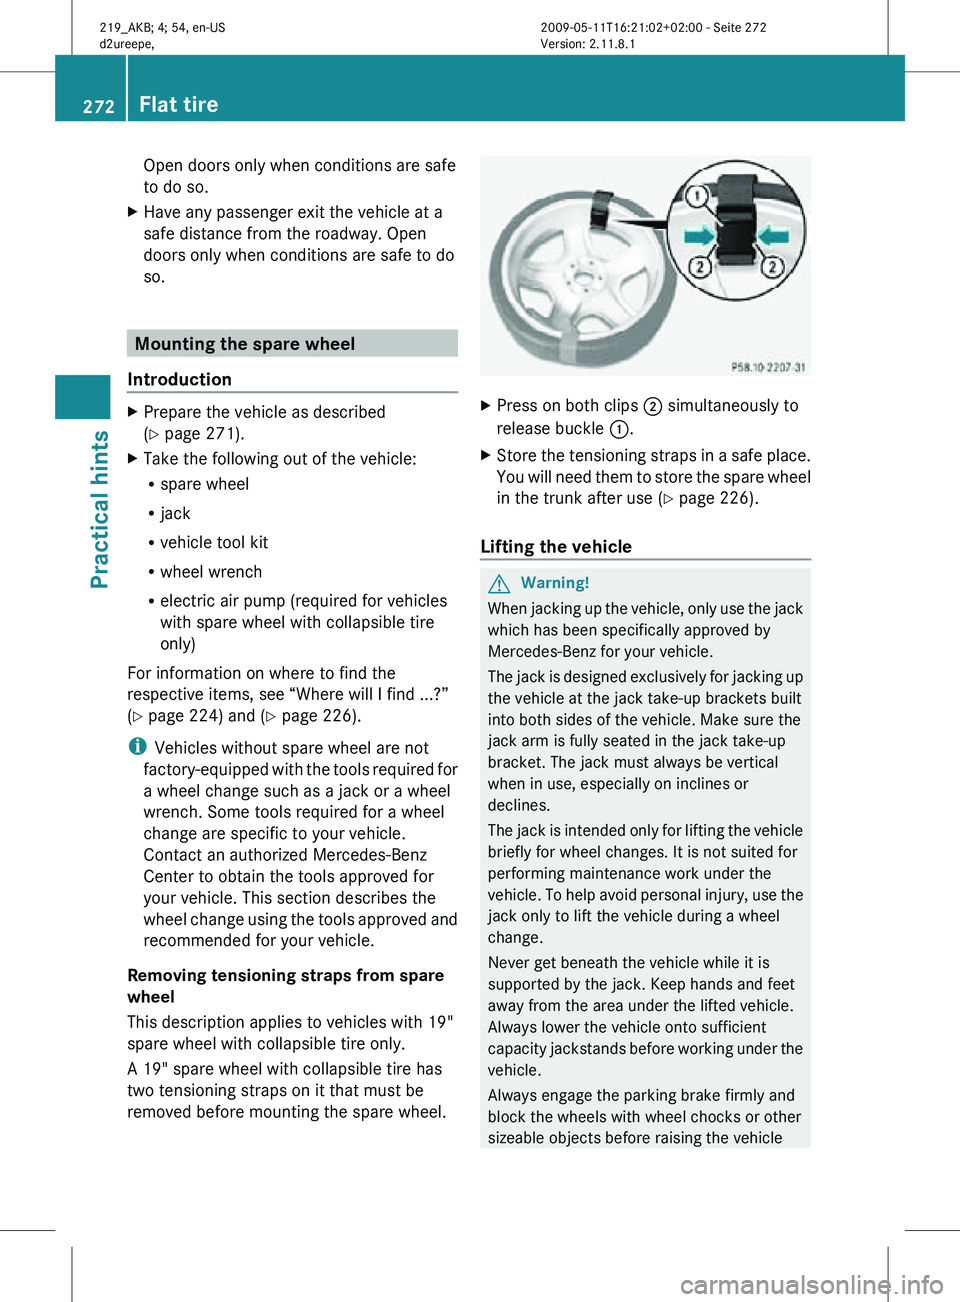
Removing tensioning straps from spare
wheel
This description applies to vehicles with 19"
spare wheel with collapsible tire only.
A 19" spare wheel with collapsible tire has
two tensioning straps on it that must be
removed before mounting the spare wheel. X
Press on both clips ; simultaneously to
release buckle :.
X Store the tensioning straps in a safe place.
You will need them to store the spare wheel
in the trunk after use (Y page 226).
Lifting the vehicle G
Warning!
When jacking up the vehicle, only use the jack
which has been specifically approved by
Mercedes-Benz for your vehicle.
The jack is designed exclusively for jacking up
the vehicle at the jack take-up brackets built
into both sides of the vehicle. Make sure the
jack arm is fully seated in the jack take-up
bracket. The jack must always be vertical
when in use, especially on inclines or
declines.
The jack is intended only for lifting the vehicle
briefly for wheel changes. It is not suited for
performing maintenance work under the
vehicle. To help avoid personal injury, use the
jack only to lift the vehicle during a wheel
change.
Never get beneath the vehicle while it is
supported by the jack. Keep hands and feet
away from the area under the lifted vehicle.
Always lower the vehicle onto sufficient
capacity jackstands before working under the
vehicle.
Always engage the parking brake firmly and
block the wheels with wheel chocks or other
sizeable objects before raising the vehicle 272
Flat tirePractical hints
219_AKB; 4; 54, en-US
d2ureepe,
Version: 2.11.8.1 2009-05-11T16:21:02+02:00 - Seite 272