2011 MERCEDES-BENZ C-CLASS ESTATE ignition
[x] Cancel search: ignitionPage 226 of 401
G
WARNING
At temperatures just above freezing point, the
street may be icy, especially in wooded areas
or on bridges. If you do not adapt yourd riving
style to the conditions, the vehicle could skid.
For this reason, adapt yourd riving style and
speed to the weather conditions.
Changes in the outside temperature are dis-
played after a short delay. Operating the on-board computer
The on-board computer is activated as soon
as you turn the key to position 1in the ignition
lock. You can use the on-board computer to
call up informatio nrelating to your vehicle
and to make and adjust settings.
i You can have certain functions set at a
qualified specialist workshop, e.g. a
Mercedes-Benz Service Centre.
Example:
R automatic door lock
R speed limit for winter tyres
You can obtain information about this at
any Mercedes-Benz Service Centre.
You can control the multifunction display and
the settings in the on-board computer using
the buttons on the multifunction steering
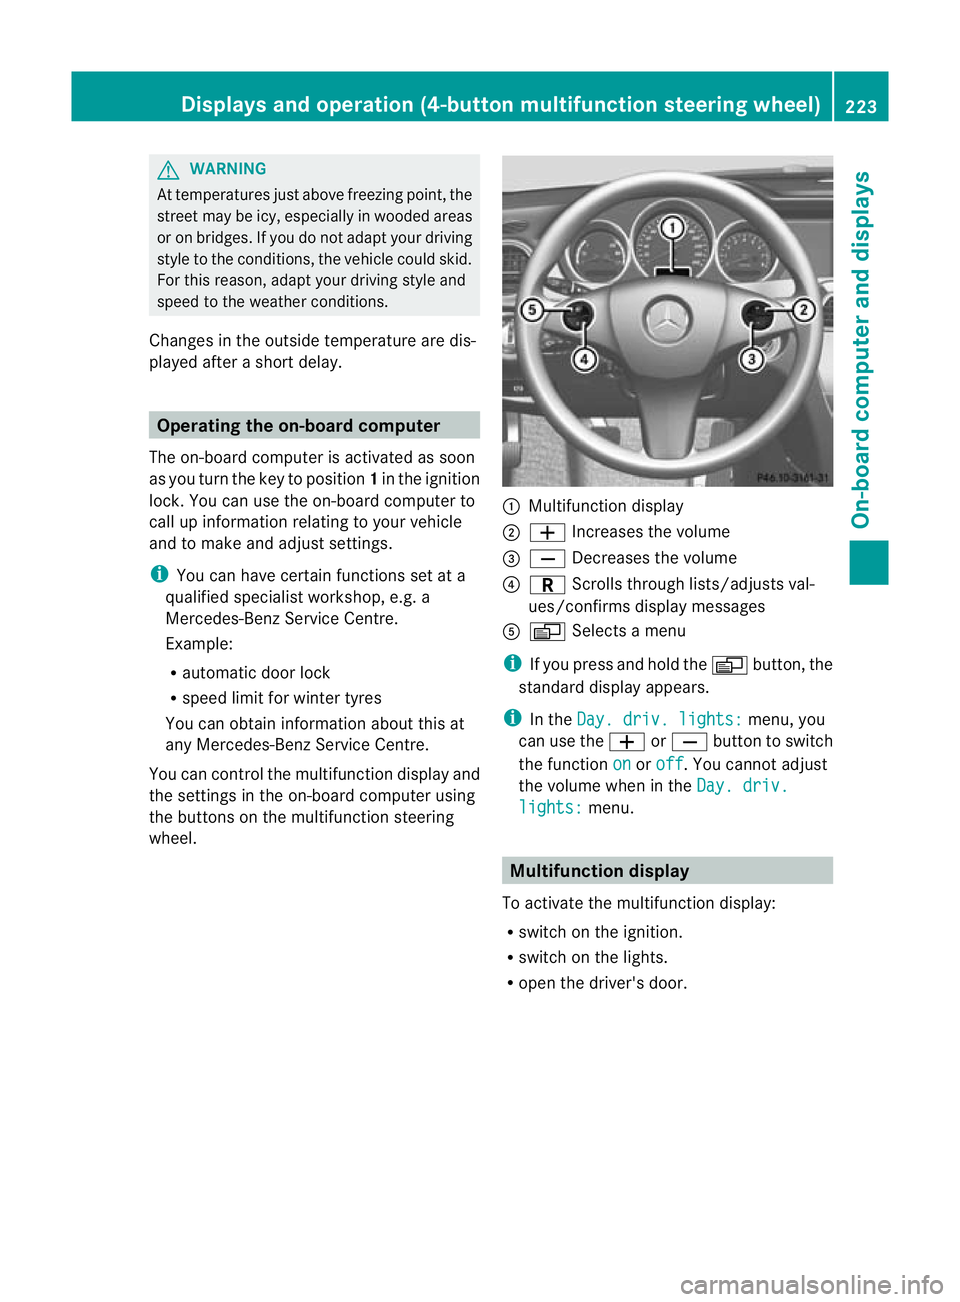
wheel. :
Multifunction display
; W Increases the volume
= X Decreases the volume
? C Scrolls through lists/adjusts val-
ues/confirms display messages
A V Selects a menu
i If you press and hold the Vbutton, the
standard display appears.
i In the Day. driv. lights: menu, you
can use the WorX button to switch
the function on or
off .Y
ou cannot adjust
the volume when in the Day. driv. lights: menu.
Multifunction display
To activate the multifunction display:
R switch on the ignition.
R switch on the lights.
R open the driver's door. Displays and operation (4-button multifunction steering wheel)
223On-board computer and displays Z
Page 229 of 401
X
To reset the trip meter: press and hold
the V until the standard display
appears.
X Press and hold the Cbutton until the
value has been reset. Trip computer
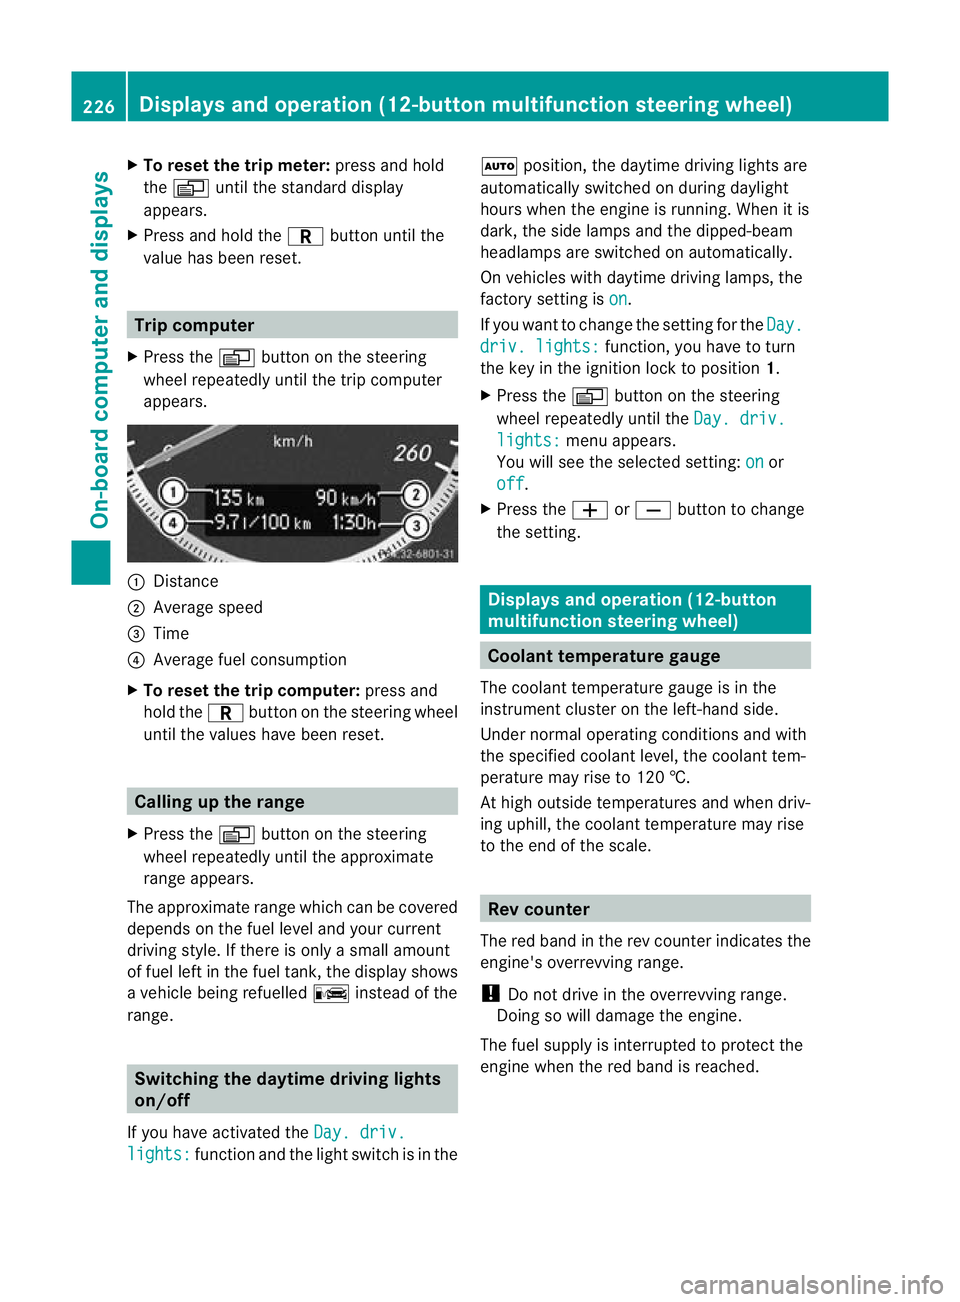
X Press the Vbutton on the steering
wheel repeatedly until the trip computer
appears. :
Distance
; Average speed
= Time
? Average fuel consumption
X To reset the trip computer: press and
hold the Cbutton on the steering wheel
until the values have been reset. Calling up the range
X Press the Vbutton on the steering
wheel repeatedly until the approximate
range appears.
The approximate range which can be covered
depends on the fuel level and your current
driving style .Ifthere is only a small amount
of fuel left in the fuel tank, the display shows
a vehicle being refuelled Cinstead of the
range. Switching the daytime driving lights
on/off
If you have activated the Day. driv.lights: function and the light switch is in the Ã
position, the daytime driving lights are
automatically switched on during daylight
hours when the engine is running. When it is
dark, the side lamps and the dipped-beam
headlamps are switched on automatically.
On vehicles with daytime driving lamps, the
factory setting is on .
If you want to change the setting for the Day. driv. lights: function, you have to turn
the key in the ignition lock to position 1.
X Press the Vbutton on the steering
wheel repeatedly until the Day. driv. lights: menu appears.
You will see the selected setting: on or
off .
X Press the WorX button to change
the setting. Displays and operation (12-button
multifunction steering wheel)
Coolant temperature gauge
The coolant temperature gauge is in the
instrumentc lusteront he left-hand side.
Under normal operating conditions and with
the specified coolant level, the coolant tem-
perature may rise to 120 †.
At high outside temperatures and when driv-
ing uphill, the coolant temperature may rise
to the end of the scale. Rev counter
The red band in the rev counter indicates the
engine's overrevving range.
! Do not drive in the overrevving range.
Doing so will damage the engine.
The fuel supply is interrupted to protect the
engine when the red band is reached. 226
Displays and operation (12-button multifunction steering wheel)On-board computer and displays
Page 230 of 401
Outside temperature display
The outside temperature display is in the mul-
tifunction display (Y page 228). G
WARNING
At temperatures just above freezing point, the
street may be icy, especially in wooded areas
or on bridges. If you do not adapt your driving
style to the conditions ,the vehicle could skid.
For this reason, adapt your driving style and
speed to the weather conditions.
Changes in the outside temperature are dis-
played after a short delay. Speedometer with segments
The segments in the speedometer indicate
which speed range is available.
Cruise control (Y page 178) activated:
The segments light up from the stored speed
to the maximum speed.
Variable SPEEDTRONIC (Y page 180) activa-
ted:
The segments light up from the start of the
scale to the selected limit speed.
DISTRONIC PLUS (Y page 183) activated:
One or two segments in the set speed range
light up.
DISTRONIC PLUS detects a vehicle in front:
The segments between the speed of the vehi-
cle in front and the stored speed light up. Operating the on-board computer
Overview The on-board computer is activated as soon
as you turn the key to position 1in the ignition
lock.
You can control the multifunction display and
the settings in the on-board computer using
the buttons on the multifunction steering
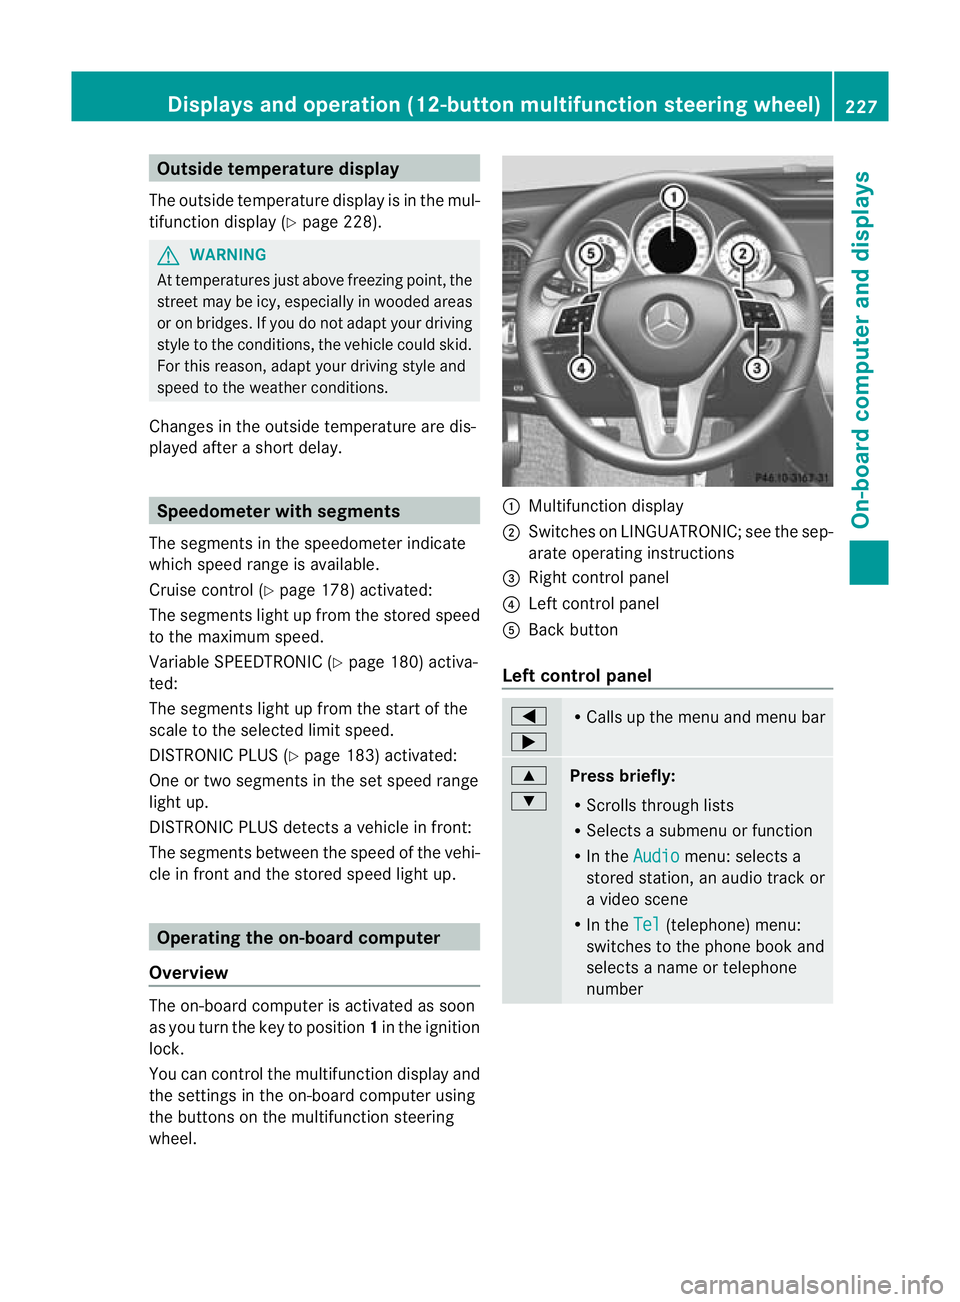
wheel. :
Multifunction display
; Switches on LINGUATRONIC; see the sep-
arate operating instructions
= Right control panel
? Left control panel
A Back button
Left control panel =
; R
Calls up the menu and menu bar 9
:
Press briefly:
R
Scrolls through lists
R Selects a submenu or function
R In the Audio menu: selects a
stored station, an audio track or
a video scene
R In the Tel (telephone) menu:
switches to the phone book and
selects a name or telephone
number Displays and operation (12-button multifunction steering wheel)
227On-board computer and displays Z
Page 234 of 401
Trip menu
Standard display X
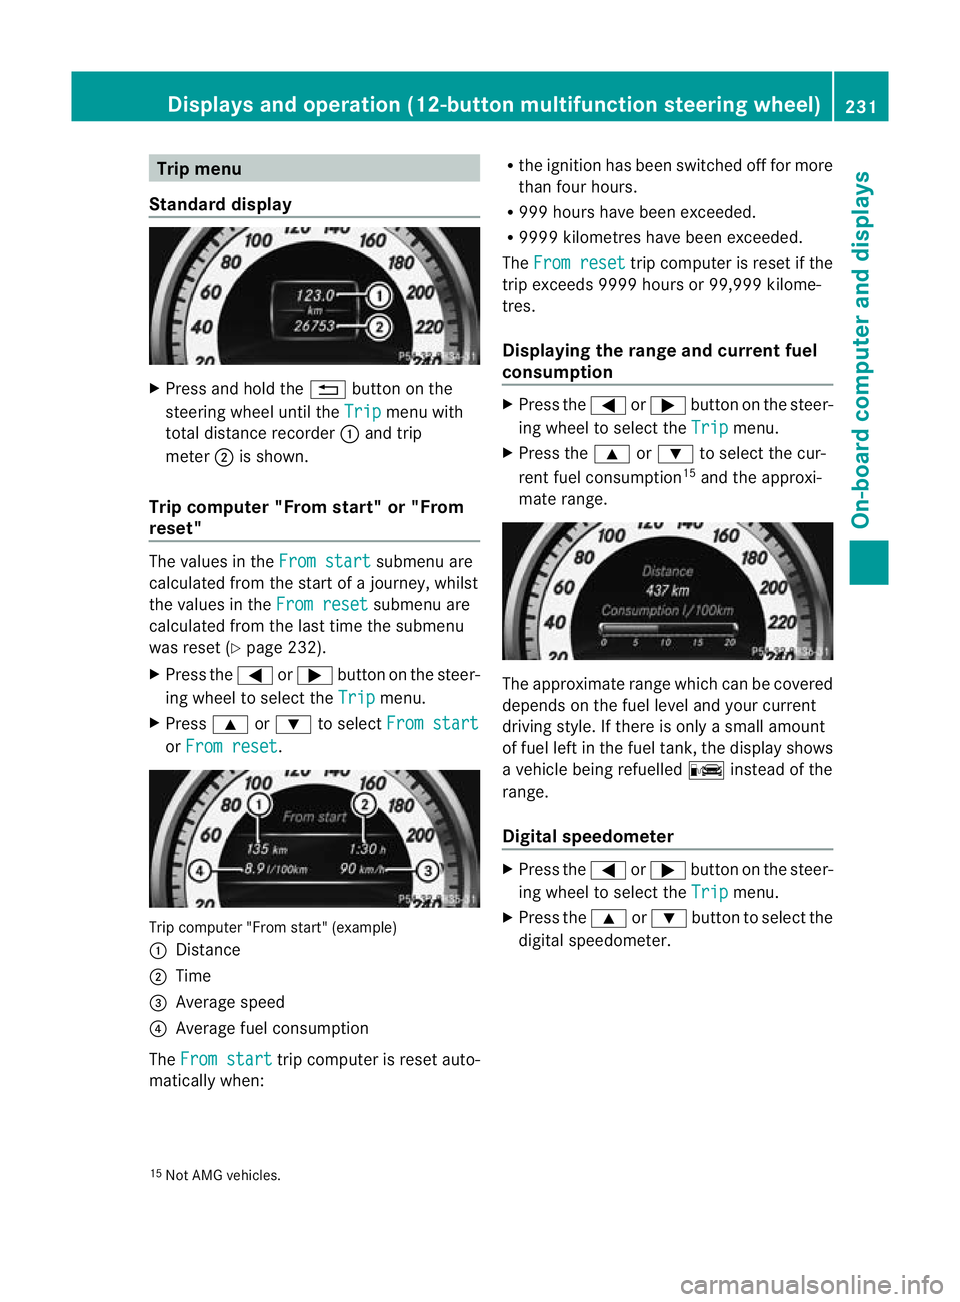
Press and hold the %button on the
steering wheel until the Trip menu with
total distance recorder :and trip
meter ;is shown.
Trip computer "From start" or "From
reset" The values in the
From start submenu are
calculated fro mthe start of a journey, whilst
the values in the From reset submenu are
calculated from the last time the submenu
was reset (Y page 232).
X Press the =or; button on the steer-
ing wheel to select the Trip menu.
X Press 9or: to select From start or
From reset .
Trip computer "From start" (example)
:
Distance
; Time
= Average speed
? Average fuel consumption
The From start trip computer is reset auto-
matically when: R
the ignition has been switched off for more
than four hours.
R 999 hours have been exceeded.
R 9999 kilometres have been exceeded.
The From reset trip computer is reset if the
trip exceeds 9999 hours or 99,999 kilome-
tres.
Displaying the range and current fuel
consumption X
Press the =or; button on the steer-
ing wheel to select the Trip menu.
X Press the 9or: to select the cur-
rent fuel consumption 15
and the approxi-
mate range. The approximate range which can be covered
depends on the fuel level and your current
driving style. If there is only a small amount
of fuel left in the fuel tank, the display shows
a vehicle being refuelled
Cinstead of the
range.
Digital speedometer X
Press the =or; button on the steer-
ing wheel to select the Trip menu.
X Press the 9or: button to select the
digital speedometer.
15 Not AMG vehicles. Displays and operation (12-button multifunction steering wheel)
231On-board computer and displays Z
Page 240 of 401
X
Press =or; on the steering wheel
to select the Assist. menu.
X Press 9or: to select Speed Lim.
Asst. .
X Press a.
The multifunction display shows Speed
Limit Assist.
X Press :.
The curren tselection is displayed.
X To activate or deactivate: pressa.
If Speed Limit Assist is operational and the
message function is activated, the multifunc-
tion display shows the Äsymbol when the
ignition is switched on.
Showing distance display This function is only available with DIS-
TRONIC PLUS.
X
Press =or; on the steering wheel
to select the Assist. menu.
X Press the 9or: button to select
Distance display .
X Press a.
The DISTRONIC PLUS distance display
(Y page 189) appears in the multifunction
display.
Deactivating/activating ESP ®G
WARNING
If the ÷ warning lamp in the instrument
cluster flashes, proceed as follows:
R Under no circumstances should you deac-
tivate ESP ®
.
R When pulling away, only depress the accel-
erator pedal as far as is necessary.
R Adapt your driving style to the prevailing
road and weather conditions.
The vehicle may otherwise begin to skid.
If you drive too fast, ESP ®
cannot reduce the
risk of an accident. ESP ®
cannot override the
laws of physics. Activating/deactivating ESP
®
on AMG vehi-
cles (Y page 76).
For further information about ESP ®
, see
(Y page 75).
X Start the engine.
X Press =or; on the steering wheel
to select the Assist. menu.
X Press the 9or: button to select
ESP .
X Press the abutton.
X To deactivate: pressaagain.
The å warning lamp in the instrument
cluster comes on. G
WARNING
If the å warning lamp in the instrument
cluster lights up when the engine is running,
ESP ®
is deactivated or is unavailable due to a
malfunction. The risk that your vehicle may
start to skid then increases in certain situa-
tions.
Always adapt your driving style to the prevail-
ing road and weather conditions.
X To activate: pressaagain.
The å warning lamp in the instrument
cluster goes out.
Activating/deactivating the PRE-SAFE ®
Brake PRE-SAFE
®
Brake is only available in vehicles
with DISTRONIC PLUS.
X Press =or; on the steering wheel
to select the Assist. menu.
X Press 9or: to select PreSafe Brake .
X Press the abutton.
The curren tselection is displayed.
X To activate/deactivate: pressa
again.
When PRE-SAFE ®
Brake (Y page 78) is acti-
vated, the multifunction display shows the Displays and operation (12-button multifunction steering wheel)
237On-board computer and displays Z
Page 241 of 401
Ä
symbol as long as the HOLD function is
not activated (Y page 193).
Vehicles with Parking Guidance: if PARK-
TRONIC is activated and you are driving at a
speed under 35 km/h, the jParking Guid-
ance symbol is shown instead of the Ä
symbol.
Activating/deactivating ATTENTION
ASSIST X
Press =or; on the steering wheel
to select the Assist. menu.
X Press the 9or: button to select
Attention Asst. .
X Press a.
The current selection is displayed.
X To activate/deactivate: pressa
again.
When ATTENTION ASSIST (Y page 203) is
activated, the Àsymbol appears in the
multifunction display when the ignition is on.
Activating/deactivating Blind Spot
Assist You can use the
Blind Spot Asst. function
to activate or deactivate Blind Spot Assist
(Y page 205) or Active Blind Spot Assist
(Y page 209).
X Press =or; on the steering wheel
to select the Assist. menu.
X Press 9or: to select Blind Spot
Asst. .
X Press a.
If the function is activated, the monitored
areas in the multifunction display light up
red.
X To activate/deactivate: pressa
again.
Activating/deactivating Lane Keeping
Assist You can use the
Lane Keep. Asst. function
to activate/deactivate Lane Keeping Assist (Y
page 208) or Active Lane Keeping Assist
(Y page 212).
X Press =or; on the steering wheel
to select the Assist. menu.
X Press 9or: to select Lane Keep.
Asst. .
X Press a.
If the function is activated, the lane marking
symbol in the multifunction display lights
up red.
X To activate/deactivate: pressa
again.
When Lane Keeping Assist or Active Lane
Keeping Assist is activated, the Ãsymbol
appears in the multifunction display when the
ignition is on. Service menu
In the
Service menu you can:
R call up display messages (Y page 248)
R reset the tyre pressure loss warning system
(Y page 362) or check the tyre pressure
electronically (Y page 363)
R call up the service due date (Y page 326) Settings menu
Introduction The
Settings menu can be used for:238
Displays and operation (12-button multifunction steering wheel)On-board computer and displays
Page 244 of 401
_
symbol in the multifunction display
are shown in red.
X Press the abutton to save the setting.
Activating/deactivating the surround
lighting and exterior lighting delayed
switch-off
If you have activated the Surround light‐ing function and the light switch is set to
Ã, the following functions are activated
when it is dark:
R Surround lighting: the exterior lighting
remains lit for 40 seconds after unlocking
with the key. The exterior lighting switches
off when you open the driver's door.
R Exterior lighting delayed switch-off: the
exterior lighting remains lit for 60 seconds
after the engine has been switched off. If
you close all the doors, the exterior lighting
goes off after 15 seconds.
If you activate the Surround lighting func-
tion, the following light up depending on the
vehicle's equipment:
R the side lamps
R the foglamps
R the daytime driving lights
R the surround lighting in the exterior mirrors
X Press the =or; button on the steer-
ing wheel to select the Settings menu.
X Press the :or9 button to select the
Light submenu.
X Press the abutton to confirm.
X Press the :or9 button to select the
Surround lighting function.
When the Surround lighting function is
activated, the light cone and the area
around the vehicle are displayed in red in
the multifunction display.
X Press the abutton to save the setting. Deactivating delayed switch-off of the exte-
rior lighting temporarily:
X
Before leaving the vehicle, turn the key to
position 0in the ignition lock.
X Turn the key to position 2in the ignition
lock and back to position 0.
The exterior lighting delayed switch-off is
deactivated.
Delayed switch-off of the exterior lighting is
reactivated the next time you start the
engine.
Activating/deactivating the interior light-
ing delayed switch-off
If you activate the Light. delay function,
the interior lighting remains on for 20 sec-
onds after you remove the key from the igni-
tion lock.
X Press the =or; button on the steer-
ing wheel to select the Settings menu.
X Press the :or9 button to select the
Light submenu.
X Press the abutton to confirm.
X Press the :or9 button to select the
Light. delay function.
When the Light. delay function is acti-
vated, the vehicle interior is displayed in
red in the multifunction display.
X Press the abutton to save the setting.
Vehicle Setting permanent SPEEDTRONIC
You can set permanent SPEEDTRONIC
(Y
page 183) using the Limit speed (win‐ ter tyres) function.
X Press the =or; button on the steer-
ing wheel to select the Settings menu.
X Press the :or9 button to select the
Vehicle submenu.
X Press the abutton to confirm.
X Press :or9 to select the Limit speed (winter tyres): function.
You will see the current setting. Displays and operation (12-button multifunction steering wheel)
241On-board computer and displays Z
Page 247 of 401
G
WARNING
The steering wheel moves when the EASY-
ENTRY/EXIT feature is active. There is a risk
of occupants becoming trapped. Before acti-
vating the EASY-ENTRY/EXIT feature, make
sure that nobody can become trapped.
Do not leave children unsupervised in the
vehicle, even if they are secured in a child
restraint system. The children could open the
driver's door and thereby unintentionally acti-
vate the EASY-ENTRY/EXIT feature and
become trapped.
X Press the =or; button on the steer-
ing wheel to select the Settings menu.
X Press the :or9 button to select the
Convenience submenu.
X Press the abutton to confirm.
X Press the :or9 button to select the
Easy Entry/Exit function.
If the Easy Entry/Exit function is activa-
ted, the vehicle steering wheel is displayed
in red in the multifunction display.
X Press the abutton to save the setting.
Switching the belta djustmenton/off
For further information on belt adjustment,
see (Y page 55).
X Press the =or; button on the steer-
ing wheel to select the Settings menu.
X Press the :or9 button to select the
Convenience submenu.
X Press the abutton to confirm.
X Press the :or9 button to select the
Belt adjustment function.
When the Belt adjustment function is
activated, the vehicle seat belt is displayed
in red in the multifunction display.
X Press the abutton to save the setting.
Switching the fold in mirrors when lock-
ing function on/off
If you switch on the Auto. fold in function,
the exterior mirrors fold in when you lock the
vehicle. When you unlock the vehicle and then open the driver's or front-passenger door, the
exterior mirrors fold out again.
If you have switched the function on and you
fold the exterior mirror
sinusing the button
on the door (Y page 113), they will not fold
out automatically. The exterior mirrors can
then only be folded out using the button on
the door.
X Press the =or; button on the steer-
ing wheel to select the Settings menu.
X Press the :or9 button to select the
Convenience submenu.
X Press the abutton to confirm.
X Press the :or9 to select the
Auto. fold in function.
If the Auto. fold in function is activated,
the vehicle's exterior mirror is displayed in
red in the multifunction display.
X Press the abutton to save the setting.
Resetting to factory settings For safety reasons, not all functions are reset:
the Limit Speed (winter tyres) function
in permanent SPEEDTRONIC can only be set
in the Vehicle submenu. If you want to reset
the Daytime driving lights function in
the Light submenu, you must turn the key in
the ignition lock to position 1.
X Press the =or; button on the steer-
ing wheel to select the Settings menu.
X Press the :or9 button to select the
Factory setting submenu.
X Press the abutton to confirm.
The Reset all settings? message
appears.
X Press the :or9 button to select
No or
Yes .
X Press the abutton to confirm the selec-
tion.
If you select Yes , the multifunction display
shows a confirmation message. 244
Displays and operation (12-button multifunction steering wheel)On-board computer and displays