2011 MERCEDES-BENZ C-CLASS ESTATE lights
[x] Cancel search: lightsPage 202 of 401
Problems with PARKTRONIC
Problem Possible causes/consequences and
M Solutions
Only the red segments
in the PARKTRONIC
warning displays are lit.
You also hear a warning
tone for approximately
two seconds.
PARKTRONIC is deacti-
vated after approx-
imately 20 seconds,
and the indicator lamp
in the PARKTRONIC
button lights up. PARKTRONIC has malfunctioned and has switched off.
X
If problems persist, have PARKTRONIC checked at a qualified
specialist workshop. Only the red segments
in the PARKTRONIC
warning displays are lit.
PARKTRONIC is deacti-
vated after approx-
imately 20 seconds. The PARKTRONIC sensors are dirty or there is interference.
X
Cleant he PARKTRONIC sensors (Y page 330).
X Switch the ignition back on. The problem may be caused by an external source of radio or
ultrasound waves.
X See if PARKTRONIC functions in a different location. Parking Guidance
Important safety notes Parking Guidance is an electronic parking aid
with ultrasound. Ultrasound is used to meas-
ure the road on both sides of the vehicle. A
suitable parking space is indicated by the
parking symbol. You receive steering instruc-
tions when parking. You may also use PARK-
TRONIC (Y page 196). G
WARNING
Parking Guidance is merely an aid and may
recommend parking spaces that are not suit-
able for parking. For example, these might be
spaces where parking is prohibited, drive-
ways, unsuitable surfaces, etc.
Parking Guidance measures the parking
space as you drive past it. Any later changes
to the parking space are not taken into
account. For instance, this may be the case when the vehicle parked in front of or behind
the space changes its position or when an
obstacle is moved into the parking space.
Parking Guidance does not relieve you of the
responsibility for paying attention. If you rely
solely on Parking Guidance, you could cause
an accident and injure yourself and others.
You are always responsible for safety and
must continue to pay attention to your imme-
diate surroundings when parking and
manoeuvring.
G
WARNING
Objects located above the height range of
Parking Guidance will not be detected when
the parking space is measured. These are not
taken into account when the parking proce-
dure is calculated, e.g. overhanging loads, tail
sections or loading ramps of goods vehicles.
In some circumstances, Parking Guidance Driving systems
199Driving and parking
Z
Page 210 of 401
Due to the nature of the system:
R
warnings may be issued in error when driv-
ing close to crash barriers or simila rsolid
lane borders.
R warnings may be interrupted when driving
alongside long vehicles, such as lorries, for
a prolonged time.
The two sensors for Blind Spot Assist are
integrated into the sides of the rear bumper.
Make sure that the bumper is free of dirt, ice
or slush in the vicinit yofthe sensors. The
radar sensors must not be covered, for exam-
ple by cycle racks or overhanging loads. Fol-
lowing a severe impact or in the event of dam-
age to the bumpers, have the function of the
radar sensors checked at aqualified special-
ist workshop, e.g. a Mercedes-Ben zService
Centre. Blind Spot Assist may otherwise not
work properly.
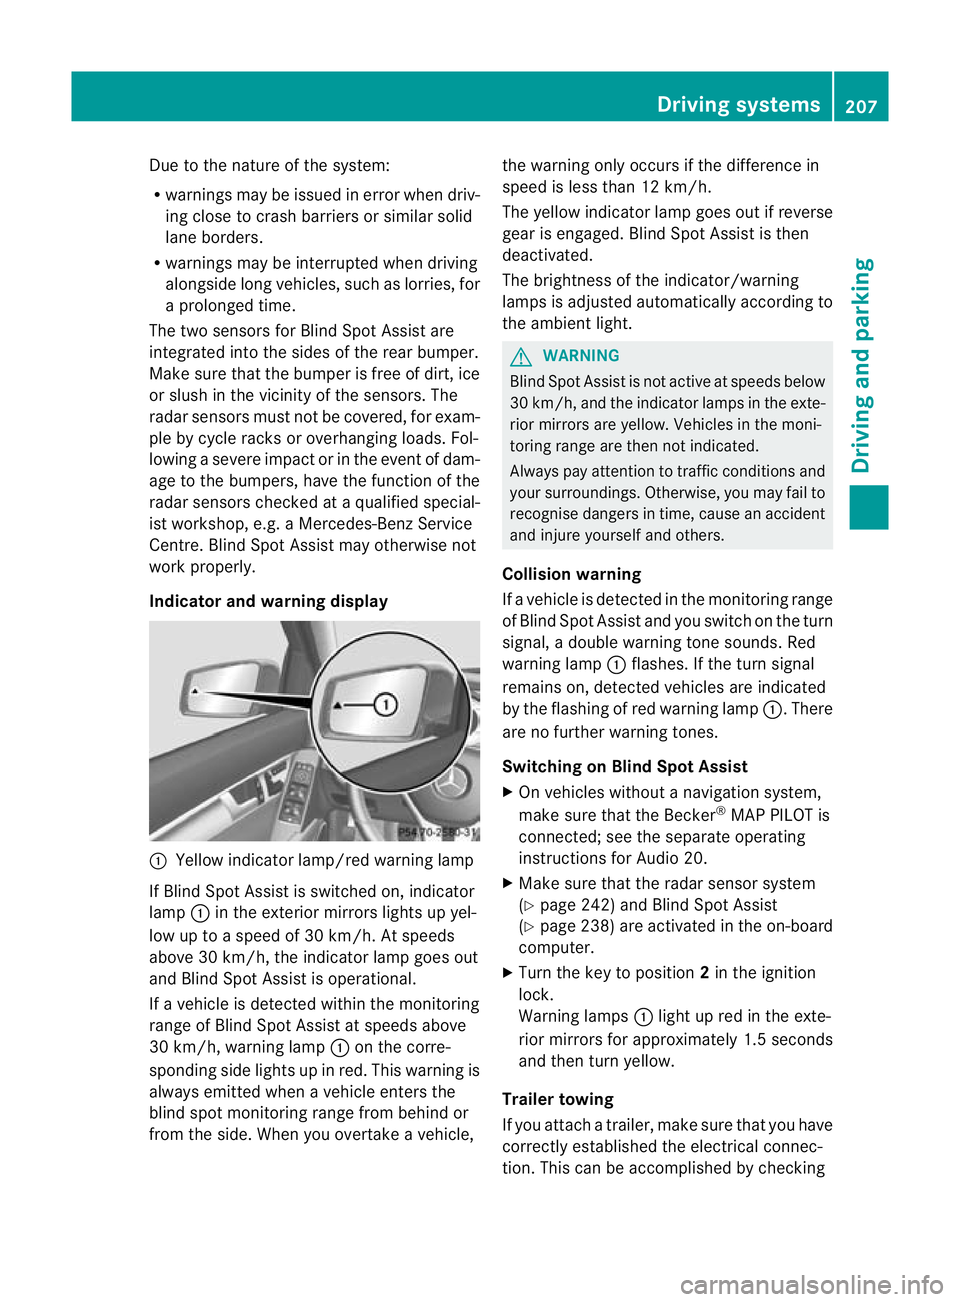
Indicator and warning display :
Yellow indicator lamp/red warning lamp
If Blind Spot Assist is switched on, indicator
lamp :in the exterior mirrors lights up yel-
low up to a speed of 30 km/h. At speeds
above 30 km/h, the indicator lamp goes out
and Blind Spot Assist is operational.
If a vehicle is detected within the monitoring
range of Blind Spot Assist at speeds above
30 km/h, warning lamp :on the corre-
sponding side lights up in red. This warning is
always emitted when a vehicle enters the
blind spot monitoring range from behind or
from the side. When you overtake a vehicle, the warning only occurs if the difference in
speed is less than 12 km/h.
The yellow indicator lamp goes out if reverse
gear is engaged. Blind Spot Assist is then
deactivated.
The brightness of the indicator/warning
lamps is adjusted automatically according to
the ambient light.
G
WARNING
Blind Spot Assist is not active at speeds below
30 km/h, and the indicator lamps in the exte-
rior mirrors are yellow. Vehicles in the moni-
toring range are then not indicated.
Always pay attention to traffic conditions and
your surroundings. Otherwise, you may fail to
recognise dangers in time, cause an accident
and injure yourself and others.
Collision warning
If a vehicle is detected in the monitoring range
of Blind Spot Assist and you switch on the turn
signal, a double warning tones ounds. Red
warning lamp :flashes. If the turn signal
remains on, detected vehicles are indicated
by the flashing of red warning lamp :.There
are no further warning tones.
Switching on Blind Spot Assist
X On vehicles without a navigation system,
make sure that the Becker ®
MAP PILOT is
connected; see the separate operating
instructions for Audio 20.
X Make sure that the radar sensor system
(Y page 242) and Blind Spot Assist
(Y page 238) are activated in the on-board
computer.
X Turn the key to position 2in the ignition
lock.
Warning lamps :light up red in the exte-
rior mirrors for approximately 1.5 seconds
and then turn yellow.
Trailer towing
If you attach a trailer, make sure that you have
correctly established the electrical connec-
tion. This can be accomplished by checking Driving systems
207Driving and parking Z
Page 211 of 401
the trailer lighting
.Blind Spot Assist is then
deactivated. The indicator lamp in the exte-
rior mirrors lights up yellow, and the BlindSpot Assist currently unavailable
See Owner's Manual message appears in
the multifunction display.
i You can deactivate the indicator lamps in
the exterior mirrors.
To do so, switch off Blind Spot Assist if:
R the key is in position 2in the ignition
lock.
R the engine is not running.
R the electrical connection to the trailer
has been established.
Lane Keeping Assist Important safety notes
Lane Keeping Assist monitors the area in
front of your vehicle by means of a camera at
the top of the windscreen. Lane Keeping
Assist detects lane markings on the road and
warns you before you leave your lane unin-
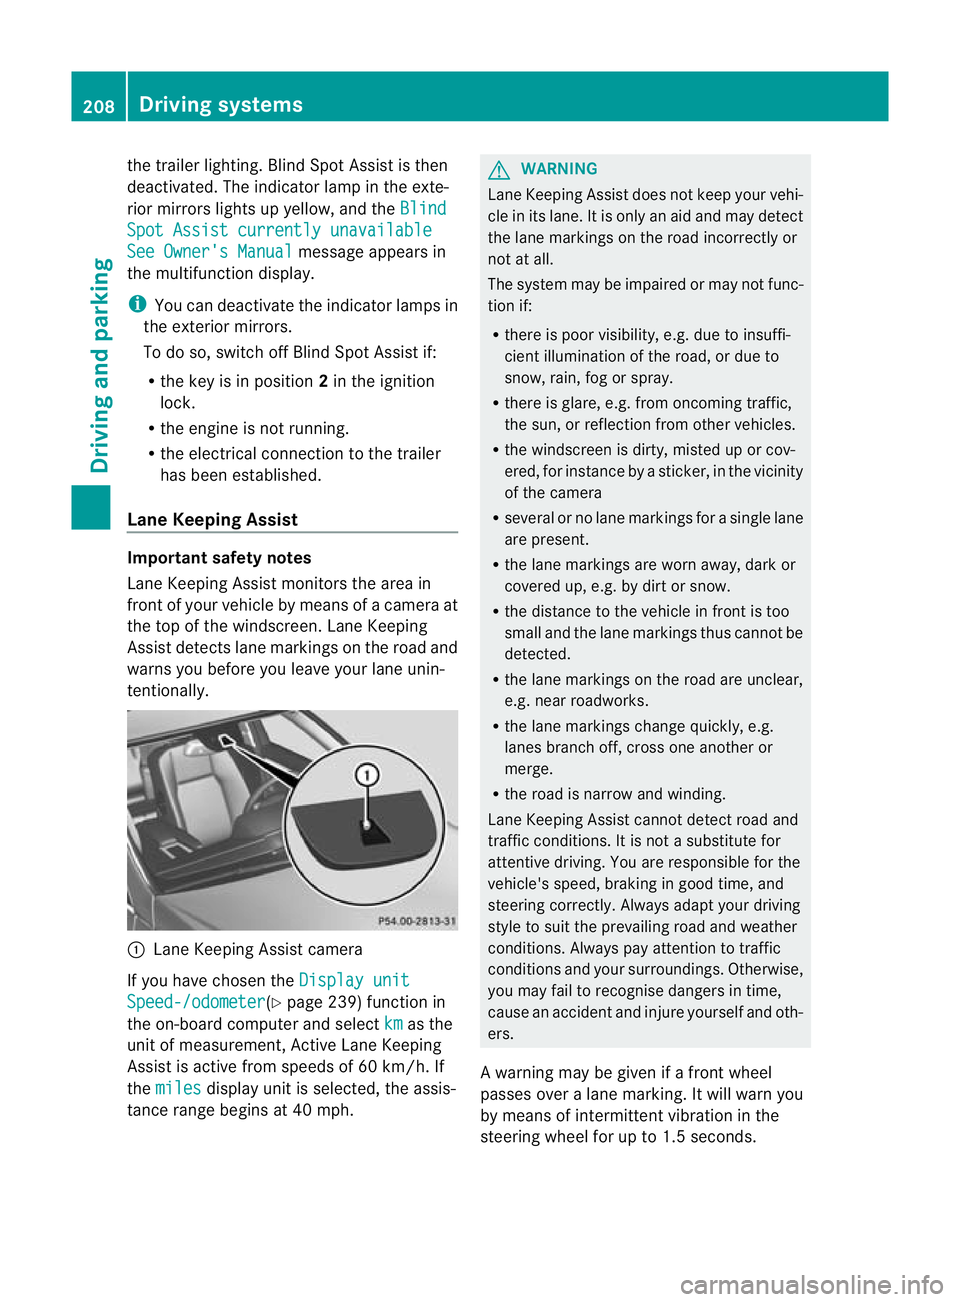
tentionally. :
Lane Keeping Assist camera
If you have chosen the Display unitSpeed-/odometer (Y
page 239) function in
the on-board computer and select km as the
unit of measurement, Active Lane Keeping
Assist is active from speeds of 60 km/h. If
the miles display unit is selected, the assis-
tance range begins at 40 mph. G
WARNING
Lane Keeping Assist does not keep your vehi-
cle in its lane. It is only an aid and may detect
the lane markings on the road incorrectly or
not at all.
The system may be impaire dormay notfunc-
tion if:
R there is poor visibility, e.g .due to insuffi-
cient illumination of the road, or due to
snow, rain, fog or spray.
R there is glare, e.g. from oncoming traffic,
the sun, or reflection from other vehicles.
R the windscree nis dirty, misted up or cov-
ered, for instance by a sticker, in the vicinity
of the camera
R several or no lane markings for a single lane
are present.
R the lane markings are worn away, dark or
covered up, e.g. by dirt or snow.
R the distance to the vehicle in front is too
small and the lane markings thus cannot be
detected.
R the lane markings on the road are unclear,
e.g. near roadworks.
R the lane markings change quickly, e.g.
lanes branch off, cross one another or
merge.
R the road is narrow and winding.
Lane Keeping Assist cannot detect road and
traffic conditions. It is not a substitute for
attentive driving. You are responsible for the
vehicle's speed, braking in good time, and
steering correctly. Always adapty our driving
style to suit the prevailing road and weather
conditions. Always pay attention to traffic
conditions and your surroundings. Otherwise,
you may fail to recognise dangers in time,
cause an accident and injure yourself and oth-
ers.
A warning may be given if a front wheel
passes over a lane marking. It will warn you
by means of intermittent vibration in the
steering wheel for up to 1.5 seconds. 208
Driving systemsDriving and parking
Page 214 of 401
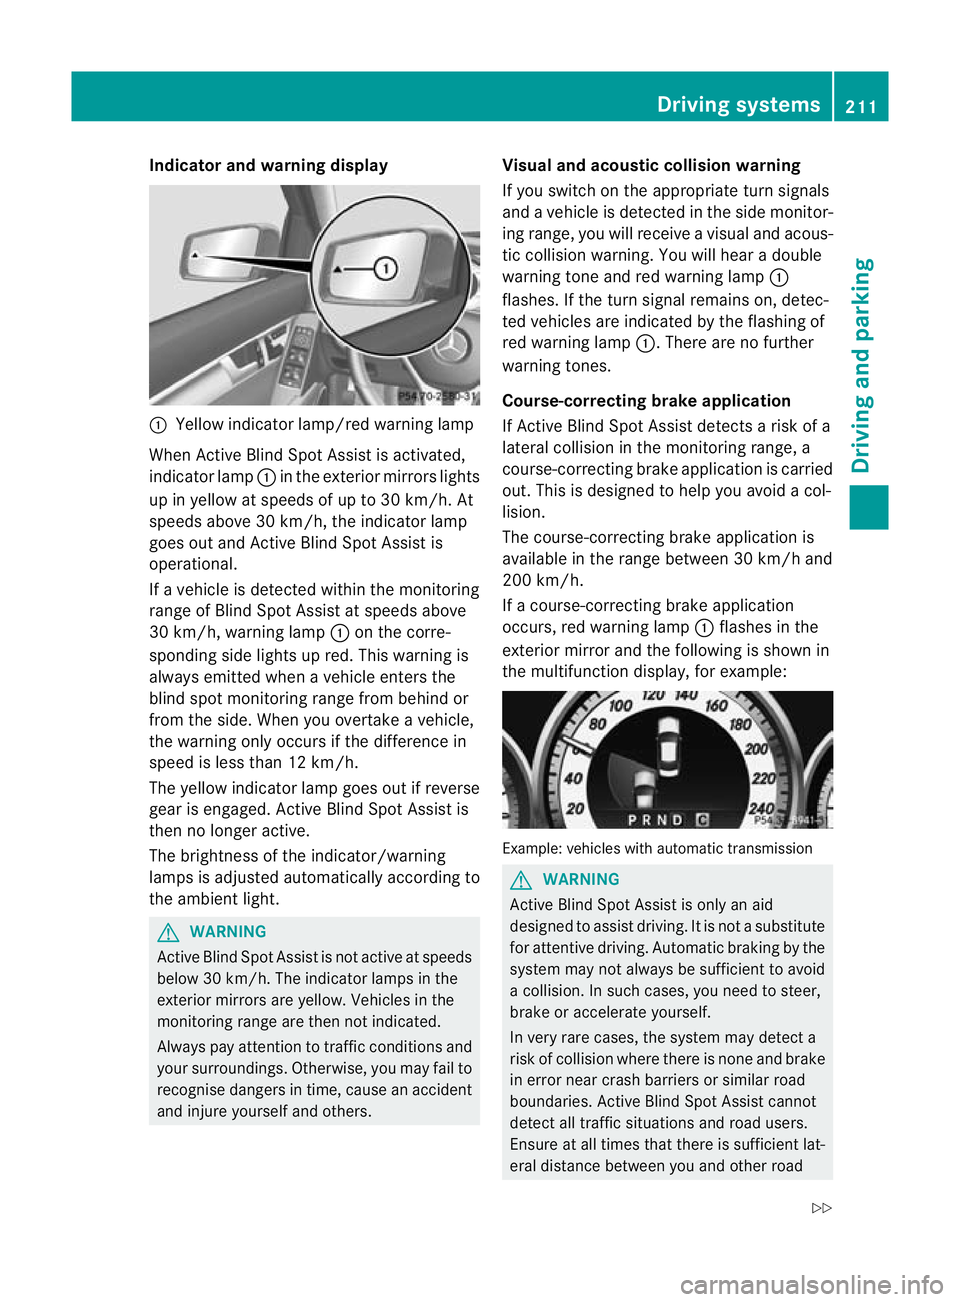
Indicator and warning display
:
Yellow indicator lamp/red warning lamp
When Active Blind Spo tAssist is activated,
indicator lamp :in the exterior mirrors lights
up in yellow at speeds of up to 30 km/h. At
speeds above 30 km/h, the indicator lamp
goes out and Active Blind Spot Assist is
operational.
If a vehicle is detected within the monitoring
range of Blind Spot Assist at speeds above
30 km/h, warning lamp :on the corre-
sponding side lights up red. This warning is
always emitted when a vehicle enters the
blind spot monitoring range from behind or
from the side. When you overtake a vehicle,
the warning only occurs if the difference in
speed is less than 12 km/h.
The yellow indicator lamp goes out if reverse
gear is engaged. Active Blind Spot Assist is
then no longer active.
The brightness of the indicator/warning
lamps is adjusted automatically according to
the ambient light. G
WARNING
Active Blind Spot Assist is not active at speeds
below 30 km/h. The indicator lamps in the
exterior mirrors are yellow. Vehicles in the
monitoring range are then not indicated.
Always pay attention to traffic conditions and
your surroundings. Otherwise, you may fail to
recognise dangers in time, cause an accident
and injure yourselfa nd others. Visual and acoustic collision warning
If you switch on the appropriate turn signals
and a vehicle is detected in the side monitor-
ing range, you will receive a visual and acous-
tic collision warning
.You will hear a double
warning tone and red warning lamp :
flashes. If the turn signal remains on, detec-
ted vehicles are indicated by the flashing of
red warning lamp :. There are no further
warning tones.
Course-correcting brake application
If Active Blind Spot Assist detects a risk of a
lateral collision in the monitoring range, a
course-correcting brake application is carried
out. This is designed to help you avoid a col-
lision.
The course-correcting brake application is
available in the range between 30 km/ha nd
200 km/h.
If a course-correcting brake application
occurs, red warning lamp :flashes in the
exterio rmirro rand the following is shown in
the multifunctio ndisplay, for example: Example: vehicles with automatic transmission
G
WARNING
Active Blind Spot Assist is only an aid
designed to assist driving. It is not a substitute
for attentive driving. Automatic braking by the
system may not always be sufficien tto avoid
a collision. In such cases, you need to steer,
brake or accelerate yourself.
In very rare cases, the system may detect a
risk of collision where there is none and brake
in error near crash barriers or similar road
boundaries. Active Blind Spot Assist cannot
detect all traffic situations and road users.
Ensure at all times that there is sufficient lat-
eral distance between you and other road Driving systems
211Driving and parking
Z
Page 215 of 401
users or obstacles. You can, for example,
countersteer gently or depress the accelera-
to
rp edal at any time to cancel inappropriate
braking action.
You are responsible for the vehicle's speed,
correct steering and for braking in good time.
Always adapt your driving style to suit the
prevailing road and weather conditions.
Always pay attention to traffic conditions and
your surroundings. Otherwise, you may fail to
recognise dangers in time, cause an accident
and injure yourself and others.
Either a very slight course-correcting brake
application, or none at all, may occur if:
R there are vehicles or obstacles, e.g. crash
barriers, on both sides of your vehicle.
R a vehicle approaches too closely on the
side.
R you have adopted a sporty driving style with
high cornering speeds.
R you brake or accelerate decisively.
R a driving safety system intervenes, such as
ESP ®
or PRE-SAFE ®
Brake.
R ESP ®
is deactivated.
R a loss of tyre pressure or a defective tyre is
detected.
Activating Active Blind Spot Assist
X On vehicles without a navigation system,
make sure that the Becker ®
MAP PILOT is
connected; see the separate operating
instructions for Audio 20.
X Make sure that the radar sensor system
(Y page 242) and Active Blind Spot Assist
(Y page 238)a re activated in the on-board
computer.
X Turn the key to position 2in the ignition
lock.
Warning lamps :light up red in the exte-
rior mirrors for approximately 1.5 seconds
and then turn yellow. Trailer towing
If you attach a trailer, make sure that you have
correctly established the electrical connec-
tion. This can be accomplished by checking
the trailer lighting. Active Blind Spot Assist is
then deactivated. The indicator lamp in the
exterior mirrors lights up yellow, and the
Active Blind Spot Assist currently unavailable See Owner's Manual mes-
sage appears in the multifunction display.
Active Lane Keeping Assist Important safety notes
Active Lane Keeping Assist monitors the area
in front of yourv
ehicle by means of a camera
at the top of the windscreen. Active Lane
Keeping Assist detects lane markings on the
road and warns you before you leave your
lane unintentionally. If you do not react to the
warning, a lane-correcting application of the
brakes can bring the vehicle back into the
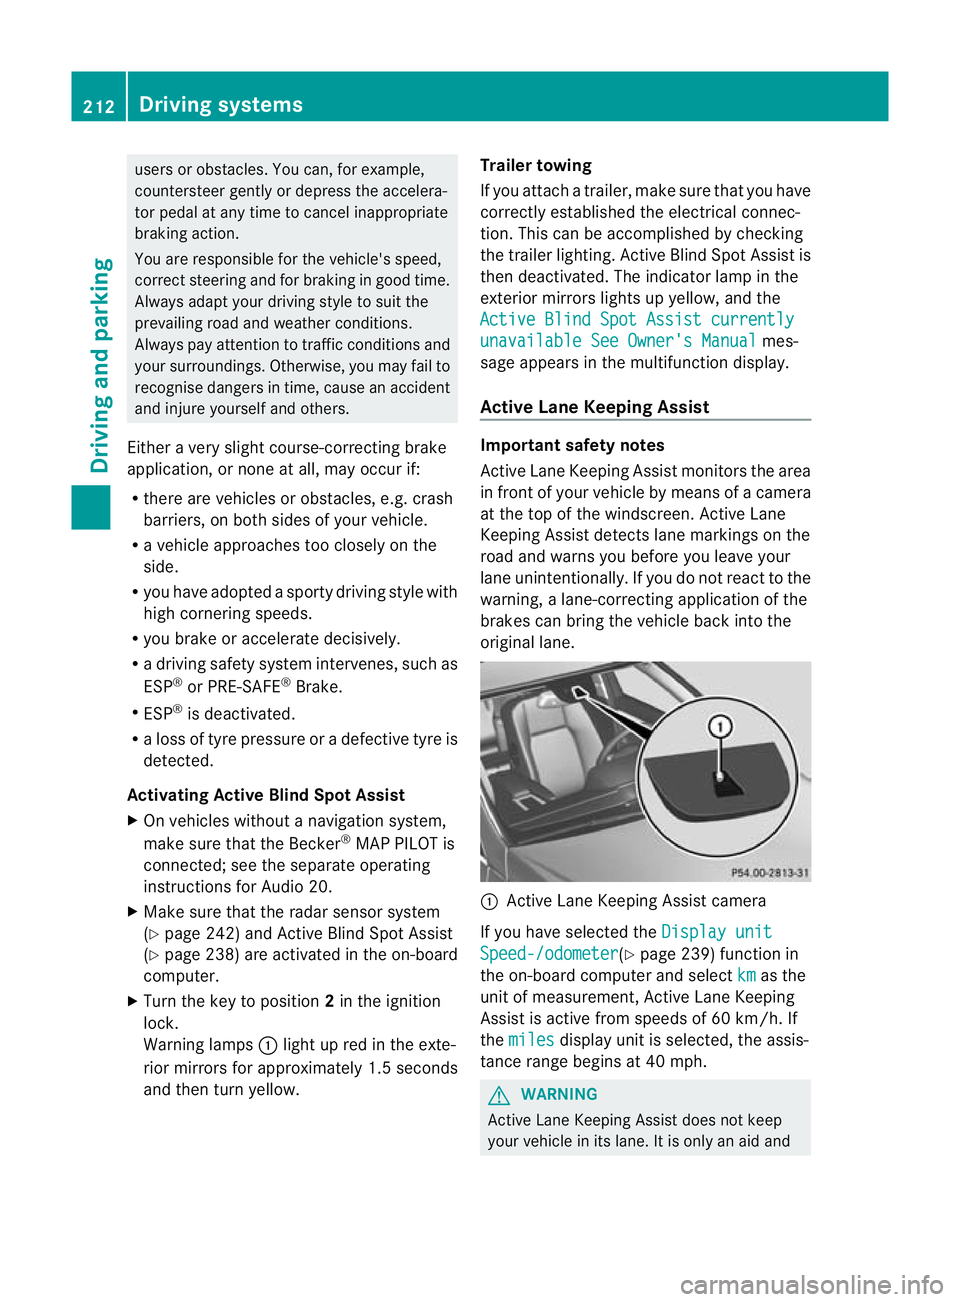
original lane. :
Active Lane Keeping Assist camera
If you have selected the Display unit Speed-/odometer (Y
page 239) function in
the on-board computer and select km as the
unit of measurement, Active Lane Keeping
Assist is active from speeds of 60 km/h. If
the miles display unit is selected, the assis-
tance range begins at 40 mph. G
WARNING
Active Lane Keeping Assist does not keep
your vehicle in its lane. It is only an aid and 212
Driving systemsDriving and parking
Page 226 of 401
G
WARNING
At temperatures just above freezing point, the
street may be icy, especially in wooded areas
or on bridges. If you do not adapt yourd riving
style to the conditions, the vehicle could skid.
For this reason, adapt yourd riving style and
speed to the weather conditions.
Changes in the outside temperature are dis-
played after a short delay. Operating the on-board computer
The on-board computer is activated as soon
as you turn the key to position 1in the ignition
lock. You can use the on-board computer to
call up informatio nrelating to your vehicle
and to make and adjust settings.
i You can have certain functions set at a
qualified specialist workshop, e.g. a
Mercedes-Benz Service Centre.
Example:
R automatic door lock
R speed limit for winter tyres
You can obtain information about this at
any Mercedes-Benz Service Centre.
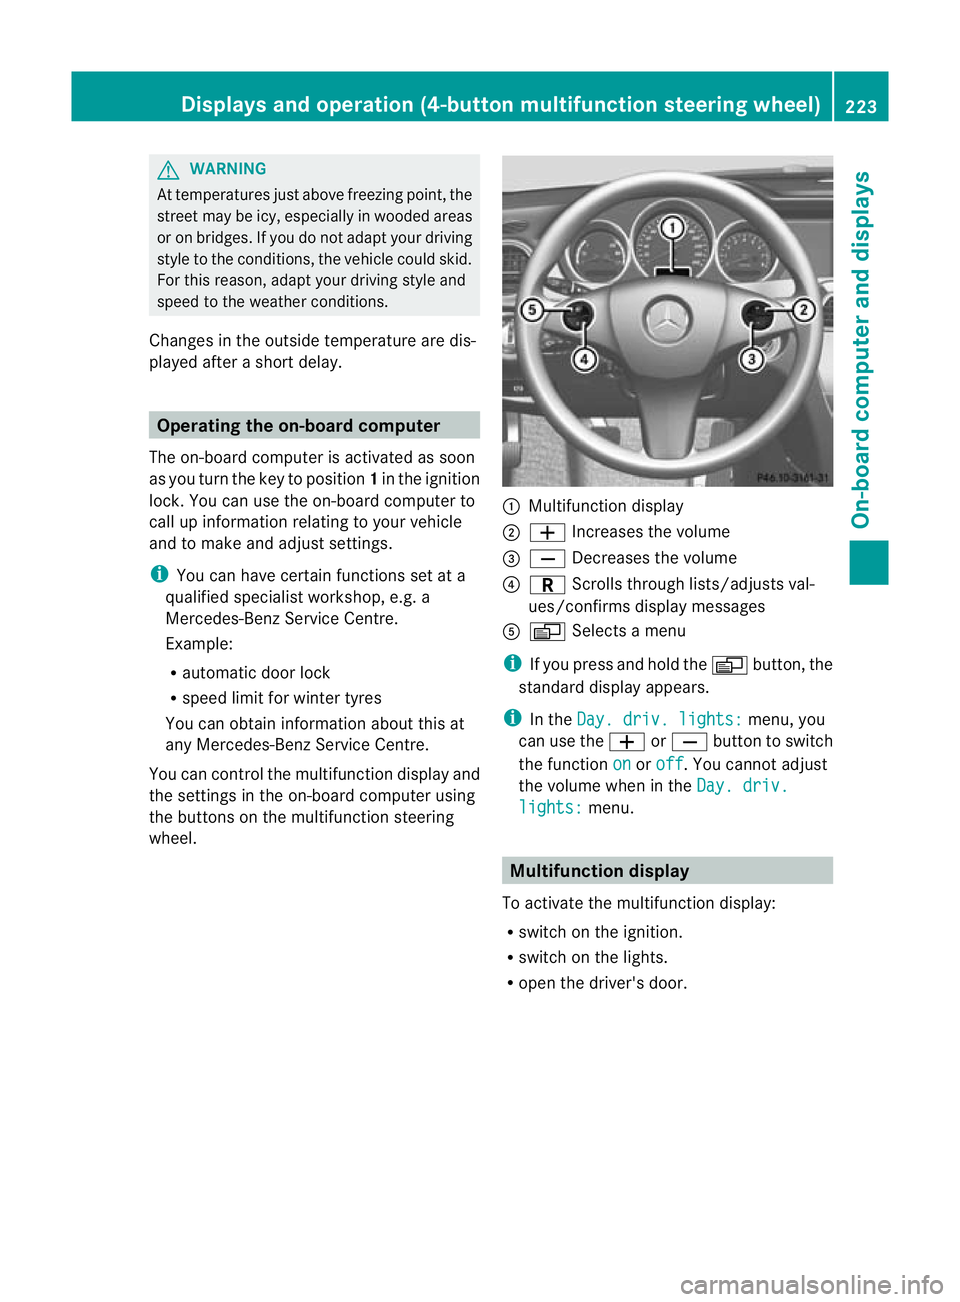
You can control the multifunction display and
the settings in the on-board computer using
the buttons on the multifunction steering
wheel. :
Multifunction display
; W Increases the volume
= X Decreases the volume
? C Scrolls through lists/adjusts val-
ues/confirms display messages
A V Selects a menu
i If you press and hold the Vbutton, the
standard display appears.
i In the Day. driv. lights: menu, you
can use the WorX button to switch
the function on or
off .Y
ou cannot adjust
the volume when in the Day. driv. lights: menu.
Multifunction display
To activate the multifunction display:
R switch on the ignition.
R switch on the lights.
R open the driver's door. Displays and operation (4-button multifunction steering wheel)
223On-board computer and displays Z
Page 228 of 401
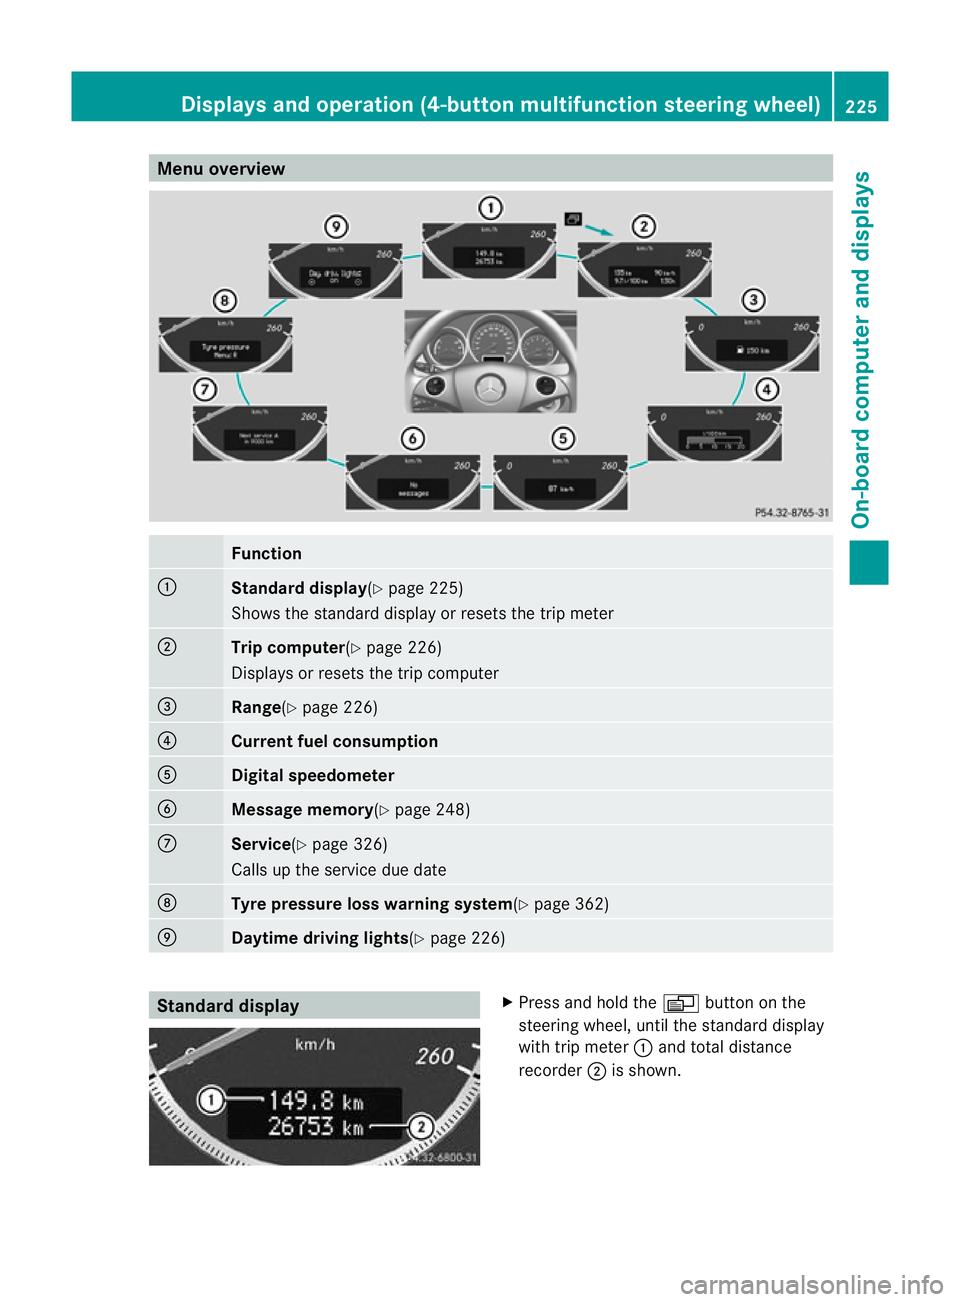
Menu overview
Function
:
Standard display
(Ypage 225)
Shows the standard display or resets the trip meter ;
Trip computer
(Ypage 226)
Displays or resets the trip computer =
Range(Y
page 226) ?
Current fuel consumption
A
Digital speedometer
B
Message memory(Y
page 248)C
Service(Y
page 326)
Calls up the service due date D
Tyre pressure loss warnin
gsystem(Y page 362) E
Daytime driving lights(Y
page 226)Standard display X
Press and hold the Vbutton on the
steering wheel, until the standard display
with trip meter :and total distance
recorder ;is shown. Displays and operation (4-button multifunction steering wheel)
225On-board computer and displays Z
Page 229 of 401
X
To reset the trip meter: press and hold
the V until the standard display
appears.
X Press and hold the Cbutton until the
value has been reset. Trip computer
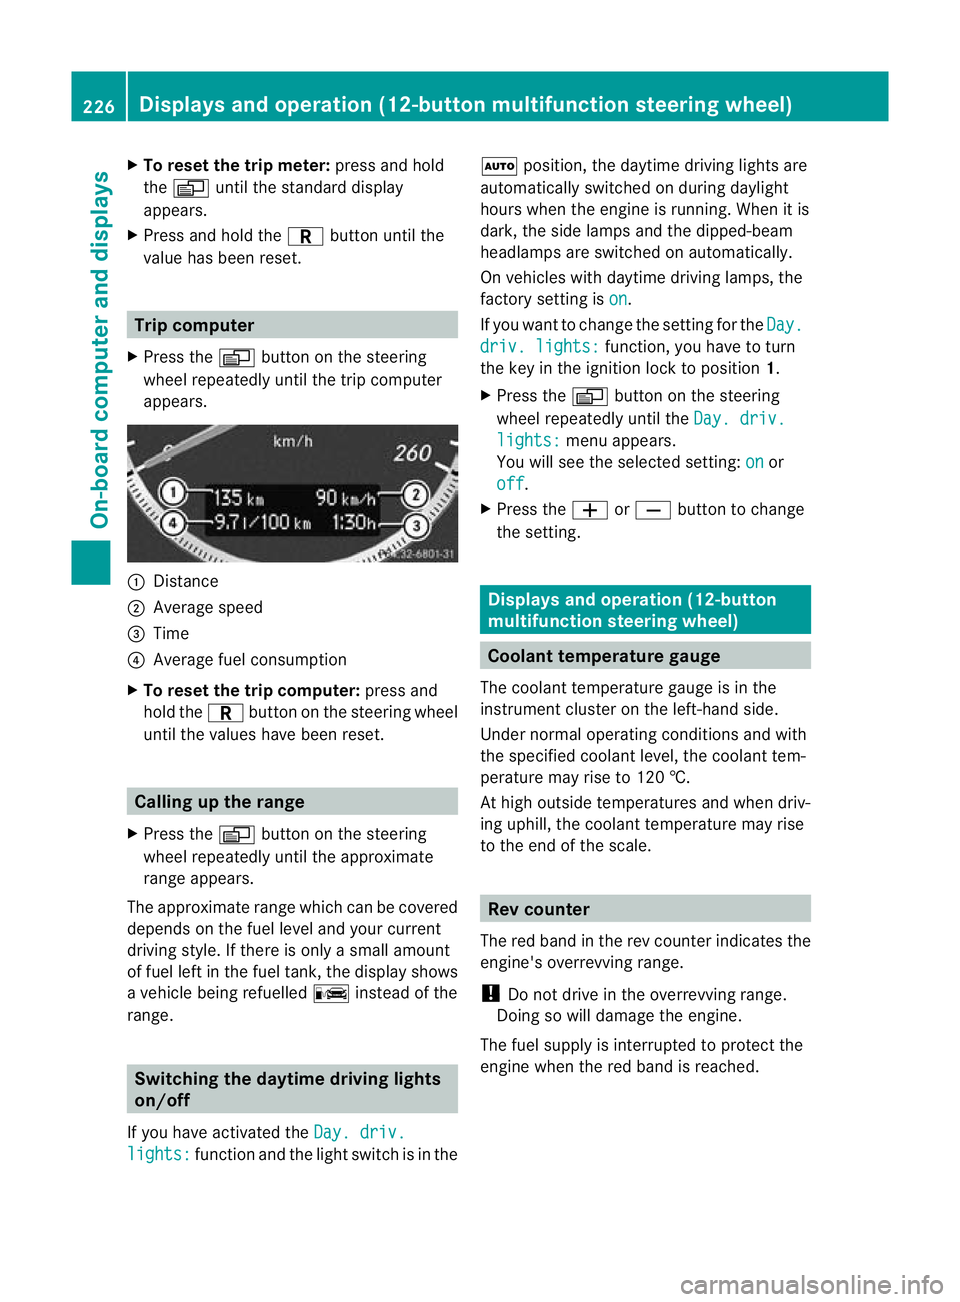
X Press the Vbutton on the steering
wheel repeatedly until the trip computer
appears. :
Distance
; Average speed
= Time
? Average fuel consumption
X To reset the trip computer: press and
hold the Cbutton on the steering wheel
until the values have been reset. Calling up the range
X Press the Vbutton on the steering
wheel repeatedly until the approximate
range appears.
The approximate range which can be covered
depends on the fuel level and your current
driving style .Ifthere is only a small amount
of fuel left in the fuel tank, the display shows
a vehicle being refuelled Cinstead of the
range. Switching the daytime driving lights
on/off
If you have activated the Day. driv.lights: function and the light switch is in the Ã
position, the daytime driving lights are
automatically switched on during daylight
hours when the engine is running. When it is
dark, the side lamps and the dipped-beam
headlamps are switched on automatically.
On vehicles with daytime driving lamps, the
factory setting is on .
If you want to change the setting for the Day. driv. lights: function, you have to turn
the key in the ignition lock to position 1.
X Press the Vbutton on the steering
wheel repeatedly until the Day. driv. lights: menu appears.
You will see the selected setting: on or
off .
X Press the WorX button to change
the setting. Displays and operation (12-button
multifunction steering wheel)
Coolant temperature gauge
The coolant temperature gauge is in the
instrumentc lusteront he left-hand side.
Under normal operating conditions and with
the specified coolant level, the coolant tem-
perature may rise to 120 †.
At high outside temperatures and when driv-
ing uphill, the coolant temperature may rise
to the end of the scale. Rev counter
The red band in the rev counter indicates the
engine's overrevving range.
! Do not drive in the overrevving range.
Doing so will damage the engine.
The fuel supply is interrupted to protect the
engine when the red band is reached. 226
Displays and operation (12-button multifunction steering wheel)On-board computer and displays