2011 MERCEDES-BENZ C-CLASS ESTATE service
[x] Cancel search: servicePage 62 of 401
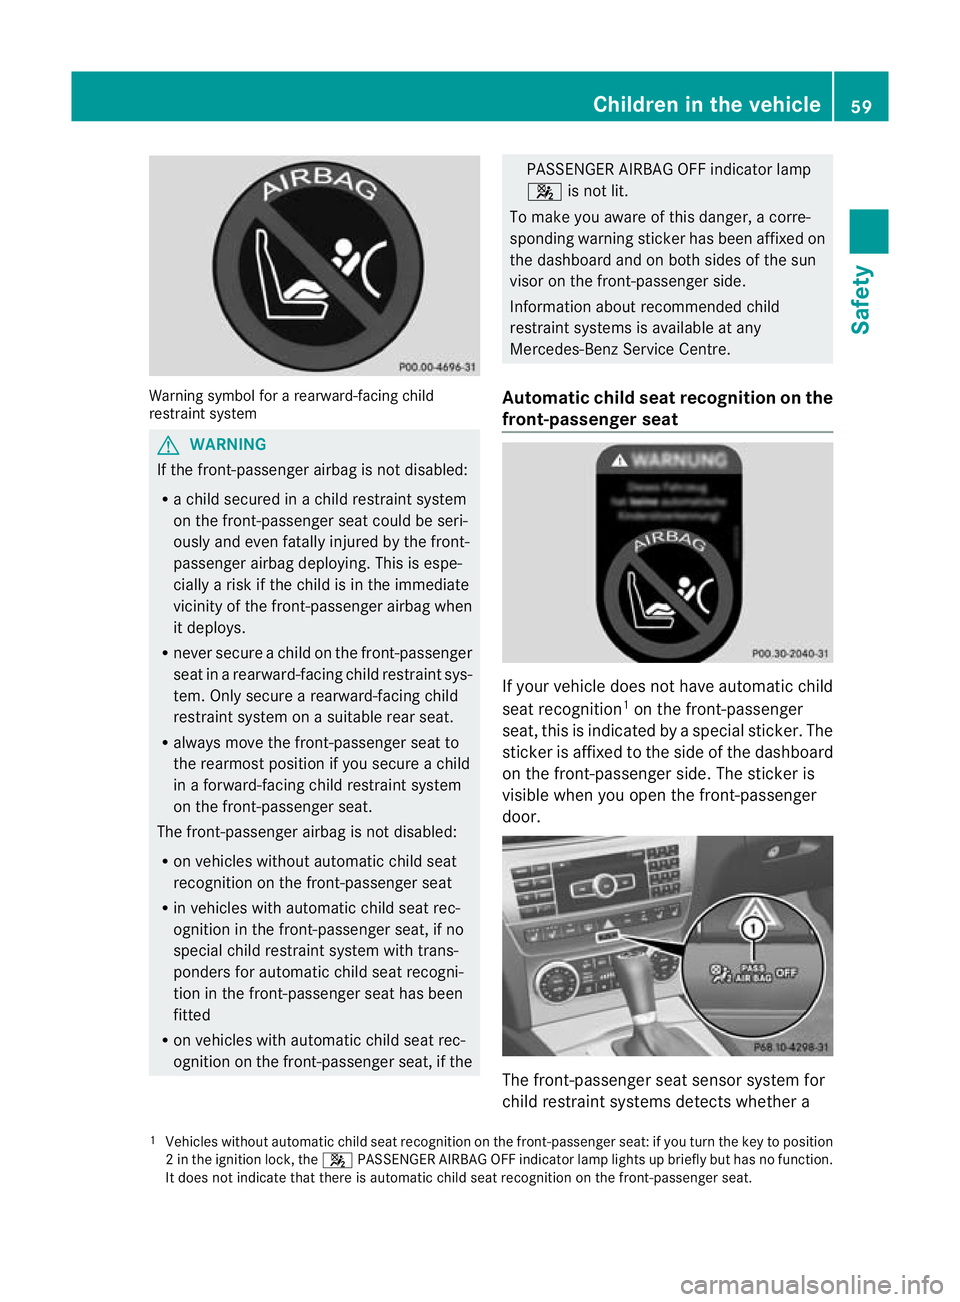
Warning symbol for a rearward-facing child
restraint system G
WARNING
If the front-passenger airbag is not disabled:
R a child secured in a child restraint system
on the front-passenger seat could be seri-
ously and even fatally injured by the front-
passenger airbag deploying. This is espe-
cially a risk if the child is in the immediate
vicinity of the front-passenger airbag when
it deploys.
R never secure a child on the front-passenger
seat in a rearward-facing child restraint sys-
tem. Only secure a rearward-facing child
restraint system on a suitable rear seat.
R always move the front-passenger seat to
the rearmost position if you secure a child
in a forward-facing child restraint system
on the front-passenger seat.
The front-passenger airbag is not disabled:
R on vehicles without automatic child seat
recognition on the front-passenger seat
R in vehicles with automatic child seat rec-
ognition in the front-passenger seat, if no
special child restraint system with trans-
ponders for automatic child seat recogni-
tion in the front-passenger seat has been
fitted
R on vehicles with automatic child seat rec-
ognition on the front-passenger seat, if the PASSENGER AIRBAG OFF indicator lamp
4
is not lit.
To make you aware of this danger, a corre-
sponding warning sticker has been affixed on
the dashboard and on both sides of the sun
visor on the front-passenger side.
Information about recommended child
restraint systems is available at any
Mercedes-Benz Service Centre.
Automatic child seat recognition on the
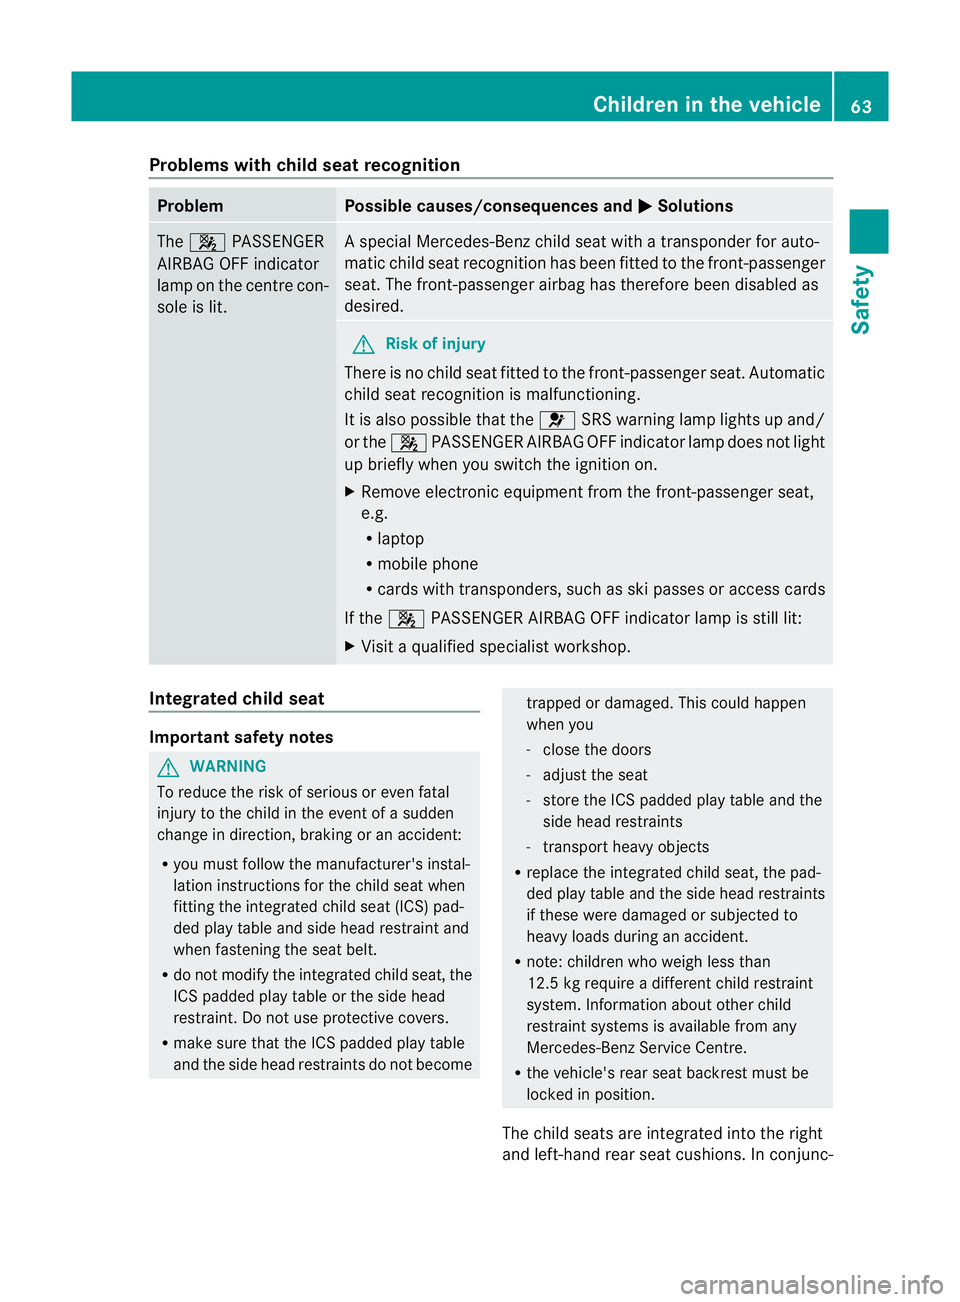
front-passenger seat If your vehicle does not have automatic child
seat recognition
1
on the front-passenger
seat, this is indicated by a special sticker. The
sticker is affixed to the side of the dashboard
on the front-passenger side. The sticker is
visible when you open the front-passenger
door. The front-passenger seat sensor system for
child restraint systems detects whether a
1 Vehicles without automatic child seat recognition on the front-passenger seat: if you turn the key to position
2int he ignition lock, the 4PASSENGER AIRBAG OFF indicator lamp lights up briefly but has no function.
It does not indicate that there is automatic child seat recognition on the front-passenger seat. Children in the vehicle
59Safety Z
Page 66 of 401
Problems with child seat recognition
Problem Possible causes/consequences and
M Solutions
The
4 PASSENGER
AIRBAG OFF indicator
lamp on the centre con-
sole is lit. As
pecial Mercedes-Benz child seat with a transponder for auto-
matic child seat recognition has been fitted to the front-passenger
seat. The front-passenger airbag has therefore been disabled as
desired. G
Risk of injury
There is no child seat fitted to the front-passenger seat. Automatic
child seat recognition is malfunctioning.
It is also possible that the 6SRS warning lamp lights up and/
or the 4PASSENGER AIRBAG OFF indicator lamp does not light
up briefly when you switch the ignition on.
X Remove electronic equipment from the front-passenger seat,
e.g.
R
laptop
R mobile phone
R cards with transponders, such as ski passes or access cards
If the 4 PASSENGER AIRBAG OFF indicator lamp is still lit:
X Visit a qualified specialist workshop. Integrated child seat
Important safety notes
G
WARNING
To reduce the risk of serious or even fatal
injury to the child in the event of a sudden
change in direction, braking or an accident:
R you must follow the manufacturer's instal-
lation instructions for the child seat when
fitting the integrated child seat (ICS) pad-
ded play table and side head restraint and
when fastening the seat belt.
R do not modify the integrated child seat, the
ICS padded play table or the side head
restraint. Do not use protective covers.
R make sure that the ICS padded play table
and the side head restraints do not become trapped or damaged. This could happen
when you
- close the doors
- adjust the seat
- store the ICS padded play table and the
side head restraints
- transport heavy objects
R replace the integrated child seat, the pad-
ded play table and the side head restraints
if these were damaged or subjected to
heavy loads during an accident.
R note: children who weigh less than
12.5 kg require a different child restraint
system. Information about other child
restraint systems is available from any
Mercedes-Benz Service Centre.
R the vehicle's rear seat backrest must be
locked in position.
The child seats are integrated into the right
and left-hand rear seat cushions. In conjunc- Children in the vehicle
63Safety Z
Page 69 of 401
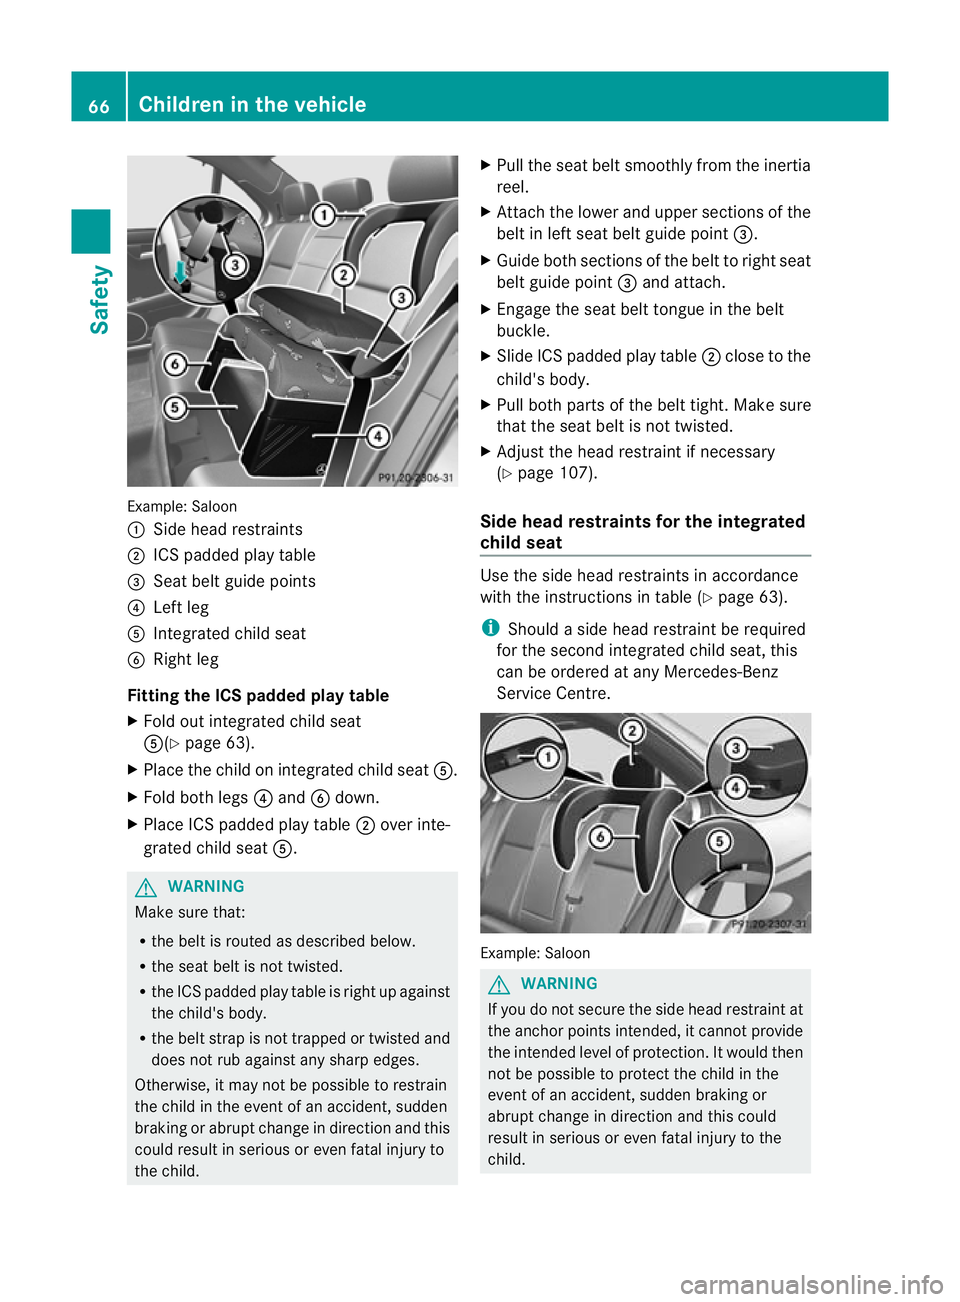
Example: Saloon
: Side head restraints
; ICSp added play table
= Seat belt guide points
? Left leg
A Integrated child seat
B Right leg
Fitting the ICS padded play table
X Fold out integrated child seat
A(Y page 63).
X Place the child on integrated child seat A.
X Fold both legs ?and Bdown.
X Place ICS padded play table ;over inte-
grated child seat A. G
WARNING
Make sure that:
R the belt is routed as described below.
R the seat belt is no ttwisted.
R the ICS padded play table is righ tup against
the child's body.
R the belt strap is not trapped or twisted and
does not rub against any sharp edges.
Otherwise, it may not be possible to restrain
the child in the event of an accident, sudden
braking or abrupt change in direction and this
could result in serious or even fatal injury to
the child. X
Pull the seat belt smoothly from the inertia
reel.
X Attach the lower and upper sections of the
belt in left seat belt guide point =.
X Guide both sections of the belt to right seat
belt guide point =and attach.
X Engage the seat belt tongue in the belt
buckle.
X Slide ICS padded play table ;close to the
child's body.
X Pull both parts of the belt tight .Make sure
that the seat belt is no ttwisted.
X Adjust the head restrain tifnecessary
(Y page 107).
Side head restraints for the integrated
child seat Use the side head restraint
sinaccordance
with the instructions in table (Y page 63).
i Should a side head restraint be required
for the second integrated child seat, this
can be ordered at any Mercedes-Benz
Service Centre. Example
:Saloon G
WARNING
If you do not secure the side head restraint at
the anchor points intended, it cannot provide
the intended level of protection .Itwould then
not be possible to protect the child in the
event of an accident, sudden braking or
abrupt change in direction and this could
result in serious or even fatal injury to the
child. 66
Children in the vehicleSafety
Page 109 of 401
i
The head restraints in the fronts eats are
fitted with the NECK-PRO system
(Y page 52). For this reason, it is not pos-
sible to remove the head restraints from
the front seats.
Vehicles without the through-loading fea-
ture: the head restraints cannot be
removed from the rear compartment seats.
Please contact a Mercedes-Benz Service
Centre for more information.
i Related topics:
R Through-loading feature in the rear
bench seat (Saloon)
R Luggage compartment enlargement
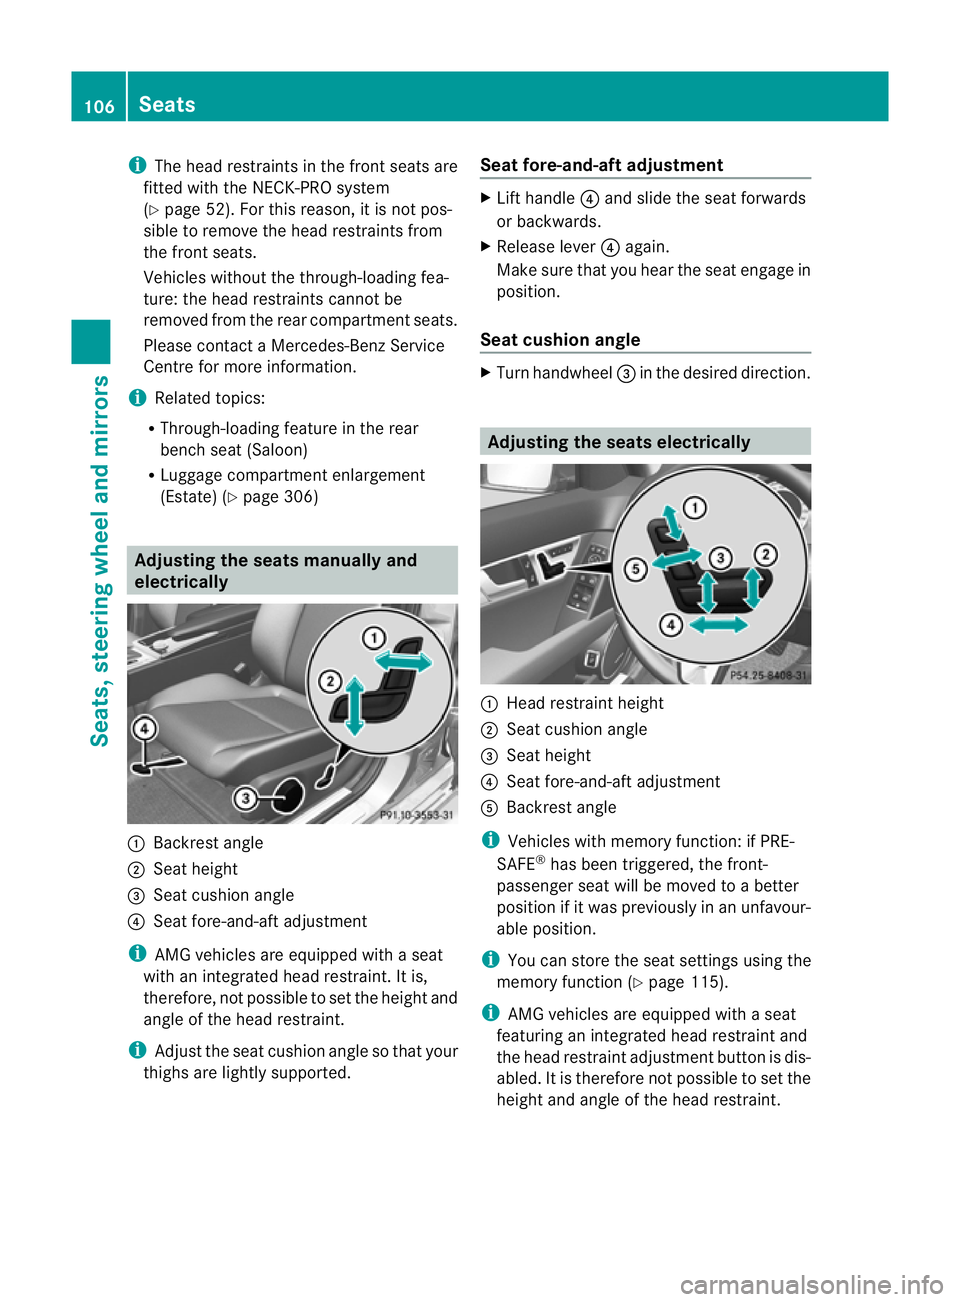
(Estate) (Y page 306) Adjusting the seats manually and
electrically :
Backrest angle
; Seat height
= Seat cushion angle
? Seat fore-and-aft adjustment
i AMG vehicles are equipped with a seat
with an integrated head restraint .Itis,
therefore, not possible to set the height and
angle of the head restraint.
i Adjust the seat cushion angle so that your
thighs are lightly supported. Seat fore-and-aft adjustment X
Lift handle ?and slide the seat forwards
or backwards.
X Release lever ?again.
Make sure that you hear the seat engage in
position.
Seat cushion angle X
Turn handwheel =in the desired direction. Adjusting the seats electrically
:
Head restraint height
; Seat cushion angle
= Seat height
? Seat fore-and-aft adjustment
A Backrest angle
i Vehicles with memory function: if PRE-
SAFE ®
has been triggered, the front-
passenger seat will be moved to a better
position if it was previously in an unfavour-
able position.
i You can store the seat settings using the
memory function (Y page 115).
i AMG vehicles are equipped with a seat
featuring an integrated head restraint and
the head restraint adjustment button is dis-
abled.Iti s therefore not possible to set the
height and angle of the head restraint. 106
SeatsSeats, steering wheel and mirrors
Page 128 of 401
Manual interior lighting control
X
To switch the front interior lighting on/
off: press the cbutton.
X To switch the rear interior lighting on/
off: press the ubutton.
X To switch the reading lamps on/off:
press the pbutton. Crash-responsive emergency lighting
The interior lighting is activated automatically
if the vehicle is involved in an accident.
X To switch off the crash-responsive
emergency lighting: press the hazard
warning lamp button.
or
X Lock and then unlock the vehicle using the
key. Changing bulbs
Important safety notes
Xenon bulbs If yourv
ehicle is equipped with xenon bulbs,
you can recognise this by the following: the
cone of light from the xenon bulbs moves
from the top to the bottom and back again
when you start the engine. For this to be
observed, the lights must be switched on
before starting the engine. G
DANGER
Xenon bulbs carry a high voltage. You could
get an electric shock and be seriously or even
fatally injured if you touch the electric con-
tacts on xenon bulbs. Therefore, never
remove the cover from xenon bulbs.
Do not change xenon bulbs yourself, but have
them replaced at a qualified specialist work-
shop which has the necessary specialist
knowledge and tools to carry out the work
required. Mercedes-Benz recommends that you use a
Mercedes-Benz Service Centre for this pur-
pose. In particular, work relevant to safety or
on safety-related systems must be carried out
at a qualified specialist workshop.
Bulbs and lamps are an important aspect of
vehicle safety. You must therefore make sure
that these function correctly at all times.
Have the headlamp setting checked regularly.
Other bulbs There are bulbs other than the xenon bulbs
that you cannot replace. Replace only the
bulbs listed (Y
page 126). Have the bulbs that
you cannot replace yourself changed at a
qualified specialist workshop.
Mercedes-Benzr ecommends that you use a
Mercedes-Benz Service Centre for this pur-
pose. In particular, work relevant to safety or
on safety-related systems must be carried out
at a qualified specialist workshop.
If you require assistance changing bulbs, con-
sult a qualified specialist workshop.
Do not touch the glass tube of new bulbs with
your bare hands. Even minor contamination
can burn into the glass surface and reduce
the service life of the bulbs. Always use a lint-
free cloth or only touch the base of the bulb
when fitting.
Only use bulbs of the correct type.
If the new bulb still does not light up, consult
a qualified specialist workshop.
Bulbs and lamps are an important aspect of
vehicle safety. You must therefore make sure
that these function correctly at all times.
Have the headlamp setting checked regularly. G
WARNING
Bulbs and lights can become very hot. For this
reason, allow them to cool down before
changing them. Otherwise, you could burn
yourself when you touch them.
Keep bulbs out of the reach of children .Oth-
erwise, they could damage them, for example,
and injure themselves. Changing bulbs
125Lights andwindscreen wipers
Z
Page 134 of 401
!
Never open the bonnet if a windscreen
wiper arm has been folded away from the
windscreen.
Never fold a windscreen wiper arm without
a wiper blade back onto the windscreen/
rear window.
Hold the windscreen wiper arm firmly when
you change the wiper blade. If you release
the windscreen wiper arm without a wiper
blade and it falls onto the windscreen, the
windscreen may be damaged by the force
of the impact.
Mercedes-Benz recommends that you have
the wiper blades replaced by aqualified
specialist workshop, e.g. at a Mercedes-
Benz Service Centre.
Replacing the windscreen wiper blades Removing the wiper blades
X
Remove the key from the ignition lock or
tur nthe key to position 0(KEYLESS-GO).
X Fold the wiper arm away from the wind-
screen until it engages.
X Set the wiper blade at right angles to the
wiper arm. X
Remove the wiper blade from the retaining
pin on the wiper arm in the direction of the
arrow.
Fitting the wiper blades
X Push the new wiper blade onto the retain-
ing pin on the wiper arm in the opposite
direction to the arrow. Make sure that the wiper blade slides fully
onto the retaining pin on the wiper arm.
X Turn the wiper blade parallel to the wiper
arm.
X Fold the wiper arm back onto the wind-
screen.
Replacing the rear window wiper blade G
WARNING
The wiper arm could be set in motion and
injure you if the windscreen wipers are
switched on.
Remove the key from the ignition lock before
replacing the wiper blade.
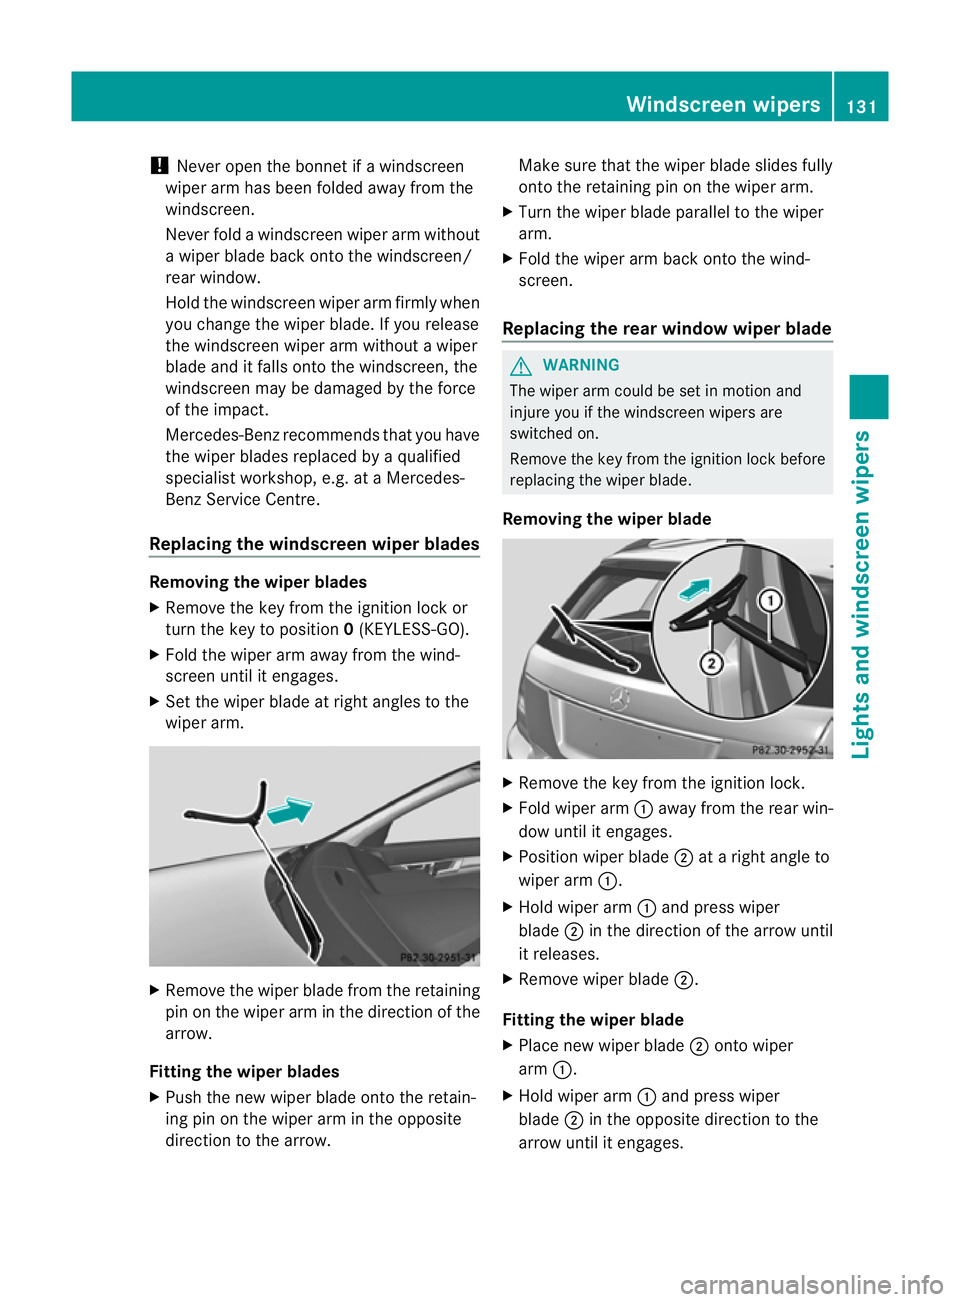
Removing the wiper blade X
Remove the key from the ignition lock.
X Fold wiper arm :away from the rear win-
dow until it engages.
X Position wiper blade ;at a right angle to
wiper arm :.
X Hold wiper arm :and press wiper
blade ;in the direction of the arrow until
it releases.
X Remove wiper blade ;.
Fitting the wiper blade
X Place new wiper blade ;onto wiper
arm :.
X Hold wiper arm :and press wiper
blade ;in the opposite direction to the
arrow until it engages. Windscreen wipers
131Lights and windscreen wipers Z
Page 137 of 401
Useful information
i This Owner's Manual describes all models
and all standard and optional equipment
available to your vehicle at the time of pub-
lication of the Owner's Manual. Country-
specific deviations are possible. Please
note that your vehicle may not be equipped
with all features described. This also
applies to safety-relevan tsystems and
functions.
i Please read the information on qualified
specialist workshops (Y page 28).Overview of climate control systems
Important safety notes
G
WARNING
Observe the settings recommended on the
following pages. Otherwise, th ewindows
could mist up. This may obstruct your view of
the traffic situation and, as a result, you may
cause an accident.
THERMATIC/THERMOTRONIC automatic cli-
mate control controls the temperature and
the humidity of the vehicle interior and filters
out undesirable substances fro mthe air.
THERMATIC/THERMOTRONIC automatic cli-
mate control is only operational when the
engine is running 12
.O ptimum operation is
only achieved when you drive with the side
windows and sliding sunroof/panorama slid-
ing sunroof closed.
i Ventilate the vehicle for a brief period
during warm weather, e.g. using the con-
venience opening feature (Y page 97). This
will speed up the cooling process and the
desired vehicle interior temperature will be
reached more quickly.
i The integrated filter can filter out most
particles of dust and completely filters out pollen.
Aclogged filter reduces the amount
of air supplied to the vehicle interior .For
this reason, you should always observe the
interval for replacing the filter, which is
specified in the Service Booklet .As it
depends on environmental conditions, e.g.
heavy air pollution, the interval may be
shorter than stated in the Service Booklet.
i It is possible that the residual heat func-
tion may be activated automatically an hour
after the key is removed. The vehicle is then
ventilated for 30 minutes to dry the air-
conditioning system.
12 THERMOTRONIC automatic climate control: the residual heat function can only be activated/deactivated
when the ignition is switched off. 134
Overview of climate control systemsClimate control
Page 146 of 401
Auxiliary heating
Important safety notes G
WARNING
Exhaust fumes are produced when the auxili-
ary heating is in operation .Inhaling these
exhaus tfumes can be poisonous. You should
therefore switch off the auxiliary heating in
confined spaces without an extraction sys-
tem, e.g .agarage. G
WARNING
When operating the auxiliary heating, parts of
the vehicle may become very hot, and highly
inflammable material such as fuels could be
ignited. Operating the auxiliary heating is thus
prohibited at filling station sorwhen your vehi-
cle is being refuelled. You must therefore
switch off the auxiliary heating at filling sta-
tions.
! Operating the auxiliary heating/ventila-
tion draws on the vehicle battery. After you
have heated or ventilated the vehicle a
maximum of two times, drive for a longer
distance.
i Switch on the auxiliary heating regularly,
e.g. for about ten minutes every month.
The auxiliary heating heats the air in the vehi-
cle interior to the set temperature without
using the heat of the running engine. The aux-
iliary heating is operated directly using the
vehicle's fuel. For this reason, the tank con-
tent must be at least at reserve fuel level to
ensure that the auxiliary heating functions.
The auxiliary heating/ventilation automati-
cally adjusts to changes in temperature and
weather conditions. For this reason, the aux-
iliary heating could switch from ventilation
mode to heating mode or from heating mode
to ventilation mode.
The auxiliary heating switches off automati-
cally after 50 minutes. This time limit can be
altered. To do this, visit a qualified specialist
workshop, e.g. a Mercedes-Ben zService
Centre. You cannot use the auxiliary ventilation to
cool the vehicle interior to a temperature
lower than the outside temperature.
Before switching on X
Turn the key to position 2in the ignition
lock.
X Set the temperature.
The auxiliary heating/ventilation can be acti-
vated even when the climate control is being
controlled manually. Optimum comfort can
be attained when the system is set to auto-
matic mode. Set the temperature to 22 †.
The auxiliary heating/ventilation can be acti-
vated or deactivated using the remote control
or the button on the centre console.
The on-board computer can be used to spec-
ify up to three departure times, one of which
may be preselected (Y page 242).
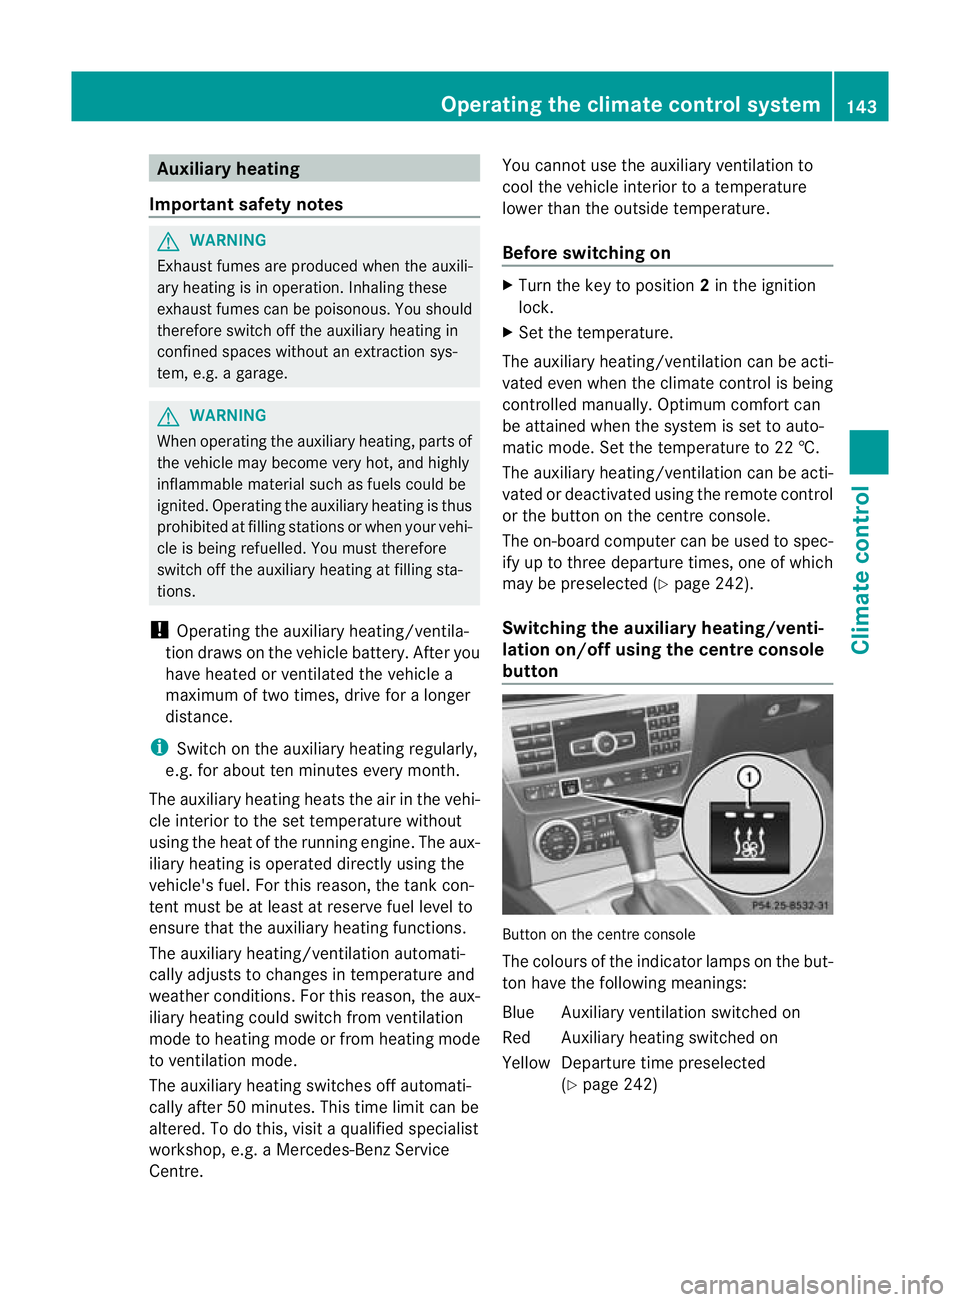
Switching the auxiliar yheating/venti-
lation on/off using the centre console
button Button on the centre console
The colours of the indicator lamps on the but-
to
nh ave the following meanings:
Blue Auxiliary ventilatio nswitched on
Red Auxiliary heating switched on
Yellow Departure time preselected (Ypage 242) Operating the climate control system
143Climate control Z