2011 MERCEDES-BENZ C-CLASS ESTATE ECO mode
[x] Cancel search: ECO modePage 125 of 401
The cornering light function improves the illu-
mination of the road over a wide angle in the
direction you are turning, enabling better vis-
ibility in tight bends, for example. It can only
be activated when the dipped-beam head-
lamps are switched on.
Active:
R if you are driving at speeds below
40 km/h, the cornering light function is
activated either by the turn signal or by the
steering wheel being turned.
R if you are driving at speeds between
40 km/h and 70 km/h ,the cornering light
function is activated by the steering wheel
being turned.
Not active: if you are driving at speeds above
40 km/h or switch off the turn signal or turn
the steering wheel to the straight-ahead posi-
tion.
The cornering light function may remain lit for
a short time, but is automatically switched off
after no more than three minutes.
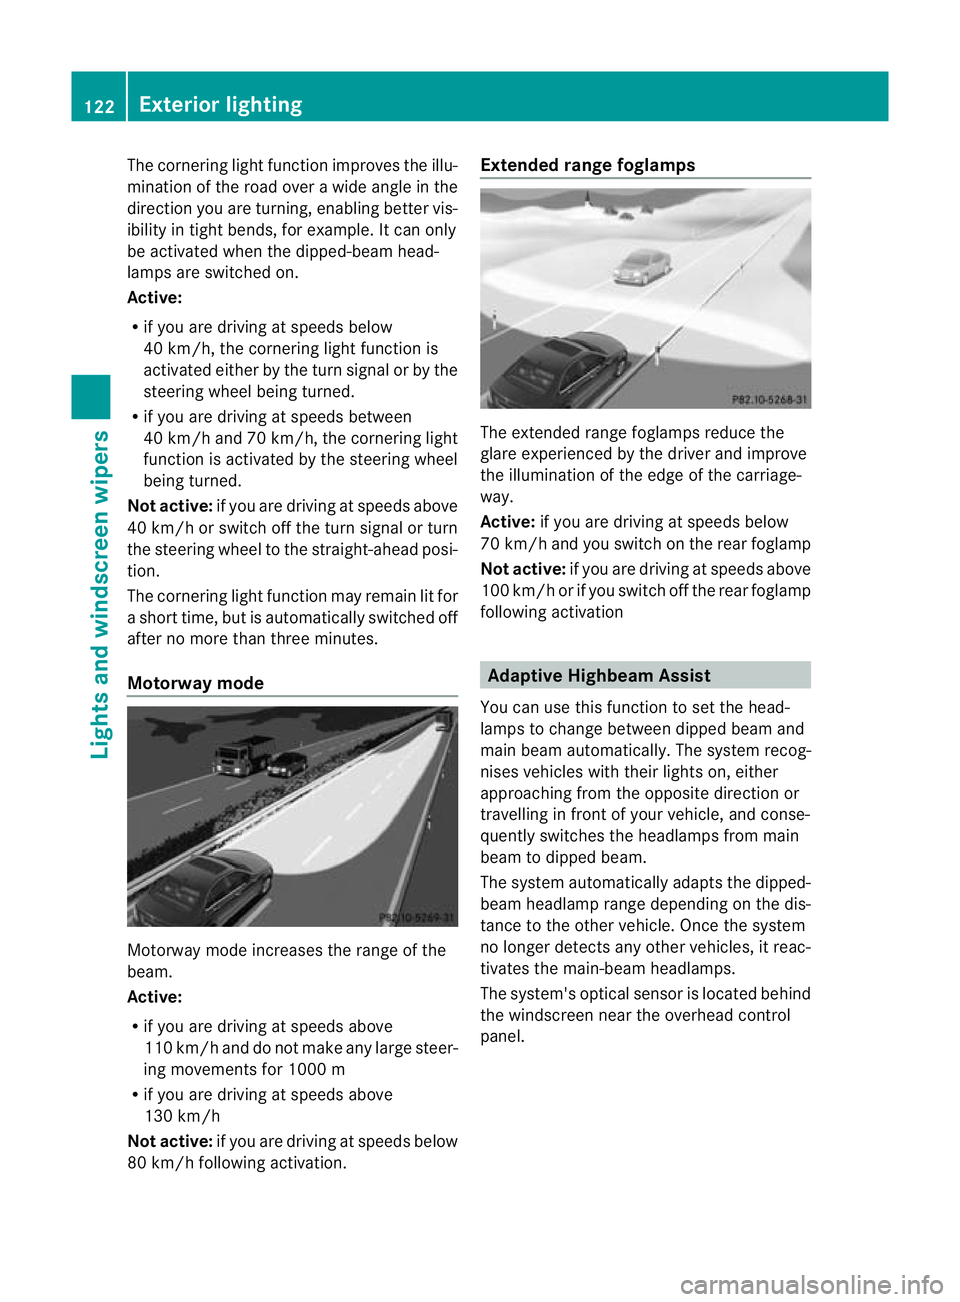
Motorway mode Motorway mode increases the range of the
beam.
Active:
R
if you are driving at speeds above
110 km/h and do not make any large steer-
ing movements for 1000 m
R if you are driving at speeds above
130 km/h
Not active: if you are driving at speeds below
80 km/h following activation. Extended range foglamps
The extended range foglamps reduce the
glare experienced by the driver and improve
the illumination of the edge of the carriage-
way.
Active:
if you are driving at speeds below
70 km/h and you switch on the rear foglamp
Not active: if you are driving at speeds above
100 km/h or if you switch off the rear foglamp
following activation Adaptive Highbeam Assist
You can use this function to set the head-
lamps to change between dipped beam and
main beam automatically .The system recog-
nises vehicles with their lights on, either
approaching from the opposite direction or
travelling in front of your vehicle, and conse-
quently switches the headlamps from main
beam to dipped beam.
The system automatically adapts the dipped-
beam headlamp range depending on the dis-
tance to the other vehicle. Once the system
no longer detects any other vehicles, it reac-
tivates the main-beam headlamps.
The system's optical sensor is located behind
the windscreen near the overhead control
panel. 122
Exterior lightingLights and windscreen wipers
Page 137 of 401
Useful information
i This Owner's Manual describes all models
and all standard and optional equipment
available to your vehicle at the time of pub-
lication of the Owner's Manual. Country-
specific deviations are possible. Please
note that your vehicle may not be equipped
with all features described. This also
applies to safety-relevan tsystems and
functions.
i Please read the information on qualified
specialist workshops (Y page 28).Overview of climate control systems
Important safety notes
G
WARNING
Observe the settings recommended on the
following pages. Otherwise, th ewindows
could mist up. This may obstruct your view of
the traffic situation and, as a result, you may
cause an accident.
THERMATIC/THERMOTRONIC automatic cli-
mate control controls the temperature and
the humidity of the vehicle interior and filters
out undesirable substances fro mthe air.
THERMATIC/THERMOTRONIC automatic cli-
mate control is only operational when the
engine is running 12
.O ptimum operation is
only achieved when you drive with the side
windows and sliding sunroof/panorama slid-
ing sunroof closed.
i Ventilate the vehicle for a brief period
during warm weather, e.g. using the con-
venience opening feature (Y page 97). This
will speed up the cooling process and the
desired vehicle interior temperature will be
reached more quickly.
i The integrated filter can filter out most
particles of dust and completely filters out pollen.
Aclogged filter reduces the amount
of air supplied to the vehicle interior .For
this reason, you should always observe the
interval for replacing the filter, which is
specified in the Service Booklet .As it
depends on environmental conditions, e.g.
heavy air pollution, the interval may be
shorter than stated in the Service Booklet.
i It is possible that the residual heat func-
tion may be activated automatically an hour
after the key is removed. The vehicle is then
ventilated for 30 minutes to dry the air-
conditioning system.
12 THERMOTRONIC automatic climate control: the residual heat function can only be activated/deactivated
when the ignition is switched off. 134
Overview of climate control systemsClimate control
Page 138 of 401
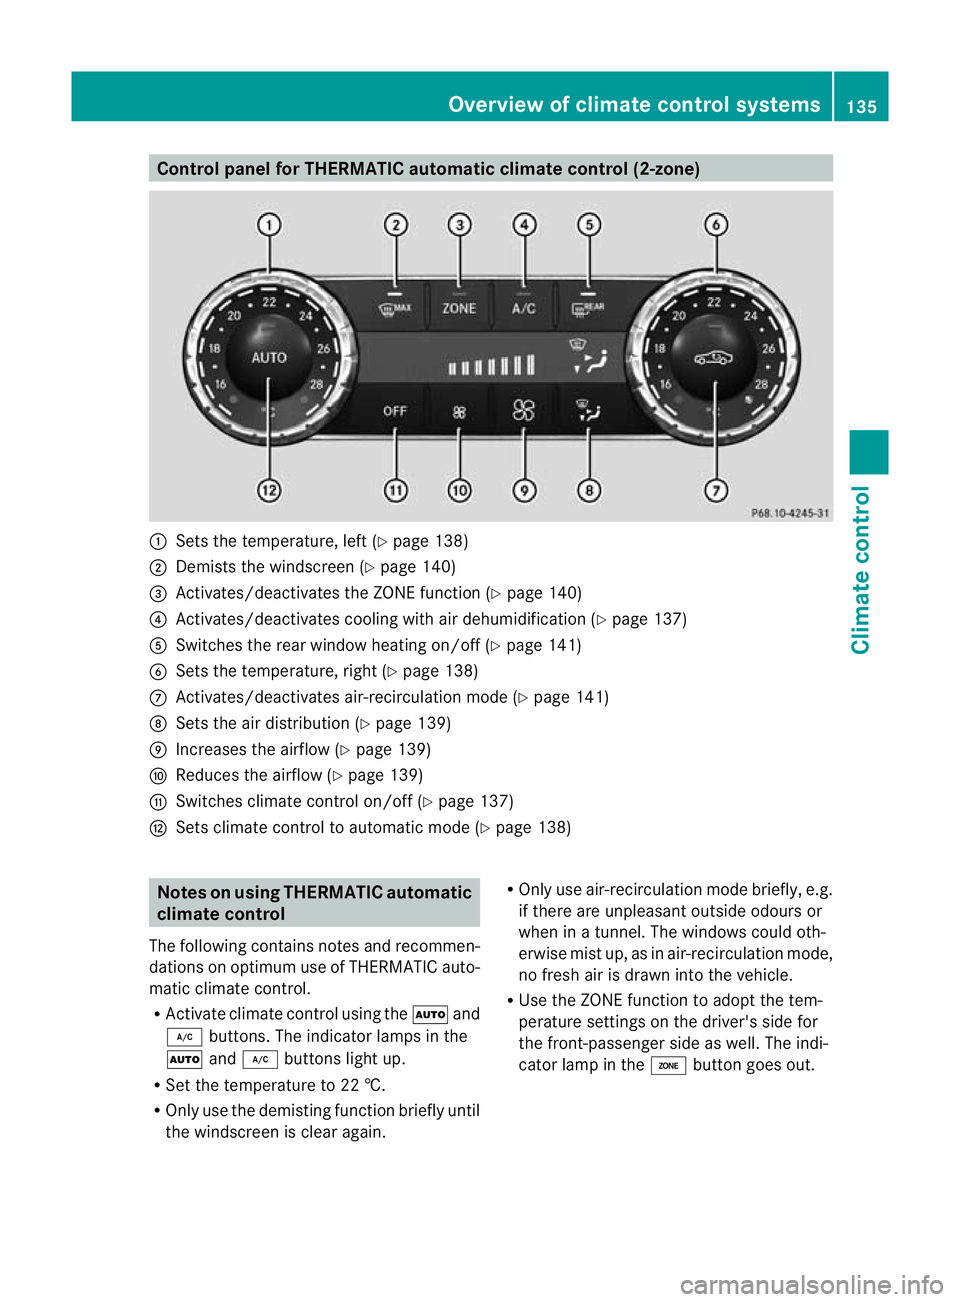
Control panel for THERMATIC automatic climate control (2-zone)
:
Sets the temperature, left (Y page 138)
; Demists the windscreen (Y page 140)
= Activates/deactivates the ZONE function (Y page 140)
? Activates/deactivates coolin gwith air dehumidification ( Ypage 137)
A Switches the rear window heating on/off (Y page 141)
B Sets the temperature, right (Y page 138)
C Activates/deactivates air-recirculation mode (Y page 141)
D Sets the air distribution (Y page 139)
E Increases the airflow (Y page 139)
F Reduces the airflow ( Ypage 139)
G Switches climate control on/off (Y page 137)
H Sets climate control to automatic mode (Y page 138)Notes on using THERMATIC automatic
climate control
The following contains notes and recommen-
dations on optimum use of THERMATIC auto-
matic climate control.
R Activate climate control using the Ãand
¿ buttons .The indicator lamps in the
à and¿ buttons light up.
R Set the temperature to 22 †.
R Only use the demisting function briefly until
the windscreen is clear again. R
Only use air-recirculation mode briefly, e.g.
if there are unpleasant outside odours or
when in a tunnel. The windows could oth-
erwise mist up, as in air-recirculation mode,
no fresh air is drawn into the vehicle.
R Use the ZONE function to adopt the tem-
perature settings on the driver's side for
the front-passenger side as well. The indi-
cator lamp in the ábutton goes out. Overview of climate control systems
135Climate control Z
Page 140 of 401
Notes on using THERMOTRONIC auto-
matic climate control
Below, you can find a numbe rofnotes and
recommendations to help you use
THERMOTRONIC automatic climate control
optimally.
R Switch on climate control using the Ã
and ¿ buttons. The indicator lamps in
the à and¿ buttons light up.
R In automatic mode, you can also use the
ñ button to set a climate mode
(FOCUS/MEDIUM/DIFFUSE). The
MEDIUM level is recommended.
R Set the temperature to 22 †.
R Only use the demisting function briefly until
the windscreen is clear again.
R Only use air-recirculation mode briefly, e.g.
if there are unpleasant outside odours or
when in a tunnel. The windows could oth-
erwise mist up, as in air-recirculation mode,
no fresh air is drawn into the vehicle.
R Use the ZONE function to adopt the tem-
perature settings on the driver's side for
the front-passenger side and the rear com-
partmen tas well.T he indicator lamp in the
á button goes out.
R Use the residual heat function if you want
to heat or ventilate the vehicle interior
when the ignition is switched off. The resid-
ual heat function can only be activated or
deactivated with the ignition switched off. Operating the climate control system
Switching climate control on/off
Important information i
When climate control is switched off, the
air supply and air circulation are also
switched off. Only select this setting
briefly. Otherwise, the windows may mist
up.
i Switch on climate control primarily using
the à button (Y page 138). Activating/deactivating X
Turn the key to position 2in the ignition
lock.
X To switch on: press theÃbutton.
The indicator lamp in the Ãbutton lights
up. Airflow and air distribution are set to
automatic mode.
or
X Press button ^.
The indicator lamp in the ^button goes
out. The previously selected settings come
into effect again.
X To switch off: press the^button.
The indicator lamp in the ^button lights
up. Activating/deactivating the cooling
with air dehumidification function
Important information The cooling with air dehumidification function
is only available when the engine is running.
The air inside the vehicle is cooled and dehu-
midified according to the temperature selec-
ted.
G
WARNING
If the "cooling with air dehumidification" func-
tion is deactivated, the air inside the vehicle
will not be cooled (during warm weather) or
dehumidified. The windows could mist up
more quickly. This may prevent you from
observing the traffic conditions, thereby caus-
ing an accident.
Condensation may drip from the underside of
the vehicle when THERMOTRONIC is in cool-
ing mode. This is normal and not a sign that
there is a malfunction.
i The cooling with air dehumidification
function uses refrigerant R134a. This cool-
ant does not contain chlorofluorocarbons,
and therefore does not damage the ozone
layer. Operating the climate control system
137Climate control Z
Page 145 of 401
i
Air-recirculatio nmode deactivates auto-
matically:
R after approximately five minutes at out-
side temperatures below approximately
5 †
R after approximately five minutes if cool-
ing with air dehumidification is deactiva-
ted
R after approximately 30 minutes at out-
side temperatures above approximately
5 † Convenience opening/closing using
the air-recirculation button
G
WARNING
Make sure that nobody can become trapped
between the side window and the door frame
as the side windows are opened and closed.
Make sure that all object sand body parts are
clear of the side windows when they are being
opened or closed .You or the objects could be
drawn in or become trapped between the side
window and the door frame as the window
moves. If there is arisk of entrapment, oper-
ate the Wswitch to move the side window
in the opposite direction.
Make sure that nobody can become trapped
as the sliding sunroof/panorama sliding sun-
roof is opened and closed. If there is a risk of
entrapment, operate the 3switch to move
the sliding sunroof/panorama sliding sunroof
in the opposite direction.
X Convenience closing feature: press and
hold the gbutton until the side win-
dows and the sliding sunroof/panorama
sliding sunroof are closed.
The indicator lamp in the gbutton lights
up. Air-recirculation mode is activated.
X Convenience opening feature: press and
hold the gbutton until the side win-
dows and the sliding sunroof/panorama
sliding sunroof are opened. The side win-
dows and the sliding sunroof/panorama sliding sunroof move back to their original
position.
The indicator lamp in the
gbutton goes
out. Air-recirculation mode is deactivated.
i If you open the side windows or the sliding
sunroof/panorama sliding sunroof man-
ually after closing the mwith the conveni-
ence closing feature, they will remain in this
position when opened using the conveni-
ence opening feature. Activating/deactivating the residual
heat function
The residual heat function is only available
with THERMOTRONIC automatic climate con-
trol.
It is possible to make use of the residual heat
of the engine to continue heating the station-
ary vehicle for up to 30 minutes after the
engine has been switched off .The heating
time depends on the temperature that has
been set.
i The blower will run at a low speed regard-
less of the airflow setting.
i If you activate the residual heat function
at high temperatures, only the ventilation
will be activated. The blower runs at
medium speed.
X Turn the key to position 0in the ignition
lock or remove it.
X To activate: press theÌbutton.
The indicator lamp in the Ìbutton lights
up.
X To switch off: press theÌbutton.
The indicator lamp in the Ìbutton goes
out.
i Residual heat is deactivated automati-
cally:
R after about 30 minutes
R when the ignition is switched on
R if the battery voltage drops
R if the coolant temperature is too low 142
Operating the climate control systemClimate control
Page 146 of 401
Auxiliary heating
Important safety notes G
WARNING
Exhaust fumes are produced when the auxili-
ary heating is in operation .Inhaling these
exhaus tfumes can be poisonous. You should
therefore switch off the auxiliary heating in
confined spaces without an extraction sys-
tem, e.g .agarage. G
WARNING
When operating the auxiliary heating, parts of
the vehicle may become very hot, and highly
inflammable material such as fuels could be
ignited. Operating the auxiliary heating is thus
prohibited at filling station sorwhen your vehi-
cle is being refuelled. You must therefore
switch off the auxiliary heating at filling sta-
tions.
! Operating the auxiliary heating/ventila-
tion draws on the vehicle battery. After you
have heated or ventilated the vehicle a
maximum of two times, drive for a longer
distance.
i Switch on the auxiliary heating regularly,
e.g. for about ten minutes every month.
The auxiliary heating heats the air in the vehi-
cle interior to the set temperature without
using the heat of the running engine. The aux-
iliary heating is operated directly using the
vehicle's fuel. For this reason, the tank con-
tent must be at least at reserve fuel level to
ensure that the auxiliary heating functions.
The auxiliary heating/ventilation automati-
cally adjusts to changes in temperature and
weather conditions. For this reason, the aux-
iliary heating could switch from ventilation
mode to heating mode or from heating mode
to ventilation mode.
The auxiliary heating switches off automati-
cally after 50 minutes. This time limit can be
altered. To do this, visit a qualified specialist
workshop, e.g. a Mercedes-Ben zService
Centre. You cannot use the auxiliary ventilation to
cool the vehicle interior to a temperature
lower than the outside temperature.
Before switching on X
Turn the key to position 2in the ignition
lock.
X Set the temperature.
The auxiliary heating/ventilation can be acti-
vated even when the climate control is being
controlled manually. Optimum comfort can
be attained when the system is set to auto-
matic mode. Set the temperature to 22 †.
The auxiliary heating/ventilation can be acti-
vated or deactivated using the remote control
or the button on the centre console.
The on-board computer can be used to spec-
ify up to three departure times, one of which
may be preselected (Y page 242).
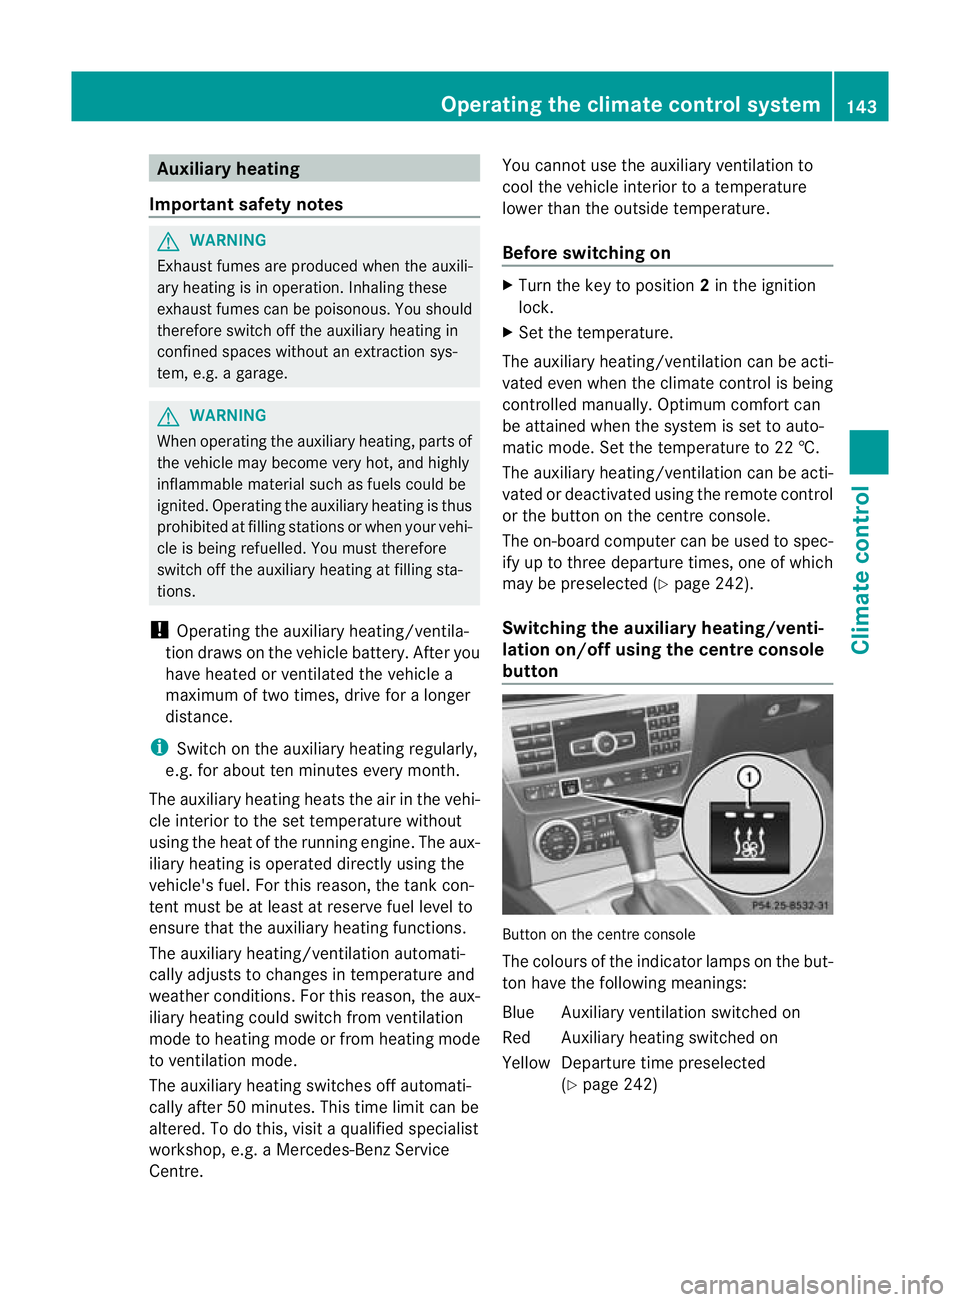
Switching the auxiliar yheating/venti-
lation on/off using the centre console
button Button on the centre console
The colours of the indicator lamps on the but-
to
nh ave the following meanings:
Blue Auxiliary ventilatio nswitched on
Red Auxiliary heating switched on
Yellow Departure time preselected (Ypage 242) Operating the climate control system
143Climate control Z
Page 155 of 401
Useful information
i This Owner's Manual describes all models
and all standard and optional equipment
available to your vehicle at the time of pub-
lication of the Owner's Manual. Country-
specific deviations are possible. Please
note that your vehicle may not be equipped
with all features described. This also
applies to safety-relevan tsystems and
functions.
i Please read the information on qualified
specialist workshops (Y page 28).Running-in notes
Important safety notes
G
WARNING
New brake pads/linings only have optimal
braking performance after several hundred
kilometres .Until then, compensate for this by
applying greate rforce to the brake pedal. This
also applies when brake pads/linings or
brake discs have been changed. The first 1,500 km
The more you look after the engine when it is
new, the more satisfied you will be with its
performance in the future.
R Therefore, drive at varying speeds and
engine speeds for the first 1,500 km.
R Avoid heavy loads on the engine during this
period, e.g. driving at full throttle.
R Change gear in good time, at the latest
when the rev counter needle is 2
/ 3 of the
way to the red area in the rev counter dis-
play.
R Do not manually shift to a lower gear to
brake the vehicle. Vehicles with automatic transmission:
R
If possible, do not depress the accelerator
pedal past the point of resistance (kick-
down).
R Only select shift ranges 3,2or 1when driv-
ing slowly, e.g. in mountainous terrain.
After 1,500 km, you may gradually bring the
vehicle up to full road and engine speeds.
Additional running-in notes for AMG vehicles:
R do not drive at speeds above 140 km/hf or
the first 1,500 km.
R only allow the engine to reach a maximum
engine speed of 4,500 rpm briefly.
i You should also observe these notes on
running in if the engine or parts of the drive
train on your vehicle have been replaced. AMG vehicles with rear axle locking
differential
Your vehicle is fitted with a self-locking dif-
ferential on the rear axle. Change the oil after
a running-in period of 3,000 km to improve
protection of the rear axle differential. This oil
change extends the service life of the differ-
ential. Have the oil change carried out at a
qualified specialist workshop. Mercedes-
Benz recommends that you use a Mercedes-
Benz Service Centre for this purpose. Driving
Important safety notes
G
WARNING
Do not place any objects in the driver's foot-
well. If you use a floormat or carpet in the
driver's footwell, make sure that it is correctly
secured and that there is sufficient clearance
for the pedals.
Do not place several floormats on top of one
another.
Loose objects or the floormats could other-
wise get caught between the pedals if you 152
DrivingDriving and parking
Page 158 of 401
Automatic transmission
X
Shift the transmission to position P.
The transmission position display in the
multifunction display shows P.
i You can also start the engine when the
transmission is in position N.
Starting procedure with the key i
To start the engine using the key instead
of KEYLESS-GO ,pull th eStart/Stop button
ou toft he ignition lock.
X To start a petrol engine: turn the key to
position 3in the ignition lock
(Y page 153) and release it as soon as the
engine is running.
X To startad iesel engine: turn the key to
position 2in the ignition lock
(Y page 153).
The % preglow indicator lamp in the
instrumen tcluster lights up.
X When the %preglow indicator lamp
goes out, tur nthe key to position 3
(Y page 153) and release it as soon as the
engine is running.
i You can start the engine without preglow
if the engine is warm.
i Vehicles with automatic transmis-
sion: you can also use the touch-start func-
tion. To do this, turn the key to position 3
(Y page 153) and release it immediately.
The engine then starts automatically.
Using KEYLESS-GO to startt he engineG
WARNING
You rvehicle can be started using a valid KEY-
LESS-GO key. For this reason, children should
never be left unsupervised in the vehicle.
Always take the key with you when leaving the
vehicle, even if you are only leaving it for a
short time.
i The Start/Stop button can be used to
start the vehicle manually without inserting the key into the ignition lock. The key must
be in the vehicle and the Start/Stop button
must be inserted in the ignition lock. This
mode for starting the engine operates inde-
pendently of the ECO start/stop automatic
engine start function.
X Depress the brake pedal and keep it
depressed.
X To star tapetrol engine: press the Start/
Stop button (Y page 153) once.
The engine starts.
X To start adiesel engine: press the Start/
Stop button (Y page 153) once.
Preglow is activated and the engine starts. Pulling away
Manual transmission X
Depress the brake pedal and keep it
depressed.
X Fully depress the clutch pedal.
X Shift to either first gear or reverse gear R.
X Release the parking brake (Y page 175).
X Release the brake pedal.
X Slowly release the clutch pedal and gently
depress the accelerato rpedal.
! Change gear in good time and avoid spin-
ning the wheels. Otherwise, you could dam-
age the vehicle.
i Follow the shift recommendations in the
multifunction display for an economical
driving style (Y page 161).
i The vehicle locks centrally once you have
pulled away. The locking knobs in the doors
drop down.
You can open the doors from the inside at
any time.
You can also deactivate the automatic lock-
ing feature (Y page 242). Driving
155Driving and parking Z