2011 MERCEDES-BENZ C-CLASS ESTATE AUX
[x] Cancel search: AUXPage 150 of 401

Problems with the auxiliary heating/ventilation
Display messages Possible causes/consequences and
M Solutions
FAIL The starter battery is not charged sufficiently or the system is
faulty.
X
Charge the starter battery.
X Make another attempt to switch on the auxiliary heating using
the remote control.
X Have the auxiliary heating checked at a qualified specialist
workshop. $
FAIL The signal transmission between the transmitter and the vehicle
is faulty.
X
Change your position in relation to the vehicle, moving closer if
necessary.
X Make another attempt to switch the auxiliary heating on or off
using the remote control. ©
FAIL There is not enough fuel in the fuel tank, or the auxiliary heating
is faulty.
X
Refuel at the nearest filling station.
X Make another attempt to switch on the auxiliary heating using
the remote control.
X Have the auxiliary heating checked at a qualified specialist
workshop. Adjusting the air vents
Important safety notes
G
WARNING
Very hot or very cold air can flow from the air
vents. This could cause burns or frostbite to
bare skin in the immediate vicinity of the
vents. Keep bare skin away from these air
outlets. If necessary, direct the airflow away
to a different area of the vehicle interior. In order to ensure the direct flow of fresh air
through the air vents into the vehicle interior,
please observe the following notes:
R
keep the air inlet between the windscreen
and the bonnet free of blockages, such as
ice, snow or leaves
R never cover the vents or air inlets in the
vehicle interior.
i For virtually draught-free ventilation,
adjust the sliders of the air vents to the
centre position. Adjusting the air vents
147Climate control Z
Page 171 of 401
Problems with the transmission
Problem Possible causes/consequences and
M Solutions
The transmission has
problems shifting gear. The transmission is losing oil.
X
Have the transmission checked at a qualified specialist work-
shop, e.g. a Mercedes-Benz Service Centre, immediately. The acceleration ability
is deteriorating.
The transmission no
longer changes gear. The transmission is in emergency mode.
It is only possible to shift into
secondgear and reverse gear.
X Stop the vehicle.
X Shift the transmission to position P.
X Switch off the engine.
X Wait at least 10 seconds before restarting the engine.
X Shift the transmission to position Dor R.
If D is selected, the transmission shifts into secondgear; ifRis
selected, the transmission shifts into reverse gear.
X Have the transmission checked at a qualified specialist work-
shop, e.g. a Mercedes-Benz Service Centre, immediately. Releasing the parking lock manually
In the event of an electrical fault, it is possible
to release the selector lever lock manually to
move it out of position P, e.g. if you wish to
tow the vehicle away. !
Do not use any sharp-edged objects to
remove the selector lever gaiter from the
centre console. This could damage the
selector lever gaiter.
X Apply the parking brake.
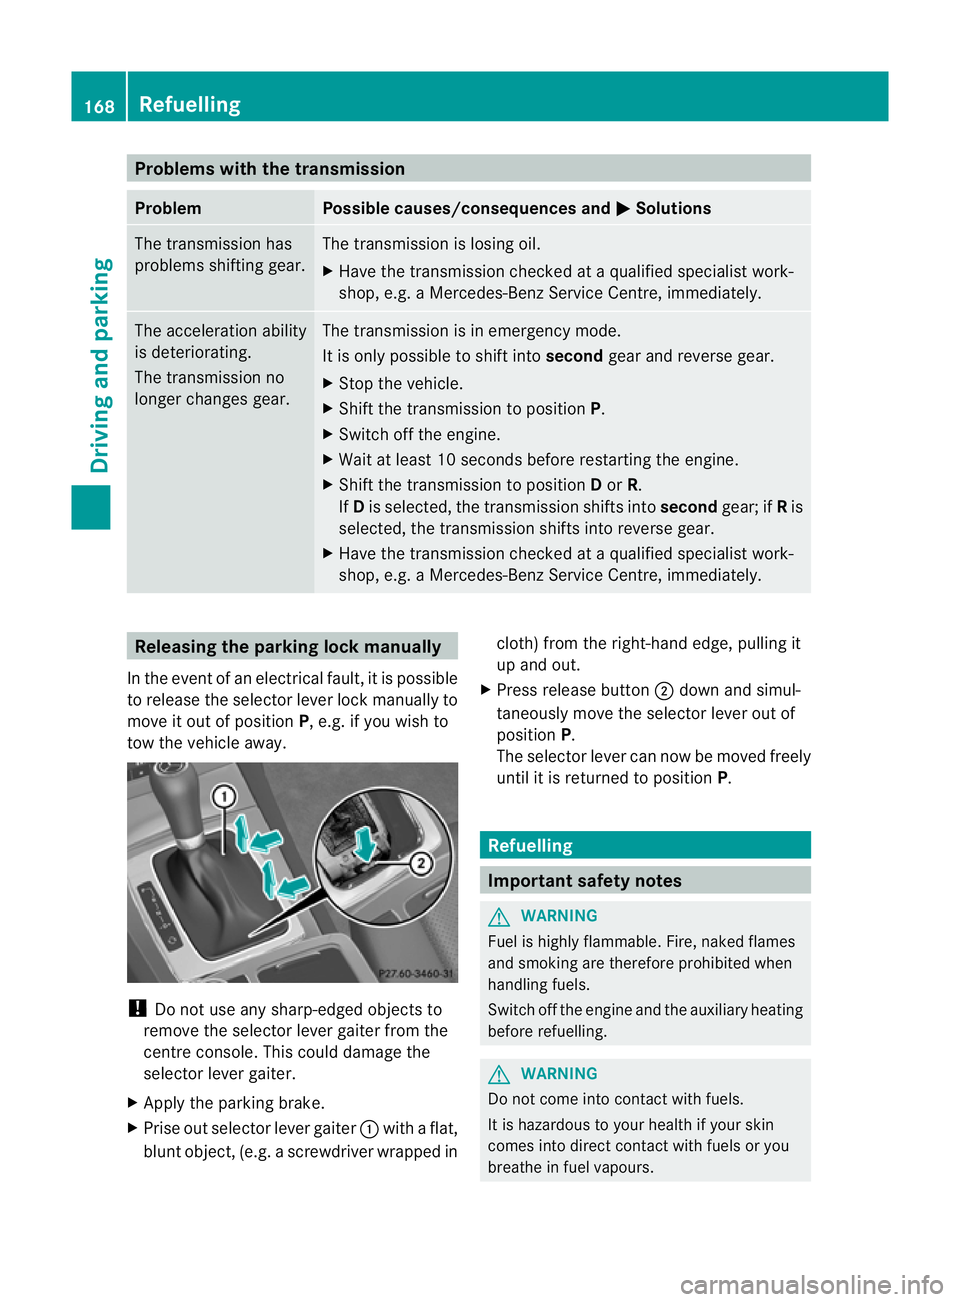
X Prise out selector lever gaiter :with a flat,
blunt object, (e.g. ascrewdriver wrapped in cloth) from the right-hand edge, pulling it
up and out.
X Press release button ;dow nand simul-
taneously move the selecto rlever out of
position P.
The selector lever can now be moved freely
until it is returned to position P. Refuelling
Important safety notes
G
WARNING
Fuel is highly flammable. Fire, naked flames
and smoking are therefore prohibited when
handling fuels.
Switch off the engine and the auxiliary heating
before refuelling. G
WARNING
Do not come into contact with fuels.
It is hazardous to your health if your skin
comes into direct contact with fuels or you
breathe in fuel vapours. 168
RefuellingDriving and parking
Page 237 of 401
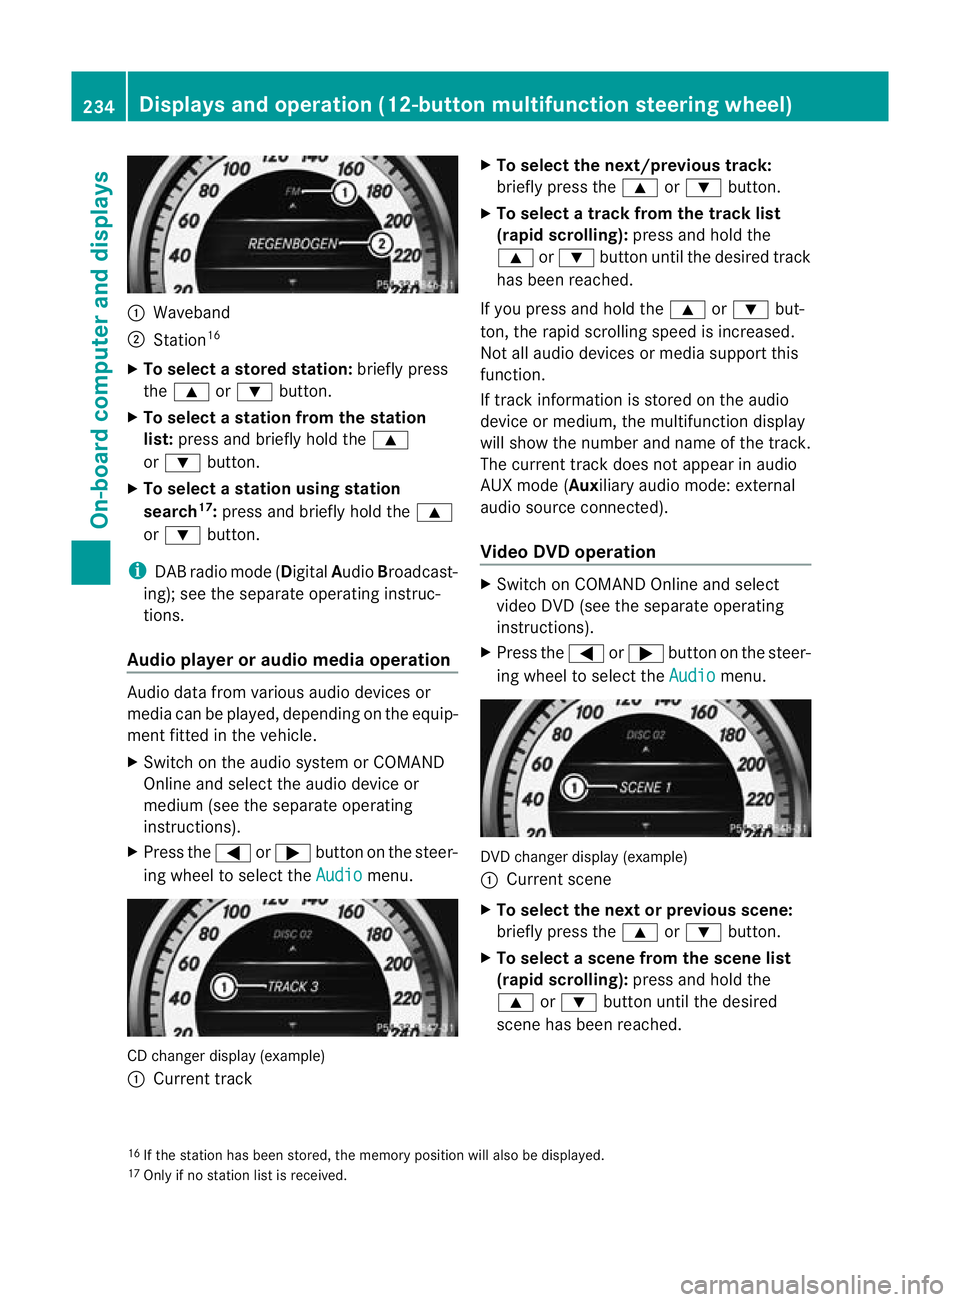
:
Waveband
; Station 16
X To select astore dstation: briefly press
the 9 or: button.
X To select a station from the station
list: press and briefly hold the 9
or : button.
X To select astation using station
search 17
:press and briefly hold the 9
or : button.
i DAB radio mode ( DigitalAudioBroadcast-
ing); see the separate operating instruc-
tions.
Audio player or audio media operation Audio data from various audi
odevices or
media can be played, depending on the equip-
ment fitted in the vehicle.
X Switch on the audio system or COMAND
Online and select the audio device or
medium (see the separate operating
instructions).
X Press the =or; button on the steer-
ing wheel to select the Audio menu.
CD changer display (example)
: Current track X
To select the next/previous track:
briefly press the 9or: button.
X To select a track from the track list
(rapid scrolling): press and hold the
9 or: button until the desired track
has been reached.
If you press and hold the 9or: but-
ton, the rapid scrolling speed is increased.
Not all audio devices or media support this
function.
If track information is stored on the audio
device or medium, the multifunction display
will show the number and name of the track.
The curren ttrack does not appear in audio
AUX mode (Auxiliary audio mode: external
audio source connected).
Video DVD operation X
Switch on COMAND Online and select
video DVD (see the separate operating
instructions).
X Press the =or; button on the steer-
ing wheel to select the Audio menu.
DVD changer display (example)
:
Current scene
X To selectt he nextorprevious scene:
briefly press the 9or: button.
X To select ascene from the scene list
(rapid scrolling): press and hold the
9 or: buttonuntil the desired
scene has been reached.
16 If the statio nhas been stored, the memory position will also be displayed.
17 Only if no statio nlist is received. 234
Displays and operation (12-button multifunction steering wheel)On-board computer and displays
Page 242 of 401
R
changing the instrument cluster settings
R changing the light settings
R changing the vehicle settings
R changing the auxiliary heating settings
R changing the convenience settings
R restoring the factory settings
Instrumen tcluster Selecting the unit of measurement for dis-
tance
The
Display unit Speed-/odometer: function allows you to choose whether cer-
tain displays appear in kilometres or miles.
The selected unit of measurement for dis-
tance applies to:
R the digital speedometer in the Trip menu
R the total distance recorder and the trip
meter
R the trip computer
R the current consumption and the range
R the navigation instruction in the Navi menu
R cruise control
R SPEEDTRONIC
R DISTRONIC PLUS
R ASSYST PLUS service interval display
X Press the =or; button on the steer-
ing wheel to selec tthe Settings menu.
X Press the :or9 button to select the
Inst. cluster submenu.
X Press the abutton to confirm.
X Press the :or9 button to select the
Display unit Speed-/odometer func-
tion.
You will see the selected setting: km or
miles .
X Press the abutton to save the setting.
Switching the additional speedometer
on/off
Only vehicles with manual transmission have
this function. i
Vehicles for the United Kingdom: this
function is not available.
The Dig. speedom [mph]: function allows
you to choose whether the status area in the
multifunction display always shows the speed
in mph instead of the outside temperature.
X Press the =or; button on the steer-
ing wheel to select the Settings menu.
X Press the :or9 button to select the
Inst. cluster submenu.
X Press the abutton to confirm.
X Press :or9 to select the Dig. speedo [mph]: function.
You will see the selected setting: on or
off .
X Press the abutton to save the setting.
Selecting the permanent display function
Only vehicles with automatic transmission
have this function.
i Vehicles for the United Kingdom: this
function is not available.
The Permanent display: function allows
you to choose whether the multifunction dis-
play always shows the outside temperature
or the speed in mph.
X Press the =or; button on the steer-
ing wheel to select the Settings menu.
X Press the :or9 button to select the
Inst. cluster submenu.
X Press the abutton to confirm.
X Press :or9 to select the Perma‐ nent display function.
You will see the selected setting: outside temperature or
Dig. speedom [mph] .
X Press the abutton to save the setting.
Lights Switching the daytime driving lights on/
off
If you have activated the
Day lights func-
tion and the light switch is set to Ã, theDisplays and operation (12-button multifunction steering wheel)
239On-board computer and displays Z
Page 245 of 401
X
Press the abutton to confirm.
X Press :or9 to adjust permanent
SPEEDTRONIC in increments of 10
(230 km/h to
160 km/h ). The
Off setting
switches permanent SPEEDTRONIC off.
X Press the abutton to store the entry.
Switching the automatic locking feature
on/off
If you select the Automatic door lock func-
tion, the vehicle is centrally locked above a
speed of around 15 km/h.
i For further information on the automatic
locking feature, see (Y page 90).
X Press the =or; button on the steer-
ing wheel to select the Settings menu.
X Press the :or9 button to select the
Vehicle submenu.
X Press the abutton to confirm.
X Press the :or9 button to select the
Automatic door lock function.
When the Automatic door locks func-
tion is activated, the vehicle doors are dis-
played in red in the multifunction display.
X Press the abutton to save the setting.
Activating/deactivating the acoustic
locking confirmation
If you activate the Acoustic Lock function,
an audible signal sounds depending on the
vehicle's date of manufacture:
R when locking
or
R once when unlocking and three times when
locking
X Press the =or; button on the steer-
ing wheel to select the Settings menu.
X Press the :or9 button to select the
Vehicle submenu.
X Press the abutton to confirm. X
Press the :or9 button to select the
Acoustic Lock function.
If the Acoustic Lock function is activated,
the & symbol in the multifunction dis-
play lights up red.
X Press the abutton to save the setting.
Activating/deactivating the radar sensor
system
i You must deactivate the radar sensor sys-
tem in certain countries and near radio
telescope facilities. For further informa-
tion, see (Y page 389).
When you are close to radio telescope facili-
ties, the radar sensor system will be deacti-
vated automatically.
The following systems are switched off when
the radar sensor system is deactivated:
R DISTRONIC PLUS (Y page 183)
R BAS PLUS (Y page 73)
R PRE-SAFE ®
Brake (Y page 78)
R Blind Spot Assist (Y page 205)
R Active Blind Spot Assist (Y page 209)
X Press the =or; button on the steer-
ing wheel to select the Settings menu.
X Press the :or9 button to select the
Vehicle submenu.
X Press the abutton to confirm.
X Press the 9or: button to select
Radar sensor (See Owner's Man.): .
You will see the selected setting: on or
off .
X Press the abutton to save the setting.
Heating menu Auxiliary heating departure time
This function is only available on vehicles with
auxiliary heating (Y
page 143).
In the Heating submenu, you can select a
stored departure time or change a departure
time. 242
Displays and operation (12-button multifunction steering wheel)On-board computer and displays
Page 246 of 401
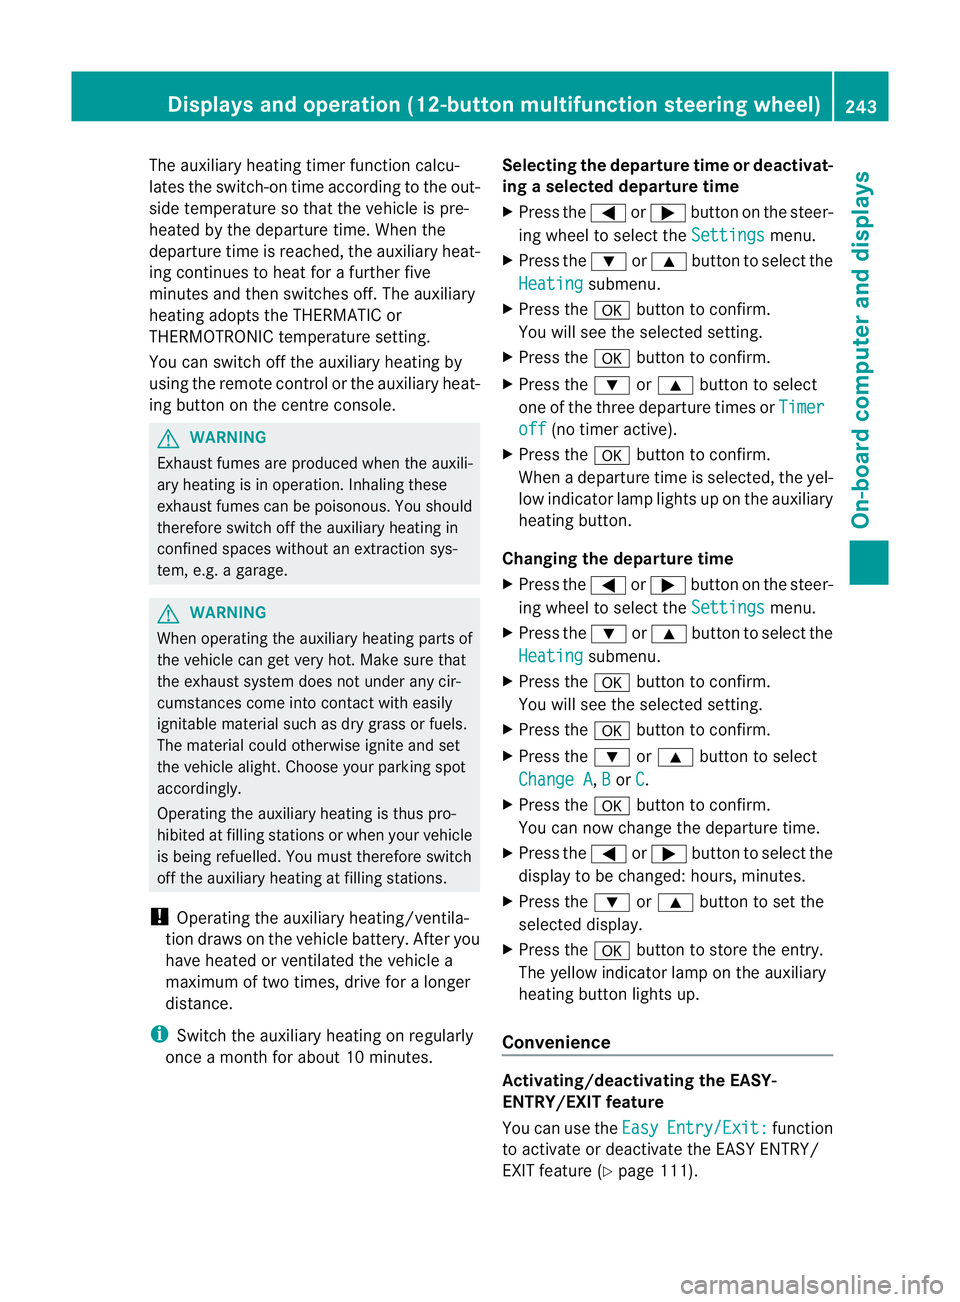
The auxiliary heating timer function calcu-
lates the switch-on time according to the out-
side temperature so that the vehicle is pre-
heated by the departure time. When the
departure time is reached, the auxiliary heat-
ing continues to heat for a further five
minutes and then switches off. The auxiliary
heating adopts the THERMATIC or
THERMOTRONIC temperature setting.
You can switch off the auxiliary heating by
using the remote control or the auxiliary heat-
ing button on the centre console. G
WARNING
Exhaust fumes are produced when the auxili-
ary heating is in operation. Inhaling these
exhaust fumes can be poisonous. You should
therefore switch off the auxiliary heating in
confined spaces without an extraction sys-
tem, e.g. a garage. G
WARNING
When operating the auxiliary heating parts of
the vehicle can get very hot. Make sure that
the exhaust system does not under any cir-
cumstances come into contact with easily
ignitable material such as dry grass or fuels.
The material could otherwise ignite and set
the vehicle alight. Choose your parking spot
accordingly.
Operating the auxiliary heating is thus pro-
hibited at filling stations or when your vehicle
is being refuelled. You must therefore switch
off the auxiliary heating at filling stations.
! Operating the auxiliary heating/ventila-
tion draws on the vehicle battery. After you
have heated or ventilated the vehicle a
maximum of two times, drive for a longer
distance.
i Switch the auxiliary heating on regularly
once a month for about 10 minutes. Selecting the departure time or deactivat-
ing a selected departure time
X
Press the =or; button on the steer-
ing wheel to select the Settings menu.
X Press the :or9 button to select the
Heating submenu.
X Press the abutton to confirm.
You will see the selected setting.
X Press the abutton to confirm.
X Press the :or9 button to select
one of the three departure times or Timer off (no timer active).
X Press the abutton to confirm.
When a departure time is selected, the yel-
low indicator lamp lights up on the auxiliary
heating button.
Changing the departure time
X Press the =or; button on the steer-
ing wheel to select the Settings menu.
X Press the :or9 button to select the
Heating submenu.
X Press the abutton to confirm.
You will see the selected setting.
X Press the abutton to confirm.
X Press the :or9 button to select
Change A ,
B or
C .
X Press the abutton to confirm.
You can now change the departure time.
X Press the =or; button to select the
display to be changed: hours, minutes.
X Press the :or9 button to set the
selected display.
X Press the abutton to store the entry.
The yellow indicator lamp on the auxiliary
heating button lights up.
Convenience Activating/deactivating the EASY-
ENTRY/EXIT feature
You can use the
Easy Entry/Exit: function
to activate or deactivate the EASY ENTRY/
EXIT feature (Y page 111). Displays and operation (12-button multifunction steering wheel)
243On-board computer and displays Z
Page 272 of 401
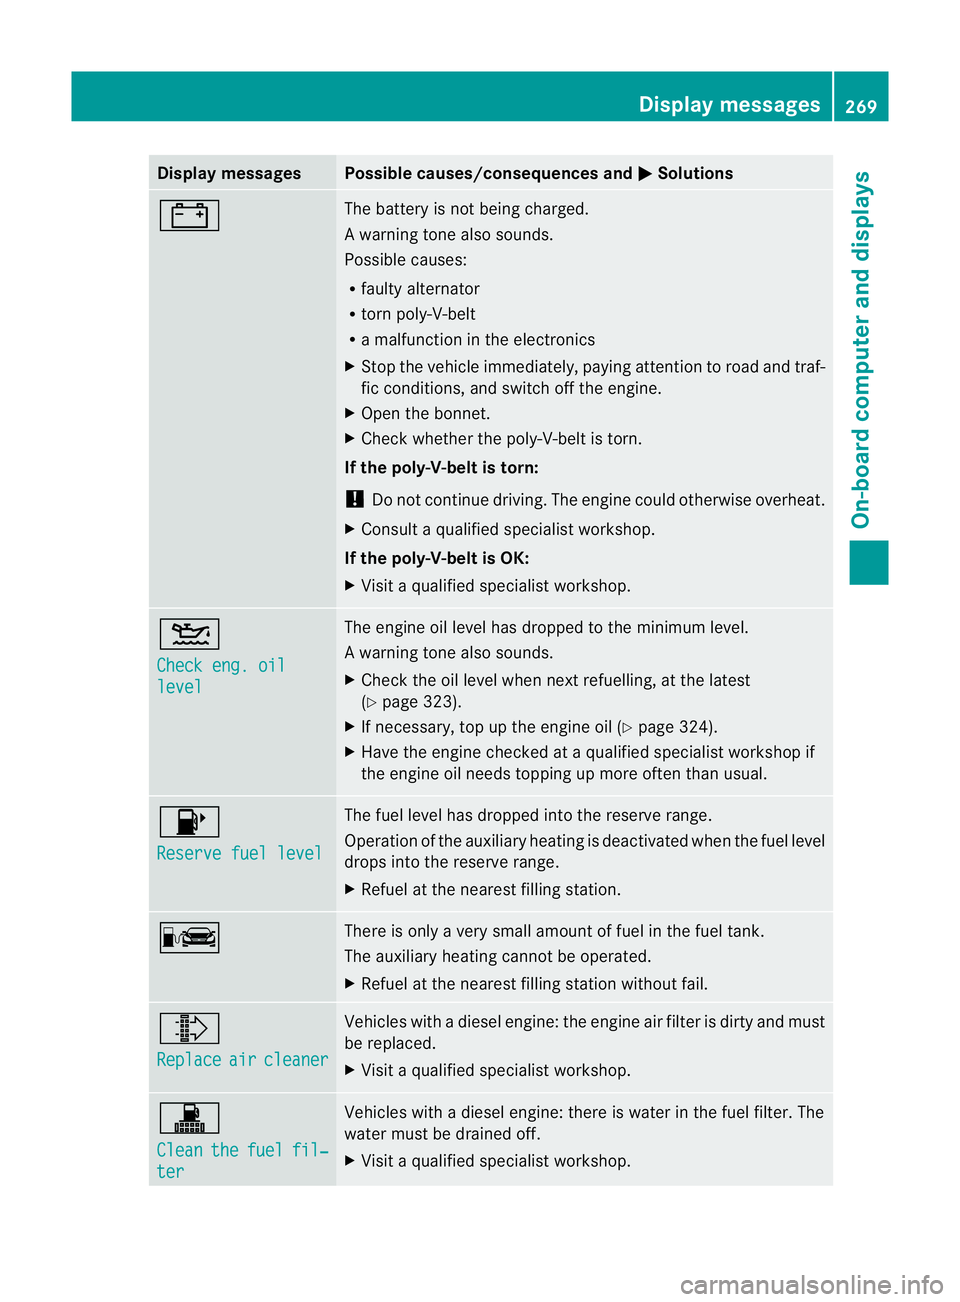
Display messages Possible causes/consequences and
M Solutions
# The battery is no
tbeing charged.
Aw arning tone also sounds.
Possible causes:
R faulty alternator
R torn poly-V-belt
R a malfunction in the electronics
X Stop the vehicle immediately, paying attentio ntoroad and traf-
fic conditions, and switch off the engine.
X Open the bonnet.
X Check whether the poly-V-belt is torn.
If the poly-V-belt is torn:
! Do not continue driving. The engine could otherwise overheat.
X Consult a qualified specialist workshop.
If the poly-V-belt is OK:
X Visit a qualified specialist workshop. 4
Check eng. oil
level The engine oil level has dropped to the minimum level.
Aw
arning tone also sounds.
X Chec kthe oil level when next refuelling, at the latest
(Y page 323).
X If necessary, top up the engine oil (Y page 324).
X Have the engine checked at a qualified specialist workshop if
the engine oil needs topping up more often than usual. 8
Reserve fuel level The fuel level has dropped into the reserve range.
Operation of the auxiliary heating is deactivated when the fuel level
drops into the reserve range.
X
Refuel at the nearest filling station. C There is only a very small amount of fuel in the fuel tank.
The auxiliary heating cannot be operated.
X
Refuel at the nearest filling station without fail. ¸
Replace
air cleaner Vehicles with a diesel engine: the engine air filter is dirty and must
be replaced.
X
Visit a qualified specialist workshop. !
Clean
the fuel fil‐
ter Vehicles with a diesel engine: there is water in the fuel filter. The
water must be drained off.
X
Visit a qualified specialist workshop. Display messages
269On-board computer and displays Z
Page 274 of 401
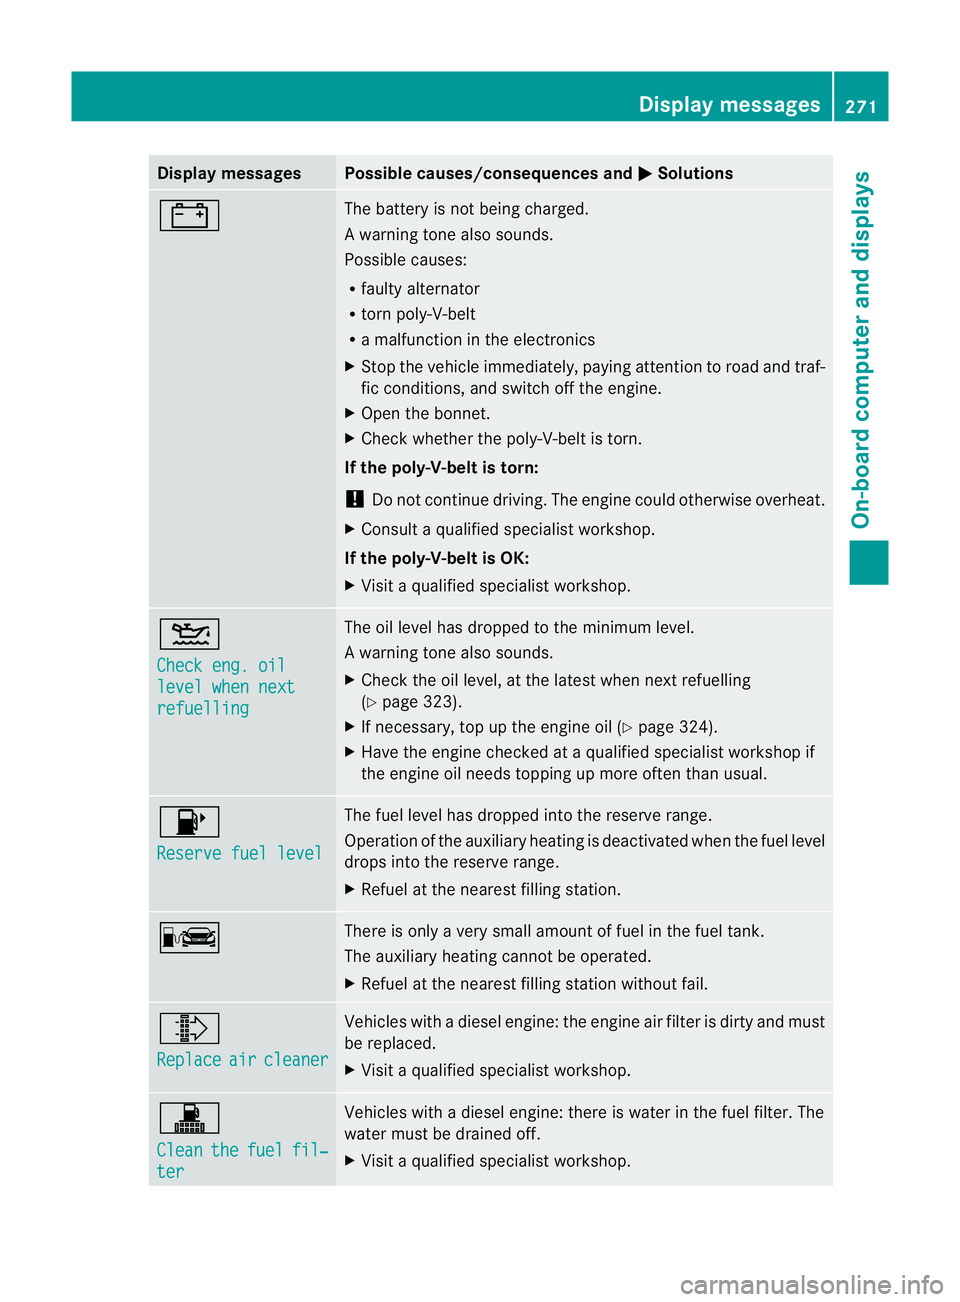
Display messages Possible causes/consequences and
M Solutions
# The battery is no
tbeing charged.
Aw arning tone also sounds.
Possible causes:
R faulty alternator
R torn poly-V-belt
R a malfunction in the electronics
X Stop the vehicle immediately, paying attentio ntoroad and traf-
fic conditions, and switch off the engine.
X Open the bonnet.
X Check whether the poly-V-belt is torn.
If the poly-V-belt is torn:
! Do not continue driving. The engine could otherwise overheat.
X Consult a qualified specialist workshop.
If the poly-V-belt is OK:
X Visit a qualified specialist workshop. 4
Check eng. oil
level when next
refuelling The oil level has dropped to the minimum level.
Aw
arning tone also sounds.
X Chec kthe oil level, at the latest when next refuelling
(Y page 323).
X If necessary, top up the engine oil (Y page 324).
X Have the engine checked at a qualified specialist workshop if
the engine oil needs topping up more often than usual. 8
Reserve fuel level The fuel level has dropped into the reserve range.
Operation of the auxiliary heating is deactivated when the fuel level
drops into the reserve range.
X
Refuel at the nearest filling station. C There is only a very small amount of fuel in the fuel tank.
The auxiliary heating cannot be operated.
X
Refuel at the nearest filling station without fail. ¸
Replace
air cleaner Vehicles with a diesel engine: the engine air filter is dirty and must
be replaced.
X
Visit a qualified specialist workshop. !
Clean
the fuel fil‐
ter Vehicles with a diesel engine: there is water in the fuel filter. The
water must be drained off.
X
Visit a qualified specialist workshop. Display messages
271On-board computer and displays Z