2011 MERCEDES-BENZ C-CLASS ESTATE ESP
[x] Cancel search: ESPPage 315 of 401
X
With your other hand, let the strap go slowly
until the load is secured.
X Make sure that locking button ?on brack-
ets Ais pressed.
This keeps brackets Ain place on the
loading rail.
X To remove: press release button =on
respective bracket Aand remove luggage
holder ;by pulling upwards and out.
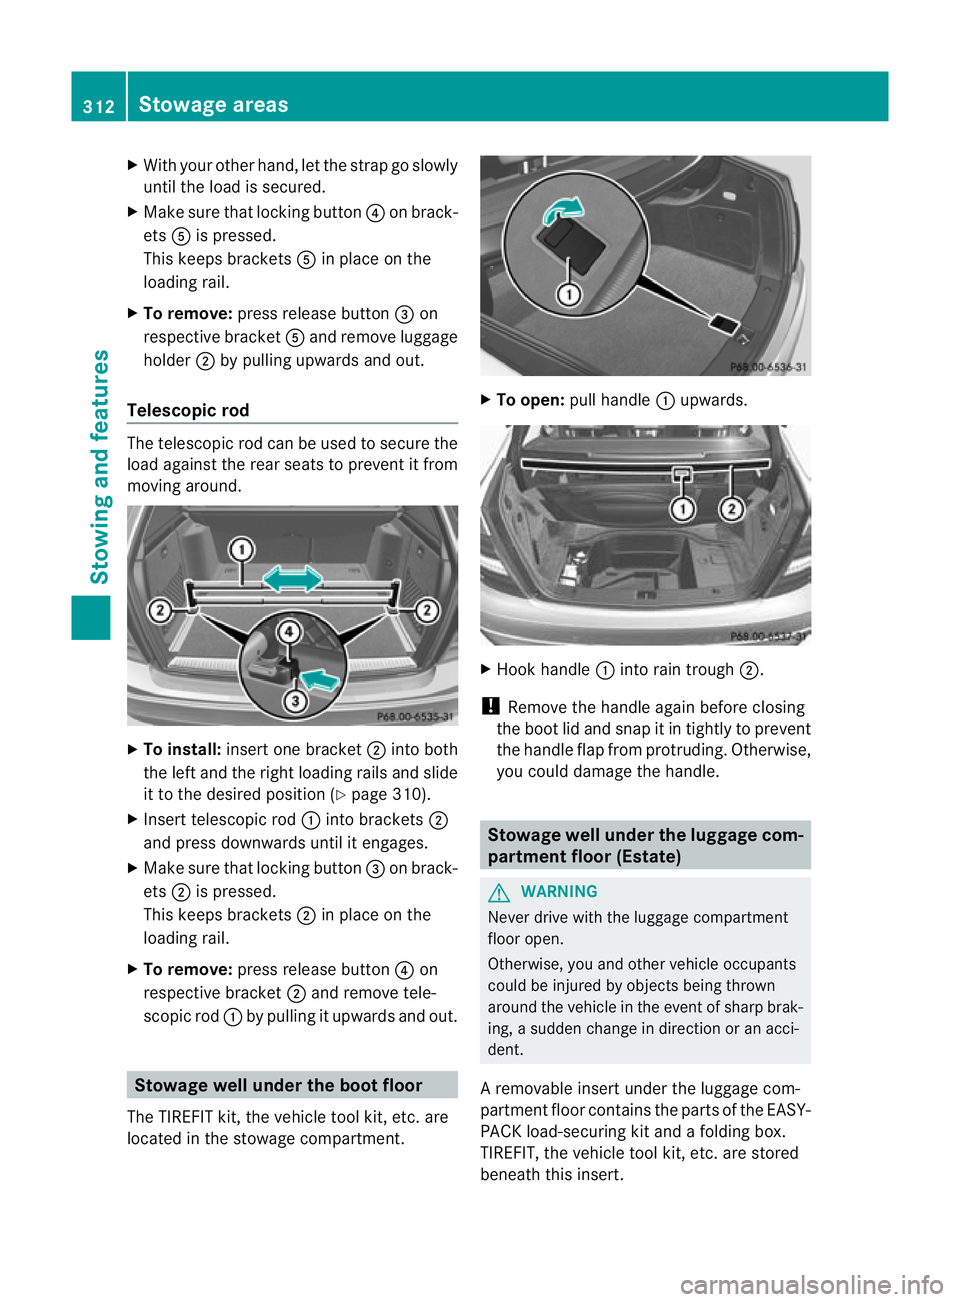
Telescopic rod The telescopic rod can be used to secure the
load against the rear seats to preven
titfrom
moving around. X
To install: insert one bracket ;into both
the left and the right loading rails and slide
it to the desired position (Y page 310).
X Insert telescopic rod :into brackets ;
and press downwards until it engages.
X Make sure that locking button =on brack-
ets ;is pressed.
This keeps brackets ;in place on the
loading rail.
X To remove: press release button ?on
respective bracket ;and remove tele-
scopic rod :by pulling it upwards and out. Stowage well under the bootf
loor
The TIREFIT kit, the vehicle tool kit ,etc. are
located in the stowage compartment. X
To open: pull handle :upwards. X
Hoo khandle :into rain trough ;.
! Remove the handle again before closing
the boot lid and snap it in tightly to prevent
the handle flap from protruding. Otherwise,
you could damage the handle. Stowage well under the luggage com-
partment floor (Estate)
G
WARNING
Never drive with the luggag ecompartment
floor open.
Otherwise, you and other vehicle occupants
could be injured by object sbeing thrown
around the vehicle in the event of sharp brak-
ing, a sudden change in direction or an acci-
dent.
Ar emovable insert under the luggage com-
partmen tfloor contains the parts of the EASY-
PACK load-securing kit and a folding box.
TIREFIT, the vehicle tool kit, etc. are stored
beneath this insert. 312
Stowage areasStowing and features
Page 330 of 401
the necessary service work has been carried
out.
You can obtain further information, e.g.
regarding service work, fro maMercedes-
Benz Service Centre or directly from
Mercedes-Benz.
! If the ASSYST PLUS service interval dis-
play has been inadvertently reset, this set-
ting can be corrected at a Mercedes-Benz
Service Centre.
Have service work carried out as described
in the Service Booklet. This may otherwise
lead to increased wear and damage to the
major assemblies or the vehicle.
Driving abroad
An extensive Mercedes-Benz Service network
is also available in other countries. The
Service Hotline's current telephone numbers
for use when you are abroad are to be found
in the "Mercedes-Benz Service24h" section
of the Service Booklet. Care
Notes on care
Regular care of your vehicle is a condition for
retaining the quality in the long term.
Use care products and cleaning agents rec-
ommended and approved by Mercedes-Benz.
! For cleaning your vehicle, do not use any
of the following:
R dry, rough or hard cloths
R abrasive cleaning agents
R solvents
R cleaning agents containing solvents
Do not scrub.
Do not touch the surfaces or protective
films with hard objects, e.g. a ring or ice
scraper. You could otherwise scratch or
damage the surfaces and protective film. H
Environmental note
Dispose of empty packaging and cleaning
cloths in an environmentally responsible man-
ner.
! Do not park up the vehicle for an extended
period straight after cleaning it, particularly
after having cleaned the wheels with wheel
cleaner. Wheel cleaners could cause
increased corrosion of the brake discs and
brake pads/linings. For this reason, you
should drive for a few minutes after clean-
ing. Braking heats the brake discs and the
brake pads/linings, thus drying them. The
vehicle can then be parked up. Care of the exterior
Automatic car wash G
WARNING
Braking efficiency is reduced after washing
the vehicle. This could cause an accident. For
this reason, following a car wash, drive with
particular care until the brakes are dry.
You can wash the vehicle in an automatic car
wash from the very start.
If the vehicle is very dirty, pre-wash it before
cleaning it in an automatic car wash.
! Make sure that the automatic transmis-
sion is in position Nwhen washing your
vehicle in a tow-through car wash. The vehi-
cle could be damaged if the transmission is
in another position.
! Make sure that:
R the side windows and sliding sunroof are
closed completely.
R the blower for the ventilation/heating is
switched off (OFF button is depressed).
R the windscreen wiper switch is at posi-
tion 0.
The vehicle could otherwise be damaged.
After using an automatic car wash, wipe off
wax from the windscreen and the wiper Care
327Maintenance and care Z
Page 334 of 401
Cleaning the exhaust tail pipes
Impurities combined with th
eeffects of road
grit and corrosive environmental factors may
cause flash rust to form on the surface. You
can restore the original shine of the exhaust
tail pipe by cleaning it regularly, especially in
winter and after washing.
! Do not clea nthe exhaust tail pipes with
alkaline-based cleaning agents, such as
wheel cleaner.
X Cleant he exhaust tail pipes with a chrome
care product tested and approved by
Mercedes-Benz.
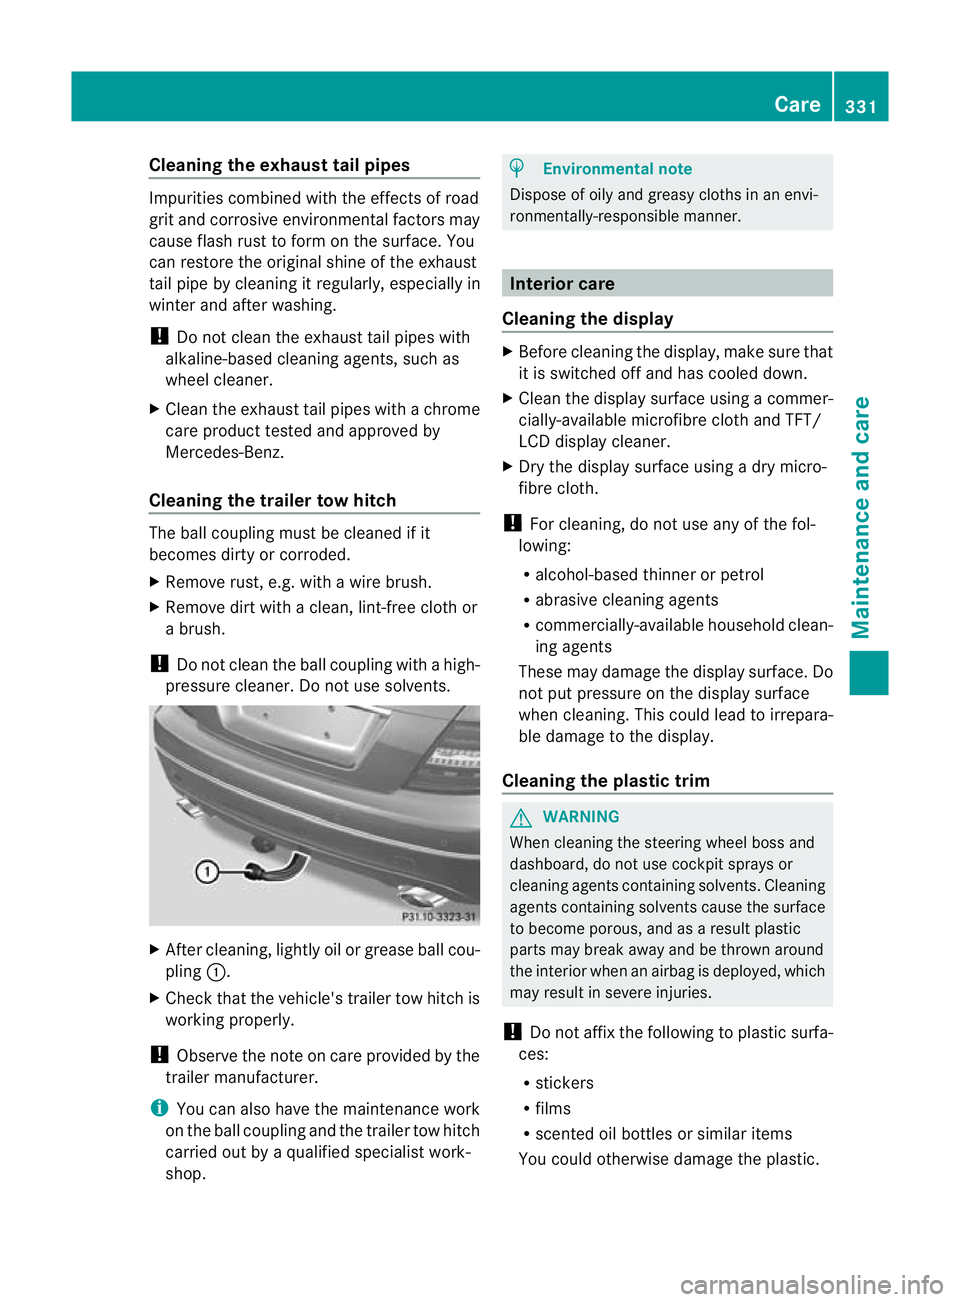
Cleaning the trailer tow hitch The ball coupling must be cleaned if it
becomes dirty or corroded.
X Remove rust, e.g. with a wire brush.
X Remove dirt with a clean, lint-free cloth or
a brush.
! Do not clean the ball coupling with a high-
pressure cleaner. Do not use solvents. X
After cleaning, lightly oil or grease ball cou-
pling :.
X Check that the vehicle's trailer tow hitch is
working properly.
! Observe the note on care provided by the
trailer manufacturer.
i You can also have the maintenance work
on the ball coupling and the trailer tow hitch
carried out by a qualified specialist work-
shop. H
Environmental note
Dispose of oily and greasy cloths in an envi-
ronmentally-responsible manner. Interior care
Cleaning the display X
Before cleaning the display, make sure that
it is switched off and has cooled down.
X Cleant he display surface using a commer-
cially-available microfibre cloth and TFT/
LCD display cleaner.
X Dry the display surface using a dry micro-
fibre cloth.
! For cleaning, do not use any of the fol-
lowing:
R alcohol-based thinner or petrol
R abrasive cleaning agents
R commercially-available household clean-
ing agents
These may damage the display surface. Do
not put pressure on the display surface
when cleaning. This could lead to irrepara-
ble damage to the display.
Cleaning the plastic trim G
WARNING
When cleaning the steering wheel boss and
dashboard, do not use cockpit sprays or
cleaning agents containing solvents. Cleaning
agents containing solvents cause the surface
to become porous, and as aresult plastic
parts may break away and be thrown around
the interior when an airbag is deployed, which
may result in severe injuries.
! Do not affix the following to plastic surfa-
ces:
R stickers
R films
R scented oil bottles or similar items
You could otherwise damage the plastic. Care
331Maintenance and care Z
Page 344 of 401
carry ou
tthe work required. Mercedes-Benz
recommends that you use aMercedes-Benz
Service Centre for this purpose. In particular,
work relevant to safety or on safety-related
systems must be carried out at a qualified
specialist workshop.
X Correct the tyre pressure if it is still at least
130 kPa (1.3 bar/20 psi) (for the values,
see the fuel filler flap).
X To increase the tyre pressure: switch on
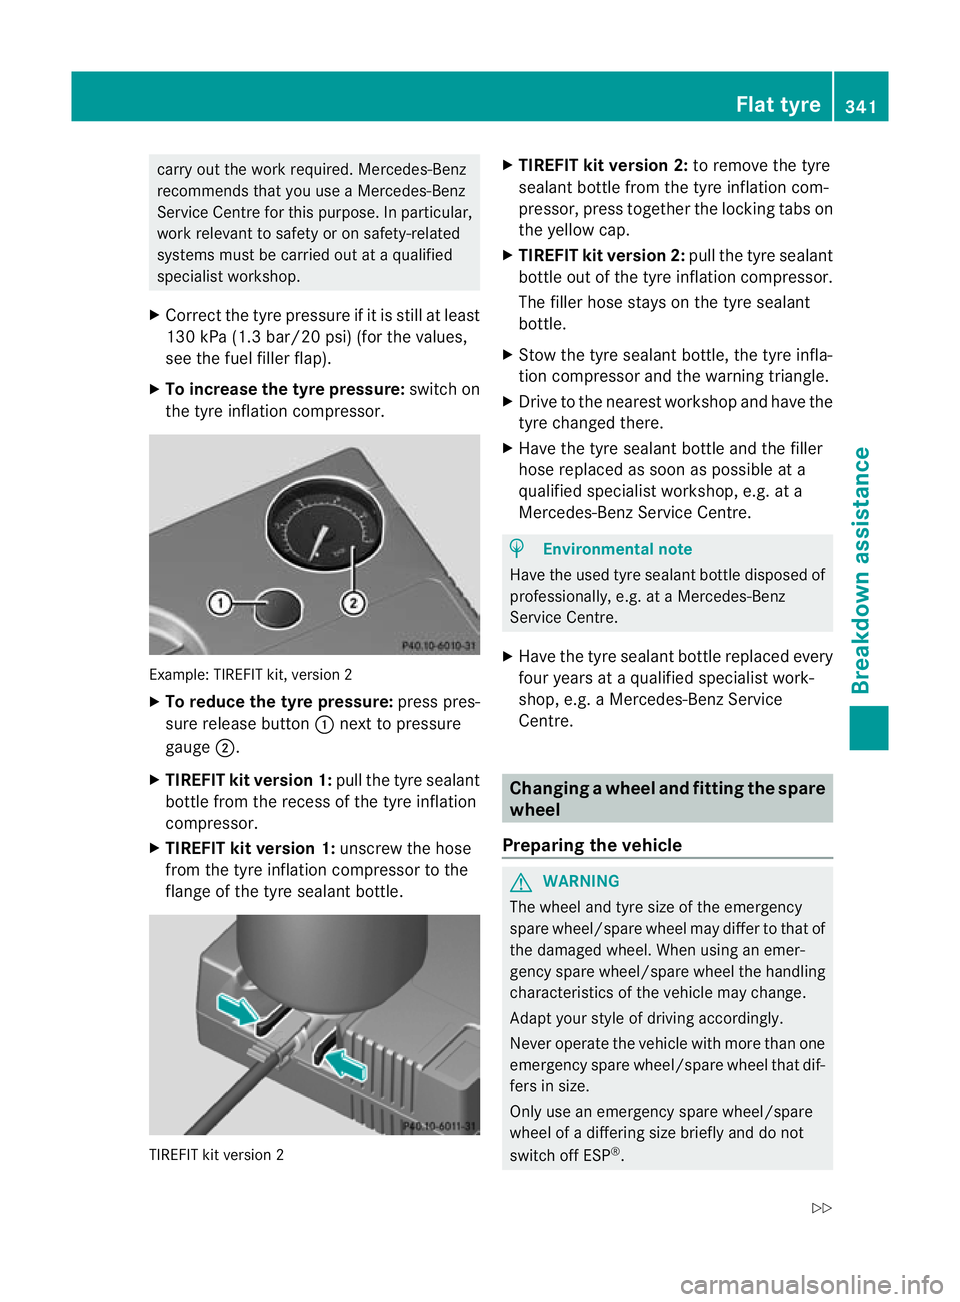
the tyre inflation compressor. Example: TIREFIT kit, version 2
X
To reduce the tyre pressure: press pres-
sure release button :next to pressure
gauge ;.
X TIREFIT kit version 1: pull the tyre sealant
bottle from the recess of the tyre inflation
compressor.
X TIREFIT kit version 1: unscrew the hose
from the tyre inflation compressor to the
flange of the tyre sealant bottle. TIREFIT kit version 2 X
TIREFIT kit version 2: to remove the tyre
sealant bottle from the tyre inflation com-
pressor, press together the locking tabs on
the yellow cap.
X TIREFIT kit version 2: pull the tyre sealant
bottle out of the tyre inflation compressor.
The filler hose stays on the tyre sealant
bottle.
X Stow the tyre sealant bottle, the tyre infla-
tion compressor and the warning triangle.
X Drive to the nearest workshop and have the
tyre changed there.
X Have the tyre sealant bottle and the filler
hose replaced as soon as possible at a
qualified specialist workshop, e.g. at a
Mercedes-Benz Service Centre. H
Environmental note
Have the used tyre sealant bottle disposed of
professionally, e.g. at aMercedes-Benz
Service Centre.
X Have the tyre sealant bottle replaced every
four years at a qualified specialist work-
shop, e.g. a Mercedes-Benz Service
Centre. Changing
awheel and fitting the spare
wheel
Preparing the vehicle G
WARNING
The wheel and tyre size of the emergency
spare wheel/spare wheel may diffe rto that of
the damaged wheel. When using an emer-
gency spare wheel/spare wheel the handling
characteristics of the vehicle may change.
Adapt your style of driving accordingly.
Never operate the vehicle with more than one
emergency spare wheel/spare wheel that dif-
fers in size.
Only use an emergency spare wheel/spare
wheel of a differing size briefly and do not
switch off ESP ®
. Flat tyre
341Breakdown assistance
Z
Page 346 of 401
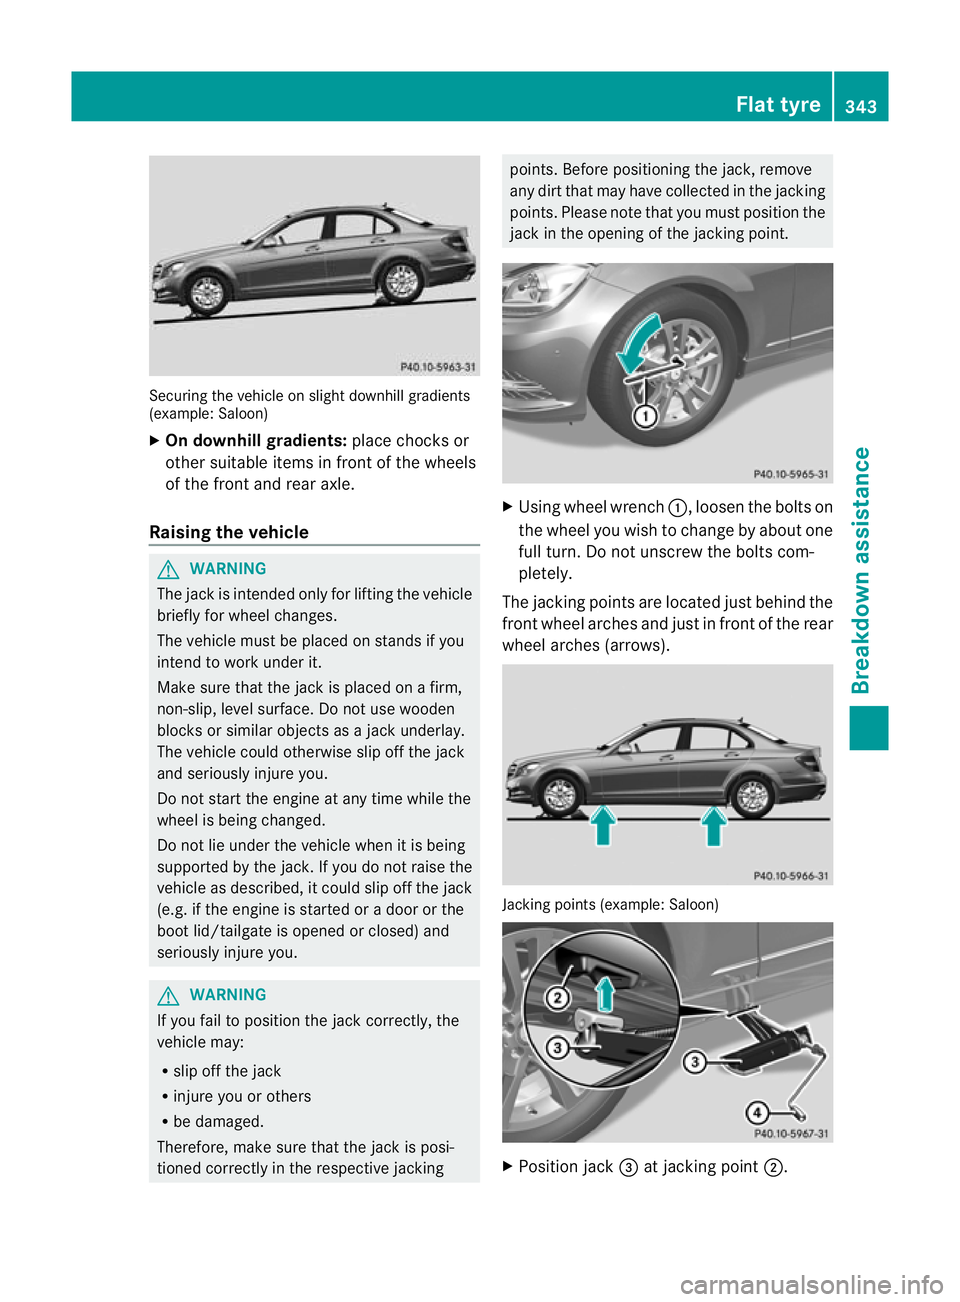
Securing the vehicle on slight downhill gradients
(example: Saloon)
X
On downhill gradients: place chocks or
othe rsuitable items in fron tofthe wheels
of the front and rear axle.
Raising the vehicle G
WARNING
The jack is intended only for lifting the vehicle
briefly for wheel changes.
The vehicle must be placed on stands if you
intend to work under it.
Make sure that the jack is placed on a firm,
non-slip, level surface. Do not use wooden
blocks or similar objects as a jack underlay.
The vehicle could otherwise slip off the jack
and seriously injure you.
Do not start the engine at any time while the
wheel is being changed.
Do not lie under the vehicle when it is being
supported by the jack. If you do not raise the
vehicle as described, it could slip off the jack
(e.g. if the engine is started or a door or the
boot lid/tailgate is opened or closed) and
seriously injure you. G
WARNING
If you fail to position the jack correctly, the
vehicle may:
R slip off the jack
R injure you or others
R be damaged.
Therefore, make sure that the jack is posi-
tioned correctly in the respective jacking points. Before positioning the jack, remove
any dirt that may have collected in the jacking
points. Please note that you must position the
jack in the opening of the jacking point.
X
Using wheel wrench :, loosen the bolts on
the wheel you wish to change by about one
full turn. Do not unscrew the bolts com-
pletely.
The jacking points are located just behind the
front wheel arches and just in front of the rear
wheel arches (arrows). Jacking points (example: Saloon)
X
Position jack =at jacking point ;. Flat tyre
343Breakdown assistance Z
Page 347 of 401
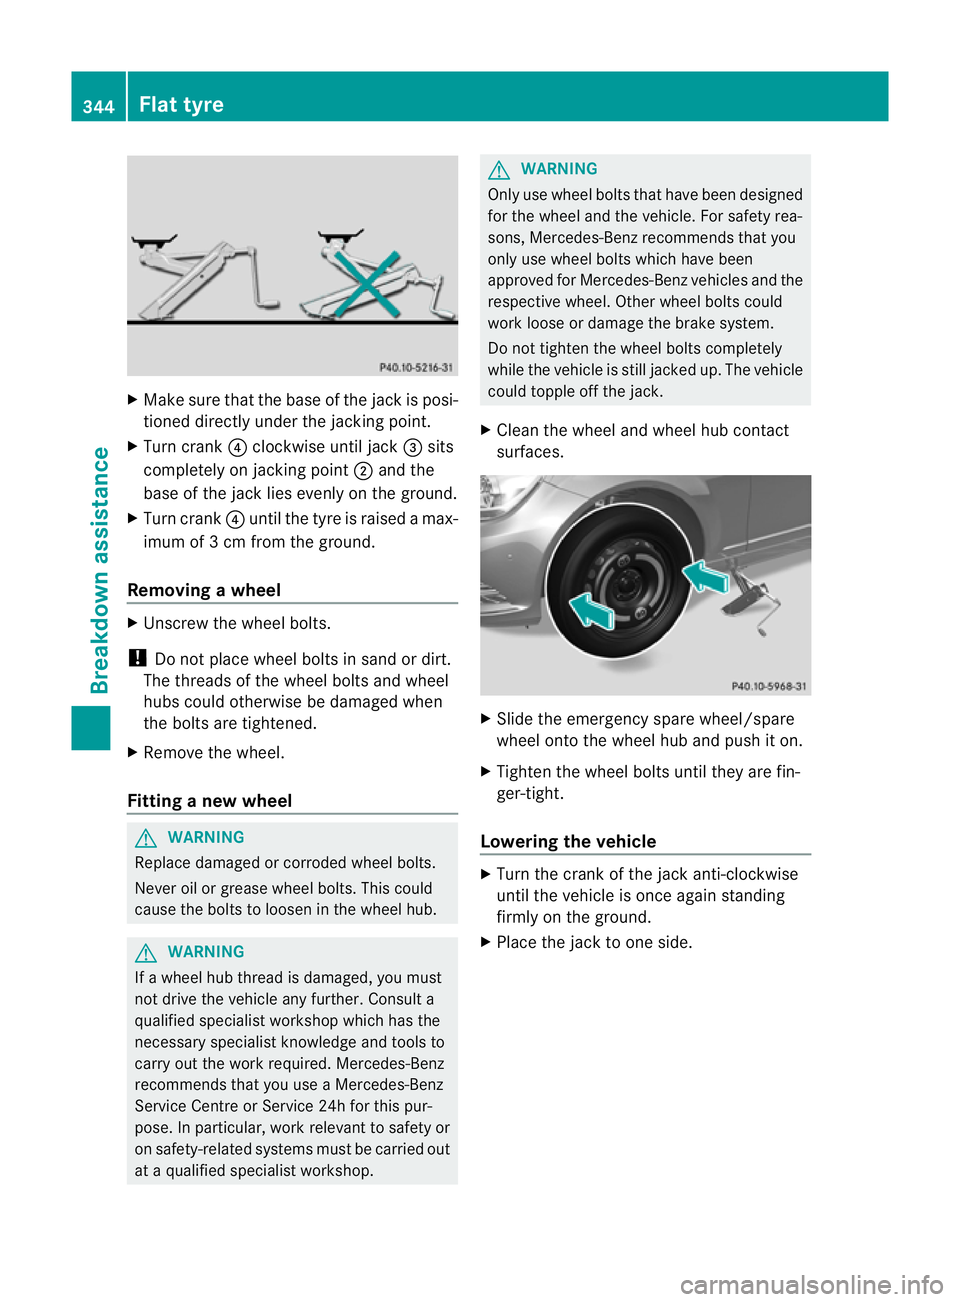
X
Make sure that the base of the jack is posi-
tioned directly under the jacking point.
X Turn crank ?clockwise until jack =sits
completely on jacking point ;and the
base of the jack lies evenly on the ground.
X Turn crank ?until the tyre is raised a max-
imum of 3 cm from the ground.
Removing awheel X
Unscrew the wheel bolts.
! Do not place wheel bolts in sand or dirt.
The threads of the wheel bolts and wheel
hubs could otherwise be damaged when
the bolts are tightened.
X Remove the wheel.
Fitting anew wheel G
WARNING
Replace damaged or corroded wheel bolts.
Never oil or grease wheel bolts. This could
cause the bolts to loose ninthe wheel hub. G
WARNING
If a wheel hub thread is damaged, you must
not drive the vehicle any further. Consult a
qualified specialist workshop which has the
necessary specialist knowledge and tools to
carry out the work required. Mercedes-Benz
recommends that you use aMercedes-Benz
Service Centre or Service 24h for this pur-
pose. In particular, work relevant to safety or
on safety-related systems must be carried out
at a qualified specialist workshop. G
WARNING
Only use wheel bolts that have been designed
for the wheel and the vehicle. For safety rea-
sons, Mercedes-Benz recommends that you
only use wheel bolts which have been
approved for Mercedes-Benz vehicles and the
respective wheel. Other wheel bolts could
work loose or damage the brake system.
Do not tighten the wheel bolts completely
while the vehicle is still jacked up. The vehicle
could topple off the jack.
X Clean the wheel and wheel hub contact
surfaces. X
Slide the emergency spare wheel/spare
wheel onto the wheel hub and push it on.
X Tighten the wheel bolts until they are fin-
ger-tight.
Lowering the vehicle X
Turn the crank of the jack anti-clockwise
until the vehicle is once again standing
firmly on the ground.
X Place the jack to one side. 344
Flat tyreBreakdown assistance
Page 349 of 401
Do not continue to drive in run-flat mode if:
R
you hear banging noises.
R the vehicle starts to shake.
R you see smoke and smell rubber.
R ESP ®
is intervening constantly.
R there are tears in the sidewalls of the tyre.
After driving in run-flat mode, you must have
the wheel(s) checked for damage at a quali-
fied specialis tworkshop which has the nec-
essary specialist knowledge and tools to carry
out the work required. The faulty tyre must be
replaced in every case.
Mercedes-Benz recommends that you use a
Mercedes-Benz Service Centre for this pur-
pose. In particular, work relevant to safety or
on safety-related systems must be carried out
at a qualified specialist workshop.
i When replacing one or all tyres, make
sure that you only use tyres marked
MOExtended and of the specified size for
the vehicle.
i Vehicles with MOExtended tyres are not
equipped with a TIREFIT kit at the factory.
It is therefore recommended that you addi-
tionally equip your vehicle with a TIREFIT kit
if you fit tyres that do not feature run-flat
properties, e.g. winter tyres. A TIREFIT kit
can be obtained from a Mercedes-Benz
Service Centre. Battery
Important safety notes
In order for the battery to achieve the maxi-
mum possible service life, it must always be
sufficiently charged.
Have the battery charge checked more fre-
quently if you use the vehicle mainly for short
trips or if you leave it standing idle for a
lengthy period.
Only replace a battery with a battery that has
been recommended by Mercedes-Benz. Consult a Mercedes-Benz Service Centre if
you wish to leave your vehicle parked up for
a long period of time. G
WARNING
Comply with safety precautions and take pro-
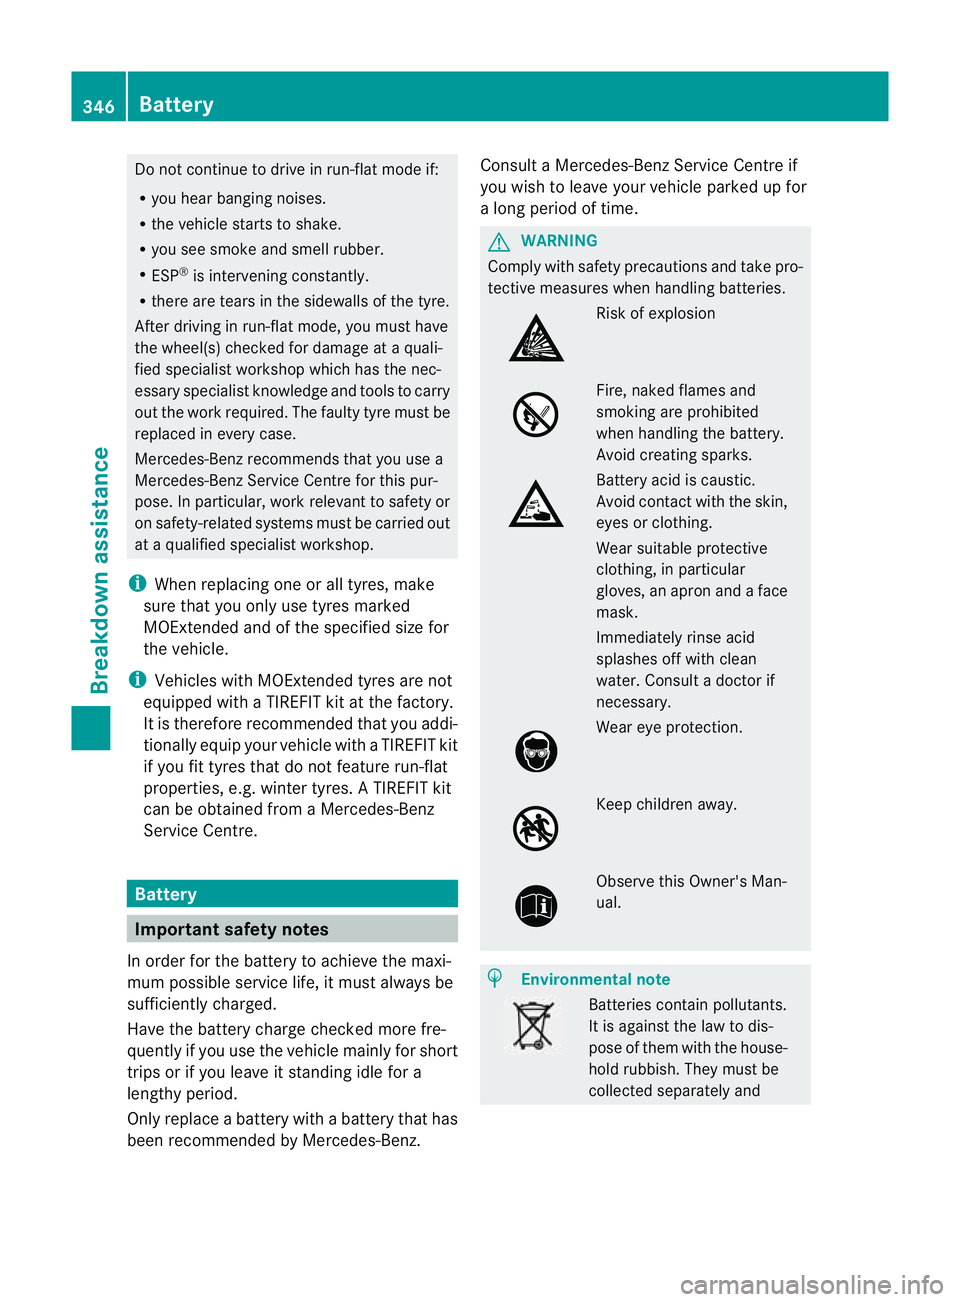
tective measures when handling batteries. Risk of explosion
Fire, naked flames and
smoking are prohibited
when handling the battery.
Avoid creating sparks.
Battery acid is caustic.
Avoid contact with the skin,
eyes or clothing.
Wear suitable protective
clothing, in particular
gloves, an apron and a face
mask.
Immediately rinse acid
splashes off with clean
water. Consult a doctor if
necessary.
Wear eye protection.
Keep children away.
Observe this Owner's Man-
ual.
H
Environmental note Batteries contain pollutants.
It is against the law to dis-
pose of them with the house-
hold rubbish. They must be
collected separately and 346
BatteryBreakdown assistance
Page 350 of 401
recycled in an environmen-
tally responsible manner.
Dispose of batteries in an
environmentally responsible
manner. Take discharged
batteries to a qualified spe-
cialist workshop, e.g. a
Mercedes-Benz Service
Centre, or to a special col-
lection point for old batter-
ies.
G
WARNING
For safety reasons, Mercedes-Benz recom-
mends that you only use batteries which have
been tested and approved for yourv ehicle by
Mercedes-Benz .These batteries provide
increased impact protection to prevent vehi-
cle occupants from suffering acid burns
should the battery be damaged in the event
of an accident.
To prevent acid burns, observe the following
safety notes when handling batteries:
R do not lean over the battery.
R do not place any metal objects on a battery.
Otherwise, you could cause a short circuit
and the battery's gas mixture could ignite.
R make sure that you do not create an elec-
trostatic charge, e.g. by wearing synthetic
clothing or as a result of friction on fabrics.
Therefore, you should not pull or slide the
battery over carpets or other synthetic
materials.
R never touch the battery first. To discharge
a possible electrostatic charge, step out of
the vehicle first and touch the bodywork.
R do not wipe the battery using a cloth. The
battery may explode as a result of electro-
static charge or due to flying sparks.
! Switch off the engine and remove the key
before disconnecting the terminal clamps
from the battery. On vehicles with KEY-
LESS-GO, make sure that the ignition is
switched off. Check that all the indicator
lamps in the instrumentc luster are off.You may otherwise destroy electronic compo-
nents, such as the alternator.
i When you park the vehicle, remove the
key if you do not require any electrical con-
sumers. The vehicle will then use very little
energy, thus conserving battery power.
Mercedes-Benz recommends that you do not
carry out work on batteries yourself, e.g.
removing or charging. Have this work per-
formed at a qualified specialist workshop, e.g.
a Mercedes-Benz Service Centre. Installation location of the battery
Your vehicle is equipped with a battery in the
engine compartment. It is fitted in front of the
front bulkhead on the right-hand side of the
vehicle when viewed in the direction of travel.
AMG vehicles: the battery is in the boot/
luggage compartment in the spare wheel well
on the right-hand side under the boot/lug-
gage compartment floor.
X Apply the parking brake firmly and, on vehi-
cles with automatic transmission, shift the
transmission to position P.
X Switch off all electrical consumers (e.g.
radio, blower, etc.).
X Turn the key to position 0(Ypage 153) in
the ignition lock and remove it, or, on vehi-
cles with KEYLESS-GO, make sure that the
ignition has been switched off
(Y page 153). All indicator lamps in the
instrument cluster must be off.
X Battery in the engine compartment:
open the bonnet (Y page 322). Battery
347Breakdown assistance Z