2011 MERCEDES-BENZ C-CLASS ESTATE service
[x] Cancel search: servicePage 350 of 401
recycled in an environmen-
tally responsible manner.
Dispose of batteries in an
environmentally responsible
manner. Take discharged
batteries to a qualified spe-
cialist workshop, e.g. a
Mercedes-Benz Service
Centre, or to a special col-
lection point for old batter-
ies.
G
WARNING
For safety reasons, Mercedes-Benz recom-
mends that you only use batteries which have
been tested and approved for yourv ehicle by
Mercedes-Benz .These batteries provide
increased impact protection to prevent vehi-
cle occupants from suffering acid burns
should the battery be damaged in the event
of an accident.
To prevent acid burns, observe the following
safety notes when handling batteries:
R do not lean over the battery.
R do not place any metal objects on a battery.
Otherwise, you could cause a short circuit
and the battery's gas mixture could ignite.
R make sure that you do not create an elec-
trostatic charge, e.g. by wearing synthetic
clothing or as a result of friction on fabrics.
Therefore, you should not pull or slide the
battery over carpets or other synthetic
materials.
R never touch the battery first. To discharge
a possible electrostatic charge, step out of
the vehicle first and touch the bodywork.
R do not wipe the battery using a cloth. The
battery may explode as a result of electro-
static charge or due to flying sparks.
! Switch off the engine and remove the key
before disconnecting the terminal clamps
from the battery. On vehicles with KEY-
LESS-GO, make sure that the ignition is
switched off. Check that all the indicator
lamps in the instrumentc luster are off.You may otherwise destroy electronic compo-
nents, such as the alternator.
i When you park the vehicle, remove the
key if you do not require any electrical con-
sumers. The vehicle will then use very little
energy, thus conserving battery power.
Mercedes-Benz recommends that you do not
carry out work on batteries yourself, e.g.
removing or charging. Have this work per-
formed at a qualified specialist workshop, e.g.
a Mercedes-Benz Service Centre. Installation location of the battery
Your vehicle is equipped with a battery in the
engine compartment. It is fitted in front of the
front bulkhead on the right-hand side of the
vehicle when viewed in the direction of travel.
AMG vehicles: the battery is in the boot/
luggage compartment in the spare wheel well
on the right-hand side under the boot/lug-
gage compartment floor.
X Apply the parking brake firmly and, on vehi-
cles with automatic transmission, shift the
transmission to position P.
X Switch off all electrical consumers (e.g.
radio, blower, etc.).
X Turn the key to position 0(Ypage 153) in
the ignition lock and remove it, or, on vehi-
cles with KEYLESS-GO, make sure that the
ignition has been switched off
(Y page 153). All indicator lamps in the
instrument cluster must be off.
X Battery in the engine compartment:
open the bonnet (Y page 322). Battery
347Breakdown assistance Z
Page 352 of 401
X
Switch off all electrical consumers (e.g.
radio, blower, etc.).
X Connect the positive terminal clamp and
secure the cover.
X Connect the negative terminal clamp.
X Battery in the engine compartment: put
the filter box back in place.
X Clip in the filter box's retaining clamps and
close them.
X Close the bonnet.
X AMG vehicles: fold downand close the
boot/luggage compartment floor.
X Close the boot/luggage compartment.
i If the powe rsupply has been interrupted,
e.g. if you reconnect the battery, you will
have to:
R set the clock; see the separate operating
instructions.
R reset the function for automatically fold-
ing the exterio rmirrors in/out by folding
the mirrors out once (Y page 113).Charging the battery
G
WARNING
Only charge the battery in a well-ventilated
area. As the battery is being charged, gases
can escape and generate minor explosions.
This could injure you and other persons or
cause damage to the paintwork or acid cor-
rosio nont he vehicle.
You can obtain information about battery
chargers which allow the battery to be
charged while still installed from a qualified
specialist workshop, e.g. aMercedes-Benz
Service Centre. G
WARNING
There is a risk of acid burns during the charg-
ing process due to the gases which escape
from the battery. Do not lean over the battery
during the charging process. G
WARNING
Battery acid is caustic. Avoid contact with the
skin, eyes or clothing.
! Only charge the installed battery with a
battery charger which has been tested and
approved by Mercedes-Benz .These battery
chargers allow the battery to be charged
while still installed.
! Only use battery chargers with a maxi-
mum charging voltage of 14.8 V.
! Only charge the battery using the jump-
start connection point.
The jump-starting connection point is in the
engine compartment (Y page 350).
X Open the bonnet (Y page 322).
X Connect the battery charger to the positive
terminal and earth point in the same order
as when connecting the donor battery in
the jump-starting procedure
(Y page 350).
X Read the battery charger's operating
instructions before charging the battery. Battery
349Breakdown assistance Z
Page 353 of 401
Jump-starting
G
WARNING
There is a risk of acid burns when jump-starting a vehicle due to the gases which escape from
the battery. Do not lean over the battery while the engine is being jump-started. G
WARNING
Gases escaping from the battery during jump-starting may cause minor explosions. Avoid cre-
ating sparks. Keep naked flames away from the battery, and do not smoke.
Comply with safety precautions when handling batteries. You will find these under "Battery" in
the index.
! Avoid repeated and lengthy starting attempts. Otherwise, non-combusted fuel may dam-
age the catalytic converter 18
and create a risk of fire.
Do not use a rapid-charging device to start the engine.
Make sure the jump leads are not damaged.
Make sure the jump leads are not touching any other metal objects when they are connected
to the battery.
If your vehicle's battery is discharged, the engine can be jump-started from another vehicle
or from a second battery using jump leads.
Observe the following points:
X The battery is not accessible in all vehicles. If the other vehicle's battery is not accessible,
jump-start the vehicle using a second battery or ajump-starting device.
X Only jump-start the vehicle when the engine is cold and the catalyti cconverter system has
cooled down 19
.
X Do not start the engine if the battery is frozen. Let the battery thaw first.
X Jump-starting may only be performed from batteries with a nominal voltage of 12 V.
X Only use jump leads which have a sufficient cross-section and insulated terminal clamps.
X Make sure that the jump leads cannot come into contact with parts, such as the pulley or
the fan. These parts move when the engine is started and while it is running.
X If the battery is fully discharged, leave the battery that is being used to jump-start connected
for a few minutes before attempting to start.T his charges the empty battery a little.
i Jump leads and further information about jump-starting can be obtained from any
Mercedes-Benz Service Centre, for example.
X Make sure that the two vehicles do not touch.
X Apply the parking brake firmly.
X Manual transmission: engage neutral.
X Automatic transmission: move the selector lever toP.
X Switch off all electrical consumers (e.g. radio, blower, etc.).
X Open the bonnet (Y page 322).
18 Only vehicles with a petrol engine.
19 Only vehicles with a petrol engine. 350
Jump-startingBreakdown assistance
Page 354 of 401
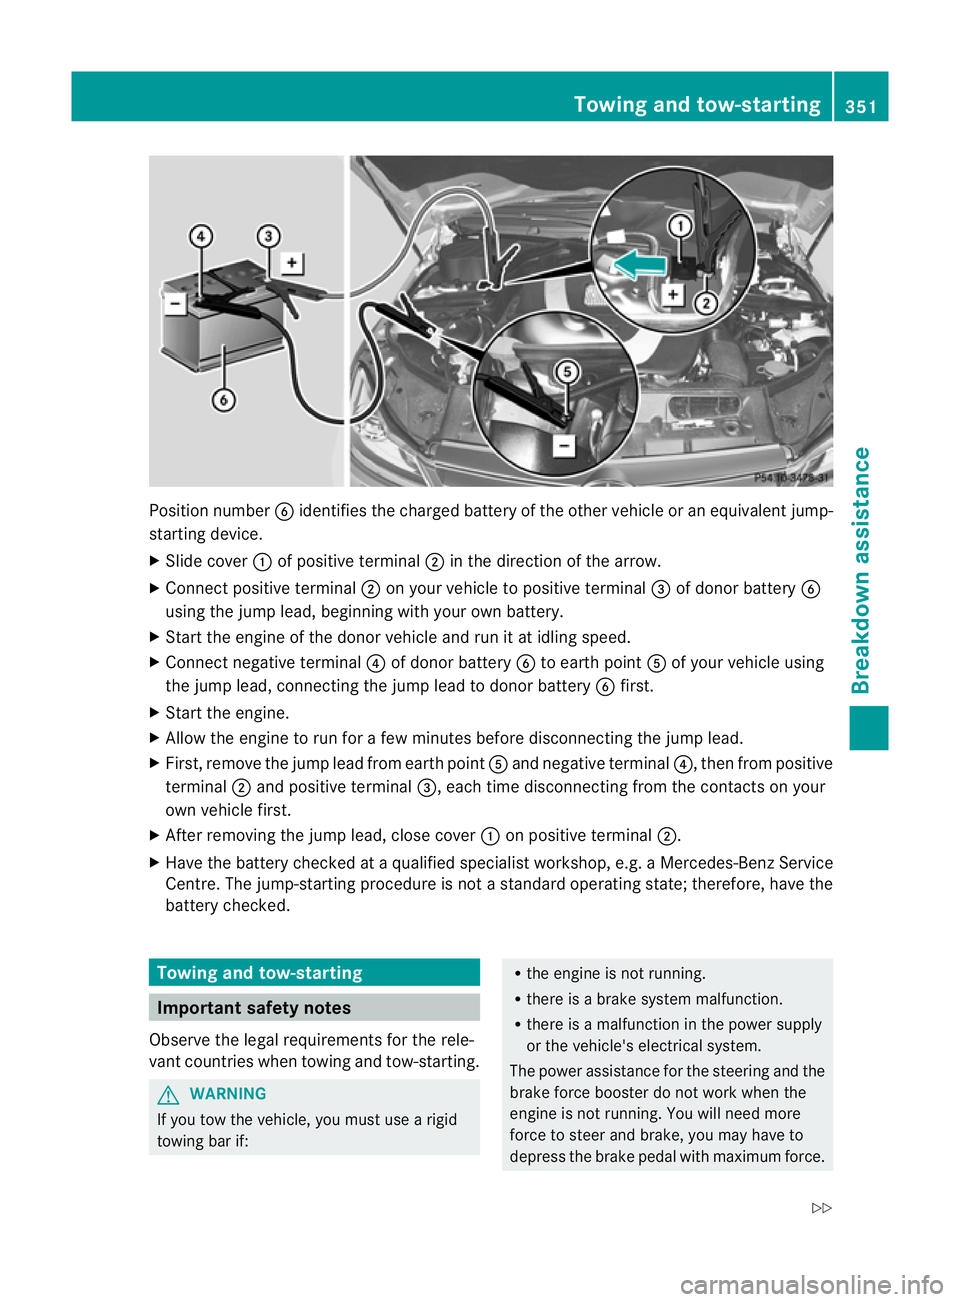
Position number
Bidentifies the charged battery of the other vehicle or an equivalent jump-
starting device.
X Slide cover :of positive terminal ;in the direction of the arrow.
X Connec tpositive terminal ;on your vehicle to positive terminal =of donor battery B
using the jump lead, beginning with your own battery.
X Start the engine of the donor vehicle and run it at idling speed.
X Connect negative terminal ?of donor battery Bto earth point Aof your vehicle using
the jump lead, connectingt he jump lead to donor battery Bfirst.
X Start the engine.
X Allow the engine to run for a few minutes before disconnecting the jump lead.
X First, remove the jump lead from earth point Aand negative terminal ?, then from positive
terminal ;and positive terminal =, each time disconnecting from the contacts on your
own vehicle first.
X After removing the jump lead, close cover :on positive terminal ;.
X Have the battery checked at a qualified specialist workshop, e.g. a Mercedes-Ben zService
Centre. The jump-starting procedure is not a standard operating state; therefore, have the
battery checked. Towing and tow-starting
Important safety notes
Observe the legal requirements for the rele-
vant countries when towing and tow-starting. G
WARNING
If you tow the vehicle, you must use a rigid
towing bar if: R
the engine is not running.
R there is a brake system malfunction.
R there is a malfunction in the power supply
or the vehicle's electrical system.
The power assistance for the steering and the
brake force booster do not work when the
engine is not running. You will need more
force to steer and brake, you may have to
depress the brake pedal with maximum force. Towing and tow-starting
351Breakdown assistance
Z
Page 358 of 401
cerned. Do not attempt to repair or bridge
faulty fuses. Otherwise, a circuit overload
could cause a fire .Have the cause traced and
rectified at a qualified specialist workshop,
e.g. a Mercedes-Benz Service Centre.
Blown fuses must be replaced with fuses of
the same rating, which you can recognise by
the colour and value. The fuse ratings are lis-
ted in the fuse allocatio nchart. AMercedes-
BenzS ervice Centre will be happy to advise
you.
If the newly inserted fuse also blows, have the
cause traced and rectified at a qualified spe-
cialist workshop, e.g. a Mercedes-Benz
Service Centre.
! Only use fuses that have been approved
for Mercedes-Benzv ehicles and which
have the correct fuse rating for the system
concerned. Otherwise, components or sys-
tems could be damaged. Before changing a fuse
X Park the vehicle and apply the parking
brake.
X Switch off all electrical consumers.
X Remove the key from the ignition lock.
The fuses are located in various fuse boxes:
R fuse box on the driver's side of the dash-
board
R fuse box in the engine compartment on the
left-hand side of the vehicle, when viewed
in the direction of travel
R fuse box in the boot/luggage compartment
on the right-hand side of the vehicle, when
viewed in the direction of travel
The fuse allocation chart is located in the
vehicle tool kit (Y page 335) in the stowage
compartment under the boot/luggage com-
partment floor. Dashboard fuse box
! Do not use a pointed objec tsuch as a
screwdriver to open the cover in the dash-
board. You could damage th edashboard or
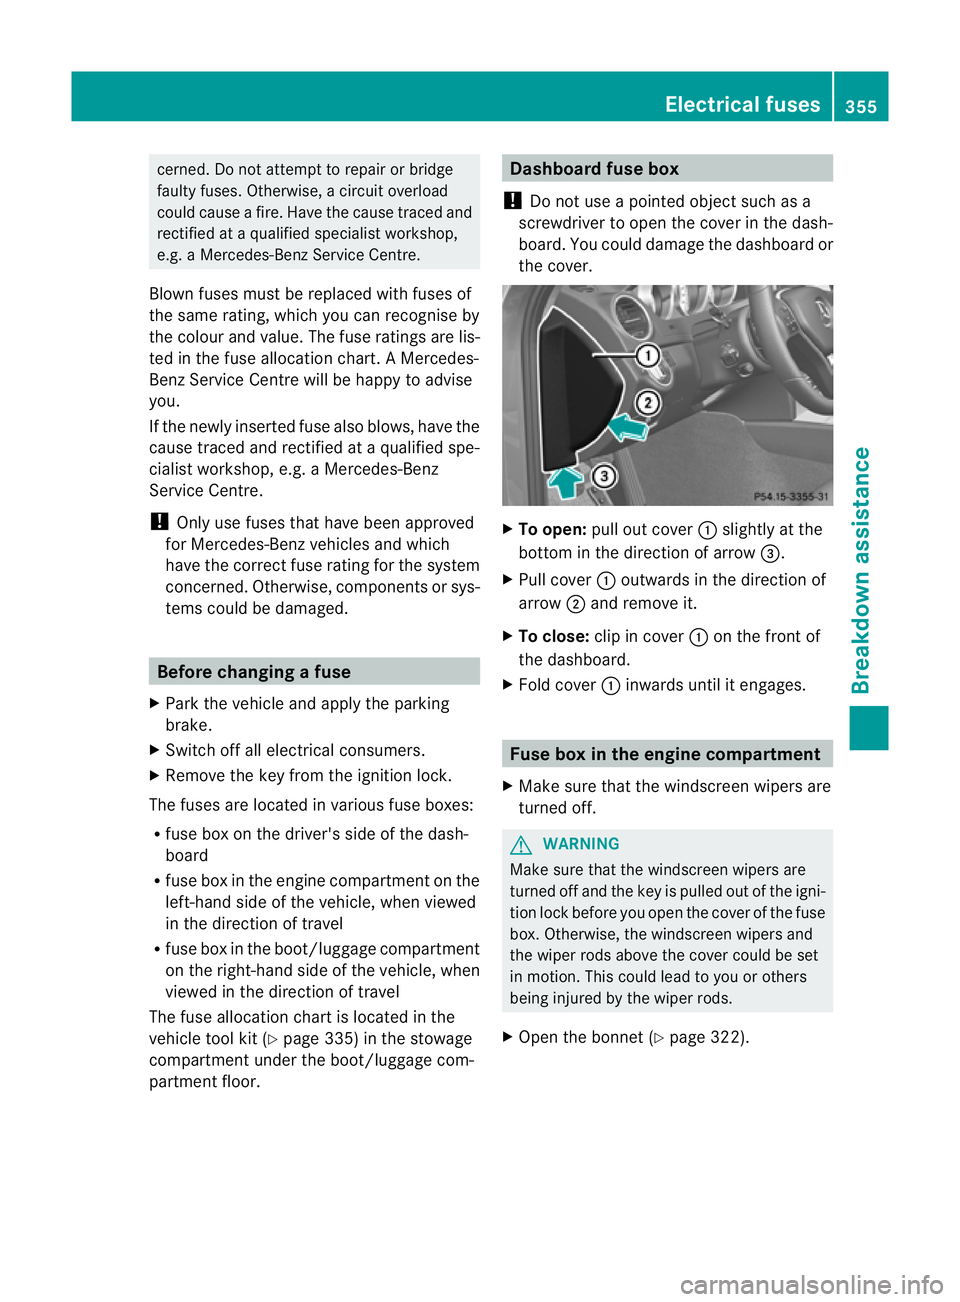
the cover. X
To open: pull out cover :slightly at the
bottom in the direction of arrow =.
X Pull cover :outwards in the direction of
arrow ;and remove it.
X To close: clip in cover :on the front of
the dashboard.
X Fold cover :inwards until it engages. Fuse box in the engine compartment
X Make sure that the windscree nwipers are
turned off. G
WARNING
Make sure that the windscreen wipers are
turned off and the key is pulled out of the igni-
tion lock before you open the cover of the fuse
box. Otherwise, the windscreen wipers and
the wiper rods above the cover could be set
in motion. This could lead to you or others
being injured by the wiper rods.
X Open the bonnet (Y page 322). Electrical fuses
355Breakdown assistance Z
Page 361 of 401
Useful information
i This Owner's Manual describes all models
and all standard and optional equipment
available to your vehicle at the time of pub-
lication of the Owner's Manual. Country-
specific deviations are possible. Please
note that your vehicle may not be equipped
with all features described. This also
applies to safety-relevan tsystems and
functions.
i Please read the information on qualified
specialist workshops (Y page 28).Important safety notes
G
WARNING
Tyres, wheels or accessories which have not
been approved by Mercedes-Ben zfor your
vehicle or are not used as they should be, can
impair driving safety. As a result, you could
cause an accident .Before purchasing and
using them, enquire about their suitability,
legal stipulations and factory recommenda-
tions at a Mercedes-Benz Service Centre.
Modification work on the brake system and
wheels is not permitted, nor is the use of
spacer plates or brake dust shields. This inva-
lidates the General Operating Permit for the
vehicle.
i Further information about tyres and
wheels can be obtained from any
Mercedes-Benz Service Centre. Operation
Notes on driving
R While driving, pay attention to vibrations,
noises and unusual handling characteris-
tics, e.g. pulling to one side. This may indi-
cate that the wheels or tyres are damaged.
If you suspect that a tyre is defective,
reduce your speed immediately. Stop the vehicle as soon as possible to chec
kthe
wheels and tyres for damage. Hidden tyre
damage could also be causing the unusual
handling characteristics. If you find no
signs of damage, have the wheels and tyres
examined at a qualified specialist work-
shop, e.g. a Mercedes-Ben zService
Centre.
R When parking your vehicle, make sure that
the tyres do not get deformed by the kerb
or other obstacles. If it is necessary to drive
over kerbs, speed humps or similar eleva-
tions, try to do so slowly and at an obtuse
angle. Otherwise, the tyres, particularly the
sidewalls, can get damaged. Notes on regularly inspecting wheels
and tyres
R Regularly chec kthe wheels and tyres of
your vehicle for damage (e.g. cuts, punctu-
res, tears, bulges on tyres and deformation,
cracks or severe corrosion on wheels), at
least every 14 days, as well as after driving
off-road or on rough roads. Damaged
wheels can cause a loss of tyre pressure.
R Regularly check the tyre tread depth and
the condition of the tread across the whole
width of the tyre (Y page 359). If neces-
sary, turn the front wheels to full lock in
order to inspect the inner side of the tyre
surface.
R All wheels must have a valve cap to protect
the valve against dirt and moisture. Do not
fit anything onto the valve (such as tyre
pressure monitoring systems) other than
the standard valve cap or other valve caps
approved by Mercedes-Ben zfor your vehi-
cle.
R Regularly check the pressure of all the tyres
including the emergency spare wheel or the
spare wheel, particularly prior to long trips,
and correc tthe pressure as necessary
(Y page 361). 358
OperationWheels and tyres
Page 362 of 401
Tyre tread
G
WARNING
Bear in mind that:
R tyre grip decreases rapidly on we troads
when the tread depth is less than 3mm.
Thus, you should replace tyres that have
insufficient tread.
R winter tyres should be replaced when the
tread depth is 4mmorless as they no lon-
ger provide adequate grip.
R the tread on a tyre may not wear evenly.
Thus, you should regularly check the tread
depth and the condition of the tread across
the entire width of all tyres. If necessary,
turn the fron twheels to full lock in order to
inspect the tyre tread more easily.
Otherwise, you could lose control of the vehi-
cle and cause an accident due to the reduced
grip of the tyres on the road. Notes on selecting, fitting and replac-
ing tyres
R Only fit tyres and wheels of the same type
and make.
R Only fit tyres of the correct size onto the
wheels.
R After fittingn ew tyres, run them in at mod-
erate speeds for the first 100 km, as they
only reach their full performance after this
distance.
R Do not drive with tyres which have too little
tread depth, as this significantly reduces
the traction on wet roads (aquaplaning).
R Replace the tyres after six years at the lat-
est, regardless of wear. This also applies to
the emergency spare wheel/spare wheel. MOExtended tyres (tyres with run-flat
characteristics)
MOExtended tyres (tyres with run-flat char-
acteristics) allow you to continue driving the vehicle even when one or more tyres lose all
air pressure.
MOExtended tyres may only be used in con-
junction with the tyre pressure loss warning
system or with the tyre pressure monitor and
on wheels specifically tested by Mercedes-
Benz.
i Vehicles with MOExtended tyres are not
equipped with a TIREFIT kit at the factory.
It is therefore recommended that you addi-
tionally equip your vehicle with the TIREFIT
kit if you fit tyres that do not feature run-
flat properties, e.g. winter tyres. A TIREFIT
kit can be obtained from a Mercedes-Benz
Service Centre.
Notes on driving with MOExtended tyres in
the event of a flat tyre can be found in the
"Breakdown assistance" section
(Y page 345). Winter operation
Points to remember
At the onset of winter, have your vehicle win-
terproofed at a qualified specialist workshop,
e.g. at a Mercedes-Benz Service Centre.
Observe the notes in the "Changing a wheel"
section (Y page 365). Driving with summer tyres
At temperatures below +7 †, summer tyres
lose elasticity and therefore traction and
braking power; change the tyres on your vehi-
cle to M+S tyres. Using summer tyres at very
cold temperatures could cause tears to form,
thereby damaging the tyres permanently.
Mercedes-Benzc annot accept responsibility
for this type of damage. Winter operation
359Wheels and tyres Z
Page 363 of 401
M+S tyres
At temperatures below +7 †, use winter tyres
or all-seaso ntyres .Both types of tyre are
identified by the M+S marking.
Only winter tyres bearing the isnowflake
symbol in addition to the M+S marking pro-
vide the best possible grip in wintry road con-
ditions. Only these tyres will allow driving
safety systems such as ABS and ESP ®
to
function optimally in winter. These tyres have
been developed specifically for driving in
snow.
Use M+S tyres of the same make and tread
on all wheels to maintain safe handling char-
acteristics. G
WARNING
M+S tyres with a tread depth of less than
4mmm ust be replaced. They are no longer
suitable for winter use and can no longer pro-
vide sufficient grip .This could cause you to
lose control of your vehicle and cause an acci-
dent.
Always observe the maximum permissible
speed specified for the M+S tyres you have
fitted.
If you fit M+S tyres that have a lower maxi-
mum permissible speed than that of the vehi-
cle, affix an appropriate warning sign in the
driver's field of vision. This can be obtained
at a qualified specialist workshop, e.g. at a
Mercedes-Benz Service Centre.
Under these circumstances, you should also
restrict the maximum speed of the vehicle
using permanent SPEEDTRONIC so that it
does not exceed the maximum permissible
speed for the M+S tyres(Y page 183).
When you have fitted M+S tyres:
X Check the tyre pressures (Y page 361).
X Restart the tyre pressure loss warning sys-
tem (Y page 362).
X Restart the tyre pressure monitor
(Y page 365). G
WARNING
If you fit the spare wheel when driving with M
+S tyres, bear in mind that driving stability will
be impaired due to unstable cornering char-
acteristics caused by the different tyres. You
should therefore adapt your driving style and
drive carefully.
Have the spare wheel replaced at the nearest
qualified specialist workshop which has the
necessary specialist knowledge and tools to
carry out the work required. Mercedes-Benz
recommends that you use aMercedes-Benz
Service Centre for this purpose. In particular,
work relevant to safety or on safety-related
systems must be carried out at a qualified
specialist workshop. Snow chains
For safety reasons, Mercedes-Benz recom-
mends that you only use snow chains that
have been specially approved for your vehicle
by Mercedes-Benz, or that are of a corre-
sponding standard of quality.
If you intend to fit snow chains, please bear
the following points in mind:
R it is not permissible to attach snow chains
to all wheel-tyre combinations; see the
information under "Wheel/tyre combina-
tions" in the "Wheels and tyres" section.
R snow chains must not be fitted to emer-
gency spare wheels, e.g. a "Minispare"
emergency spare wheel.
R only fit snow chains in pairs and to the rear
wheels, even on vehicles with 4MATIC.
Observe the manufacturer's installation
instructions.
! Vehicles with steel wheels: if you wish
to fit snow chains to steel wheels, make
sure that you remove the respective
wheels' hubcaps first .The hubcaps may
otherwise be damaged.
Do not exceed the maximum permissible
speed of 50 km/h. 360
Winter operationWheels and tyres