2011 MERCEDES-BENZ C-CLASS COUPE ECU
[x] Cancel search: ECUPage 289 of 373
not secure the objects sufficiently in the event
of an accident.
Luggage nets are located in the front-
passenger footwell and on the left-hand side
of the boot. Through-loading facility in the rear
benc
hseat
Important safety notes G
WARNING
Do not carry heavy or hard objects inside the
vehicle or in the boot unless they are secured.
Otherwise, you and other vehicle occupants
could be injured by object sbeing thrown
around the vehicle in the event of sharp brak-
ing, a sudden change in direction or an acci-
dent. G
WARNING
Always drive with the boot lid closed. Exhaust
fumes could otherwise enter the vehicle inte-
rior.
The left-hand and right-hand rear seat backr-
ests can be folded down separately to
increase the boot capacity.
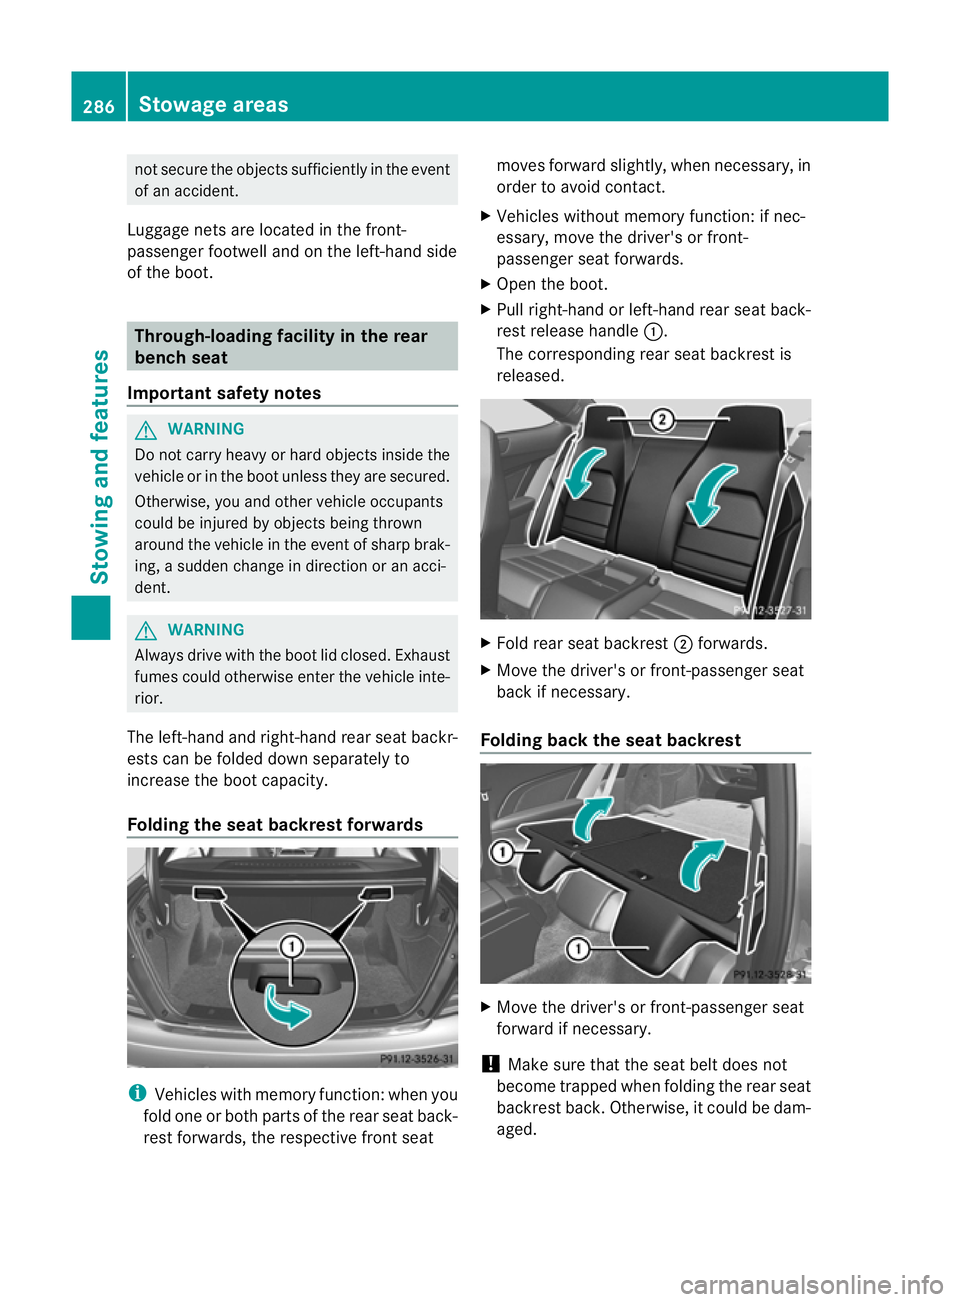
Folding the seat backrest forwards i
Vehicles with memory function :when you
fold one or both parts of the rear seat back-
rest forwards, the respective front seat moves forward slightly, when necessary, in
order to avoid contact.
X Vehicles without memory function: if nec-
essary, move the driver's or front-
passenger seat forwards.
X Open the boot.
X Pull right-hand or left-hand rear seat back-
rest release handle :.
The corresponding rear seat backrest is
released. X
Fold rear seat backrest ;forwards.
X Move the driver's or front-passenger seat
back if necessary.
Folding back the seat backrest X
Move the driver's or front-passenger seat
forward if necessary.
! Make sure that the seat belt does not
become trapped when folding the rear seat
backrest back. Otherwise, it could be dam-
aged. 286
Stowage areasStowing and features
Page 290 of 373
X
Fold rea rseat backrest :back until it
engages. G
WARNING
Make sure that the rear seat backrest is cor-
rectly engaged. Otherwise, vehicle occupants
could be injured by objects being thrown
around if you:
R brake sharply
R change direction suddenly
R are involved in an accident
If the rear seat backrest is not engaged, this
will be shown in the multifunction display in
the instrument cluster.
i You should always engage the rear seat
backrests if you do not need the through-
loading feature. This will preven tunauthor-
ised access to the boot from the vehicle
interior.
X Move the driver's or front-passenger seat
back if necessary. Securing
aload
Lashing eyelets G
WARNING
Distribute the load on the lashing eyelets
evenly.
Otherwise, vehicle occupants could be
injured by objects being thrown around if you:
R brake sharply
R change directio nsuddenly
R are involved in an accident
Please observe the loading guidelines.
Observe the following notes on securing
loads:
R secure the load using the lashing eyelets.
R do no tuse elastic straps or nets to secure
a load, as these are only intended as an
anti-slip protection for light loads. R
do not route lashing materials across sharp
edges or corners.
R pad sharp edges for protection.
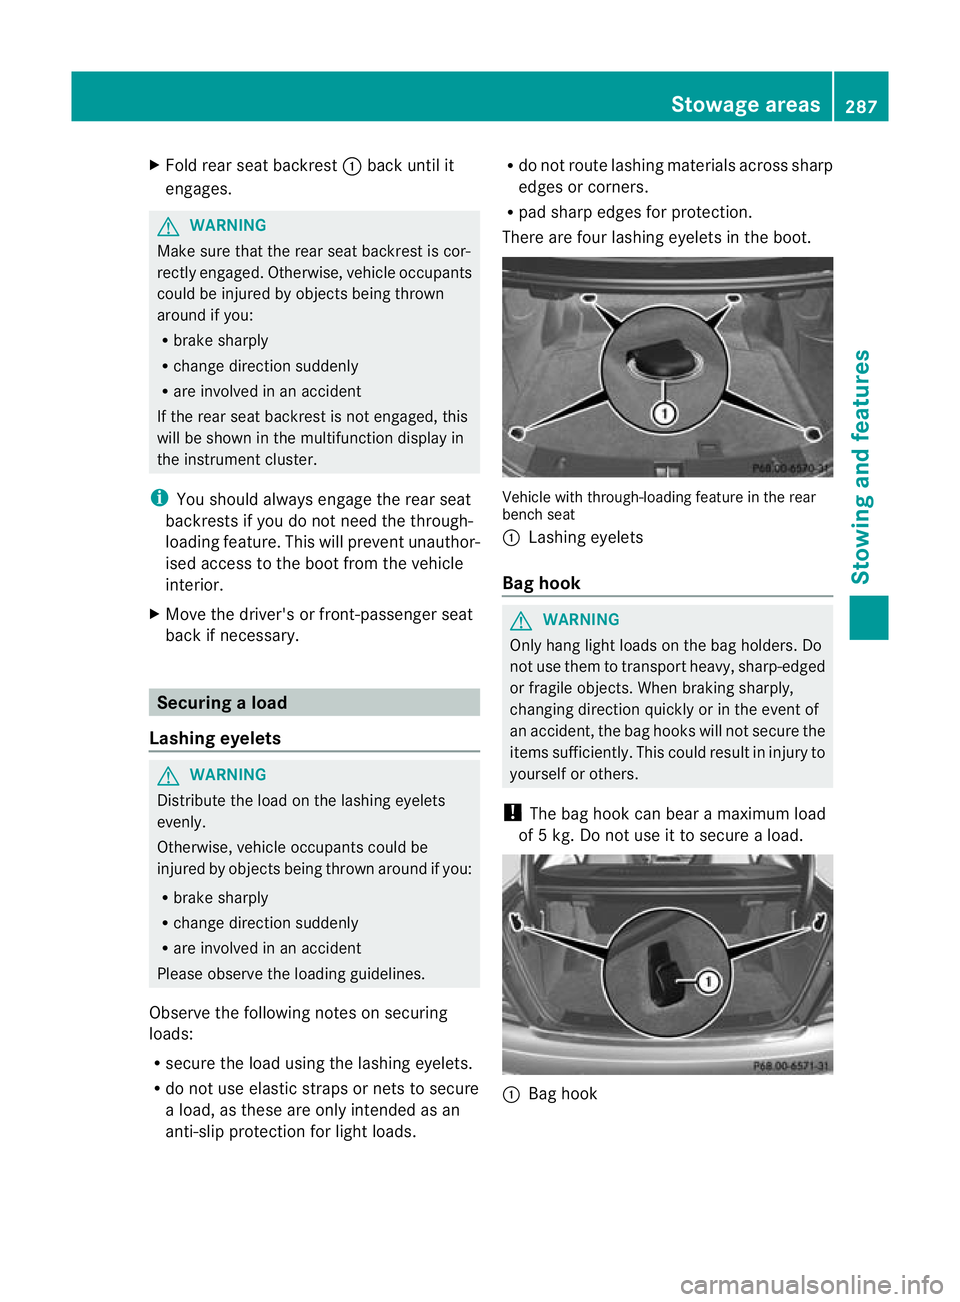
There are four lashing eyelets in the boot. Vehicle with through-loading feature in the rear
bench seat
:
Lashing eyelets
Bag hook G
WARNING
Only hang light loads on the bag holders. Do
not use them to transport heavy, sharp-edged
or fragile objects. When braking sharply,
changing direction quickly or in the event of
an accident, the bag hooks will not secure the
items sufficiently. This could result in injury to
yourselforo thers.
! The bag hoo kcan bear a maximum load
of 5 kg. Do not use it to secure a load. :
Bag hook Stowage areas
287Stowing and features Z
Page 291 of 373
Stowage well under the boot floor
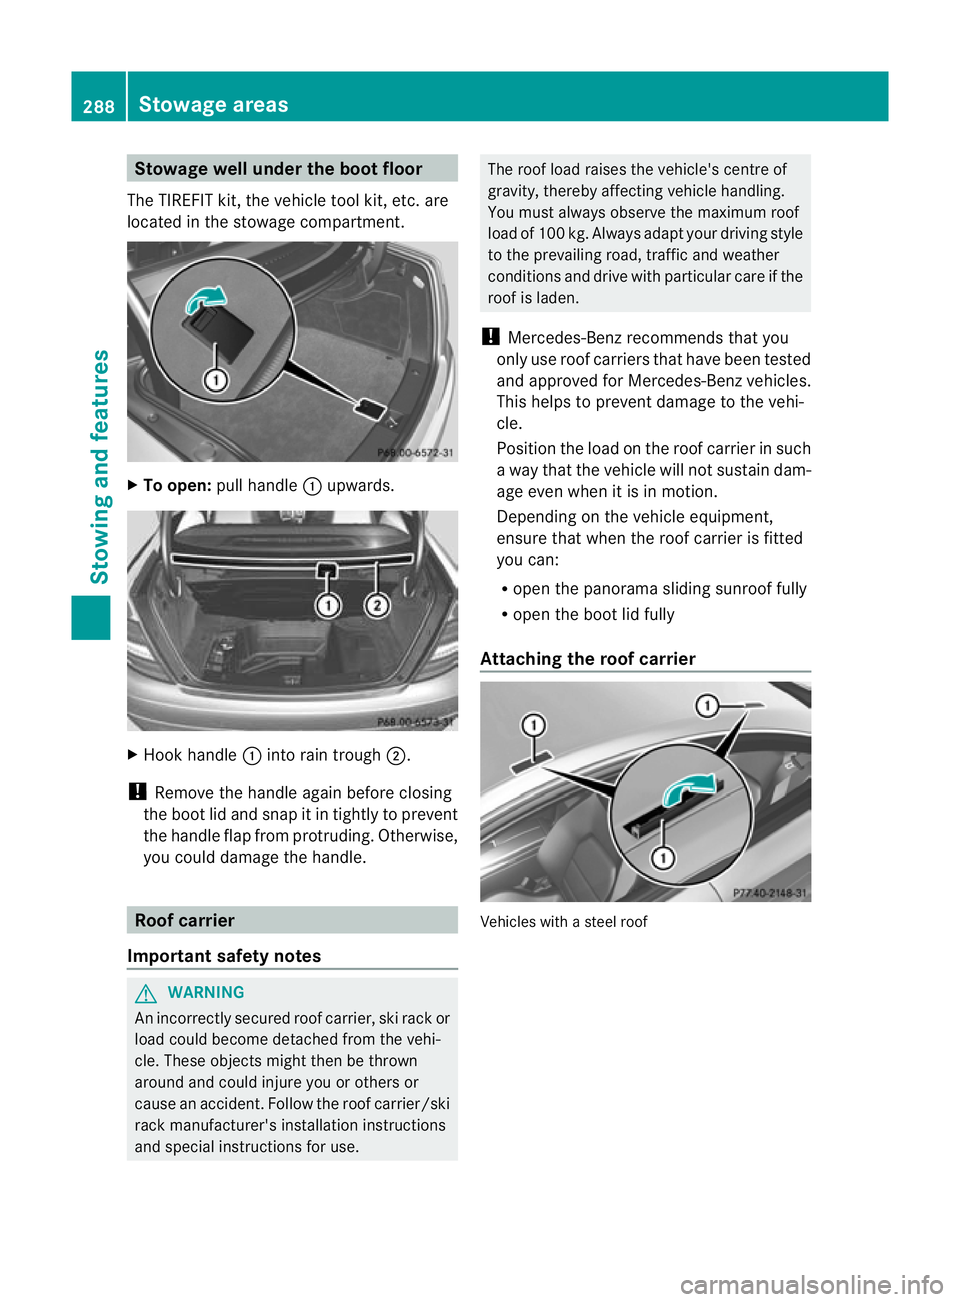
The TIREFIT kit, the vehicle tool kit, etc. are
located in the stowage compartment. X
To open: pull handle :upwards. X
Hook handle :into rain trough ;.
! Remove the handle again before closing
the boot lid and snap it in tightly to prevent
the handle flap from protruding. Otherwise,
you could damage the handle. Roof carrier
Important safety notes G
WARNING
An incorrectly secured roof carrier, ski rack or
load could become detached from the vehi-
cle. These objects might then be thrown
around and could injure you or others or
cause an accident. Follow the roof carrier/ski
rack manufacturer's installation instructions
and special instructions for use. The roof load raises the vehicle's centre of
gravity, thereby affecting vehicle handling.
You must always observe the maximum roof
load of 100 kg. Always adapt your driving style
to the prevailing road, traffic and weather
conditions and drive with particular care if the
roof is laden.
! Mercedes-Benz recommends that you
only use roof carriers that have been tested
and approved for Mercedes-Benz vehicles.
This helps to prevent damage to the vehi-
cle.
Position the load on the roof carrier in such
a way that the vehicle will not sustain dam-
age even when it is in motion.
Depending on the vehicle equipment,
ensure that when the roof carrier is fitted
you can:
R open the panorama sliding sunroof fully
R open the boot lid fully
Attaching the roof carrier Vehicles with a steel roof288
Stowage areasStowing and features
Page 292 of 373
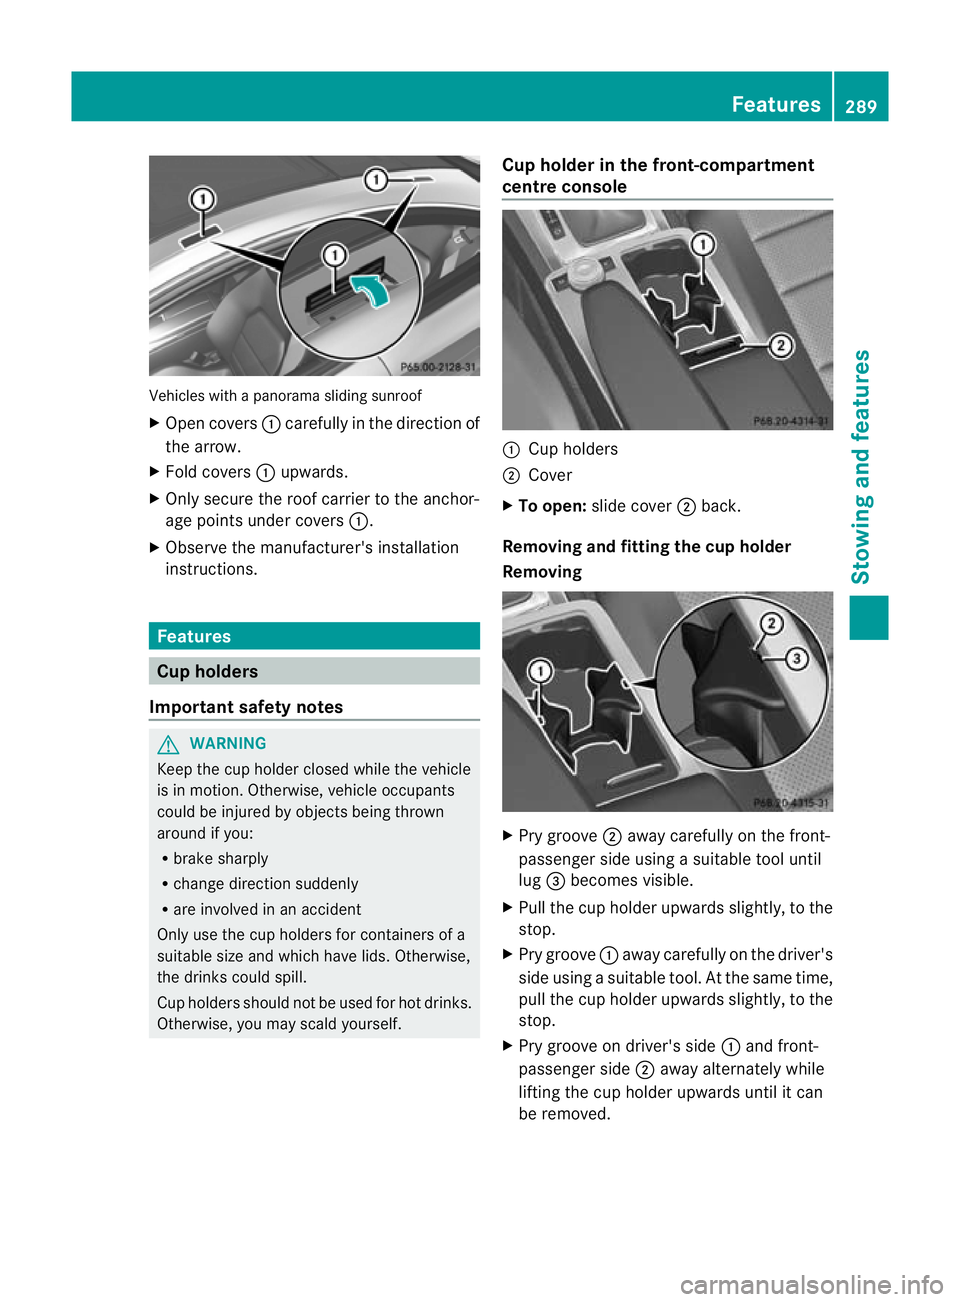
Vehicles with a panorama sliding sunroof
X
Open covers :carefully in the direction of
the arrow.
X Fold covers :upwards.
X Only secure the roof carrier to the anchor-
age points under covers :.
X Observe the manufacturer's installation
instructions. Features
Cup holders
Important safety notes G
WARNING
Keep the cup holder closed while the vehicle
is in motion. Otherwise, vehicle occupants
could be injured by objects being thrown
around if you:
R brake sharply
R change direction suddenly
R are involved in an accident
Only use the cup holders for containers of a
suitable size and which have lids. Otherwise,
the drinks could spill.
Cup holders should not be used for hot drinks.
Otherwise, you may scald yourself. Cup holder in the front-compartment
centre console
:
Cup holders
; Cover
X To open: slide cover ;back.
Removing and fitting the cup holder
Removing X
Pry groove ;away carefully on the front-
passenger side using a suitable tool until
lug =becomes visible.
X Pull the cup holder upwards slightly, to the
stop.
X Pry groove :away carefully on the driver's
side using a suitable tool. At the same time,
pull the cup holder upwards slightly, to the
stop.
X Pry groove on driver's side :and front-
passenger side ;away alternately while
lifting the cup holder upwards until it can
be removed. Features
289Stowing and features Z
Page 300 of 373
Frequencies for the garage door opener
The radio type approval number and the frequency range for the garage door opener can be
found on the Internet at: http://www.mercedes-benz.de/betriebsanleitung. Floormat on the driver's side
G
WARNING
Make sure that there is sufficien tclearance
around the pedals when floormats are used,
and that the floormats are properly secured.
The floormats must be correctly secured at all
times using retainers and press-studs.
Before you drive off, chec kthe floormats and
secure if necessary. Afloormat which is not
properly secured can slip and, thereby, inter-
fere with the movemen tofthe pedals.
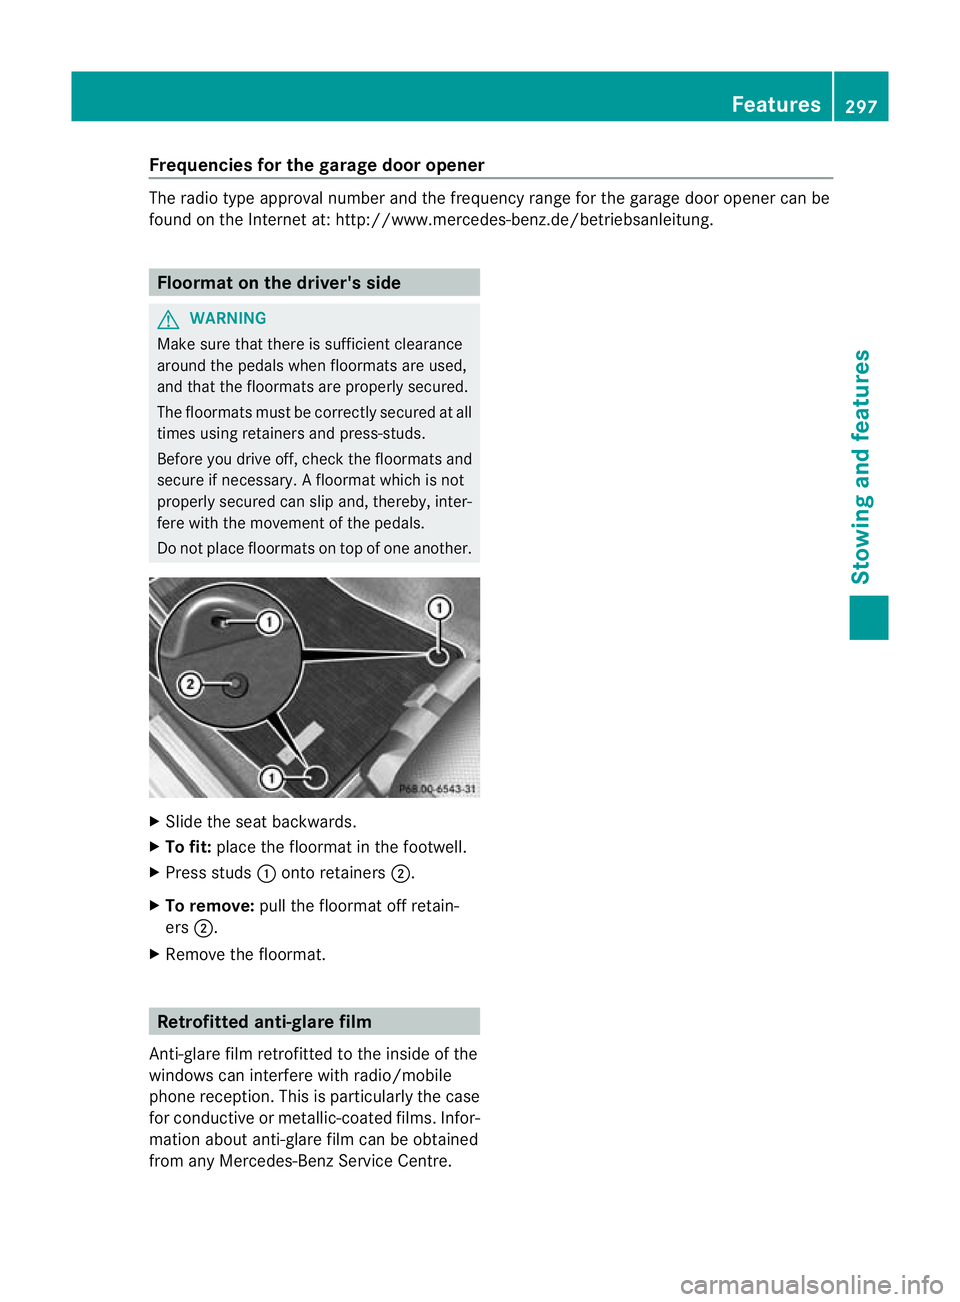
Do not place floormats on top of one another. X
Slide the seat backwards.
X To fit: place the floormat in the footwell.
X Press studs :onto retainers ;.
X To remove: pull the floormat off retain-
ers ;.
X Remove the floormat. Retrofitted anti-glare film
Anti-glare film retrofitted to the inside of the
windows can interfere with radio/mobile
phone reception. This is particularly the case
for conductive or metallic-coated films. Infor-
mation about anti-glare film can be obtained
from any Mercedes-Benz Service Centre. Features
297Stowing and features Z
Page 306 of 373

Example: vehicles with a diesel engine
X
Pull oil dipstick :outoft he oil dipstick
tube.
X Wipe off oil dipstick :.
X Slowly slide oil dipstick :into the guide
tube to the stop, and take it out again.
The oil level is correct if the level is between
MIN mark =and MAX mark ;.
X Top up the oil if necessary.
Adding engine oil H
Environmental note
When topping up the oil, take care not to spill
any. If oil enters the soil or waterways, it is
harmful to the environment. G
WARNING
If engine oil comes into contact with hot
engine parts, it may ignite and you could burn
yourself. Do not spill any engine oil on hot
engine parts. Example: engine oil cap X
Turn cap :anti-clockwise and remove it.
X Top up with the amount of oil required.
Fill carefully to the maximum mark on the oil
dipstick.
i Depending on the engine, the difference
between the minimum mark and the maxi-
mum mark is approximately 1.5 – 2 litres.
! Do not add too much oil. If the oil level is
above the "max" mark on the dipstick, too
much oil has been added. This can lead to
damage to the engine or the catalytic con-
verter. Have excess oil siphoned off.
For further information on engine oil, see
(Y page 355).
X Replace cap :on the filler neck and
tighten clockwise.
Ensure that the cap locks into place
securely. Checking and adding other service
products
Checking the coolant level Only check the coolant level when the vehicle
is on a level surface and the engine has cooled
down.
X
Turn the key to position 2(Y page 137) in
the ignition lock.
On vehicles with KEYLESS-GO, press the
Start/Stop button twice (Y page 137).
X Check the coolant temperature display in
the instrument cluster. G
WARNING
The cooling system is pressurised. Therefore,
only unscrew the cap once the engine has
cooled down. The coolant temperature gauge
must display less than 70 †.Otherwise, you
could be scalded if hot coolant escapes. Engine compartment
303Maintenance and care Z
Page 312 of 373

graphite coating could be damaged. This
could cause wiper noise.
X Fold the wiper arms away from the wind-
screen.
X Clean the wiper blades carefully using a
damp cloth.
X Fold the windscreen wipers back again
before switching on the ignition.
! Hold the wiper arm securely when folding
back. The windscreen could be damaged if
the wiper arm hits against it suddenly.
Cleaning the exterior lighting X
Clean the plastic lenses of the exterior
lighting using a wet sponge and a mild
cleaning agent, e.g. Mercedes-Benz car
shampoo or cleaning cloths.
! Only use cleaning agents or cleaning
cloths that are suitable for plastic lenses.
Unsuitable cleaning agents or cleaning
cloths could scratch or damage the plastic
lenses of the exterior lighting.
Cleaning the sensors X
Clean sensors :of the driving systems
with water, car shampoo and a soft cloth. !
If you clean the sensors with a high-pres-
sure cleaner, make sure that you keep a
distance of at least 30 cm between the
vehicle and the high-pressure cleaner noz-
zle. Information about the correct distance
is available from the equipment manufac-
turer.
Cleaning the reversing camera X
Use clear water and a soft cloth to clean
camera lens :.
! Do not clean the camera lens and the area
around the reversing camera with a high-
pressure cleaner.
Cleaning the exhaust tail pipes Impurities combined with the effects of road
grit and corrosive environmental factors may
cause flash rust to form on the surface. You
can restore the original shine of the exhaust
tail pipe by cleaning it regularly, especially in
winter and after washing.
!
Do not clean the exhaust tail pipes with
alkaline-based cleaning agents, such as
wheel cleaner.
X Clean the exhaust tail pipes with a chrome
care product tested and approved by
Mercedes-Benz.
Cleaning the trailer tow hitch The ball coupling must be cleaned if it
becomes dirty or corroded. Care
309Maintenance and care Z
Page 317 of 373
Useful information
i This Owner's Manual describes all models
and all standard and optional equipment
available to your vehicle at the time of pub-
lication of the Owner's Manual. Country-
specific deviations are possible. Please
note that your vehicle may not be equipped
with all features described. This also
applies to safety-relevan tsystems and
functions.
i Please read the information on qualified
specialist workshops (Y page 26).Where will I find...?
Warning triangle
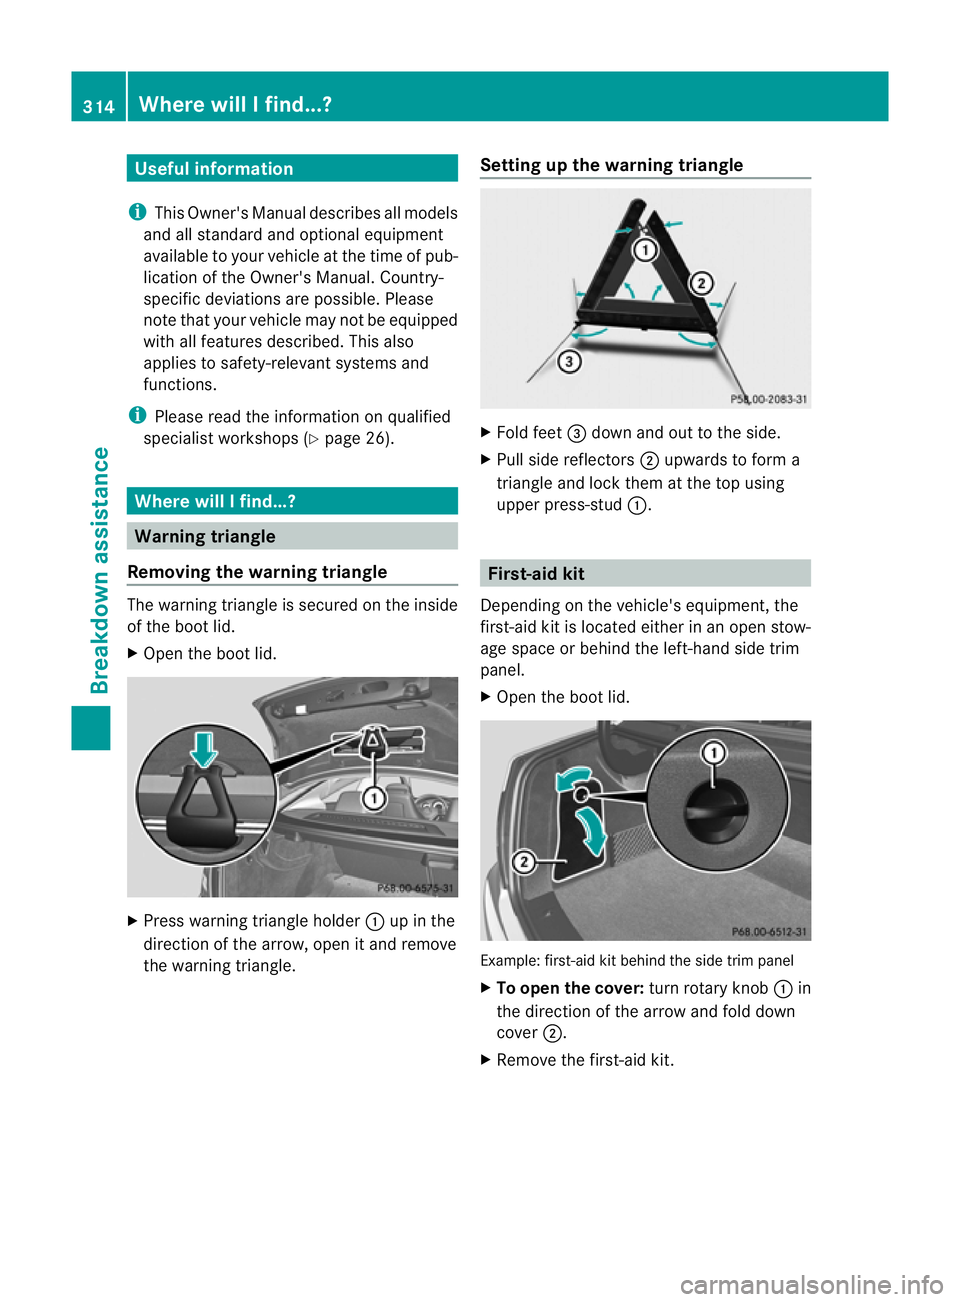
Removing the warning triangle The warning triangle is secured on the inside
of the boo tlid.
X Open the boot lid. X
Press warning triangle holder :up in the
direction of the arrow, open it and remove
the warning triangle. Setting up the warning triangle X
Fold feet =down and out to the side.
X Pull side reflectors ;upwards to form a
triangle and lock the matthe top using
upper press-stud :. First-aid kit
Depending on the vehicle's equipment, the
first-aid kit is located either in an open stow-
age space or behind the left-hand side trim
panel.
X Open the boot lid. Example: first-aid kit behind the side trim panel
X
To open the cover: turn rotary knob:in
the direction of the arrow and fold down
cover ;.
X Remove the first-aid kit. 314
Where will I find...?Breakdown assistance