2011 MAZDA MODEL RX 8 power steering
[x] Cancel search: power steeringPage 184 of 442

Black plate (184,1)
Signal Warning/Indicator Lights Page
Low Fuel Warning Light 5-47
Seat Belt Warning Light/Beep 5-47
Door-Ajar Warning Light 5-49
Low Washer Fluid Level Warning Light 5-49
Automatic Transmission Warning Light 5-49
Tire Pressure Monitoring System Warning Light 5-50
KEY Warning Light (Red)/KEY Indicator Light (Green) 5-52
Security Indicator Light 5-53
Headlight High-Beam Indicator Light 5-54
Shift Position Indicator Light 5-54
TCS/DSC Indicator Light 5-55
DSC OFF Indicator Light 5-55
Cruise Main Indicator Light (Amber)/Cruise Set Indicator Light (Green) 5-55
Lights-On Indicator Light 5-56
Power Steering Malfunction Indicator Light 5-56
Headlight Auto-Leveling Malfunction Indicator Light 5-56
5-42
Driving Your Mazda
Warning/Indicator Lights and Beep Sounds
RX-8_8BQ7-EA-10H_Edition1 Page184
Wednesday, July 14 2010 11:50 AM
Form No.8BQ7-EA-10H
Page 198 of 442

Black plate (198,1)
Cruise Set Indicator Light (Green)
The indicator light illuminates green when
a cruising speed has been set.
qLights-On Indicator Light
This indicator light illuminates when the
exterior lights and dashboard illumination
are on.
qPower Steering Malfunction
Indicator Light
This indicator light illuminates when the
ignition is switched ON, and turns off
when the engine is started.
If the light remains illuminated after the
engine is started, or illuminates while
driving, turn off the engine after parking
in a safe place, and then start the engine
again.
If the light does not illuminate after
restarting the engine, this indicates that
the power steering is restored and normal
steering is possible.
If the light remains illuminated, the power
steering is still inoperable. Consult an
Authorized Mazda Dealer.NOTE
lThe power steering system is inoperable
when the power steering malfunction
indicator light illuminates. Steering is
possible, but requires more physical effort.
lRepeatedly jerking the steering wheel left
and right while the vehicle is stopped or
moving extremely slowly will cause the
power steering system to go into protective
mode which will make the steering feel
heavy, but this does not indicate a
malfunction. If this occurs, park the vehicle
safely and wait a few minutes for the system
to return to normal.
qHeadlight Auto-Leveling
Malfunction Indicator Lightí
This indicator light stays on for a few
seconds when the ignition is switched
ON.
Thereafter, the indicator light will
illuminate when the headlight auto-
leveling system has a malfunction.
If the indicator light illuminates, contact
an Authorized Mazda Dealer.
5-56
Driving Your Mazda
íSome models.
Warning/Indicator Lights and Beep Sounds
RX-8_8BQ7-EA-10H_Edition1 Page198
Wednesday, July 14 2010 11:51 AM
Form No.8BQ7-EA-10H
Page 268 of 442

Black plate (268,1)
Audio Control Switch
Operation
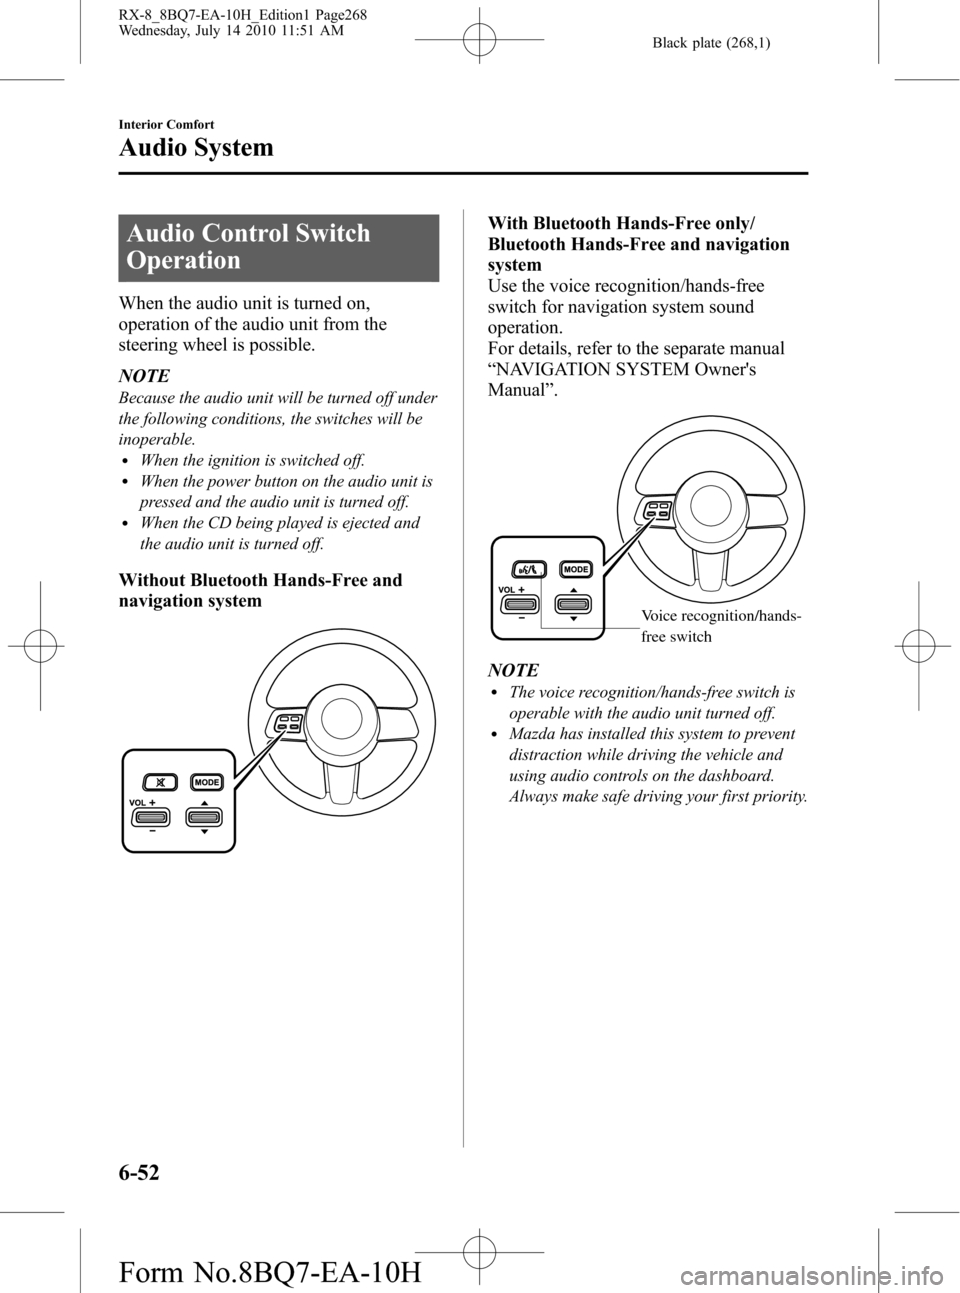
When the audio unit is turned on,
operation of the audio unit from the
steering wheel is possible.
NOTE
Because the audio unit will be turned off under
the following conditions, the switches will be
inoperable.
lWhen the ignition is switched off.lWhen the power button on the audio unit is
pressed and the audio unit is turned off.
lWhen the CD being played is ejected and
the audio unit is turned off.
Without Bluetooth Hands-Free and
navigation system
With Bluetooth Hands-Free only/
Bluetooth Hands-Free and navigation
system
Use the voice recognition/hands-free
switch for navigation system sound
operation.
For details, refer to the separate manual
“NAVIGATION SYSTEM Owner's
Manual”.
Voice recognition/hands-
free switch
NOTElThe voice recognition/hands-free switch is
operable with the audio unit turned off.
lMazda has installed this system to prevent
distraction while driving the vehicle and
using audio controls on the dashboard.
Always make safe driving your first priority.
6-52
Interior Comfort
Audio System
RX-8_8BQ7-EA-10H_Edition1 Page268
Wednesday, July 14 2010 11:51 AM
Form No.8BQ7-EA-10H
Page 271 of 442

Black plate (271,1)
CAUTION
ØClose the cover when the auxiliary
jack is not in use to prevent
foreign objects and liquids from
penetrating the auxiliary jack.
ØDo not place objects or apply force
to the auxiliary jack with the plug
connected.
ØDepending on the portable audio
device, noise may occur when
using the device with it connected
to the accessory socket equipped
on the vehicle. (If noise occurs, do
not use the accessory socket.)
NOTE
lBefore using the auxiliary jack, read the
manufacturer's instructions for the product
being connected.
lUse a commercially-available, non-
impedance (3.5
) stereo mini plug for
connecting the portable audio unit to the
auxiliary jack. Before using the auxiliary
jack, read the manufacturer's instructions
for connecting a portable audio unit to the
auxiliary jack.
lTo prevent discharging of the battery, do
not use the auxiliary input for long periods
with the engine off or idling.
lNoise may occur depending on the product
connected to the auxiliary jack.
lWith regard to connecting a portable audio
or similar device to a power source, use the
battery for the device, not the accessory
socket.
lInsert the plug to the auxiliary jack
securely.
lInsert or remove the plug with the plug
perpendicular to the auxiliary jack hole.
lInsert or remove the plug by holding its
base.
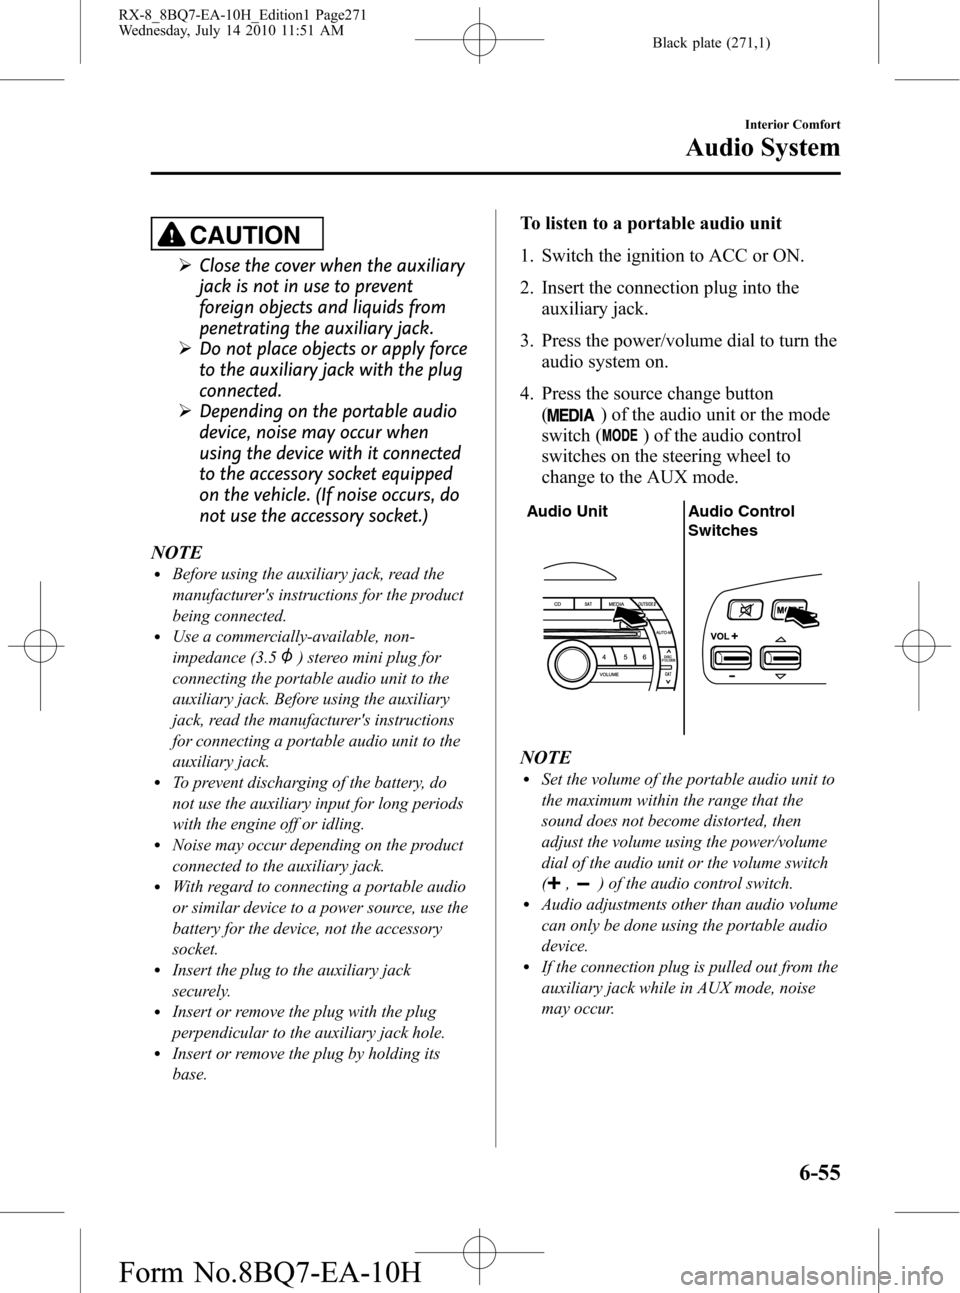
To listen to a portable audio unit
1. Switch the ignition to ACC or ON.
2. Insert the connection plug into the
auxiliary jack.
3. Press the power/volume dial to turn the
audio system on.
4. Press the source change button
(
) of the audio unit or the mode
switch (
) of the audio control
switches on the steering wheel to
change to the AUX mode.
Audio Unit Audio Control
Switches
NOTElSet the volume of the portable audio unit to
the maximum within the range that the
sound does not become distorted, then
adjust the volume using the power/volume
dial of the audio unit or the volume switch
(
,) of the audio control switch.lAudio adjustments other than audio volume
can only be done using the portable audio
device.
lIf the connection plug is pulled out from the
auxiliary jack while in AUX mode, noise
may occur.
Interior Comfort
Audio System
6-55
RX-8_8BQ7-EA-10H_Edition1 Page271
Wednesday, July 14 2010 11:51 AM
Form No.8BQ7-EA-10H
Page 281 of 442

Black plate (281,1)
qVolume Adjustment
The power/volume dial of the audio unit
or navigation system is used to adjust the
volume. Turn the dial to the right to
increase volume, to the left to decrease it.
Audio unit Navigation system
NOTElThe volume can also be adjusted using the
volume button on the steering wheel.
lThe music volume of the audio unit and the
navigation system cannot be adjusted while
Bluetooth Hands-Free is being used.
qHelp Function Use
The help function informs the user of all
the available voice commands under the
current conditions.
1. Press the voice recognition/hands-free
switch with a short press.
2.Say:[Beep]“Help”
3. Follow the prompts to receive the
appropriate voice guidance
instructions.
Convenient Use of the
Hands-Free System
qPhone Book Usage
Phone book registration
Phone numbers can be registered to the
Bluetooth Hands-Free phone book.
NOTE
Do this function only when parked. It is too
distracting to attempt while driving and you
may make too many errors to be effective.
1. Press the voice recognition/hands-free
switch with a short press (without
navigation system) or a long press
(with navigation system).
NOTE
For vehicles with the navigation system, you
can also press the voice recognition/hands-free
switch with a short press and say: [Beep]
“Telephone”or“Phone”.
2.Say:[Beep]“Phone book”
3.Prompt:“Select one of the following:
new entry, edit, list names, delete or
erase all..., or say“cancel”to return to
main menu.”
4.Say:[Beep]“New entry”
5.Prompt:“Name please.”
6.Say:[Beep]“XXXXX... (Ex.“Mary's
phone”)”(Say a voice tag for the name
registered.)
7.Prompt:“Adding XXXXX... (Ex.
“Mary's phone”) (Registered voice
tag). Is this correct?”
8.Say:[Beep]“Ye s”
9.Prompt:“Home, Work, Mobile, or
Pager?”
Interior Comfort
Bluetooth Hands-Free
6-65
RX-8_8BQ7-EA-10H_Edition1 Page281
Wednesday, July 14 2010 11:51 AM
Form No.8BQ7-EA-10H
Page 313 of 442

Black plate (313,1)
NOTE
Do not throw away the empty tire sealant
bottle after use. Return the empty tire sealant
bottle to an Authorized Mazda Dealer when
replacing the tire. The empty tire sealant bottle
will need to be used to extract and dispose of
the used sealant from the tire.
13. Attach the vehicle speed restriction
sticker in a place where the driver can
easily see it.
WARNING
Do not attach the vehicle speed
restriction sticker to the instrument
panel, as it would obstruct vision of
areas such as warning light indicators
or the speedometer:
Attaching the vehicle speed
restriction sticker to the steering
wheel pad is dangerous. The sticker
could interfere with air bag inflation
and cause serious injury.14. Install the compressor hose to the tire
valve.
Valve
Compressor hose
15. Insert the compressor plug into the
interior accessory socket and turn the
ignition switch to the ACC position
(page 6-88).
Compressor Compressor
plug
Center console
CAUTION
ØBefore pulling out the compressor
plug from the electrical socket,
make sure the compressor power
switch is off.
ØThe compressor turns on and off
with the push-button switch.
16. Turn the compressor switch on and
inflate the tire carefully to the correct
inflation pressure.
In Case of an Emergency
Flat Tire
7-9
RX-8_8BQ7-EA-10H_Edition1 Page313
Wednesday, July 14 2010 11:52 AM
Form No.8BQ7-EA-10H
Page 372 of 442

Black plate (372,1)
DESCRIPTIONFUSE
RATINGPROTECTED COMPONENT
18 FOG 15A Fog lights
í
19 A/C 10A Air conditioner
20 IG 40A For protection of various circuits
21 P.WIND 1 30A Power window
22 IG KEY 15A For protection of various circuits
23 STOP 10A Brake lights
24 FUEL PUMP 20A Fuel pump
25 HORN 15A Horn
26 HAZARD 15A Hazard warning flashers, Turn signal lights
27 ETV 15A Electric throttle valve
28 ST 10A Starter
29 WIPER 20A Windshield wiper and washer
30 TCM 15A TCM
í
31 ENGINE 15AEngine control system, Supplemental restraint system, ABS,
Power steering
32 TAIL 10ATaillights, License plate light, Parking lights, Front side-maker
lights, Rear side-marker lights
33 ILLUMI 7.5A Illumination
34 EGI COMP1 15A Engine control system
35 EGI COMP2 10A Engine control system
36 EGI INJ 15A Fuel injector
37 P.WIND 2 20A Power window
38 EPS 60A Power steering
8-40
Maintenance and Care
íSome models.
Owner Maintenance
RX-8_8BQ7-EA-10H_Edition1 Page372
Wednesday, July 14 2010 11:52 AM
Form No.8BQ7-EA-10H
Page 438 of 442

Black plate (438,1)
F
Flasher
Hazard warning .......................... 5-70
Flat Tire ............................................... 7-3
Changing .................................... 7-11
Instant Mobility System
(IMS) Emergency Flat Tire Repair
Kit ................................................ 7-5
Spare tire and tool storage ............ 7-3
Fluids
Classification .............................. 10-4
Owner maintenance ..................... 8-8
Fog Lights ......................................... 5-63
Foot Brake .......................................... 5-6
Front Seats
(Electrically Operated Seats) ............... 2-6
Front Seats
(Manually Operated Seats) ................. 2-2
Fuel
Filler lid and cap ........................ 3-41
Gauge ......................................... 5-39
Requirements ............................... 4-2
Tank capacity ............................. 10-5
Fuses ................................................. 8-36
Panel description ........................ 8-39
Replacement ............................... 8-36
G
Gauges .............................................. 5-36
Glove Compartment .......................... 6-85
H
Hazard Warning Flasher .................... 5-70
Hazardous Driving .............................. 4-7
Headlight Washer .............................. 5-68
H
Headlights
Control ....................................... 5-59
Flashing ...................................... 5-62
High-low beam .......................... 5-61
Leveling ..................................... 5-62
On reminder ............................... 5-61
HomeLink Wireless Control
System .............................................. 5-70
Hood Release .................................... 3-43
Horn .................................................. 5-69
I
Ignition
Keys ........................................... 3-20
Switch .......................................... 5-2
Illuminated Entry System ................. 6-78
Immobilizer System
(with Advanced Key) ........................ 3-46
Immobilizer System
(without Advanced Key) ................... 3-49
Indicator Lights ................................. 5-41
Cruise ......................................... 5-55
DSC OFF .................................... 5-55
Headlight auto-leveling
malfunction ................................ 5-56
Headlight high-beam .................. 5-54
KEY ............................................ 5-52
Power steering malfunction ........ 5-56
Security ...................................... 5-53
Shift position .............................. 5-54
TCS/DSC ................................... 5-55
Turn-signal/hazard warning ....... 5-57
11-4
Index
RX-8_8BQ7-EA-10H_Edition1 Page438
Wednesday, July 14 2010 11:53 AM
Form No.8BQ7-EA-10H