2011 MAZDA MODEL RX 8 ignition
[x] Cancel search: ignitionPage 210 of 442

Black plate (210,1)
Headlight Washerí
The ignition must be switched ON and the
headlights must be turned on.
The headlight washers operate
automatically once every fifth time the
windshield washer operates.
If you want to operate only the headlight
washers, pull the windshield wiper lever
toward you twice rapidly.
Washer OFF
NOTE
When you pull the windshield wiper lever
twice, the windshield washer may spray a
little.
Rear Window Defroster
The rear window defroster clears frost,
fog, and thin ice from the rear window.
The ignition must be switched ON.
Press the switch to turn on the rear
window defroster. The rear window
defroster operates for about 15 minutes
and turns off automatically.
The indicator light illuminates during
operation.
To turn off the rear window defroster
before the 15 minutes has elapsed, press
the switch again.
Indicator light
CAUTION
Do not use sharp instruments or
window cleaners with abrasives to
clean the inside of the rear window
surface. They may damage the
defroster grid inside the window.
NOTE
This defroster is not designed for melting snow.
If there is an accumulation of snow on the rear
window, remove it before using the defroster.
5-68
Driving Your Mazda
íSome models.
Switches and Controls
RX-8_8BQ7-EA-10H_Edition1 Page210
Wednesday, July 14 2010 11:51 AM
Form No.8BQ7-EA-10H
Page 211 of 442

Black plate (211,1)
qMirror Defrosterí
To turn on the mirror defrosters, switch
the ignition ON and press the rear window
defroster switch (page 5-68).
Horn
To sound the horn, press themark on
the steering wheel.
Driving Your Mazda
Switches and Controls
5-69íSome models. RX-8_8BQ7-EA-10H_Edition1 Page211
Wednesday, July 14 2010 11:51 AM
Form No.8BQ7-EA-10H
Page 218 of 442

Black plate (218,1)
Operating Tips
qOperating the Climate Control
System
Operate the climate control system with
the engine running.
NOTE
To prevent the battery from being discharged,
do not leave the fan control dial on for a long
period of time with the ignition switched ON
when the engine is not running.
qClearing the Air Inlet
Clear all obstructions such as leaves,
snow and ice from the hood and the air
inlet in the cowl grille to improve the
system efficiency.
qFoggy Windows
The windows may fog up easily in humid
weather. Use the climate control system to
defog the windows.
To help defog the windows, operate the
air conditioner to dehumidify the air.
NOTE
The air conditioner may be used along with the
heater to dehumidify the air.
qParking in Direct Sunlight
If the vehicle has been parked in direct
sunlight during hot weather, open the
windows to let warm air escape, then run
the climate control system.
qNot Using for a Long Period
Run the air conditioner about 10 minutes
at least once a month to keep internal
parts lubricated.
qCheck the Refrigerant before the
Weather Gets Hot
Have the air conditioner checked before
the weather gets hot. Lack of refrigerant
may make the air conditioner less
efficient. Consult an Authorized Mazda
Dealer for refrigerant inspection.
The air conditioner is filled with
HFC134a (R134a), a refrigerant that will
not damage the ozone layer.
If the air conditioner is low on refrigerant
or has a malfunction, consult an
Authorized Mazda Dealer.
qReplacement of the Cabin Air Filter
If your vehicle is equipped with an air
filter for the air conditioner, it is necessary
to change the filter periodically as
indicated in scheduled maintenance (page
8-3). Consult an Authorized Mazda
Dealer for replacement of the cabin air
filter.
6-2
Interior Comfort
Climate Control System
RX-8_8BQ7-EA-10H_Edition1 Page218
Wednesday, July 14 2010 11:51 AM
Form No.8BQ7-EA-10H
Page 242 of 442

Black plate (242,1)
qPower/Volume/Sound Controls
Audio control dial Power/Volume dial
Power ON/OFF
Switch the ignition to ACC or ON.
Press the power/volume dial to turn the
audio system on.
Press the power/volume dial again to turn
the audio system off.
NOTE
To prevent the battery from being discharged,
do not leave the audio system on for a long
period of time when the engine is not running.
Volume adjustment
To adjust the volume, turn the power/
volume dial.
Turn the power/volume dial to the right to
increase volume, to the left to decrease it.
Audio sound adjustment
1. Press the audio control dial to select the
function. The selected function will be
indicated.
6-26
Interior Comfort
Audio System
RX-8_8BQ7-EA-10H_Edition1 Page242
Wednesday, July 14 2010 11:51 AM
Form No.8BQ7-EA-10H
Page 251 of 442

Black plate (251,1)
NOTE
Do not perform the following operation while
“UPDATING”is displayed. Otherwise, the
updating procedure will be cancelled.
lTurning off the audio powerlSwitching to other modeslSwitching the ignition off
When the SIRIUS mode is switched to
another mode, or when the power is
turned off, the present channel which is
being received is stored as the last
channel.
Channel selection
Turning the manual tuning dial allows you
to select the desired receiving channel.
lTurn the knob clockwise: Channel UplTurn the knob counterclockwise:
Channel Down
Unsubscribed channel
When a selected station has not been
subscribed to, the display indicates the
following:
[CALL
888] and [539SIRI]
(Flashes alternately)
NOTE
When the subscription contract is canceled, all
of the channels including channel 184 appear
as unsubscribed.
Invalid channel
When a selected channel is not
broadcasting, [SR
(bank number)
INVALID] is displayed for one second,
followed by [SR
(bank number)
CHANNEL], which is also displayed for
one second. The display then returns to
the previous valid channel.NOTE
If the last channel selected has become
unavailable because of a channel update the
above indication is displayed until any button
is pressed.
Preset channel programming
(Programming with“channel number”
display)
1. Select the desired channel to be
programmed. At this point, the
following is displayed:
[SR
(bank number)(channel
number)]
2. Keep pressing the channel preset
button for 1.5 seconds or more.
The programming process is complete
after the channel number flashes. Then,
[SR
(bank number)] is displayed
and a beep sound is heard at the same
time.
3. [SR
(bank number)CH
(preset number)(channel number)]
are displayed.
(Programming with“text”display (e.g.
channel name))
1. Select the desired channel to be
programmed. At this point, the
following is displayed:
[SR
(bank number)(selected text
(e.g. channel name))]
2. Keep pressing the channel preset
button for 1.5 seconds or more.
The programming process is complete
after the text (e.g. channel name)
flashes. Then, [SR
(bank number)]
is displayed and you will hear beep
sound at the same time.
Interior Comfort
Audio System
6-35
RX-8_8BQ7-EA-10H_Edition1 Page251
Wednesday, July 14 2010 11:51 AM
Form No.8BQ7-EA-10H
Page 263 of 442

Black plate (263,1)
2. Press the channel preset button for the
desired tray number while“WAIT”is
displayed.
3. When“IN”is displayed, insert the CD.
NOTE
The CD cannot be inserted to the desired tray
number if the number is already occupied.
Multiple insertion
1. Press and hold the load button (
)
for about 2 seconds until a beep sound
is heard.
2. When“IN”is displayed, insert the CD.
3. When“IN”is displayed again, insert
the next CD.
NOTE
The first-inserted CD will be played
automatically when:
lNo other CD is inserted within 15 seconds
after“IN”is displayed.
lThe CD trays are full.
Displaying the CD-inserted tray
number
When you want to know the number for a
CD-inserted tray, press the display button
(
). The tray number will be displayed
for 5 seconds.
Ejecting the CD
Normal ejection
1. Press the CD eject button (
). The
disc number and“DISC OUT”will be
displayed.
2. Pull out the CD.
NOTE
When the CD is ejected during play, the next
CD will be played automatically.
Ejecting CDs from desired tray number
1. Press and hold the CD eject button (
)
for about 2 seconds until a beep sound
is heard.
The“DISC OUT”display flashes.
2. Press the channel preset button for the
desired CD number for less than 5
seconds after the beep sound is heard.
3. Pull out the CD.
Multiple ejection
1. Press and hold the CD eject button (
)
for about 2 seconds until a beep sound
is heard.
The“DISC OUT”display flashes.
2. Press the CD eject button (
) again
for less than 5 seconds after the beep
sound is heard.
NOTE
If the button is not pressed and about 5
seconds have elapsed while“DISC OUT”is
flashing, CDs are automatically ejected.
3. Pull out the CD, then the next CD will
be ejected.
NOTE
lCDs will be ejected starting with the one
with the lowest number.
lAll CDs in the tray will be ejected
continuously.
lCDs can be ejected when the ignition is
switched off. Press and hold the CD eject
button (
) for about 2 seconds and all
CDs will eject.
Playback
Press the CD play button (
) to start
play when a CD is in the unit.
If a CD is not in the unit when the CD
play button (
) is pressed,“NO DISC”
will flash on and off.
Interior Comfort
Audio System
6-47
RX-8_8BQ7-EA-10H_Edition1 Page263
Wednesday, July 14 2010 11:51 AM
Form No.8BQ7-EA-10H
Page 268 of 442

Black plate (268,1)
Audio Control Switch
Operation
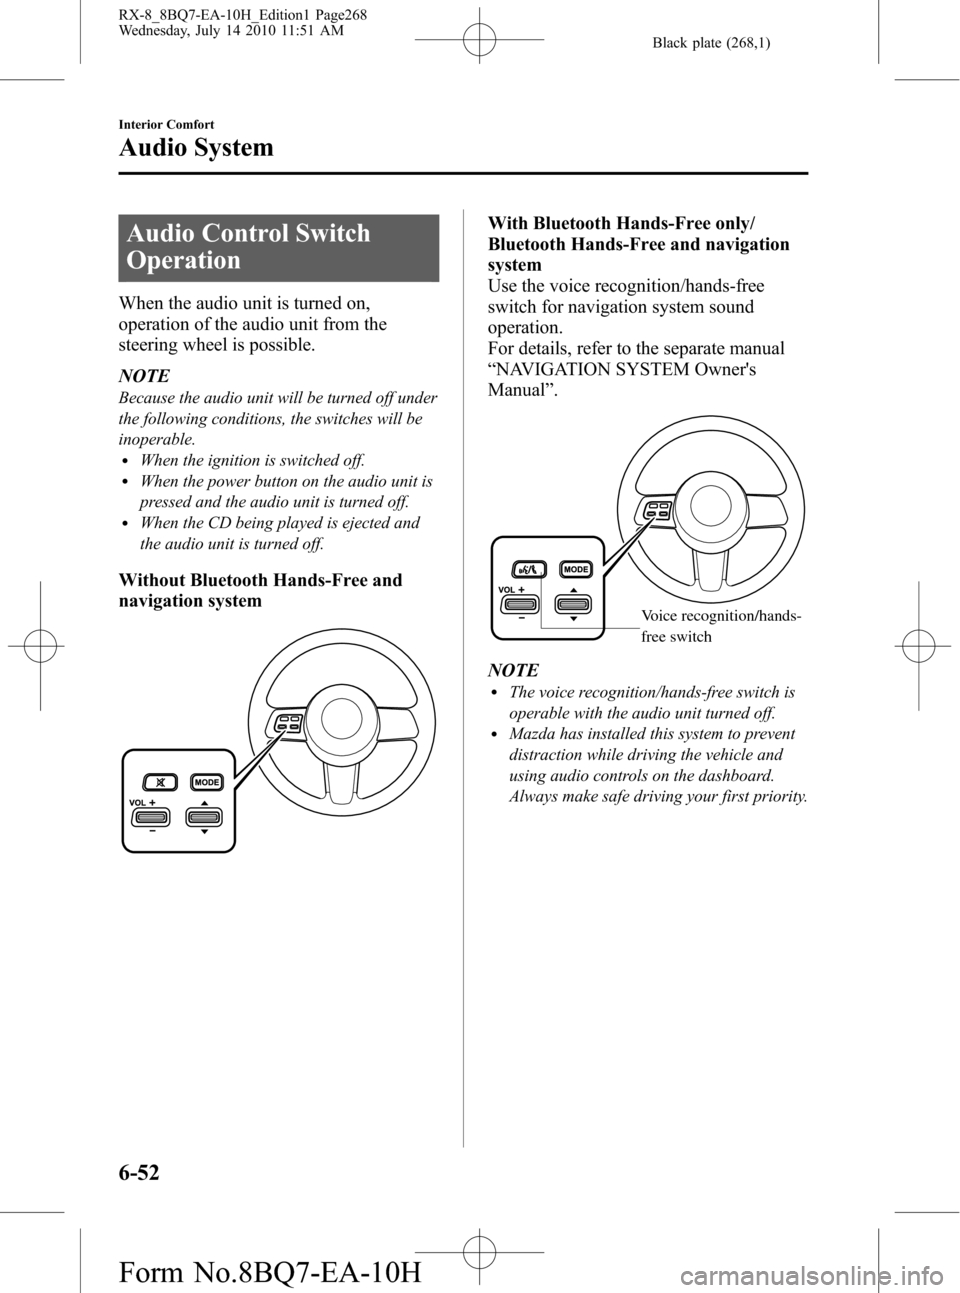
When the audio unit is turned on,
operation of the audio unit from the
steering wheel is possible.
NOTE
Because the audio unit will be turned off under
the following conditions, the switches will be
inoperable.
lWhen the ignition is switched off.lWhen the power button on the audio unit is
pressed and the audio unit is turned off.
lWhen the CD being played is ejected and
the audio unit is turned off.
Without Bluetooth Hands-Free and
navigation system
With Bluetooth Hands-Free only/
Bluetooth Hands-Free and navigation
system
Use the voice recognition/hands-free
switch for navigation system sound
operation.
For details, refer to the separate manual
“NAVIGATION SYSTEM Owner's
Manual”.
Voice recognition/hands-
free switch
NOTElThe voice recognition/hands-free switch is
operable with the audio unit turned off.
lMazda has installed this system to prevent
distraction while driving the vehicle and
using audio controls on the dashboard.
Always make safe driving your first priority.
6-52
Interior Comfort
Audio System
RX-8_8BQ7-EA-10H_Edition1 Page268
Wednesday, July 14 2010 11:51 AM
Form No.8BQ7-EA-10H
Page 271 of 442

Black plate (271,1)
CAUTION
ØClose the cover when the auxiliary
jack is not in use to prevent
foreign objects and liquids from
penetrating the auxiliary jack.
ØDo not place objects or apply force
to the auxiliary jack with the plug
connected.
ØDepending on the portable audio
device, noise may occur when
using the device with it connected
to the accessory socket equipped
on the vehicle. (If noise occurs, do
not use the accessory socket.)
NOTE
lBefore using the auxiliary jack, read the
manufacturer's instructions for the product
being connected.
lUse a commercially-available, non-
impedance (3.5
) stereo mini plug for
connecting the portable audio unit to the
auxiliary jack. Before using the auxiliary
jack, read the manufacturer's instructions
for connecting a portable audio unit to the
auxiliary jack.
lTo prevent discharging of the battery, do
not use the auxiliary input for long periods
with the engine off or idling.
lNoise may occur depending on the product
connected to the auxiliary jack.
lWith regard to connecting a portable audio
or similar device to a power source, use the
battery for the device, not the accessory
socket.
lInsert the plug to the auxiliary jack
securely.
lInsert or remove the plug with the plug
perpendicular to the auxiliary jack hole.
lInsert or remove the plug by holding its
base.
To listen to a portable audio unit
1. Switch the ignition to ACC or ON.
2. Insert the connection plug into the
auxiliary jack.
3. Press the power/volume dial to turn the
audio system on.
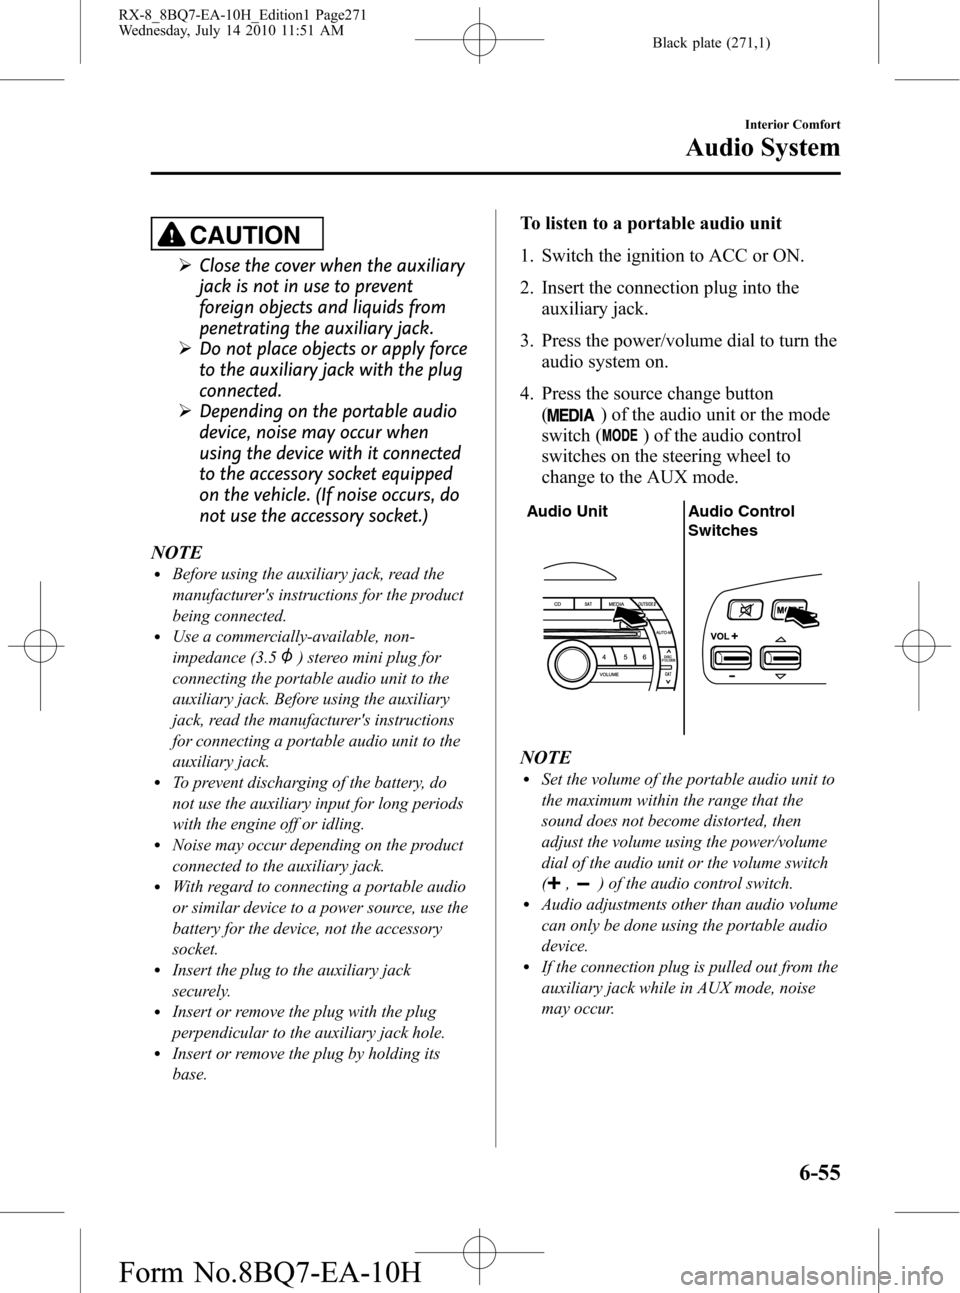
4. Press the source change button
(
) of the audio unit or the mode
switch (
) of the audio control
switches on the steering wheel to
change to the AUX mode.
Audio Unit Audio Control
Switches
NOTElSet the volume of the portable audio unit to
the maximum within the range that the
sound does not become distorted, then
adjust the volume using the power/volume
dial of the audio unit or the volume switch
(
,) of the audio control switch.lAudio adjustments other than audio volume
can only be done using the portable audio
device.
lIf the connection plug is pulled out from the
auxiliary jack while in AUX mode, noise
may occur.
Interior Comfort
Audio System
6-55
RX-8_8BQ7-EA-10H_Edition1 Page271
Wednesday, July 14 2010 11:51 AM
Form No.8BQ7-EA-10H