Page 425 of 606
![MAZDA MODEL CX-9 2011 Owners Manual (in English) Black plate (425,1)
5.Say:[Beep] XXXXX... (Ex.
“Marys phone”)”(Say a voice tag for
the name registered.)
6.Prompt:
“Adding XXXXX... (Ex.“Marys
phone”) (Registered voice tag). Is this
cor MAZDA MODEL CX-9 2011 Owners Manual (in English) Black plate (425,1)
5.Say:[Beep] XXXXX... (Ex.
“Marys phone”)”(Say a voice tag for
the name registered.)
6.Prompt:
“Adding XXXXX... (Ex.“Marys
phone”) (Registered voice tag). Is this
cor](/manual-img/28/13937/w960_13937-424.png)
Black plate (425,1)
5.Say:[Beep] XXXXX... (Ex.
“Mary's phone”)”(Say a voice tag for
the name registered.)
6.Prompt:
“Adding XXXXX... (Ex.“Mary's
phone”) (Registered voice tag). Is this
correct?”
7.Say:[Beep]“Ye s”
8. When a voice tag registration is
completed, the display returns to the
Hands-Free phonebook screen.
qMute
The microphone can be muted during a
call.
Press selection button 3.
qTransferring a Call
Transferring a call from Hands-Free to
a device (Mobile phone)
Press selection button 2.
qOutgoing Call Records
A maximum of six outgoing call records
are displayed.
Making phone calls using the outgoing
call record or deleting one or all outgoing
call records is possible.
Making a call using the outgoing call
record
1. Press selection button 3 to display the
outgoing call record screen.
2. Press the desired selection button of the
outgoing call record.
The content of the outgoing call record
is displayed.3. Press selection button 1 or the pick-up
button of the audio control switch to
make a call.
Deleting one outgoing call record
1. Press selection button 3 to display the
outgoing call record screen.
2. Press the desired selection button of the
outgoing call record.
The content of the outgoing call record
is displayed.
3. Press selection button 2 to display
“Delete recent outgoing call?”.
4. Press selection button 1 to delete the
outgoing call record.
NOTE
Press the return button () to return
to the previous display.
Deleting all the outgoing call records
1. Press selection button 3 to display the
outgoing call record screen.
2. Press selection button 5 to display
“Delete all recent outgoing calls?”.
3. Press selection button 1 to delete all
outgoing call records.
NOTE
Press the return button () to return
to the previous display.
qIncoming Call Records
A maximum of six incoming call records
are displayed.
Making phone calls using the incoming
call record or deleting one or all incoming
call records is possible.
Interior Comfort
Bluetooth Hands-Free (Panel Operation)
6-171
CX-9_8BH2-EA-10H_Edition3 Page425
Wednesday, March 23 2011 9:32 AM
Form No.8BH2-EA-10H
Page 426 of 606

Black plate (426,1)
Making a call using the incoming call
record
1. Press selection button 4 to display the
incoming call record screen.
2. Press the desired selection button of the
incoming call record.
The content of the incoming call record
is displayed.
3. Press selection button 1 or the pick-up
button of the audio control switch to
make a call.
Deleting one incoming call record
1. Press selection button 4 to display the
incoming call record screen.
2. Press the desired selection button of the
incoming call record.
The content of the incoming call record
is displayed.
3. Press selection button 2 to display
“Delete recent incoming call?”.
4. Press selection button 1 to delete the
incoming call record.
NOTE
Press the return button () to return
to the previous display.
Deleting all the incoming call records
1. Press selection button 4 to display the
incoming call record screen.
2. Press selection button 5 to display
“Delete all recent incoming calls?”.
3. Press selection button 1 to delete all the
incoming call records.
NOTE
Press the return button () to return
to the previous display.
qDTMF (Dual Tone Multi-
Frequency Signal) Transmission
This function is used when transmitting
DTMF via the audio control panel's
manual tuning dial.
The receiver of a DTMF transmission is
generally a home telephone answering
machine or a company's automated
guidance call center.
1. Press selection button 4 after
connecting to a home device or service
to display the tone transmission screen.
2. Turn the manual tuning dial to select a
number or symbol and then press the
enter button (
) to transmit the
code.
NOTE
If the DTMF code has two or more digits or
symbols, each one must be transmitted
individually.
6-172
Interior Comfort
Bluetooth Hands-Free (Panel Operation)
CX-9_8BH2-EA-10H_Edition3 Page426
Wednesday, March 23 2011 9:32 AM
Form No.8BH2-EA-10H
Page 427 of 606

Black plate (427,1)
Hands-Free Setting
qDevice
Device registration
For the registration of a Bluetooth
equipped device to Bluetooth Hands-Free,
refer to
“Bluetooth Hands-Free Preparation”
(page 6-166).
Device selection
If several devices have been programmed,
the Bluetooth unit links the device last
programmed. If you would like to link a
different programmed device, it is
necessary to change the link. The order of
device priority after the link has been
changed is maintained even when the
ignition is switched off.
NOTE
If the device name cannot be displayed,“...”is
added at the end to the part of the title which
can be displayed.
Changing the link to only a Bluetooth
Hands-Free device
1. Press selection button 6 to display the
Bluetooth Hands-Free setting menu
screen.
2. Press selection button 3 to display the
link change screen and the current
pairing programming device name.
3. Press selection button 1, 2, 3, 4, 5, 6, or
7 to select the name of the device you
would like to change.
The“
”symbol disappears, and the
device name and
“Connection is in progress.”are
displayed.NOTE
Press the return button () to return
to the link change screen.
4. When the link change is completed, a
“
”symbol and“Link Changed”are
displayed, and then it returns to the
normal display.
If an error occurs while trying to link a
device,“Error”is displayed and the
display returns to the link change
screen.
NOTE
If a link error occurs, check the programming
status of the Bluetooth Hands-Free device and
the location of the device in the vehicle (not in
the trunk or a metal-type box), and then try the
link operation again.
Changing the link to a Bluetooth
Hands-Free and Bluetooth audio device
1. Press selection button 6 to display the
Bluetooth Hands-Free setting menu
screen.
2. Press selection button 3 to display the
link change screen and the present
pairing programming device name.
3. Press selection button 1, 2, 3, 4, 5, 6, or
7 to select the name of the device you
would like to change.
4. The device name and
“Please Select Device”are displayed.
5. Press selection button 2 to select
“Phone”. The“
”symbol disappears,
and then“Connection is in progress.”
is displayed.
NOTE
Press the return button () to return
to the link change screen.
Interior Comfort
Bluetooth Hands-Free (Panel Operation)
6-173
CX-9_8BH2-EA-10H_Edition3 Page427
Wednesday, March 23 2011 9:32 AM
Form No.8BH2-EA-10H
Page 428 of 606

Black plate (428,1)
6. When the link change is completed, a
“
”symbol and“Link Changed”are
displayed, and then it returns to the
normal display.
If an error occurs while trying to
change the link,“Error”is displayed,
and then it returns to the link change
screen.
NOTE
lIf a link error occurs, check the
programming status of the Bluetooth
Hands-Free device and the location of the
device in the vehicle (not in the trunk or a
metal-type box), and then try the link
operation again.
lDevice (Music player) selection can also be
done by operating the panel button (page
6-127).
Registered device (Mobile phone)
deletion
An individually registered device can be
cleared.
NOTE
lDo this function only when parked. It is too
distracting to attempt while driving and you
may make too many errors to be effective.
lIf the device name and Bluetooth address
cannot be displayed,“...”is added at the
end to the part of the title which can be
displayed.
1. Press selection button 6 to display the
Bluetooth Hands-Free setting menu
screen.
2. Press selection button 4 to display the
pair link deletion screen and the current
pairing programming device name.
3. Press selection button 1, 2, 3, 4, 5, 6, or
7 to select the name of the device you
would like to change.4. The link delete confirmation screen is
displayed, and then
“Delete select device?”, the device
name, and the Bluetooth address are
displayed.
5. Press selection button 1 to delete the
selected device.
NOTE
Press the return button () to return
to the previous display.
6. When the link deletion is completed,
“Deleted”is displayed, and then it
returns to the normal display.
If an error occurs while trying to delete
the link,“Error”is displayed, and then
it returns to the link deletion screen.
NOTE
If a device is deleted while it is being linked,
linking to other devices will not be possible.
Bluetooth Hands-Free device
information display
1. Press selection button 6 to display the
Bluetooth Hands-Free setting menu
screen.
2. Press selection button 6 to display the
device information display screen.
If the device information is available,
the device name and Bluetooth address
are displayed, and then it returns to the
Bluetooth Hands-Free setting menu
screen.
If the device information is not
available,
“Failed to obtain device information.”
is displayed, and then it returns to the
Bluetooth Hands-Free setting menu
screen.
6-174
Interior Comfort
Bluetooth Hands-Free (Panel Operation)
CX-9_8BH2-EA-10H_Edition3 Page428
Wednesday, March 23 2011 9:32 AM
Form No.8BH2-EA-10H
Page 429 of 606
Black plate (429,1)
NOTE
If the device name and Bluetooth address
cannot be displayed,“...”is added at the end
to the part of the title which can be displayed.When Bluetooth Hands-
Free Cannot be Used
Bluetooth Hands-Free cannot be used
under the following conditions:
lThe device is outside of the
communication area.
lThe device has a malfunction.lThe device is not connected to the
hands-free unit equipped on the
vehicle.
lThe device's battery is weak.lThe device is turned off.lThe device is placed where radio
reception is difficult.
lThe ignition is switched off.
Interior Comfort
Bluetooth Hands-Free (Panel Operation)
6-175
CX-9_8BH2-EA-10H_Edition3 Page429
Wednesday, March 23 2011 9:32 AM
Form No.8BH2-EA-10H
Page 430 of 606

Black plate (430,1)
Safety Certification
FCC ID: CB2MBLUEC09 IC:279B-
MBLUEC09
This device complies with Part 15 of the
FCC Rules and with RSS-210 of Industry
Canada. Operation is subject to the
following two conditions:
(1) This device may not cause harmful
interference, and
(2) This device must accept any
interference received, including
interference that may cause undesired
operation.
WARNING
Changes or modifications not
expressively approved by the party
responsible for compliance could void
the user's authority to operate the
equipment.
The term“IC:”before the radio
certification number only signifies that
Industry Canada technical specifications
were met.
The antenna used for this transmitter must
not be co-located or operating in
conjunction with any other antenna or
transmitter. End-users and installers must
be provided with installation instructions
and transmitter operating conditions for
satisfying RF exposure compliance.
Mazda Bluetooth Hands-
Free Customer Service
lU.S.A.
Phone: 800-430-0153 (Toll-free)
www.MazdaUSA.com/bluetooth
lCanada
Phone: 800-430-0153 (Toll-free)
www.mazdahandsfree.ca
6-176
Interior Comfort
Bluetooth Hands-Free (Panel Operation)
CX-9_8BH2-EA-10H_Edition3 Page430
Wednesday, March 23 2011 9:32 AM
Form No.8BH2-EA-10H
Page 431 of 606

Black plate (431,1)
Rear View Monitorí
The rear view monitor is a visual assist system when reversing the vehicle that provides
images from the rear of the vehicle.
WARNING
The rear view monitor is only a visual assist device when reversing the vehicle. The
images on the screen may be different from the actual conditions. Always drive
carefully confirming the safety of the rear and the surrounding conditions by looking
directly with your eyes. Reversing the vehicle by only looking at the screen may cause
an accident or a collision with an object.
CAUTION
ØDo not use the rear view monitor under the following conditions: Using the rear
view monitor under the following conditions is dangerous and could result in
injury or vehicle damage or both.
ØIcy or snow-covered roads.
ØTire chains or a temporary spare tire is installed.
ØThe liftgate is not fully closed.
ØThe vehicle is on a road incline.
ØWhen the display is cold, images may course across the monitor or the screen and
may be dimmer than usual, which could cause difficulty in confirming the
surrounding conditions of the vehicle. Always drive carefully confirming the safety
of the rear and the surrounding conditions by looking directly with your eyes.
ØDo not apply excessive force to the camera. The camera position and angle may
deviate.
ØDo not disassemble, modify, or remove it as it may no longer be waterproof.
ØThe camera cover is made of plastic. Do not apply degreasing agents, organic
solvents, wax, or glass coating agents to the camera cover. If any are spilled on
the cover, wipe off with a soft cloth immediately.
ØDo not rub the cover excessively, or polish it using an abrasive compound or a
hard brush. The cover may be damaged affecting the image.
Interior Comfort
Rear View Monitor
6-177íSome models. CX-9_8BH2-EA-10H_Edition3 Page431
Wednesday, March 23 2011 9:32 AM
Form No.8BH2-EA-10H
Page 432 of 606

Black plate (432,1)
NOTElIf water, snow, or mud is stuck on the camera lens, wipe it off using a soft cloth. If it cannot be
wiped off, use a mild detergent.
lIf the camera temperature changes rapidly, such as by pouring hot water on it under cold
temperature conditions, the rear view monitor may not operate correctly.
lWhen replacing the tires, consult an Authorized Mazda Dealer. Replacing the tires could result in
deviation of the guide lines which appear on the display.
lIf the vehicle's front, side, or rear has been involved in a collision, the alignment of the rear view
parking camera (location, installation angle) may have deviated. Always consult an Authorized
Mazda Dealer to have the vehicle inspected.
(Navigation system)
lThe screen may not change to the camera image while the navigation system is being activated
immediately after the vehicle battery has been connected. If this occurs, activate the rear-view
monitor camera again soon after the navigation system.
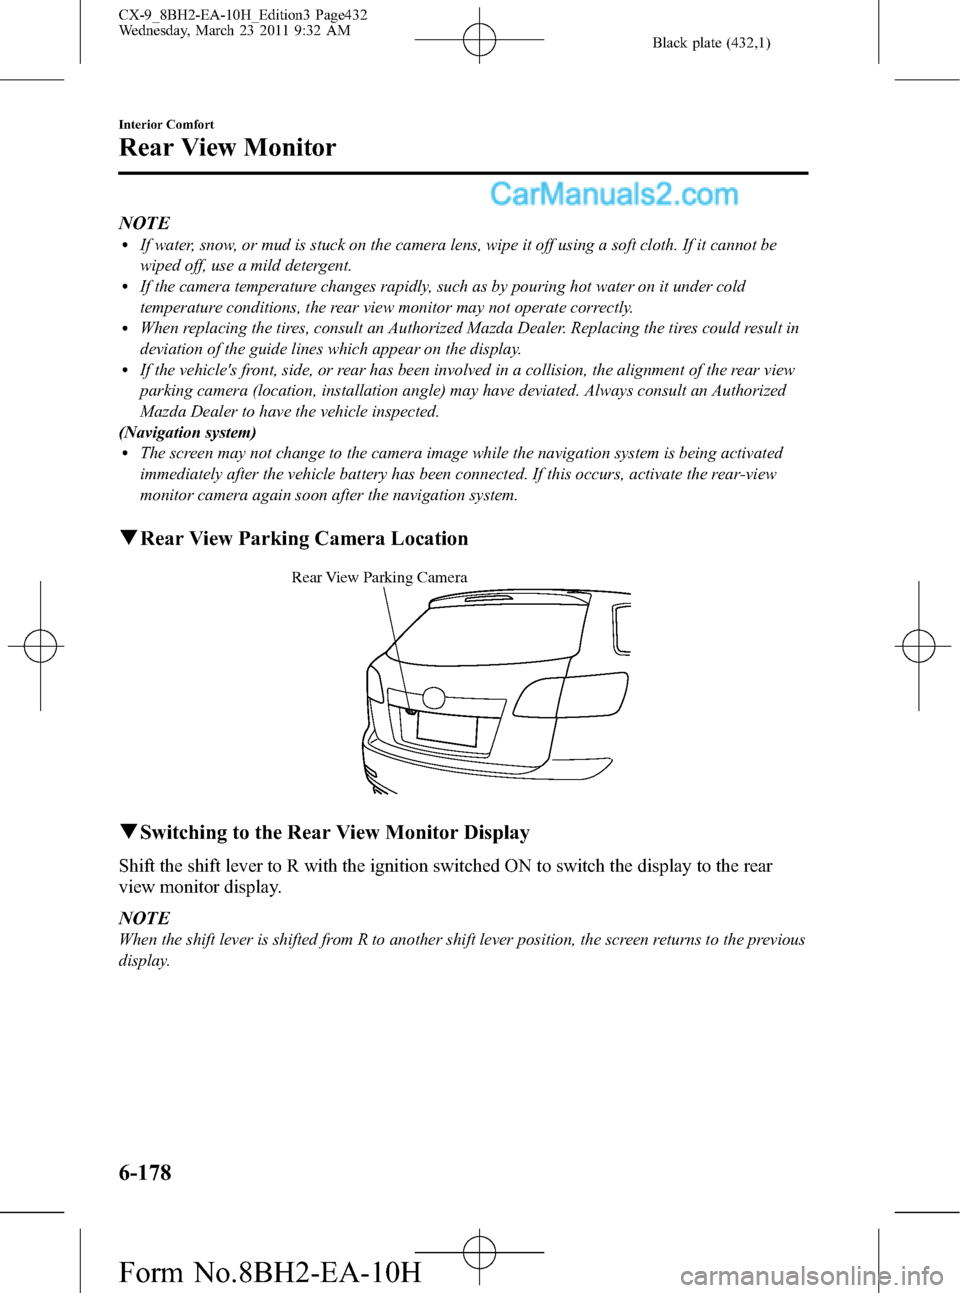
qRear View Parking Camera Location
Rear View Parking Camera
qSwitching to the Rear View Monitor Display
Shift the shift lever to R with the ignition switched ON to switch the display to the rear
view monitor display.
NOTE
When the shift lever is shifted from R to another shift lever position, the screen returns to the previous
display.
6-178
Interior Comfort
Rear View Monitor
CX-9_8BH2-EA-10H_Edition3 Page432
Wednesday, March 23 2011 9:32 AM
Form No.8BH2-EA-10H