Page 93 of 140

93
Audio Operation
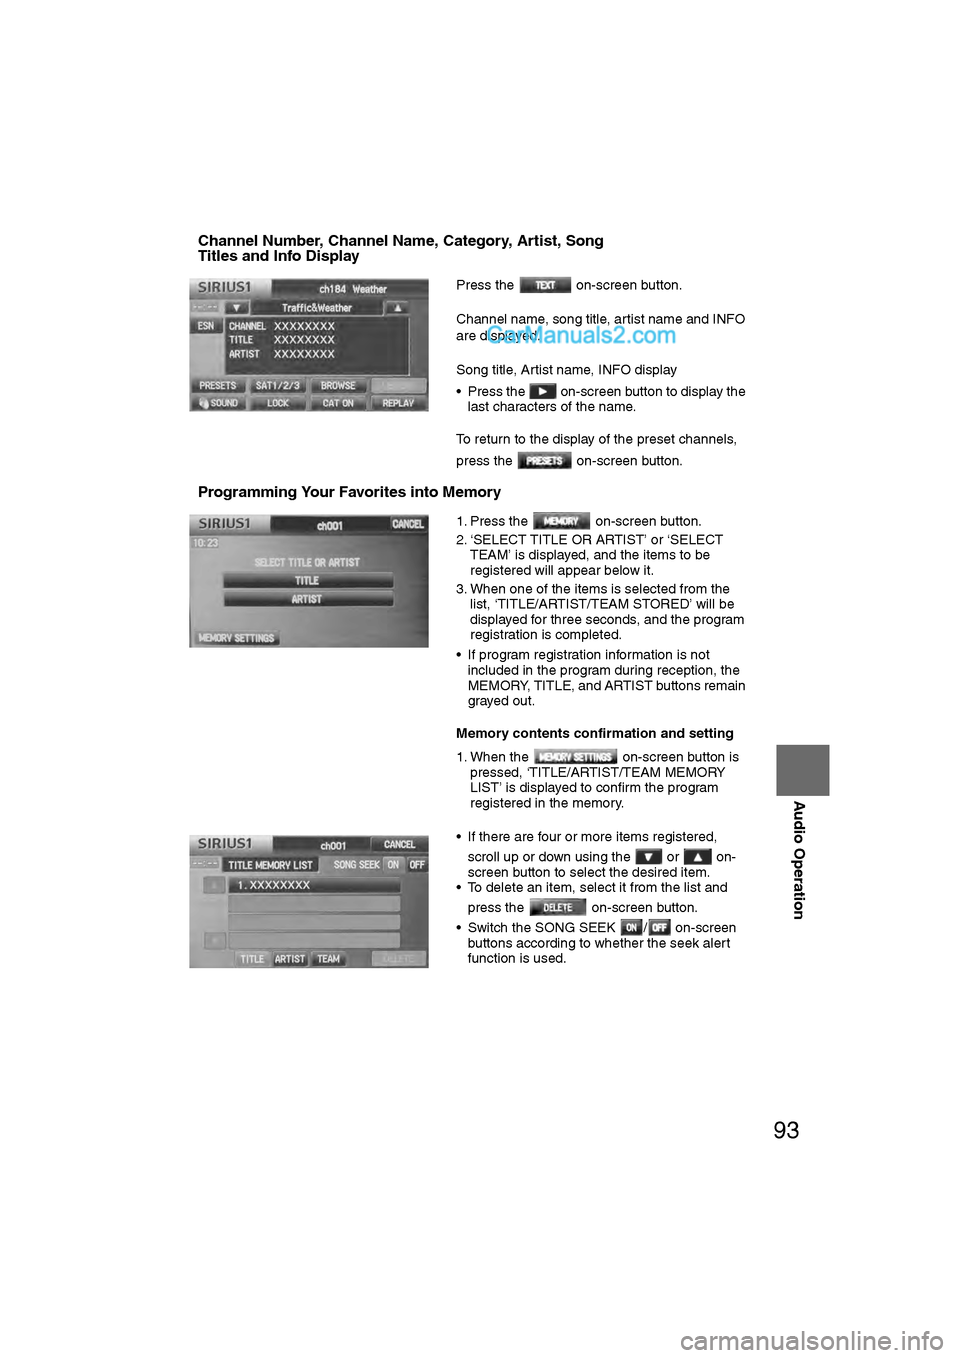
nChannel Number, Channel Name, Category, Artist, Song
Titles and Info Display
nProgramming Your Favorites into Memory
Press the on-screen button.
Channel name, song title, artist name and INFO
are displayed.
Song title, Artist name, INFO display
• Press the on-screen button to display the last characters of the name.
To return to the display of the preset channels,
press the on-screen button.
1. Press the on-screen button.
2. ‘SELECT TITLE OR ARTIST’ or ‘SELECT TEAM’ is displayed, and the items to be
registered will appear below it.
3. When one of the items is selected from the list, ‘TITLE/ARTIST/TEAM STORED’ will be
displayed for three seconds, and the program
registration is completed.
• If program registration information is not included in the program during reception, the
MEMORY, TITLE, and ARTIST buttons remain
grayed out.
Memory contents confirmation and setting
1. When the on-screen button is pressed, ‘TITLE/ARTIST/TEAM MEMORY
LIST’ is displayed to confirm the program
registered in the memory.
• If there are four or more items registered, scroll up or down using the or on-
screen button to select the desired item.
• To delete an item, select it from the list and
press the on-screen button.
• Switch the SONG SEEK / on-screen buttons according to whether the seek alert
function is used.
�2�%�:���0�:�9���)���F�S�S�O�����4�E�K�I�����������8�L�Y�V�W�H�E�]�����1�E�]�����������������������������������4�1
Page 99 of 140

99
Audio Operation
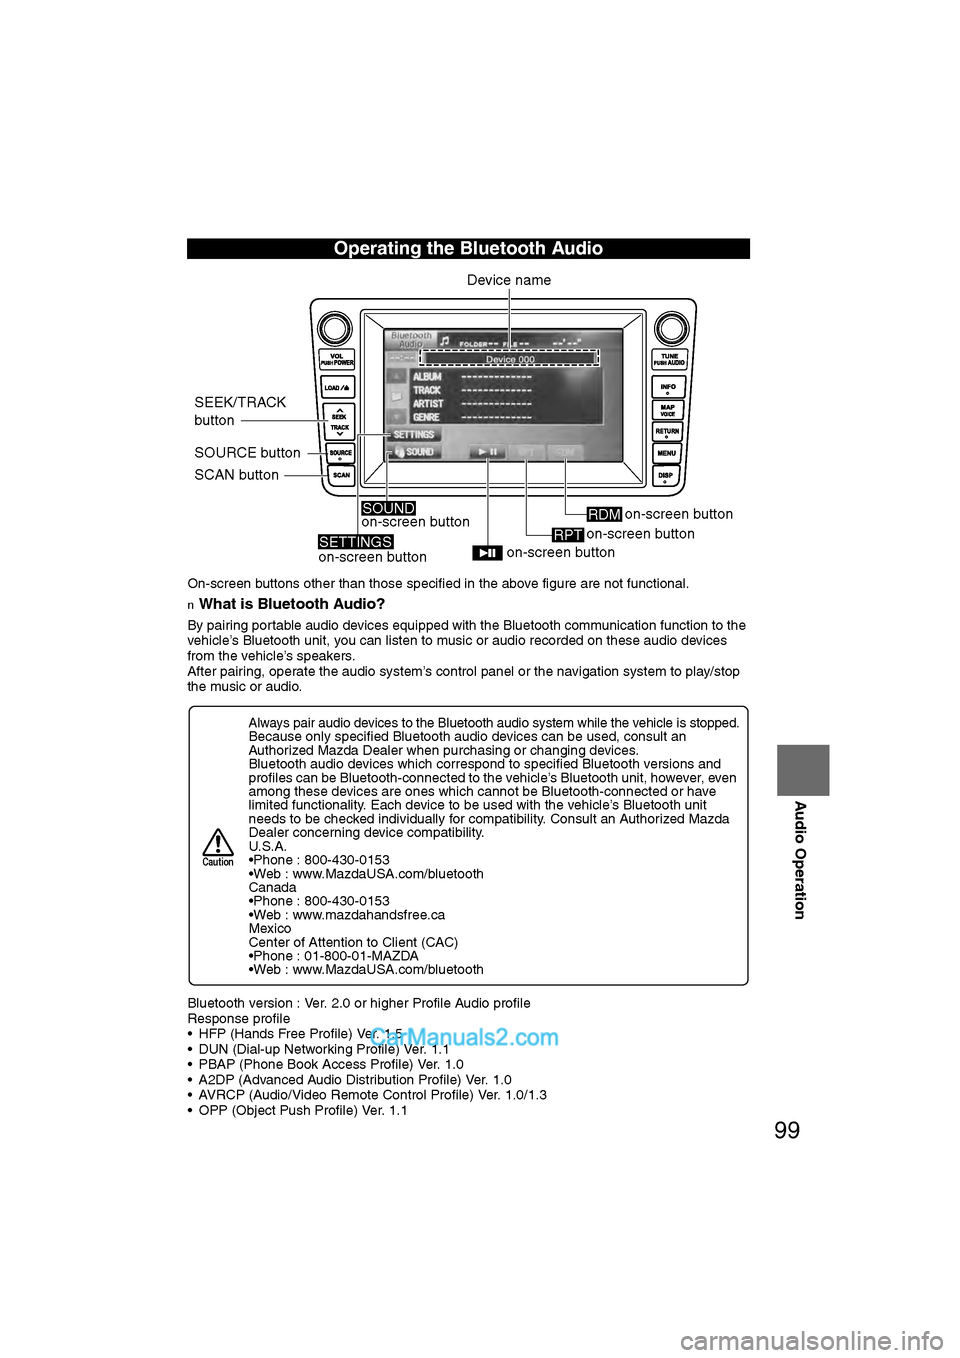
On-screen buttons other than those specified in the above figure are not functional.
nWhat is Bluetooth Audio?
By pairing portable audio devices equipped with the Bluetooth communication function to the
vehicle’s Bluetooth unit, you can listen to music or audio recorded on these audio devices
from the vehicle’s speakers.
After pairing, operate the audio system’s control panel or the navigation system to play/stop
the music or audio.
Bluetooth version : Ver. 2.0 or higher Profile Audio profile
Response profile
• HFP (Hands Free Profile) Ver. 1.5
• DUN (Dial-up Networking Profile) Ver. 1.1
• PBAP (Phone Book Access Profile) Ver. 1.0
• A2DP (Advanced Audio Distribution Profile) Ver. 1.0
• AVRCP (Audio/Video Remote Control Profile) Ver. 1.0/1.3
• OPP (Object Push Profile) Ver. 1.1
Operating the Bluetooth Audio
Always pair audio devices to the Bluetooth audio system while the vehicle is stopped.Because only specified Bluetooth audio devices can be used, consult an
Authorized Mazda Dealer when purchasing or changing devices.
Bluetooth audio devices which correspond to specified Bluetooth versions and
profiles can be Bluetooth-connected to the vehicle’s Bluetooth unit, however, even
among these devices are ones which cannot be Bluetooth-connected or have
limited functionality. Each device to be used with the vehicle’s Bluetooth unit
needs to be checked individually for compatibility. Consult an Authorized Mazda
Dealer concerning device compatibility.
U.S.A.
•Phone : 800-430-0153
•Web : www.MazdaUSA.com/bluetooth
Canada
•Phone : 800-430-0153
•Web : www.mazdahandsfree.ca
Mexico
Center of Attention to Client (CAC)
•Phone : 01-800-01-MAZDA
•Web : www.MazdaUSA.com/bluetooth
SOURCE button
SCAN button
SEEK/TRACK
buttonDevice name
on-screen button on-screen button
SOUND
SETTINGSon-screen button
on-screen buttonRDM
on-screen button
RPT
Caution
�2�%�:���0�:�9���)���F�S�S�O�����4�E�K�I�����������8�Y�I�W�H�E�]�����.�Y�P�]���������������������������������4�1
Page 102 of 140

102
Before
UseGetting
started
RoutingAddress
Book
Vo i c e Recognition
Navigation
Set Up
RDM-TMC
Audio Operation
Navigation
Set Up
Note
l
The Bluetooth audio device needs to be operated for pairing it to the vehicle’s Bluetooth
unit. Refer to the audio device’s instruction manual for the pairing procedure.
l If the pairing failed, a message indicating a pairing error is displayed for three seconds then
the screen returns to the normal display.
l Pairing cannot be performed while the vehicle is moving. When the vehicle starts to move,
the buttons other than the on-screen button are grayed out.
l If seven Bluetooth audio devices have been already paired, additional pairing cannot be
performed. Delete one paired Bluetooth audio device to pair another one.
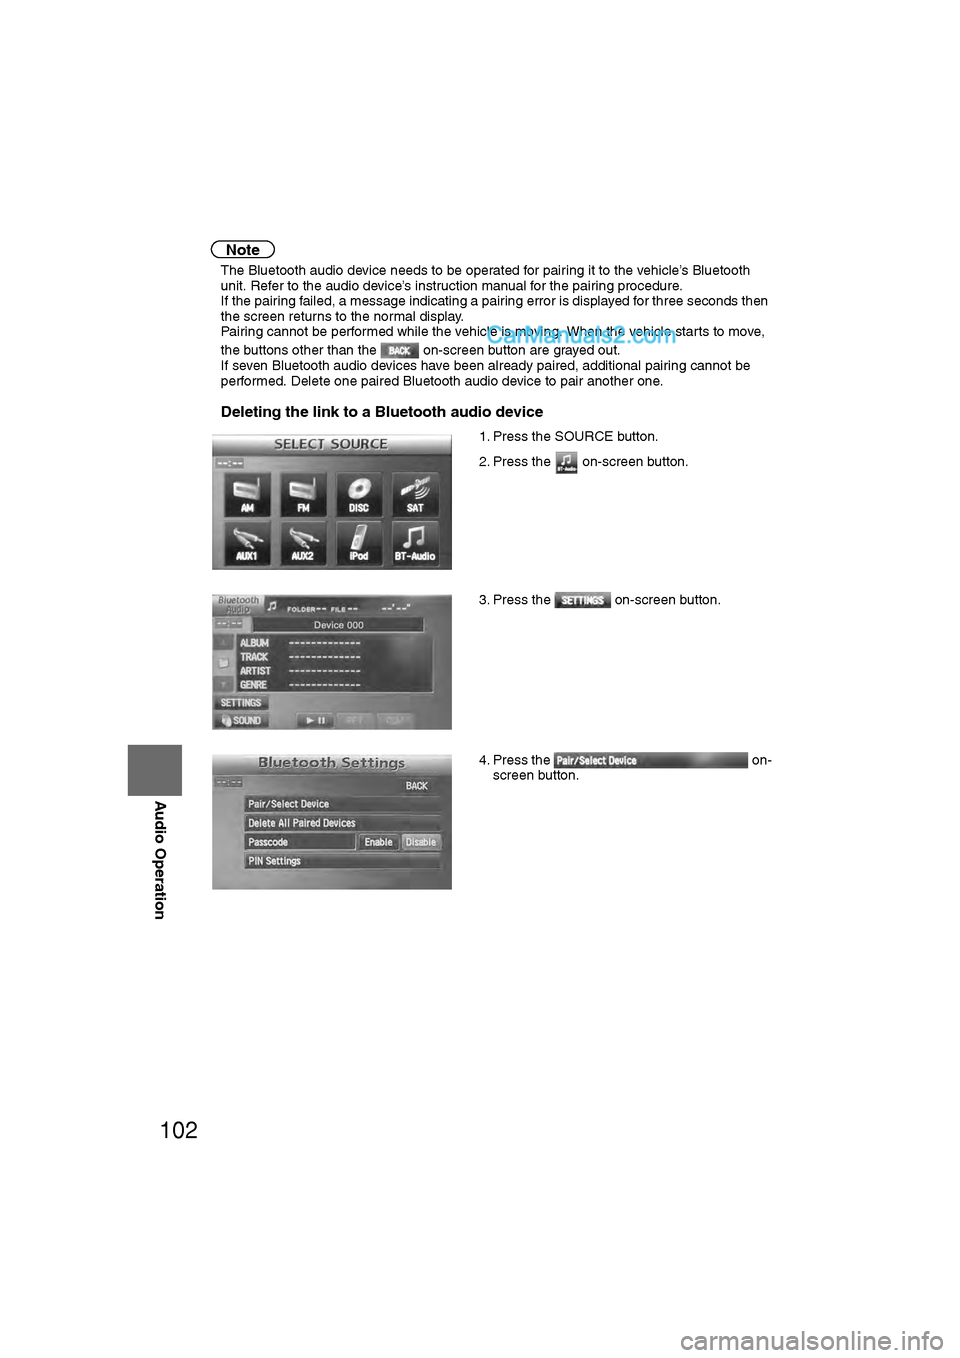
nDeleting the link to a Bluetooth audio device
1. Press the SOURCE button.
2. Press the on-screen button.
3. Press the on-screen button.
4. Press the on-
screen button.
�2�%�:���0�:�9���)���F�S�S�O�����4�E�K�I�������������8�L�Y�V�W�H�E�]�����1�E�]�����������������������������������4�1
Page 103 of 140
103
Audio Operation
Note
lIf the paired Bluetooth audio device deletion failed, a message indicating a deletion failure
is displayed for three seconds then the screen returns to the normal display.
l Pairing cannot be performed while the vehicle is moving. When the vehicle starts to move,
the buttons other than the on-screen button are grayed out. 5. Press the on-screen button of the Bluetooth
audio device you would like to delete from the
paired Bluetooth audio devices.
6. Press the on-screen button.
7. A confirmation screen is displayed to ask if the device is deleted. If the on-screen
button is pressed, the paired Bluetooth audio
device can be deleted.
On-screen buttons for paired
Bluetooth audio divices
�2�%�:���0�:�9���)���F�S�S�O�����4�E�K�I�������������8�L�Y�V�W�H�E�]�����1�E�]�����������������������������������4�1
Page 104 of 140

104
Before
UseGetting
started
RoutingAddress
Book
Vo i c e Recognition
Navigation
Set Up
RDM-TMC
Audio Operation
Navigation
Set Up
nChanging paired Bluetooth device
1. Press the SOURCE button.
2. Press the on-screen button.
3. Press the on-screen button.
4. Press the on-
screen button.
5. Press the on-screen button of the Bluetooth device you would like to choose from the
paired Bluetooth devices.
• : Completed pairing as Hands-free mobile phone. Highlighted while
connected.
• : Completed pairing as Bluetooth audio device. Highlighted while connected.
6. The Bluetooth Device Setting screen is displayed.
• DEVICE NAME: Name of the Bluetooth device
• PHONE: Status as Hands-free mobile phone
• AUDIO: Status as Bluetooth audio device
7. If the PHONE or AUDIO on-screen button is pressed, the selected phone or audio
function becomes operable.
On-screen buttons for paired
Bluetooth audio divices
�2�%�:���0�:�9���)���F�S�S�O�����4�E�K�I�������������8�L�Y�V�W�H�E�]�����1�E�]�����������������������������������4�1
Page 120 of 140

120
Before
UseGetting
started
RoutingAddress
Book
Vo i c e Recognition
Navigation
Set Up
RDM-TMC
Bluetooth Hands-Free
Note
l
A mobile telephone can be paired only when the vehicle is parked.
l If a Bluetooth device has already been paired to the vehicle as a Bluetooth audio device, it
does not need to be paired again when using the device as a hands-free mobile phone.
Conversely, it does not need to be paired again as a Bluetooth audio device if it has already
been paired as a hands-free mobile phone.
l Since the communication range of a Bluetooth equipped mobile telephone is about 10
meters (32 ft), if a mobile telephone is placed within a 10-meter (32\
ft) radius of the vehicle,
it may be detected/paired unintentionally while another telephone is being pa\
ired.
nDeleting the link to a Mobile telephone
Refer to “Deleting the link to a Bluetooth audio device”. ( page 102)
nChanging the registered mobile telephone
Refer to “Changing Paired Bluetooth device”. ( page 104)
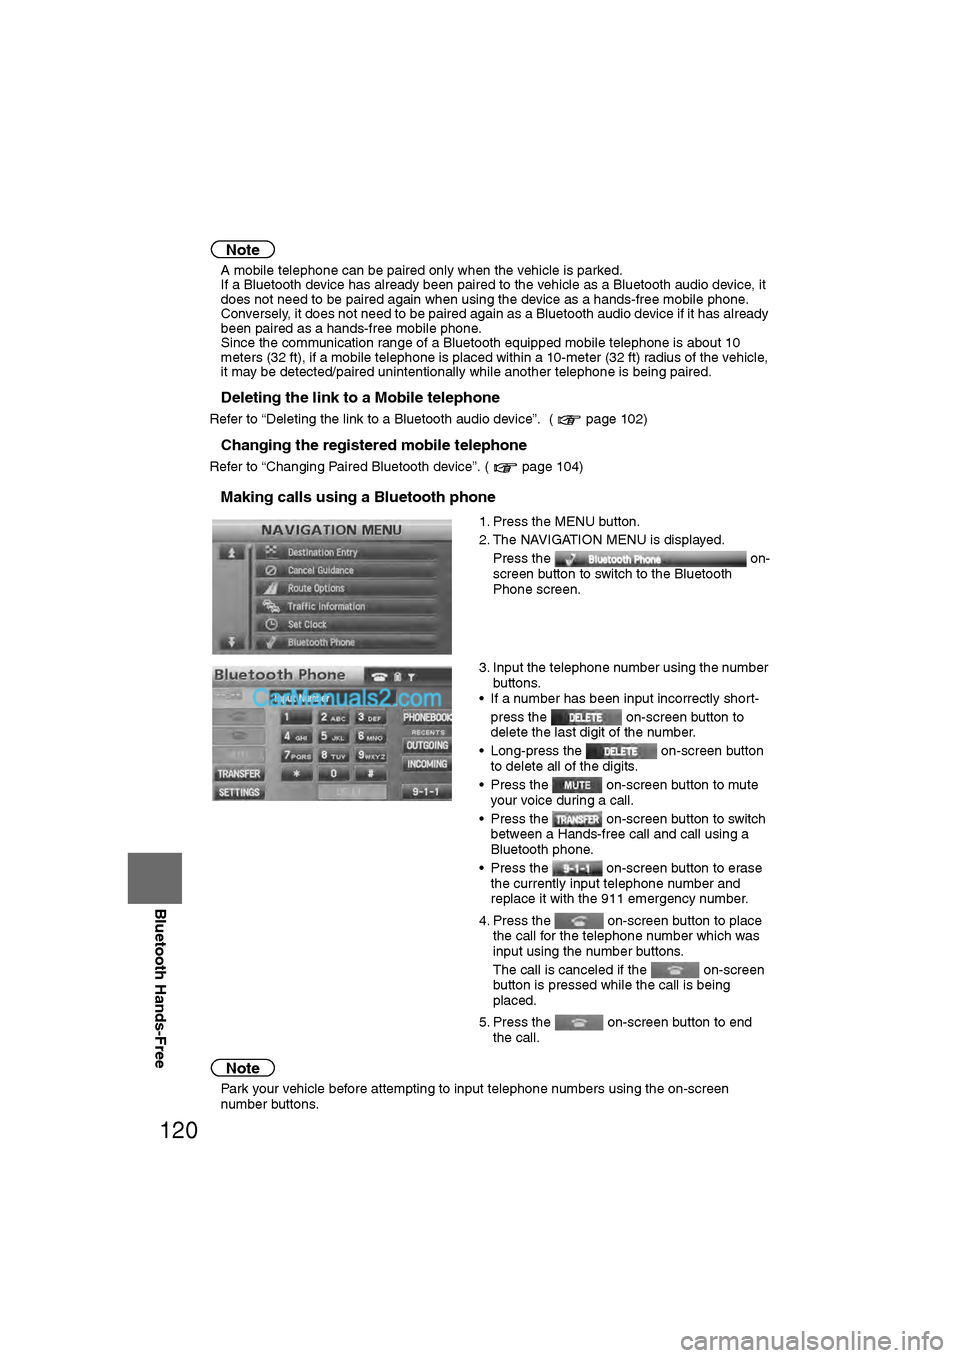
nMaking calls using a Bluetooth phone
Note
l Park your vehicle before attempting to input telephone numbers using the on-screen
number buttons. 1. Press the MENU button.
2. The NAVIGATION MENU is displayed.
Press the on-
screen button to switch to the Bluetooth
Phone screen.
3. Input the telephone number using the number buttons.
• If a number has been input incorrectly short-
press the on-screen button to
delete the last digit of the number.
• Long-press the on-screen button to delete all of the digits.
• Press the on-screen button to mute your voice during a call.
• Press the on-screen button to switch between a Hands-free call and call using a
Bluetooth phone.
• Press the on-screen button to erase the currently input telephone number and
replace it with the 911 emergency number.
4. Press the on-screen button to place the call for the telephone number which was
input using the number buttons.
The call is canceled if the on-screen
button is pressed while the call is being
placed.
5. Press the on-screen button to end the call.
�2�%�:���0�:�9���)���F�S�S�O�����4�E�K�I�������������8�L�Y�V�W�H�E�]�����1�E�]�����������������������������������4�1