2011 LINCOLN TOWN CAR reset
[x] Cancel search: resetPage 98 of 306
Heated seats (if equipped)
WARNING:Persons who are unable to feel pain to the skin
because of advanced age, chronic illness, diabetes, spinal cord
injury, medication, alcohol use, exhaustion, or other physical
conditions, must exercise care when using the seat heater. The seat
heater may cause burns even at low temperatures, especially if used
for long periods of time. Do not place anything on the seat that
insulates against heat, such as a blanket or cushion, because this may
cause the seat heater to overheat. Do not puncture the seat with pins,
needles, or other pointed objects because this may damage the heating
element which may cause the seat heater to overheat. An overheated
seat may cause serious personal injury.
Note:Do not do the following:
•Place heavy objects on the seat
•Operate the seat heater if water or any other liquid is spilled on the
seat. Allow the seat to dry thoroughly.
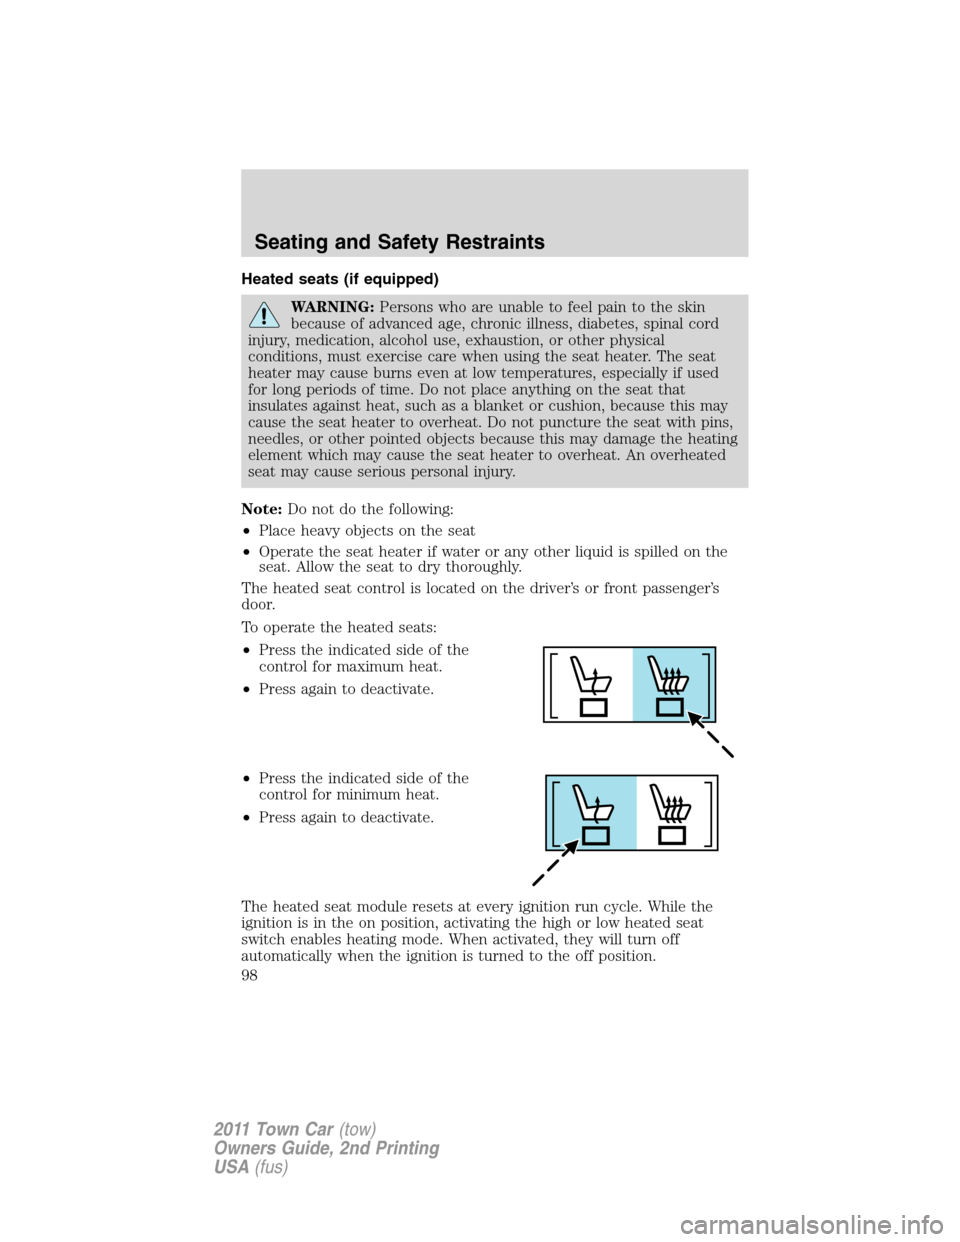
The heated seat control is located on the driver’s or front passenger’s
door.
To operate the heated seats:
•Press the indicated side of the
control for maximum heat.
•Press again to deactivate.
•Press the indicated side of the
control for minimum heat.
•Press again to deactivate.
The heated seat module resets at every ignition run cycle. While the
ignition is in the on position, activating the high or low heated seat
switch enables heating mode. When activated, they will turn off
automatically when the ignition is turned to the off position.
Seating and Safety Restraints
98
2011 Town Car(tow)
Owners Guide, 2nd Printing
USA(fus)
Page 99 of 306
The indicator light will illuminate when the heated seats have been
activated.
Rear heated seats (if equipped)
WARNING:Persons who are unable to feel pain to the skin
because of advanced age, chronic illness, diabetes, spinal cord
injury, medication, alcohol use, exhaustion, or other physical
conditions, must exercise care when using the seat heater. The seat
heater may cause burns even at low temperatures, especially if used
for long periods of time. Do not place anything on the seat that
insulates against heat, such as a blanket or cushion, because this may
cause the seat heater to overheat. Do not puncture the seat with pins,
needles, or other pointed objects because this may damage the heating
element which may cause the seat heater to overheat. An overheated
seat may cause serious personal injury.
Note:Do not do the following:
•Place heavy objects on the seat
•Operate the seat heater if water or any other liquid is spilled on the
seat. Allow the seat to dry thoroughly.
The rear seat heat controls are located on the rear door panels and
operate like the front heated seats. Refer to theHeated Seatssection in
this chapter.
Easy-access/easy-out feature (if equipped)
This feature automatically moves the driver’s seat rearward 2 in. (5 cm)
when:
•the transmission is in N (Neutral) or P (Park)
•the key is removed from the ignition
The seat will move forward (to the original position) when:
•the transmission is in N (Neutral) or P (Park)
•the key is placed in the ignition
Seat-mounted cup holders (if equipped)
Your vehicle may be equipped with cupholders in the cushion of the
front center seat and the rear seat . The rear seat cupholder is designed
to over rotate from the seat when subjected to a heavy load. The rear
seat cupholder can be reset by rotating to the closed position.
Seating and Safety Restraints
99
2011 Town Car(tow)
Owners Guide, 2nd Printing
USA(fus)
Page 195 of 306
FUEL PUMP SHUT-OFF SWITCHFUEL
RESET
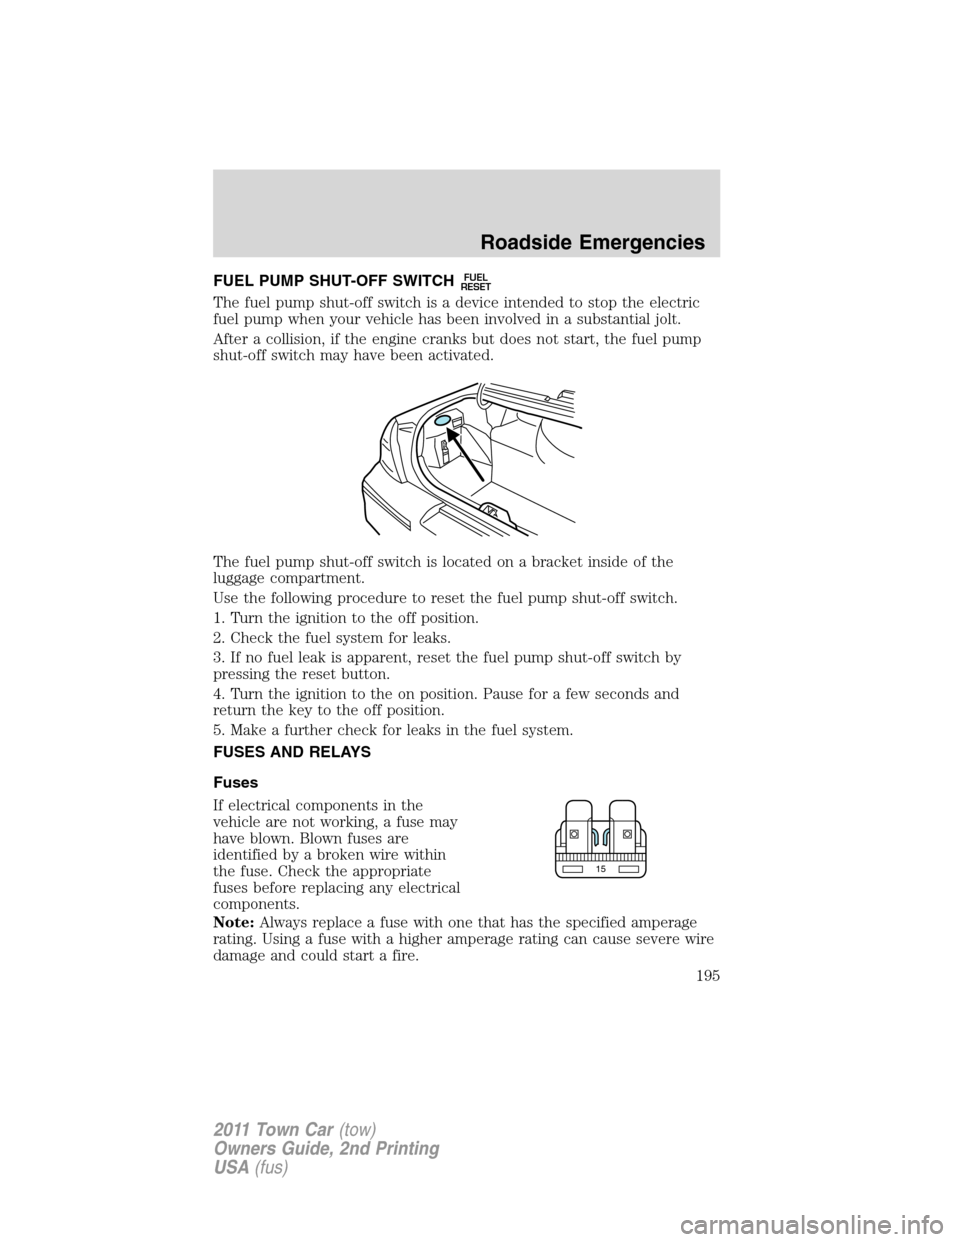
The fuel pump shut-off switch is a device intended to stop the electric
fuel pump when your vehicle has been involved in a substantial jolt.
After a collision, if the engine cranks but does not start, the fuel pump
shut-off switch may have been activated.
The fuel pump shut-off switch is located on a bracket inside of the
luggage compartment.
Use the following procedure to reset the fuel pump shut-off switch.
1. Turn the ignition to the off position.
2. Check the fuel system for leaks.
3. If no fuel leak is apparent, reset the fuel pump shut-off switch by
pressing the reset button.
4. Turn the ignition to the on position. Pause for a few seconds and
return the key to the off position.
5. Make a further check for leaks in the fuel system.
FUSES AND RELAYS
Fuses
If electrical components in the
vehicle are not working, a fuse may
have blown. Blown fuses are
identified by a broken wire within
the fuse. Check the appropriate
fuses before replacing any electrical
components.
Note:Always replace a fuse with one that has the specified amperage
rating. Using a fuse with a higher amperage rating can cause severe wire
damage and could start a fire.
15
Roadside Emergencies
195
2011 Town Car(tow)
Owners Guide, 2nd Printing
USA(fus)
Page 241 of 306
WARNING:Keep batteries out of reach of children. Batteries
contain sulfuric acid. Avoid contact with skin, eyes or clothing.
Shield your eyes when working near the battery to protect against
possible splashing of acid solution. In case of acid contact with skin or
eyes, flush immediately with water for a minimum of 15 minutes and
get prompt medical attention. If acid is swallowed, call a physician
immediately.
WARNING:Battery posts, terminals and related accessories
contain lead and lead compounds.Wash hands after handling.
Because your vehicle’s engine is electronically controlled by a computer,
some control conditions are maintained by power from the battery. When
the battery is disconnected or a new battery is installed, the engine must
relearn its idle and fuel trim strategy for optimum driveability and
performance. To begin this process:
1. With the vehicle at a complete stop, set the parking brake.
2. Put the gearshift in P (Park), turn off all accessories and start the
engine.
3. Run the engine until it reaches normal operating temperature.
4. Allow the engine to idle for at least one minute.
5. Turn the A/C on and allow the engine to idle for at least one minute.
6. Release the parking brake. With your foot on the brake pedal and with
the A/C on, put the vehicle in D (Drive) and allow the engine to idle for
at least one minute.
7. Drive the vehicle to complete the relearning process.
•The vehicle may need to be driven 10 miles (16 km) or more to
relearn the idle and fuel trim strategy.
•If you do not allow the engine to relearn its idle trim, the idle
quality of your vehicle may be adversely affected until the idle
trim is eventually relearned.
If the battery has been disconnected or a new battery has been installed,
the clock and radio settings must be reset once the battery is
reconnected.
Maintenance and Specifications
241
2011 Town Car(tow)
Owners Guide, 2nd Printing
USA(fus)
Page 247 of 306
•Thesymbol will display in the message center.
•The message center will display COOLANT OVER TEMPERATURE.
•A chime will sound.
•Theservice engine soon
indicator light will illuminate.
If the engine reaches a preset over-temperature condition, the engine
will automatically switch to alternating cylinder operation. Each disabled
cylinder acts as an air pump and cools the engine.
When this occurs the vehicle will still operate. However:
•The engine power will be limited.
•The air conditioning system will be disabled.
Continued operation will increase the engine temperature and the engine
will completely shut down, causing steering and braking effort to
increase.
Once the engine temperature cools, the engine can be re-started. Take
your vehicle to an authorized dealer as soon as possible to minimize
engine damage.
When fail-safe mode is activated
You have limited engine power when in the fail-safe mode, so drive the
vehicle with caution. The vehicle will not be able to maintain high-speed
operation and the engine will run rough. Remember that the engine is
capable of completely shutting down automatically to prevent engine
damage, therefore:
1. Pull off the road as soon as safely possible and turn off the engine.
2. Arrange for the vehicle to be taken to an authorized dealer.
3. If this is not possible, wait a short period for the engine to cool.
4. Check the coolant level and replenish if low.
WARNING:Fail-safe mode is for use during emergencies only.
Operate the vehicle in fail-safe mode only as long as necessary to
bring the vehicle to rest in a safe location and seek immediate repairs.
When in fail-safe mode, the vehicle will have limited power, will not be
able to maintain high-speed operation, and may completely shut down
without warning, potentially losing engine power, power steering assist,
and power brake assist, which may increase the possibility of a crash
resulting in serious injury.
Maintenance and Specifications
247
2011 Town Car(tow)
Owners Guide, 2nd Printing
USA(fus)
Page 252 of 306
At the next opportunity, safely pull off of the road, remove the fuel filler
cap, align the cap properly and reinstall it. The check fuel cap
light
or CHECK FUEL CAP message may not reset immediately; it
may take several driving cycles for the check fuel cap light
or CHECK
FUEL CAP message to turn off. A driving cycle consists of an engine
start-up (after four or more hours with the engine off) followed by city
and highway driving.
Continuing to drive with the check fuel cap light
or CHECK FUEL
CAP message on may cause the
light to turn on as well.
If you must replace the fuel filler cap, replace it with a fuel filler
cap that is designed for your vehicle. The customer warranty may
be void for any damage to the fuel tank or fuel system if the
correct genuine Ford, Motorcraft or other certified fuel filler cap
is not used.
WARNING:The fuel system may be under pressure. If the fuel
filler cap is venting vapor or if you hear a hissing sound, wait
until it stops before completely removing the fuel filler cap. Otherwise,
fuel may spray out and injure you or others.
WARNING:If you do not use the proper fuel filler cap,
excessive vacuum in the fuel tank may damage the fuel system
or cause the fuel cap to disengage in a collision, which may result in
personal injury.
FFV (Flex Fuel Vehicle) fuel cap
If your vehicle is FFV capable, it will have a yellow colored fuel cap.
Choosing the right fuel
If your vehicle is a flexible fuel vehicle (FFV), use only UNLEADED
FUEL and FUEL ETHANOL (Ed75–Ed85).
If your vehicle is not a flexible fuel vehicle (FFV), then only use
UNLEADED fuel or UNLEADED fuel blended with a maximum of 10%
ethanol. Do not use fuel ethanol (E85), diesel, methanol, leaded fuel or
any other fuel.
The use of leaded fuel is prohibited by law and could damage your
vehicle.
Your vehicle was not designed to use fuel or fuel additives with metallic
compounds, including manganese-based additives.
Maintenance and Specifications
252
2011 Town Car(tow)
Owners Guide, 2nd Printing
USA(fus)
Page 266 of 306
Cooling system
•Protect against freezing temperatures.
•When removing vehicle from storage, check coolant fluid level.
Confirm there are no cooling system leaks, and fluid is at the
recommended level.
Battery
•Check and recharge as necessary. Keep connections clean.
•If storing your vehicle for more than 30 days without recharging the
battery, it may be advisable to disconnect the battery cables to ensure
battery charge is maintained for quick starting.
Note:If battery cables are disconnected, it will be necessary to reset
memory features.
Brakes
•Make sure brakes and parking brake are fully released.
Tires
•Maintain recommended air pressure.
Miscellaneous
•Make sure all linkages, cables, levers and pins under vehicle are
covered with grease to prevent rust.
•Move vehicles at least 25 feet (8 m) every 15 days to lubricate
working parts and prevent corrosion.
Removing vehicle from storage
When your vehicle is ready to come out of storage, do the following:
•Wash your vehicle to remove any dirt or grease film build-up on
window surfaces.
•Check windshield wipers for any deterioration.
•Check under the hood for any foreign material that may have collected
during storage (mice/squirrel nests).
•Check the exhaust for any foreign material that may have collected
during storage.
•Check tire pressures and set tire inflation per the Tire Label.
Maintenance and Specifications
266
2011 Town Car(tow)
Owners Guide, 2nd Printing
USA(fus)
Page 295 of 306
ENGINE IDLE HOUR METER (IF EQUIPPED):
Your vehicle may be equipped with an idle meter to indicate how much
time the vehicle is idling in P (Park) or N (Neutral). The meter is
incorporated with the vehicle odometer. Depressing the odometer-reset
button once will display the trip odometer (miles [km] followed by a “T”
for trip odometer); depressing the odometer-reset button a second time
will display the idle meter (hours followed by an “H” for hours). The idle
meter only accumulates time when the vehicle is in P (Park) or N
(Neutral). Displayed time is cumulative for the vehicle.It cannot be
reset to zero.Police/Fleet vehicles often experience long periods of
idling, during which engine oil will continue to break down but distance
is not accumulated on the odometer.
To assist fleet managers in maintaining proper oil change intervals, the
idle meter will help determine when an oil change is required. For every
hour that the vehicle idles, it has accumulated the equivalent of
approximately 33 miles (53 km) of driving. Using the combination of the
vehicle odometer and idle meter allows the fleet manager to better
determine when the oil needs to be changed
Engine idle hour meter calculation:
Idle hours x 33 = miles (km) equivalency
Miles (km) driven + miles (km) equivalency = oil change interval
Example:When the odometer has accumulated 3,000 miles (4,800 km)
and the idle meter shows 61 hours, a 5,000 mile (8,000 km) oil change
interval will have been reached: 3,000 road miles (4,800 road km) + (61
idle hours x 33 miles [53 km]/idle hour) = 5,013 miles (8,067 km).
Scheduled Maintenance Guide
295
2011 Town Car(tow)
Owners Guide, 2nd Printing
USA(fus)