2011 LINCOLN MKZ Front seat
[x] Cancel search: Front seatPage 160 of 345
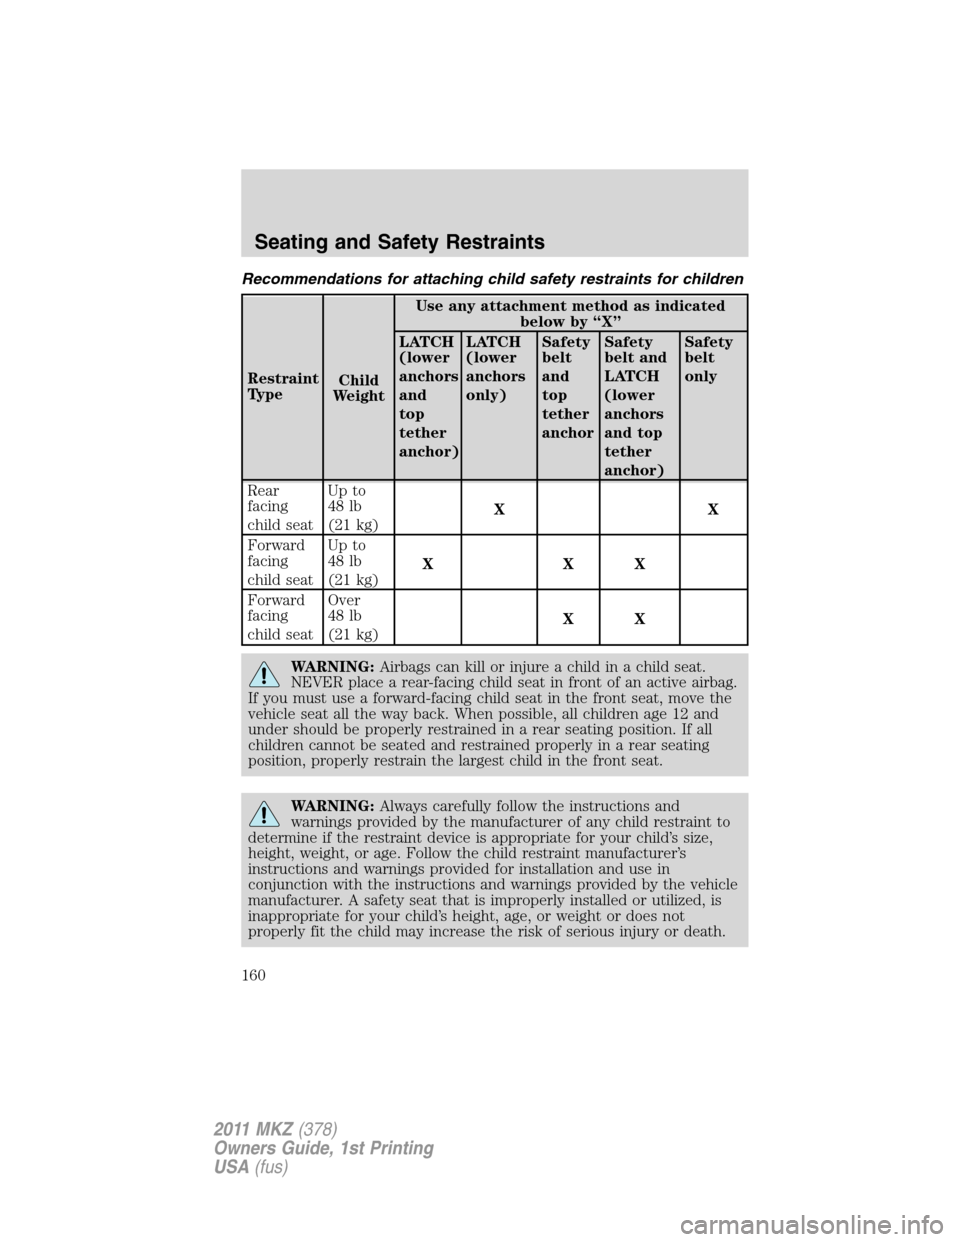
Recommendations for attaching child safety restraints for children
Restraint
TypeChild
WeightUse any attachment method as indicated
below by “X”
LATCH
(lower
anchors
and
top
tether
anchor)LATCH
(lower
anchors
only)Safety
belt
and
top
tether
anchorSafety
belt and
LATCH
(lower
anchors
and top
tether
anchor)Safety
belt
only
Rear
facing
child seatUp to
48 lb
(21 kg)XX
Forward
facing
child seatUp to
48 lb
(21 kg)XXX
Forward
facing
child seatOver
48 lb
(21 kg)XX
WARNING:Airbags can kill or injure a child in a child seat.
NEVER place a rear-facing child seat in front of an active airbag.
If you must use a forward-facing child seat in the front seat, move the
vehicle seat all the way back. When possible, all children age 12 and
under should be properly restrained in a rear seating position. If all
children cannot be seated and restrained properly in a rear seating
position, properly restrain the largest child in the front seat.
WARNING:Always carefully follow the instructions and
warnings provided by the manufacturer of any child restraint to
determine if the restraint device is appropriate for your child’s size,
height, weight, or age. Follow the child restraint manufacturer’s
instructions and warnings provided for installation and use in
conjunction with the instructions and warnings provided by the vehicle
manufacturer. A safety seat that is improperly installed or utilized, is
inappropriate for your child’s height, age, or weight or does not
properly fit the child may increase the risk of serious injury or death.
Seating and Safety Restraints
160
2011 MKZ(378)
Owners Guide, 1st Printing
USA(fus)
Page 162 of 345
Follow all the safety restraint and airbag precautions that apply to adult
passengers in your vehicle.
If the child is the proper height, age, and weight (as specified by your
child safety seat or booster manufacturer), fits the restraint and can be
restrained properly, then restrain the child in the child safety seat or
with the belt-positioning booster. Remember that child seats and
belt-positioning boosters vary and may be designed to fit children of
different heights, ages and weights. Children who are too large for child
safety seats or belt-positioning boosters (as specified by your child safety
seat manufacturer) should always properly wear safety belts.
SAFETY SEATS FOR CHILDREN
Infant and/or toddler seats
Use a safety seat that is recommended for the size and weight of the
child.
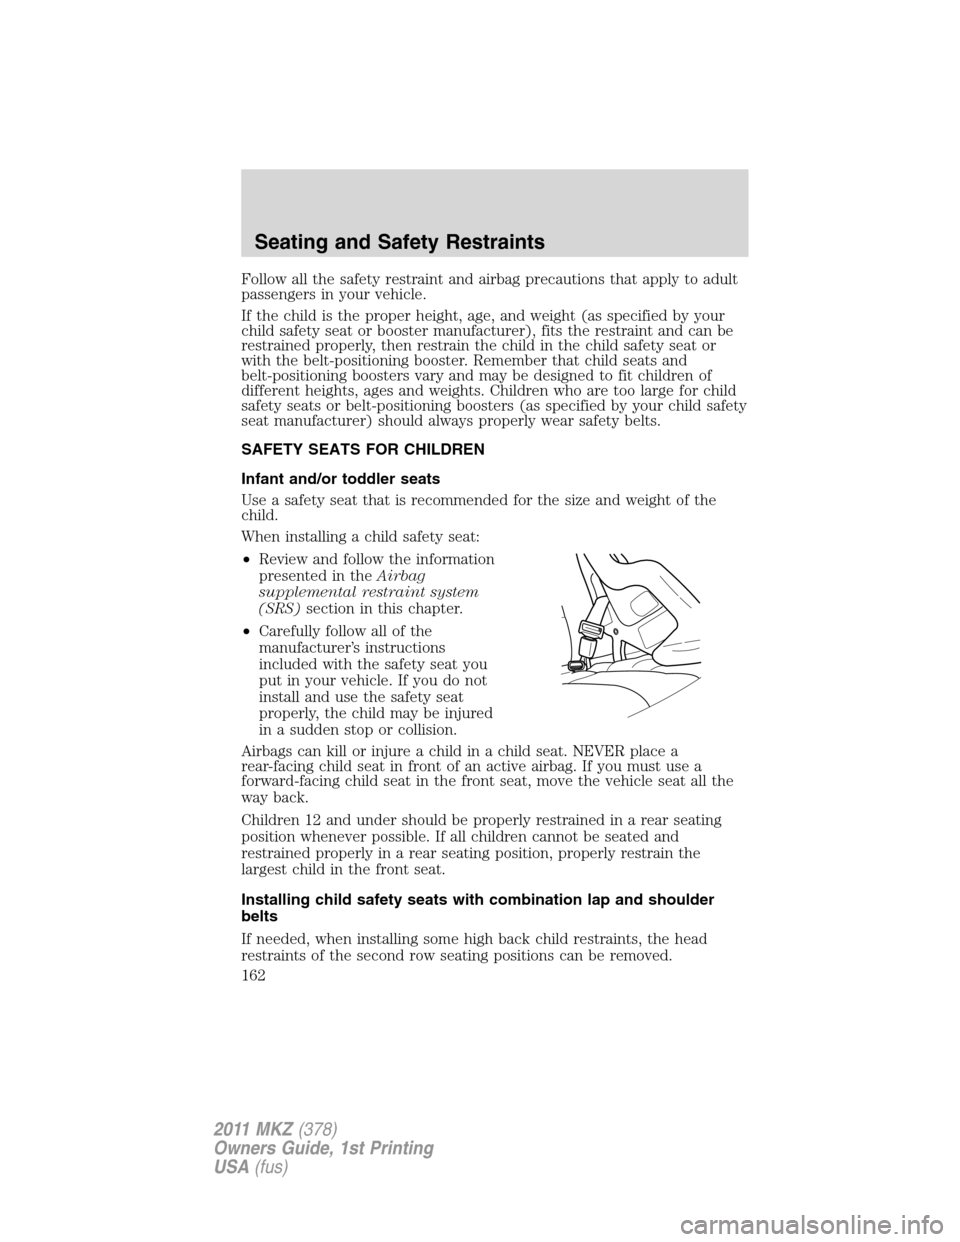
When installing a child safety seat:
•Review and follow the information
presented in theAirbag
supplemental restraint system
(SRS)section in this chapter.
•Carefully follow all of the
manufacturer’s instructions
included with the safety seat you
put in your vehicle. If you do not
install and use the safety seat
properly, the child may be injured
in a sudden stop or collision.
Airbags can kill or injure a child in a child seat. NEVER place a
rear-facing child seat in front of an active airbag. If you must use a
forward-facing child seat in the front seat, move the vehicle seat all the
way back.
Children 12 and under should be properly restrained in a rear seating
position whenever possible. If all children cannot be seated and
restrained properly in a rear seating position, properly restrain the
largest child in the front seat.
Installing child safety seats with combination lap and shoulder
belts
If needed, when installing some high back child restraints, the head
restraints of the second row seating positions can be removed.
Seating and Safety Restraints
162
2011 MKZ(378)
Owners Guide, 1st Printing
USA(fus)
Page 163 of 345
To remove the head restraint(s), seeSecond-row adjustable head
restraintsin this chapter for more information.
WARNING:If the head restraint has been removed from a
seating position to accommodate a high back child restraint, the
head restraint must be re-installed prior to use of the seat by any other
occupant in order to reduce the risk of personal injury in the event of
a collision.
Check to make sure the child seat is properly secured before each use.
Children 12 and under should be properly restrained in a rear seating
position whenever possible. If all children cannot be seated and
restrained properly in a rear seating position, properly restrain the
largest child in the front seat.
When installing a child safety seat with combination lap/shoulder belts:
•Use the correct safety belt buckle for that seating position.
•Insert the belt tongue into the proper buckle until you hear a snap
and feel it latch. Make sure the tongue is securely fastened in the
buckle.
•Keep the buckle release button pointing up and away from the safety
seat, with the tongue between the child seat and the release button,
to help prevent accidental unbuckling.
•Place vehicle seat back in upright position.
•Put the safety belt in the automatic locking mode. Refer to Step 5
below. This vehicle does not require the use of a locking clip.
WARNING:Depending on where you secure a child restraint,
and depending on the child restraint design, you may block
access to certain safety belt buckle assemblies and/or LATCH lower
anchors, rendering those features potentially unusable. To avoid risk of
injury, occupants should only use seating positions where they are able
to be properly restrained.
Perform the following steps when installing the child seat with
combination lap/shoulder belts:
Note:Although the child seat illustrated is a forward facing child seat,
the steps are the same for installing a rear facing child seat.
Seating and Safety Restraints
163
2011 MKZ(378)
Owners Guide, 1st Printing
USA(fus)
Page 169 of 345
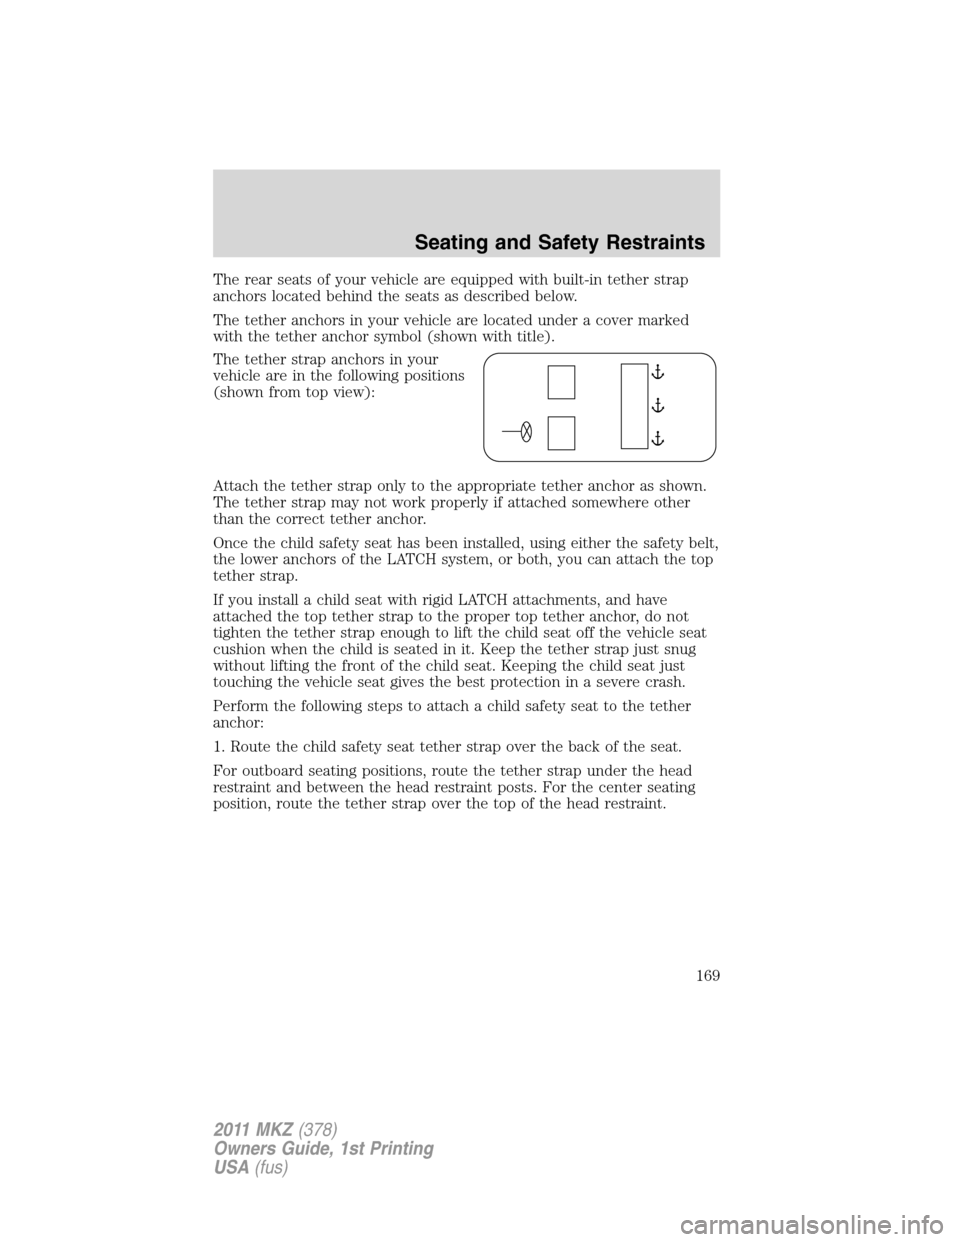
The rear seats of your vehicle are equipped with built-in tether strap
anchors located behind the seats as described below.
The tether anchors in your vehicle are located under a cover marked
with the tether anchor symbol (shown with title).
The tether strap anchors in your
vehicle are in the following positions
(shown from top view):
Attach the tether strap only to the appropriate tether anchor as shown.
The tether strap may not work properly if attached somewhere other
than the correct tether anchor.
Once the child safety seat has been installed, using either the safety belt,
the lower anchors of the LATCH system, or both, you can attach the top
tether strap.
If you install a child seat with rigid LATCH attachments, and have
attached the top tether strap to the proper top tether anchor, do not
tighten the tether strap enough to lift the child seat off the vehicle seat
cushion when the child is seated in it. Keep the tether strap just snug
without lifting the front of the child seat. Keeping the child seat just
touching the vehicle seat gives the best protection in a severe crash.
Perform the following steps to attach a child safety seat to the tether
anchor:
1. Route the child safety seat tether strap over the back of the seat.
For outboard seating positions, route the tether strap under the head
restraint and between the head restraint posts. For the center seating
position, route the tether strap over the top of the head restraint.
Seating and Safety Restraints
169
2011 MKZ(378)
Owners Guide, 1st Printing
USA(fus)
Page 174 of 345
Follow all instructions provided by the manufacturer of the booster seat.
WARNING:Never place, or allow a child to place, the shoulder
belt under a child’s arm or behind the back because it reduces
the protection for the upper part of the body and may increase the risk
of injury or death in a collision.
Child restraint and safety belt maintenance
Inspect the vehicle safety belts and child safety seat systems periodically
to make sure they work properly and are not damaged. Inspect the
vehicle and child seat safety belts to make sure there are no nicks, tears
or cuts. Replace if necessary. All vehicle safety belt assemblies, including
retractors, buckles, front safety belt buckle assemblies, buckle support
assemblies (slide bar-if equipped), shoulder belt height adjusters (if
equipped), shoulder belt guide on seatback (if equipped), child safety
seat LATCH and tether anchors, and attaching hardware, should be
inspected after a collision. Refer to the child restraint manufacturer’s
instructions for additional inspection and maintenance information
specific to the child restraint. Ford Motor Company recommends that all
safety belt assemblies in use in vehicles involved in a collision be
replaced. However, if the collision was minor and an authorized dealer
finds that the belts do not show damage and continue to operate
properly, they do not need to be replaced. Safety belt assemblies not in
use during a collision should also be inspected and replaced if either
damage or improper operation is noted.
For proper care of soiled safety belts, refer toInteriorin theCleaning
chapter.
WARNING:Failure to inspect and if necessary replace the
safety belt assembly or child restraint system under the above
conditions could result in severe personal injuries in the event of a
collision.
Seating and Safety Restraints
174
2011 MKZ(378)
Owners Guide, 1st Printing
USA(fus)
Page 177 of 345
![LINCOLN MKZ 2011 Owners Manual •Extra load:A class of P-metric or Metric tires designed to carry a
heavier maximum load at 41 psi [43 psi (2.9 bar) for Metric tires].
Increasing the inflation pressure beyond this pressure will no LINCOLN MKZ 2011 Owners Manual •Extra load:A class of P-metric or Metric tires designed to carry a
heavier maximum load at 41 psi [43 psi (2.9 bar) for Metric tires].
Increasing the inflation pressure beyond this pressure will no](/manual-img/15/6974/w960_6974-176.png)
•Extra load:A class of P-metric or Metric tires designed to carry a
heavier maximum load at 41 psi [43 psi (2.9 bar) for Metric tires].
Increasing the inflation pressure beyond this pressure will not increase
the tire’s load carrying capability.
•kPa:Kilopascal, a metric unit of air pressure.
•PSI:Pounds per square inch, a standard unit of air pressure.
•Cold inflation pressure:The tire pressure when the vehicle has
been stationary and out of direct sunlight for an hour or more and
prior to the vehicle being driven for 1 mile (1.6 km).
•Recommended inflation pressure:The cold inflation pressure found
on the Safety Compliance Certification Label or Tire Label located on
the B-Pillar or the edge of the driver’s door.
•B-pillar:The structural member at the side of the vehicle behind the
front door.
•Bead area of the tire:Area of the tire next to the rim.
•Sidewall of the tire:Area between the bead area and the tread.
•Tread area of the tire:Area of the perimeter of the tire that
contacts the road when mounted on the vehicle.
•Rim:The metal support (wheel) for a tire or a tire and tube assembly
upon which the tire beads are seated.
INFLATING YOUR TIRES
Safe operation of your vehicle requires that your tires are properly
inflated. Remember that a tire can lose up to half of its air pressure
without appearing flat.
Every day before you drive, check your tires. If one looks lower than the
others, use a tire gauge to check pressure of all tires and adjust if
required.
At least once a month and before long trips, inspect each tire and check
the tire pressure with a tire gauge (including spare, if equipped). Inflate
all tires to the inflation pressure recommended by Ford Motor Company.
You are strongly urged to buy a reliable tire pressure gauge, as automatic
service station gauges may be inaccurate. Ford recommends the use of a
digital or dial-type tire pressure gauge rather than a stick-type tire
pressure gauge.
Use the recommended cold inflation pressure for optimum tire
performance and wear. Under-inflation or over-inflation may cause
uneven treadwear patterns.
Tires, Wheels and Loading
177
2011 MKZ(378)
Owners Guide, 1st Printing
USA(fus)
Page 182 of 345

WARNING:When mounting replacement tires and wheels, you
should not exceed the maximum pressure indicated on the
sidewall of the tire to set the beads without additional precautions
listed below. If the beads do not seat at the maximum pressure
indicated, re-lubricate and try again.
When inflating the tire for mounting pressures up to 20 psi (1.38 bar)
greater than the maximum pressure on the tire sidewall, the following
precautions must be taken to protect the person mounting the tire:
1. Make sure that you have the correct tire and wheel size.
2. Lubricate the tire bead and wheel bead seat area again.
3. Stand at a minimum of 12 ft (3.66 m) away from the tire wheel
assembly.
4. Use both eye and ear protection.
For a mounting pressure more than 20 psi (1.38 bar) greater than the
maximum pressure, a Ford dealer or other tire service professional
should do the mounting.
Always inflate steel carcass tires with a remote air fill with the person
inflating standing at a minimum of 12 ft (3.66 m) away from the tire
wheel assembly.
Important:Remember to replace the wheel valve stems when the road
tires are replaced on your vehicle.
It is recommended that the two front tires or two rear tires generally be
replaced as a pair.
The tire pressure sensors mounted in the wheels (originally installed on
your vehicle) are not designed to be used in aftermarket wheels.
The use of wheels or tires not recommended by Ford Motor Company
may affect the operation of your tire pressure monitoring system.
If the TPMS indicator is flashing, your TPMS is malfunctioning. Your
replacement tire might be incompatible with your TPMS, or some
component of the TPMS may be damaged.
Safety practices
Driving habits have a great deal to do with your tire mileage and safety.
•Observe posted speed limits
•Avoid fast starts, stops and turns
•Avoid potholes and objects on the road
Tires, Wheels and Loading
182
2011 MKZ(378)
Owners Guide, 1st Printing
USA(fus)
Page 200 of 345

you have been planning for the past 2 years. Measuring the inside of
the vehicle with the rear seat folded down, you have room for
12-100 lb. (45 kg) bags of cement. Do you have enough load capacity
to transport the cement to your home? If you and your friend each
weigh 220 lb. (99 kg), the calculation would be: 1400 - (2 x 220) - (12
x 100) = 1400 - 440 - 1200 = - 240 lb. No, you do not have enough
cargo capacity to carry that much weight. In metric units, the
calculation would be: 635 kg - (2 x 99 kg) - (12 x 45 kg) = 635 - 198 -
540 = -103 kg. You will need to reduce the load weight by at least
240 lb. (104 kg). If you remove 3-100 lb. (45 kg) cement bags, then
the load calculation would be:
1400 - (2 x 220) - (9 x 100) = 1400 - 440 - 900 = 60 lb. Now you have
the load capacity to transport the cement and your friend home. In
metric units, the calculation would be: 635 kg - (2 x 99 kg) - (9 x
45 kg) = 635 - 198 - 405 = 32 kg.
The above calculations also assume that the loads are positioned in your
vehicle in a manner that does not overload the Front or the Rear Gross
Axle Weight Rating specified for your vehicle on the Safety Compliance
Certification Label found on the edge of the driver’s door.
TRAILER TOWING
WARNING:Never tow a trailer with this vehicle. Your vehicle is
not equipped to tow. No towing packages are available through
an authorized dealer.
RECREATIONAL TOWING
Follow these guidelines if you have a need for recreational (RV) towing.
An example of recreational towing would be towing your vehicle behind
a motor home. These guidelines are designed to ensure that your
transmission is not damaged.
Note:Put your climate control system in recirculated air mode to
prevent exhaust fumes from entering the vehicle. Refer to theClimate
Controlschapter for more information.
In case of roadside emergency with a disabled vehicle, please refer to
Wrecker towingin theRoadside Emergencieschapter.
These guidelines are designed to prevent damage to your vehicle.
Tires, Wheels and Loading
200
2011 MKZ(378)
Owners Guide, 1st Printing
USA(fus)