2011 LINCOLN MKS warning
[x] Cancel search: warningPage 171 of 377
WARNING:Always carefully follow the instructions and
warnings provided by the manufacturer of any child restraint to
determine if the restraint device is appropriate for your child’s size,
height, weight, or age. Follow the child restraint manufacturer’s
instructions and warnings provided for installation and use in
conjunction with the instructions and warnings provided by the vehicle
manufacturer. A safety seat that is improperly installed or utilized, is
inappropriate for your child’s height, age, or weight or does not
properly fit the child may increase the risk of serious injury or death.
WARNING:Never let a passenger hold a child on his or her lap
while the vehicle is moving. The passenger cannot protect the
child from injury in a collision, which may result in serious injury or
death.
WARNING:Never use pillows, books, or towels to boost a child.
They can slide around and increase the likelihood of injury or
death in a collision.
WARNING:Always restrain an unoccupied child seat or booster
seat. These objects may become projectiles in a collision or
sudden stop, which may increase the risk of serious injury.
WARNING:Never place, or allow a child to place, the shoulder
belt under a child’s arm or behind the back because it reduces
the protection for the upper part of the body and may increase the risk
of injury or death in a collision.
WARNING:Do not leave children, unreliable adults, or pets
unattended in your vehicle.
Transporting children
Always make sure your child is secured properly in a device that is
appropriate for their age, height and weight. All children are shaped
differently. The child height, age and weight thresholds provided are
recommendations or the minimum requirements of law. The National
Highway Traffic Safety Administration (NHTSA) provides education and
Seating and Safety Restraints
171
2011 MKS(mks)
Owners Guide, 1st Printing
USA(fus)
Page 173 of 377
Airbags can kill or injure a child in a child seat. NEVER place a
rear-facing child seat in front of an active airbag. If you must use a
forward-facing child seat in the front seat, move the vehicle seat all the
way back.
Children 12 and under should be properly restrained in a rear seating
position whenever possible. If all children cannot be seated and
restrained properly in a rear seating position, properly restrain the
largest child in the front seat.
Installing child safety seats with combination lap and shoulder
belts
Check to make sure the child seat is properly secured before each use.
Children 12 and under should be properly restrained in a rear seating
position whenever possible. If all children cannot be seated and
restrained properly in a rear seating position, properly restrain the
largest child in the front seat.
When installing a child safety seat with combination lap/shoulder belts:
•Use the correct safety belt buckle for that seating position.
•Insert the belt tongue into the proper buckle until you hear a snap
and feel it latch. Make sure the tongue is securely fastened in the
buckle.
•Keep the buckle release button pointing up and away from the safety
seat, with the tongue between the child seat and the release button,
to help prevent accidental unbuckling.
•Place vehicle seat back in upright position.
•Put the safety belt in the automatic locking mode. Refer to Step 5
below. This vehicle does not require the use of a locking clip.
WARNING:Depending on where you secure a child restraint,
and depending on the child restraint design, you may block
access to certain safety belt buckle assemblies and/or LATCH lower
anchors, rendering those features potentially unusable. To avoid risk of
injury, occupants should only use seating positions where they are able
to be properly restrained.
Perform the following steps when installing the child seat with
combination lap/shoulder belts:
Note:Although the child seat illustrated is a forward facing child seat,
the steps are the same for installing a rear facing child seat.
Seating and Safety Restraints
173
2011 MKS(mks)
Owners Guide, 1st Printing
USA(fus)
Page 178 of 377
WARNING:Never attach two child safety seats to the same
anchor. In a crash, one anchor may not be strong enough to hold
two child safety seat attachments and may break, causing serious
injury or death.
Each time you use the safety seat, check that the seat is properly
attached to the lower anchors and tether anchor, if applicable. Tug the
child seat from side to side and forward and back where it is secured to
the vehicle. The seat should move less than one inch when you do this
for a proper installation.
If the safety seat is not anchored properly, the risk of a child being
injured in a crash greatly increases.
WARNING:Depending on where you secure a child restraint,
and depending on the child restraint design, you may block
access to certain safety belt buckle assemblies and/or LATCH lower
anchors, rendering those features potentially unusable. To avoid risk of
injury, occupants should only use seating positions where they are able
to be properly restrained.
Combining safety belt and LATCH lower anchors for attaching
child safety seats
When used in combination, either the safety belt or the LATCH lower
anchors may be attached first, provided a proper installation is achieved.
Attach the tether strap afterward, if included with the child seat. Refer
toRecommendations for attaching child safety restraints for children
in this chapter.
Attaching child safety seats with tether straps
Many forward-facing child safety seats include a tether strap which
extends from the back of the child safety seat and hooks to an anchoring
point called the top tether anchor. Tether straps are available as an
accessory for many older safety seats. Contact the manufacturer of your
child seat for information about ordering a tether strap, or to obtain a
longer tether strap if the tether strap on your safety seat does not reach
the appropriate top tether anchor in the vehicle.
The rear seats of your vehicle are equipped with built-in tether strap
anchors located behind the seats as described below.
The tether anchors in your vehicle are located under a cover marked
with the tether anchor symbol (shown with title).
Seating and Safety Restraints
178
2011 MKS(mks)
Owners Guide, 1st Printing
USA(fus)
Page 184 of 377
Follow all instructions provided by the manufacturer of the booster seat.
WARNING:Never place, or allow a child to place, the shoulder
belt under a child’s arm or behind the back because it reduces
the protection for the upper part of the body and may increase the risk
of injury or death in a collision.
Child restraint and safety belt maintenance
Inspect the vehicle safety belts and child safety seat systems periodically
to make sure they work properly and are not damaged. Inspect the
vehicle and child seat safety belts to make sure there are no nicks, tears
or cuts. Replace if necessary. All vehicle safety belt assemblies, including
retractors, buckles, front safety belt buckle assemblies, buckle support
assemblies (slide bar-if equipped), shoulder belt height adjusters (if
equipped), shoulder belt guide on seatback (if equipped), child safety
seat LATCH and tether anchors, and attaching hardware, should be
inspected after a collision. Refer to the child restraint manufacturer’s
instructions for additional inspection and maintenance information
specific to the child restraint. Ford Motor Company recommends that all
safety belt assemblies in use in vehicles involved in a collision be
replaced. However, if the collision was minor and an authorized dealer
finds that the belts do not show damage and continue to operate
properly, they do not need to be replaced. Safety belt assemblies not in
use during a collision should also be inspected and replaced if either
damage or improper operation is noted.
For proper care of soiled safety belts, refer toInteriorin theCleaning
chapter.
WARNING:Failure to inspect and if necessary replace the
safety belt assembly or child restraint system under the above
conditions could result in severe personal injuries in the event of a
collision.
Seating and Safety Restraints
184
2011 MKS(mks)
Owners Guide, 1st Printing
USA(fus)
Page 186 of 377

WARNING:The traction grade assigned to this tire is based on
straight-ahead braking traction tests, and does not include
acceleration, cornering, hydroplaning or peak traction characteristics.
Temperature A B C
The temperature grades are A (the highest), B and C, representing the
tire’s resistance to the generation of heat and its ability to dissipate heat
when tested under controlled conditions on a specified indoor laboratory
test wheel. Sustained high temperature can cause the material of the tire
to degenerate and reduce tire life, and excessive temperature can lead to
sudden tire failure. The grade C corresponds to a level of performance
which all passenger car tires must meet under the Federal Motor Vehicle
Safety Standard No. 139. Grades B and A represent higher levels of
performance on the laboratory test wheel than the minimum required by
law.
WARNING:The temperature grade for this tire is established
for a tire that is properly inflated and not overloaded. Excessive
speed, underinflation, or excessive loading, either separately or in
combination, can cause heat buildup and possible tire failure.
TIRES
Tires are designed to give many thousands of miles of service, but they
must be maintained in order to get the maximum benefit from them.
Glossary of tire terminology
•Tire label:A label showing the OE (Original Equipment) tire sizes,
recommended inflation pressure and the maximum weight the vehicle
can carry.
•Tire Identification Number (TIN):A number on the sidewall of
each tire providing information about the tire brand and
manufacturing plant, tire size and date of manufacture. Also referred
to as DOT code.
•Inflation pressure:A measure of the amount of air in a tire.
•Standard load:A class of P-metric or Metric tires designed to carry a
maximum load at 35 psi [37 psi (2.5 bar) for Metric tires]. Increasing
the inflation pressure beyond this pressure will not increase the tire’s
load carrying capability.
•Extra load:A class of P-metric or Metric tires designed to carry a
heavier maximum load at 41 psi [43 psi (2.9 bar) for Metric tires].
Tires, Wheels and Loading
186
2011 MKS(mks)
Owners Guide, 1st Printing
USA(fus)
Page 188 of 377

WARNING:Under-inflation is the most common cause of tire
failures and may result in severe tire cracking, tread separation
or “blowout”, with unexpected loss of vehicle control and increased
risk of injury. Under-inflation increases sidewall flexing and rolling
resistance, resulting in heat buildup and internal damage to the tire. It
also may result in unnecessary tire stress, irregular wear, loss of
vehicle control and accidents. A tire can lose up to half of its air
pressure and not appear to be flat!
Always inflate your tires to the Ford recommended inflation pressure
even if it is less than the maximum inflation pressure information found
on the tire. The Ford recommended tire inflation pressure is found on
the Safety Compliance Certification Label or Tire Label which is located
on the B-Pillar or the edge of the driver’s door. Failure to follow the tire
pressure recommendations can cause uneven treadwear patterns and
adversely affect the way your vehicle handles.
Maximum Permissible Inflation Pressureis the tire manufacturer’s
maximum permissible pressure and/or the pressure at which the
maximum load can be carried by the tire. This pressure is normally
higher than the manufacturer’s recommended cold inflation pressure
which can be found on the Safety Compliance Certification Label or Tire
Label which is located on the B-Pillar or the edge of the driver’s door.
The cold inflation pressure should never be set lower than the
recommended pressure on the Safety Compliance Certification Label or
Tire Label.
When weather temperature changes occur, tire inflation pressures also
change. A 10°F (6°C) temperature drop can cause a corresponding drop
of 1 psi (7 kPa) in inflation pressure. Check your tire pressures
frequently and adjust them to the proper pressure which can be found
on the Safety Compliance Certification Label or Tire Label.
To check the pressure in your tire(s):
1. Make sure the tires are cool, meaning they are not hot from driving
even a mile.
If you are checking tire pressure when the tire is hot, (i.e. driven more
than 1 mile [1.6 km]), never “bleed” or reduce air pressure. The tires are
hot from driving and it is normal for pressures to increase above
recommended cold pressures. A hot tire at or below recommended cold
inflation pressure could be significantly under-inflated.
Tires, Wheels and Loading
188
2011 MKS(mks)
Owners Guide, 1st Printing
USA(fus)
Page 190 of 377
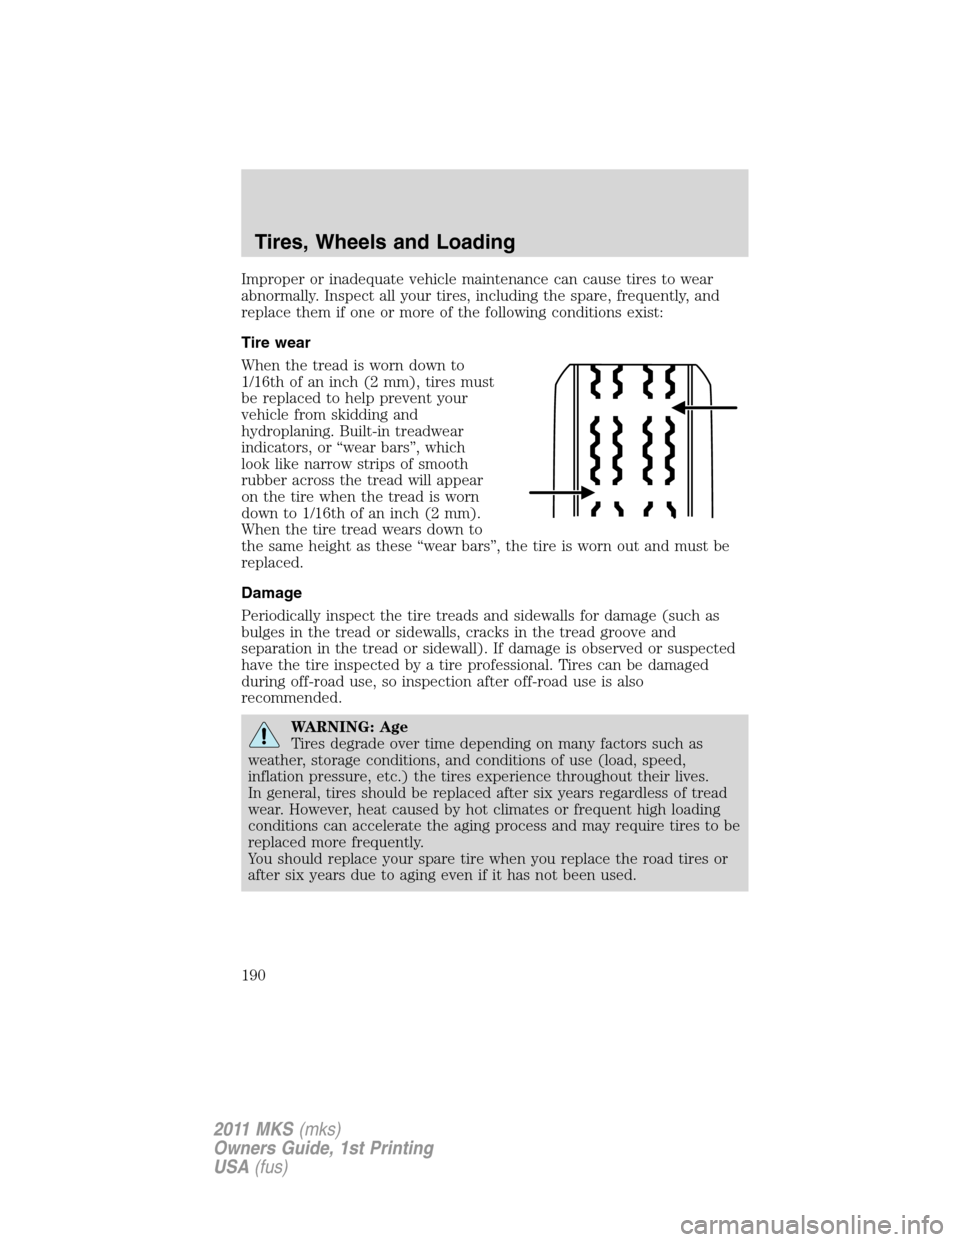
Improper or inadequate vehicle maintenance can cause tires to wear
abnormally. Inspect all your tires, including the spare, frequently, and
replace them if one or more of the following conditions exist:
Tire wear
When the tread is worn down to
1/16th of an inch (2 mm), tires must
be replaced to help prevent your
vehicle from skidding and
hydroplaning. Built-in treadwear
indicators, or “wear bars”, which
look like narrow strips of smooth
rubber across the tread will appear
on the tire when the tread is worn
down to 1/16th of an inch (2 mm).
When the tire tread wears down to
the same height as these “wear bars”, the tire is worn out and must be
replaced.
Damage
Periodically inspect the tire treads and sidewalls for damage (such as
bulges in the tread or sidewalls, cracks in the tread groove and
separation in the tread or sidewall). If damage is observed or suspected
have the tire inspected by a tire professional. Tires can be damaged
during off-road use, so inspection after off-road use is also
recommended.
WARNING: Age
Tires degrade over time depending on many factors such as
weather, storage conditions, and conditions of use (load, speed,
inflation pressure, etc.) the tires experience throughout their lives.
In general, tires should be replaced after six years regardless of tread
wear. However, heat caused by hot climates or frequent high loading
conditions can accelerate the aging process and may require tires to be
replaced more frequently.
You should replace your spare tire when you replace the road tires or
after six years due to aging even if it has not been used.
Tires, Wheels and Loading
190
2011 MKS(mks)
Owners Guide, 1st Printing
USA(fus)
Page 191 of 377

U.S. DOT Tire Identification Number (TIN)
Both U.S. and Canada Federal regulations require tire manufacturers to
place standardized information on the sidewall of all tires. This
information identifies and describes the fundamental characteristics of
the tire and also provides a U.S. DOT Tire Identification Number for
safety standard certification and in case of a recall.
This begins with the letters “DOT” and indicates that the tire meets all
federal standards. The next two numbers or letters are the plant code
designating where it was manufactured, the next two are the tire size
code and the last four numbers represent the week and year the tire was
built. For example, the numbers 317 mean the 31st week of 1997. After
2000 the numbers go to four digits. For example, 2501 means the 25th
week of 2001. The numbers in between are identification codes used for
traceability. This information is used to contact customers if a tire defect
requires a recall.
Tire replacement requirements
Your vehicle is equipped with tires designed to provide a safe ride and
handling capability.
WARNING:Only use replacement tires and wheels that are the
same size, load index, speed rating and type (such as P-metric
versus LT-metric or all-season versus all-terrain) as those originally
provided by Ford. The recommended tire and wheel size may be found
on either the Safety Compliance Certification Label or the Tire Label
which is located on the B-Pillar or edge of the driver’s door. If this
information is not found on these labels then you should contact your
authorized dealer as soon as possible. Use of any tire or wheel not
recommended by Ford can affect the safety and performance of your
vehicle, which could result in an increased risk of loss of vehicle
control, vehicle rollover, personal injury and death. Additionally the use
of non-recommended tires and wheels could cause steering,
suspension, axle or transfer case/power transfer unit failure. If you
have questions regarding tire replacement, contact your authorized
dealer as soon as possible.
Tires, Wheels and Loading
191
2011 MKS(mks)
Owners Guide, 1st Printing
USA(fus)