2011 Lancia Ypsilon lock
[x] Cancel search: lockPage 31 of 299

SEATS
WARNING
All adjustments must be made with
the car stationary
.
FRONT SEATS
Lengthwise adjustment
Lift the lever A fig. 18 and push the seat forwards
or backwards: in driving position your arms
should rest on the rim of the steering wheel.
WARNING
Once you have released the
adjustment lever,
always check that
the seat is locked on the guides by trying to
move it back and forth. If the seat is not
locked into place, it may unexpectedly slide
and cause the driver to lose control of the
car.
Height adjustment
Move lever B fig. 19 upwards or downwards to
achieve the required height.
IMPORTANT Carry out the adjustment whilst
seated in the driver's seat.
fig. 18
L0F0062
fig. 19
L0F0063
29GETTING TO
KNOW YOUR CARSAFETY
STARTING
AND
DRIVING
WARNING LIGHTS
AND MESSAGES
IN AN EMERGENCY
SERVICING AND
MAINTENANCE
TECHNICAL
SPECIFICATIONS
INDEX
Page 34 of 299

Downwards adjustment:press button A fig. 23
and lower the head restraint.
Proceed as follows to remove the head restraints:
❒raise the head restraints to their maximum
height;
❒press buttons A and B fig. 23 at the side of the
two supports, then remove the head restraints
by pulling them upwards.
IMPORTANT If the rear seats are used, always set
the head restraints in the "completely raised"
position.
STEERING WHEELThe steering wheel can be adjusted vertically.
To adjust, move lever A fig. 24 downwards to
position 1, then adjust the wheel to the most
suitable position and lock it in position by moving
lever A to position 2.
WARNING
All adjustments must be carried out
only with the
car stationary and
engine off.
A
B
fig. 23
L0F0201
fig. 24
L0F0078
32GETTING TO
KNOW YOUR CAR
SAFETY
STARTING
AND
DRIVING
WARNING LIGHTS
AND MESSAGES
IN AN EMERGENCY
SERVICING AND
MAINTENANCE
TECHNICAL
SPECIFICATIONS
INDEX
Page 52 of 299

EXTERNAL COURTESY LIGHTS
This function lights up the car and the space
around it when the doors are unlocked.
Activation:when the car is parked and the doors
are unlocked by pressing the
button on the
remote control (or the luggage compartment is
unlocked by pressing
), the dipped beam
headlights, side lights and number plate lights are
activated.
The lights remain lit for approximately 25 seconds
unless the doors and boot are locked again with
the remote control or the doors or boot are opened
and reclosed. In these cases they go out after 5
seconds.
The exterior courtesy lights can be enabled/
disabled using the Setup Menu (see the paragraph
“Menu Items” in this chapter).
WINDOW CLEANINGThe right stalk controls windscreen wiper/washer
and heated rear window wiper/washer operation.
WINDSCREEN WASHER/WIPER
They can be operated only with the ignition key
turned to MAR.
The ring nut A fig. 35 can be moved to four
different positions:
windscreen wiper off.intermittent operation.continuous slow operation.continuous fast operation.
fig. 35
L0F0126
50GETTING TO
KNOW YOUR CAR
SAFETY
STARTING
AND
DRIVING
WARNING LIGHTS
AND MESSAGES
IN AN EMERGENCY
SERVICING AND
MAINTENANCE
TECHNICAL
SPECIFICATIONS
INDEX
Page 59 of 299

The roof lights switch on according to the
following modes:
❒for about 10 seconds when the doors are
unlocked;
❒for about 3 minutes when one of the doors is
opened;
❒for about 10 seconds when the doors are closed.
The timing is interrupted when the ignition key
is turned to MAR.
Three modes are provided for switching off:
❒when all doors are closed, the 3-minute timer
will stop and a 10-second one will start. This
timer will stop when the key is turned to MAR;
❒when doors are locked (either with remote
control or with key on driver side door), the roof
light turns off.
❒the courtesy lights are turned off in any case
after 15 minutes to preserve battery duration
Timing when getting out of the car
After removing the key from the ignition switch,
the roof lights switch on as follows:
❒if the ignition key is removed within 3 minutes
from the engine stopping, the roof lights switch
on for 10 seconds;
❒for about 3 minutes when one of the doors is
opened;
❒for about 10 seconds when one of the doors is
closed.The timing stops automatically when the doors are
locked.
REAR ROOF LIGHT
Versions without sun roof
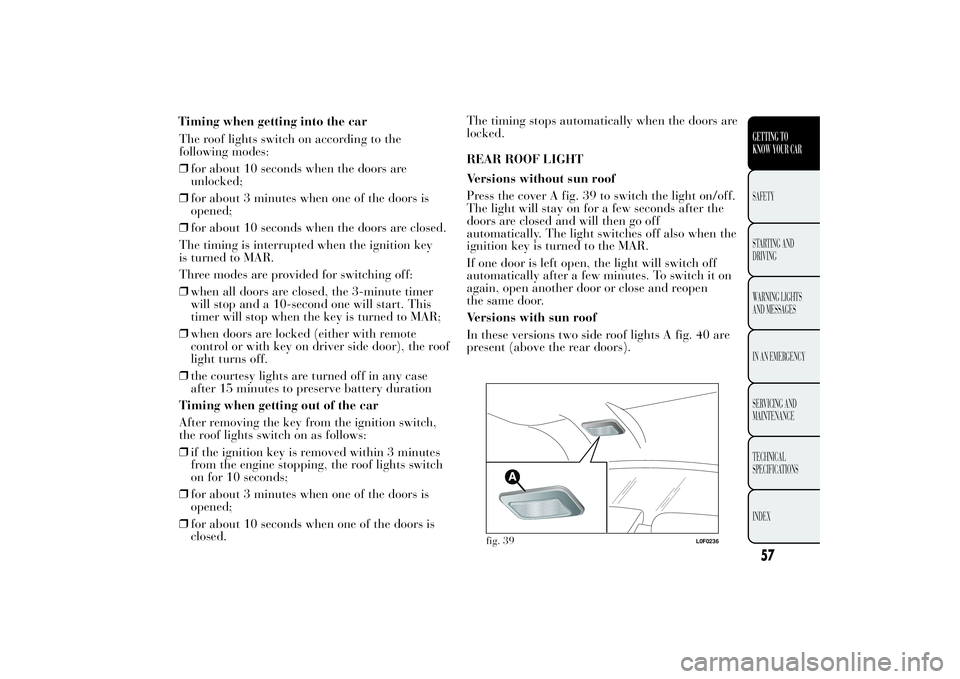
Press the cover A fig. 39 to switch the light on/off.
The light will stay on for a few seconds after the
doors are closed and will then go off
automatically. The light switches off also when the
ignition key is turned to the MAR.
If one door is left open, the light will switch off
automatically after a few minutes. To switch it on
again, open another door or close and reopen
the same door.
Versions with sun roof
In these versions two side roof lights A fig. 40 are
present (above the rear doors).
fig. 39
L0F0236
57GETTING TO
KNOW YOUR CARSAFETY
STARTING
AND
DRIVING
WARNING LIGHTS
AND MESSAGES
IN AN EMERGENCY
SERVICING AND
MAINTENANCE
TECHNICAL
SPECIFICATIONS
INDEX
Timing when getting into the car
Page 62 of 299

CENTRAL LOCKING
Press button
fig. 45 to lock all the doors
simultaneously (the LED on the button will light
up when the doors are locked). Locking takes
place irrespective of the position of the ignition
key.
DUALDRIVE ELECTRIC POWER STEERING
(for versions/markets, where provided)
Press the CITY button fig. 46 to activate the
function (see paragraph "Dualdrive electric power
steering" in this chapter). When this function is
active, the word CITY on the instrument panel
will light up. To deactivate the function press the
button again.ECO FUNCTION
(for versions/markets, where provided)
Press the ECO button fig. 47 for at least 5 seconds
to activate the function.
When the ECO function is activated, the car is set
for city driving, characterised by less effort on
the steering wheel (Dualdrive system on) and
reduced fuel consumption. When this function is
activated, the word ECO on the display will light
up on some versions.
This function stays in the memory and, when the
vehicle is started again, the system keeps the
setting it had before the engine was stopped. Press
the ECO button again to deactivate the function
and restore the normal driving setting.
fig. 45
L0F0081
fig. 46
L0F0043
60GETTING TO
KNOW YOUR CAR
SAFETY
STARTING
AND
DRIVING
WARNING LIGHTS
AND MESSAGES
IN AN EMERGENCY
SERVICING AND
MAINTENANCE
TECHNICAL
SPECIFICATIONS
INDEX
Page 63 of 299

FUEL CUT-OFF SYSTEM
This intervenes in the case of an impact causing:
❒the interruption of the fuel supply with the
engine consequently cutting out
❒the automatic unlocking of the doors
❒the automatic switching on of the interior lights
❒the switching on of the hazard warning lights.
On some versions, the intervention of the system is
indicated by a message shown on the display.
IMPORTANT Carefully check the car for fuel
leaks, for instance in the engine compartment,
under the car or near the tank area. After a
collision, turn the ignition key to STOP to prevent
the battery from running down.
To restore the correct operation of the car, proceed
as follows:❒turn the ignition key to the MAR position;
❒activate the right direction indicator;
❒deactivate the right direction indicator;
❒activate the left direction indicator;
❒deactivate the left direction indicator;
❒activate the right direction indicator;
❒deactivate the right direction indicator;
❒activate the left direction indicator;
❒deactivate the left direction indicator;
❒turn the ignition key to the STOP position.
WARNING
If, after an impact, you smell fuel or
notice leaks from
the fuel system,
do not reactivate the system to avoid the risk
of fire.
fig. 47
L0F0039
61GETTING TO
KNOW YOUR CARSAFETY
STARTING
AND
DRIVING
WARNING LIGHTS
AND MESSAGES
IN AN EMERGENCY
SERVICING AND
MAINTENANCE
TECHNICAL
SPECIFICATIONS
INDEX
Page 67 of 299

Closing
Press button B from the fully open position. Press
the button again for more than half a second to
automatically move the sun roof to spoiler
position.
Use the sunroof only at “spoiler”
position if a transverse roof rack is
fitted. Do not open the sunroof if there
is snow or ice on it: you may damage it.
WARNING
When leaving the vehicle, always
remove the key
from the ignition to
avoid the risk of injury to those still inside
the car due to accidental operation of the
sunroof. Improper use of the roof can be
dangerous. Before and during operation,
always check that no-one is exposed to the
risk of being injured by the moving sunroof
or by objects getting caught or hit by it.
ANTI-PINCH SAFETY DEVICE
For versions/markets where provided, the sun roof
has an anti-pinch safety system capable of
detecting the presence of an obstacle whilst the
roof is closing; when this happens, the system
stops and the movement of the glass is
immediately reversed.
DOORSDOOR CENTRAL LOCKING/UNLOCKING
Locking the doors from outside
With the doors closed press button
on the
remote control or turn the metal insert (located
inside the key) in the driver's side door lock. The
LED above the
button switches on to indicate
that the doors have been locked.
The door locking function is operated:
❒with all the doors closed;
❒with all the doors closed and the luggage
compartment open.
Unlocking the doors from outside
Press button
on the remote control or turn the
metal insert (located inside the key) in the driver's
side door lock.
Locking/unlocking the doors from inside
Press button. The button has an LED that
indicates whether the doors are locked or
unlocked.
LED on: doors locked. Press button
once again
to centrally unlock all doors. The LED will switch
off.
LED off: doors unlocked. Press the button
again to centrally lock all doors. The doors will
be locked only if all the doors are properly shut.
65GETTING TO
KNOW YOUR CARSAFETY
STARTING
AND
DRIVING
WARNING LIGHTS
AND MESSAGES
IN AN EMERGENCY
SERVICING AND
MAINTENANCE
TECHNICAL
SPECIFICATIONS
INDEX
Page 68 of 299

Once the doors have been locked via the remote
control or the key pawl, it will no longer be
possible to unlock them by pressing button
.
In the absence of electrical power supply (blown
fuse, battery disconnected, etc.) it is still possible
to lock the doors manually.
IMPORTANT With central locking active, pulling
the internal opening lever of the passenger side
door unlocks the door (the LED stays on). Pulling
the internal opening lever of the driver side door
activates central unlocking.
IMPORTANT The rear doors cannot be opened
from the inside when the child-lock system is
engaged (see the description in the following
paragraph).
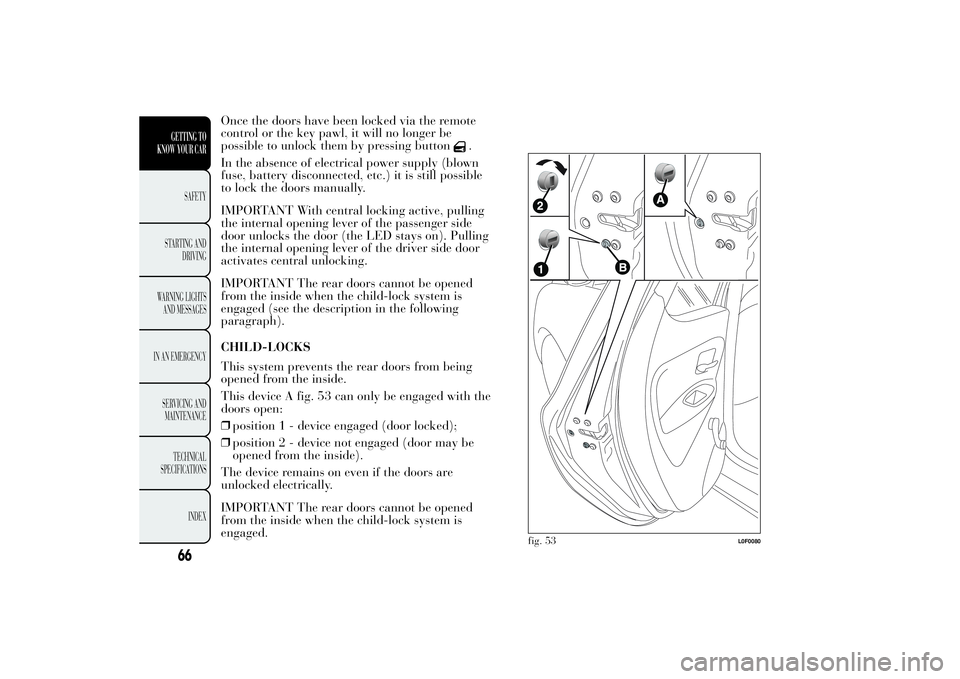
CHILD-LOCKS
This system prevents the rear doors from being
opened from the inside.
This device A fig. 53 can only be engaged with the
doors open:
❒position 1 - device engaged (door locked);
❒position 2 - device not engaged (door may be
opened from the inside).
The device remains on even if the doors are
unlocked electrically.
IMPORTANT The rear doors cannot be opened
from the inside when the child-lock system is
engaged.
fig. 53
L0F0080
66GETTING TO
KNOW YOUR CAR
SAFETY
STARTING
AND
DRIVING
WARNING LIGHTS
AND MESSAGES
IN AN EMERGENCY
SERVICING AND
MAINTENANCE
TECHNICAL
SPECIFICATIONS
INDEX