Page 281 of 761
Maintenance
18
7
MAINTENANCE UNDER SEVERE USAGE CONDITIONS - 1.4L/1.6L DIESEL ENGINE
The following items must be serviced more frequently on cars mainly used under severe driving conditions.
Refer to the chart below for the appropriate maintenance intervals.
R : Replace I : Inspect and if necessary, adjust, correct, clean or replace
MAINTENANCE ITEM Maintenance
operation Maintenance intervals
Driving condition
Engine oil and For Europe R Every 15,000 km (10,000 miles) or 6 months A, B, C, F, G,
engine oil filter Except Europe R Every 5,000 km (3,000 miles) or 6 months H, I, J, K, L
Air cleaner filter R C, E
Manual transaxle fluid (if equipped) R Every 120,000 km (80,000 miles) C, D, E, G, H, I, K
Steering gear rack, linkage and boots I C, D, E, F, G
Inspect more frequently
depending on the condition
Replace more frequently
depending on the condition
Page 286 of 761
723
Maintenance
Steering gear box, linkage &
boots/lower arm ball joint
With the vehicle stopped and engine off,
check for excessive free-play in the
steering wheel.
Check the linkage for bends or damage.
Check the dust boots and ball joints for
deterioration, cracks, or damage.
Replace any damaged parts.Drive shafts and boots
Check the drive shafts, boots and clamps
for cracks, deterioration, or damage.
Replace any damaged parts and, if nec-
essary, repack the grease.
Air conditioning refrigerant (if equipped)
Check the air conditioning lines and con-
nections for leakage and damage.
Page 309 of 761

Maintenance
46
7
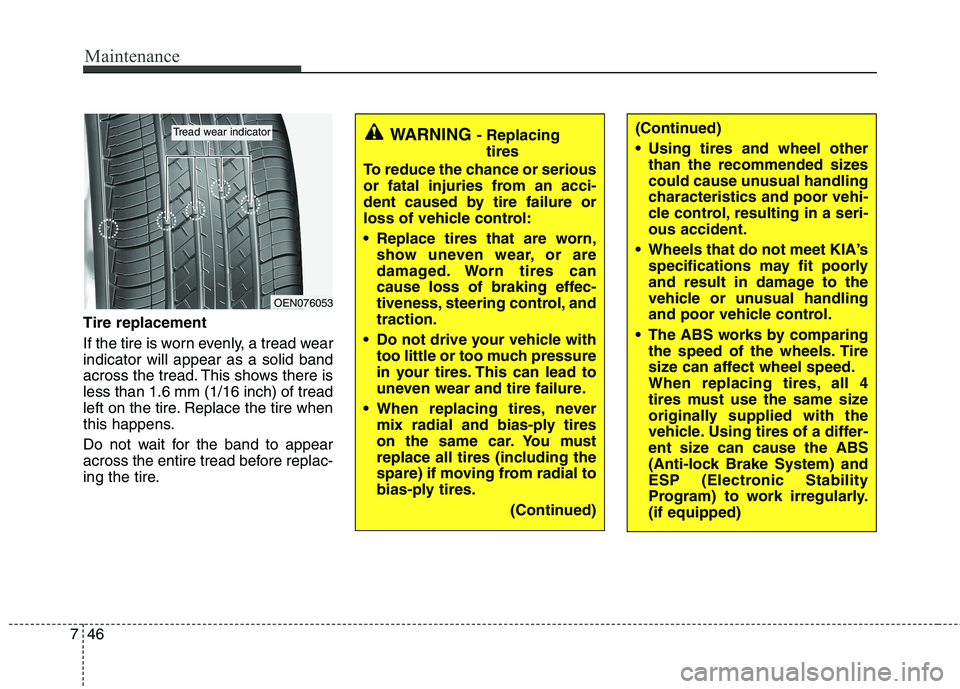
Tire replacement
If the tire is worn evenly, a tread wear indicator will appear as a solid band
across the tread. This shows there isless than 1.6 mm (1/16 inch) of tread
left on the tire. Replace the tire when
this happens.
Do not wait for the band to appear
across the entire tread before replac-
ing the tire.
OEN076053
Tread wear indicatorWARNING - Replacing
tires
To reduce the chance or serious
or fatal injuries from an acci-
dent caused by tire failure or
loss of vehicle control:
Replace tires that are worn, show uneven wear, or are
damaged. Worn tires can
cause loss of braking effec-
tiveness, steering control, andtraction.
Do not drive your vehicle with too little or too much pressure
in your tires. This can lead to
uneven wear and tire failure.
When replacing tires, never mix radial and bias-ply tires
on the same car. You must
replace all tires (including the
spare) if moving from radial to
bias-ply tires.
(Continued)(Continued)
Using tires and wheel otherthan the recommended sizes
could cause unusual handling
characteristics and poor vehi-
cle control, resulting in a seri-ous accident.
Wheels that do not meet KIA’s specifications may fit poorly
and result in damage to the
vehicle or unusual handling
and poor vehicle control.
The ABS works by comparing the speed of the wheels. Tire
size can affect wheel speed.
When replacing tires, all 4
tires must use the same size
originally supplied with the
vehicle. Using tires of a differ-
ent size can cause the ABS
(Anti-lock Brake System) and
ESP (Electronic Stability
Program) to work irregularly.(if equipped)
Page 322 of 761

759
Maintenance
Engine compartment fuse panelDescription Fuse rating Protected component
B+1 50A I/P Junction Box(FOG LP FRT 10A,FOG LP RR 10A, AUDIO 20A, ROOM LP 10A, STOP LP 15A,
PDM 1 25A, DEICER 15A, DR LOCK 20A, FOLD’G MIRR 10A, SUNROOF 20A, Relay-Tail Lamp,
Fuse- TAIL LP LH 10A, TAIL LP RH 10A)
B+2 50A I/P Junction Box(HAZARD 15A, Relay-Power Window, Fuse-P/WDW LH 25A, P/WDW RH 25A,
SAFETY P/WDW 15A)
C/FAN 40A Cooling Fan Relay(High), Cooling Fan Relay (Low) ALT 125A/150A Alternator(Gasoline/Diesel)
ABS 2 40A ABS, ESP
ABS 1 40A ABS, ESP
RR HTD 40A I/P Junction Box(Rear Heater Relay)
BLOWER 40A Blower Motor
MDPS 80A MDPS(Motor Driving Power Steering)IG2 40A Ignition Switch(IG2, Start)
ECU 1 20A ECU
F/PUMP 20A Fuel Pump Relay(Gasoline) IG1 40A Ignition Switch(IG1, Accessory)
H/LP 20A Head Lamp Low Beam
H/LP LO LH 10A Left Head Lamp Low Beam
H/LP LO RH 10A Right Head Lamp Low Beam H/LP HI 20A Head Lamp High Beam
HORN 10A Horn, Burglar Alarm Horn, Battery Sensor
ECU 4 10A ECU(Gasoline)
Page 338 of 761

775
Maintenance
Interior care
Interior general precautions
Prevent caustic solutions such as per- fume and cosmetic oil from contacting
the dashboard because they may cause
damage or discoloration. If they do con-tact the dashboard, wipe them off imme-
diately. See the instructions for the prop-
er way to clean vinyl.
Cleaning the upholstery and interiortrim
Vinyl
Remove dust and loose dirt from vinyl
with a whisk broom or vacuum cleaner.
Clean vinyl surfaces with a vinyl cleaner.
Fabric
Remove dust and loose dirt from fabric
with a whisk broom or vacuum cleaner.Clean with a mild soap solution recom-
mended for upholstery or carpets.
Remove fresh spots immediately with a
fabric spot cleaner. If fresh spots do not
receive immediate attention, the fabriccan be stained and its color can be
affected. Also, its fire-resistant properties
can be reduced if the material is not
properly maintained.
Cleaning the lap/shoulder belt web-bing
Clean the belt webbing with any mild
soap solution recommended for cleaning
upholstery or carpet. Follow the instruc-
tions provided with the soap. Do not
bleach or re-dye the webbing because
this may weaken it.
Cleaning the interior window glass
If the interior glass surfaces of the vehi-
cle become fogged (that is, covered with
an oily, greasy or waxy film), they should
be cleaned with glass cleaner. Follow the
directions on the glass cleaner container.CAUTION
Never allow water or other liquids
to come in contact with electrical/electronic components inside thevehicle as this may damage them.
CAUTION
Using anything but recommended
cleaners and procedures may affectthe fabric’s appearance and fire-resistant properties.
CAUTION
Do not scrape or scratch the insideof the rear window. This may result in damage to the rear windowdefroster grid.CAUTION
When cleaning leather products(steering wheel, seats etc.), use
neutral detergents or low alcohol content solutions. If you use highalcohol content solutions oracid/alkaline detergents, the color
of the leather may fade or the sur-face may get stripped off.
Page 358 of 761

Introduction
6
1
INDICATOR SYMBOLS ON THE INSTRUMENT CLUSTER
Engine coolant temperature
warning light
Seat belt warning light
High beam indicator
Turn signal indicator
ABS warning light*
Parking brake & Brake fluid
warning light
Malfunction indicator*
Immobiliser indicator*
Glow indicator (Diesel only)
Fuel filter warning light (Diesel only)
Tailgate open warning light*
❈ For more detailed explanations, refer to “Instrument cluster” in section 4.
Charging system warning light
Door ajar warning light*
ESP indicator*
ESP OFF indicator*
Front fog light indicator*
Engine oil pressure warning light
Electric power steering (EPS)
system warning light*
Air bag warning light*
Low tyre pressure telltale* / TPMS malfunction indicator*
Rear fog light indicator*
Cruise SET indicator*
Speed limit indicator* AUTO STOP for ISG system indicator*
Cruise indicator*
AUTOSTOP
KEY OUT indicator*KEY
OUT
Light on indicator
Automatic transaxle shift pattern indicator*
Manual transaxle shift pattern indicator*
* if equipped
Door open position indicator*
Low fuel level warning light Low tyre pressure position telltale*
YN RHD 1.QXP 6/1/2010 4:00 PM Page 6
Page 360 of 761

Your vehicle at a glance
2
2
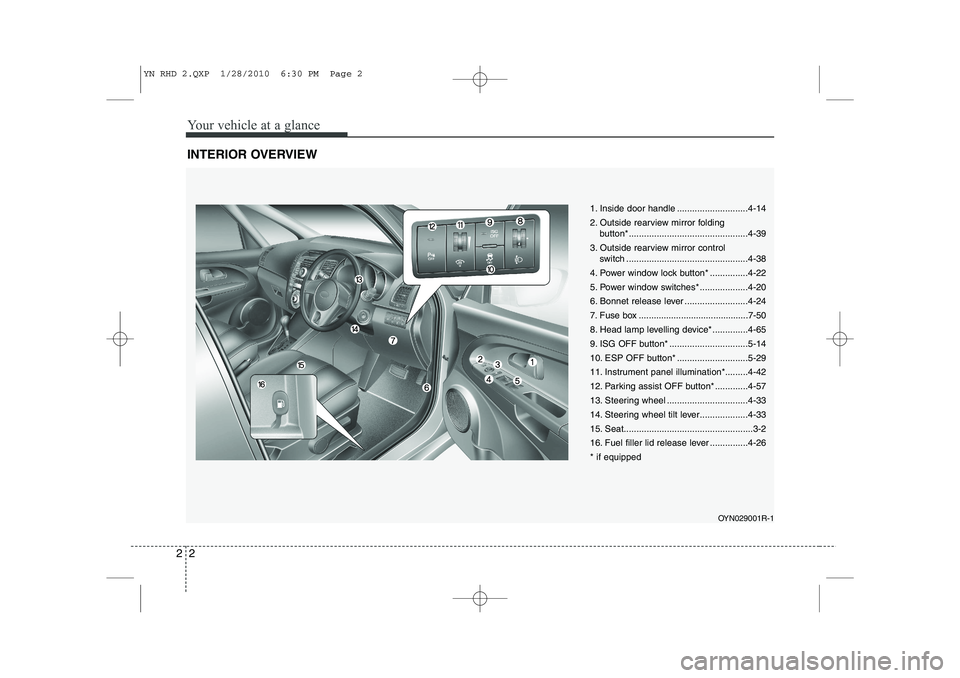
INTERIOR OVERVIEW
1. Inside door handle ............................4-14
2. Outside rearview mirror folding
button*...............................................4-39
3. Outside rearview mirror control switch ................................................4-38
4. Power window lock button* ...............4-22
5. Power window switches* ...................4-20
6. Bonnet release lever .........................4-24
7. Fuse box ............................................7-50
8. Head lamp levelling device* ..............4-65
9. ISG OFF button* ...............................5-14
10. ESP OFF button* ............................5-29
11. Instrument panel illumination*.........4-42
12. Parking assist OFF button* .............4-57
13. Steering wheel ................................4-33
14. Steering wheel tilt lever...................4-33
15. Seat...................................................3-2
16. Fuel filler lid release lever ...............4-26* if equipped
OYN029001R-1
YN RHD 2.QXP 1/28/2010 6:30 PM Page 2
Page 361 of 761

23
Your vehicle at a glance
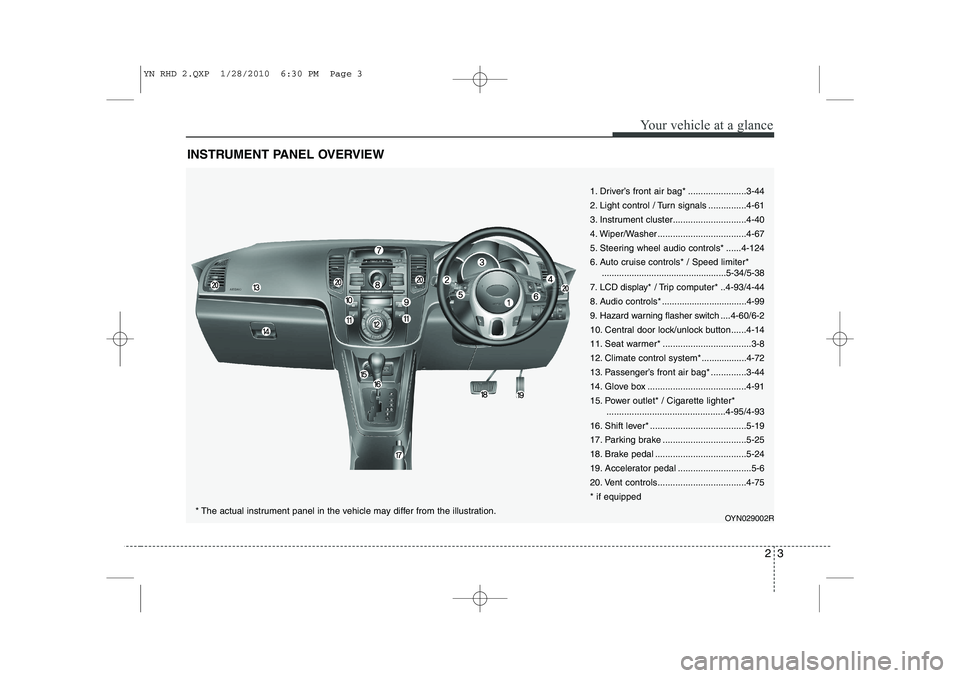
INSTRUMENT PANEL OVERVIEW
1. Driver’s front air bag* .......................3-44
2. Light control / Turn signals ...............4-61
3. Instrument cluster.............................4-40
4. Wiper/Washer ...................................4-67
5. Steering wheel audio controls* ......4-124
6. Auto cruise controls* / Speed limiter*..................................................5-34/5-38
7. LCD display* / Trip computer* ..4-93/4-44
8. Audio controls * ..................................4-99
9. Hazard warning flasher switch ....4-60/6-2
10. Central door lock/unlock button......4-14
11. Seat warmer* ...................................3-8
12. Climate control system*..................4-72
13. Passenger’s front air bag* ..............3-44
14. Glove box .......................................4-91
15. Power outlet* / Cigarette lighter* ...............................................4-95/4-93
16. Shift lever* ......................................5-19
17. Parking brake .................................5-25
18. Brake pedal ....................................5-24
19. Accelerator pedal .............................5-6
20. Vent controls...................................4-75* if equipped
OYN029002R
* The actual instrument panel in the vehicle may differ from the illustration.
YN RHD 2.QXP 1/28/2010 6:30 PM Page 3