Page 344 of 761
Specifications & Consumer information
2
8
DIMENSIONS BULB WATTAGE
Item mm (in)
Overall length 4068 (160.16)
Overall width 1765 (69.49)
Overall height 1600 (62.99)
Front tread 1553 (61.14)* 1
/1547 (60.91)* 2
/1541 (60.67)* 3
Rear tread 1557 (61.30)* 1
/1551 (61.06)* 2
/1545 (60.83)* 3
Wheelbase 2615 (102.95)
* 1
Fitted with 195/65R15 tires.
* 2
Fitted with 205/55R16 tires.
* 3
Fitted with 205/50R17 tires.
Light BulbWattage
HeadlightsHigh55
Low55
Front turn signal lights21
Position lights5
Side repeater lights (if equipped)5
Front fog lights (if equipped) 27
Stop and tail lights21/5
Tail lights-
Rear turn signal lights 21
Back-up lights16
Rear fog lights (if equipped)21
High mounted stop light5
License plate lights5
Front map lamp10
Side room lamp (if equipped)5
Sunvisor lamp (if equipped)5
Luggage room lamp5
Glove box lamp5
Page 364 of 761
Safety features of your vehicle
2
3
Driver’s seat
(1) Seat adjustment, forward / backward
(2) Seatback recliner
(3) Seat adjustment, height*
(4) Seat warmer*
(5) Armrest*
(6) Headrest adjustment
Front passenger seat
(7) Seat adjustment, forward /
backward
(8) Seatback recliner
(9) Seat warmer*
(10) Headrest adjustment Rear seat
(11) Seat adjustment, forward / backward
(12) Armrest*
(13) Headrest adjustment
(14) Split folding rear seat* if equipped
SEATS
OYN039001R
YN RHD 3.QXP 10/20/2009 4:20 PM Page 2
Page 367 of 761
35
Safety features of your vehicle
Adjusting the seatback recliner
To recline the seatback, rotate the knob
forward or rearward to the desired angle.
Seat cushion height (for driver’s seat)
To change the height of the seat cushion,
push the lever that is located on the out-
side of the seat cushion upwards or
downwards.
• To lower the seat cushion, push thelever down several times.
To raise the seat cushion, pull the lever up several times.
Armrest (for driver’s seat, if equipped)
To use the armrest, swing down the arm-
rest to the lowest position.
OYN039004/HOYN039003/HOSA038123/H
YN RHD 3.QXP 10/20/2009 4:20 PM Page 5
Page 368 of 761

Safety features of your vehicle
6
3
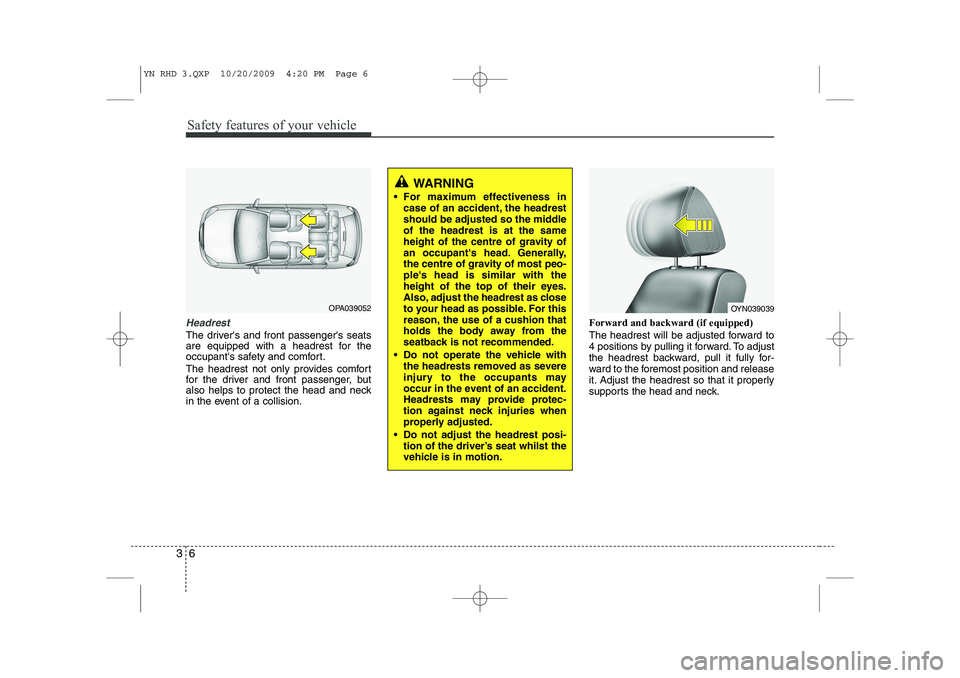
Headrest
The driver's and front passenger's seats
are equipped with a headrest for the
occupant's safety and comfort.
The headrest not only provides comfort
for the driver and front passenger, but
also helps to protect the head and neck
in the event of a collision. Forward and backward (if equipped)
The headrest will be adjusted forward to
4 positions by pulling it forward. To adjust
the headrest backward, pull it fully for-
ward to the foremost position and release
it. Adjust the headrest so that it properly
supports the head and neck.
WARNING
For maximum effectiveness in case of an accident, the headrest
should be adjusted so the middleof the headrest is at the same
height of the centre of gravity of
an occupant's head. Generally,
the centre of gravity of most peo-ple's head is similar with the
height of the top of their eyes.
Also, adjust the headrest as close
to your head as possible. For this
reason, the use of a cushion that
holds the body away from the
seatback is not recommended.
Do not operate the vehicle with the headrests removed as severe
injury to the occupants may
occur in the event of an accident.
Headrests may provide protec-
tion against neck injuries when
properly adjusted.
Do not adjust the headrest posi- tion of the driver’s seat whilst the
vehicle is in motion.
OPA039052OYN039039
YN RHD 3.QXP 10/20/2009 4:20 PM Page 6
Page 369 of 761

37
Safety features of your vehicle
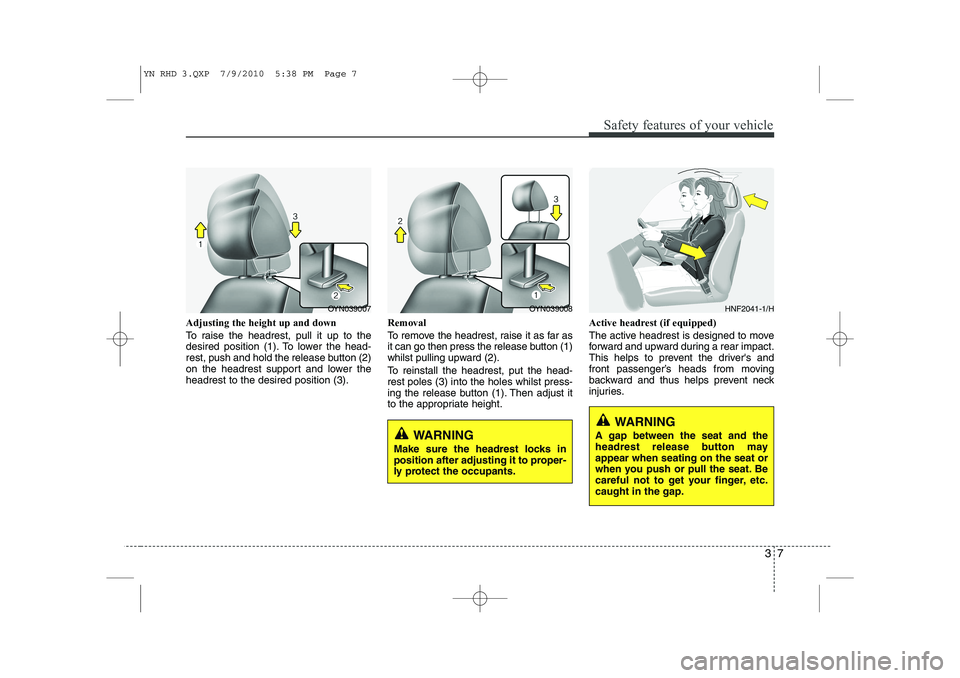
Adjusting the height up and down
To raise the headrest, pull it up to the
desired position (1). To lower the head-
rest, push and hold the release button (2)
on the headrest support and lower theheadrest to the desired position (3).Removal
To remove the headrest, raise it as far as
it can go then press the release button (1)
whilst pulling upward (2).
To reinstall the headrest, put the head- rest poles (3) into the holes whilst press-
ing the release button (1). Then adjust it
to the appropriate height.Active headrest (if equipped)
The active headrest is designed to move
forward and upward during a rear impact.
This helps to prevent the driver's and
front passenger’s heads from moving
backward and thus helps prevent neck
injuries.
HNF2041-1/H
WARNING
Make sure the headrest locks in
position after adjusting it to proper-
ly protect the occupants.
OYN039007OYN039008
WARNING
A gap between the seat and the
headrest release button mayappear when seating on the seat or
when you push or pull the seat. Be
careful not to get your finger, etc.caught in the gap.
YN RHD 3.QXP 7/9/2010 5:38 PM Page 7
Page 374 of 761

Safety features of your vehicle
12
3
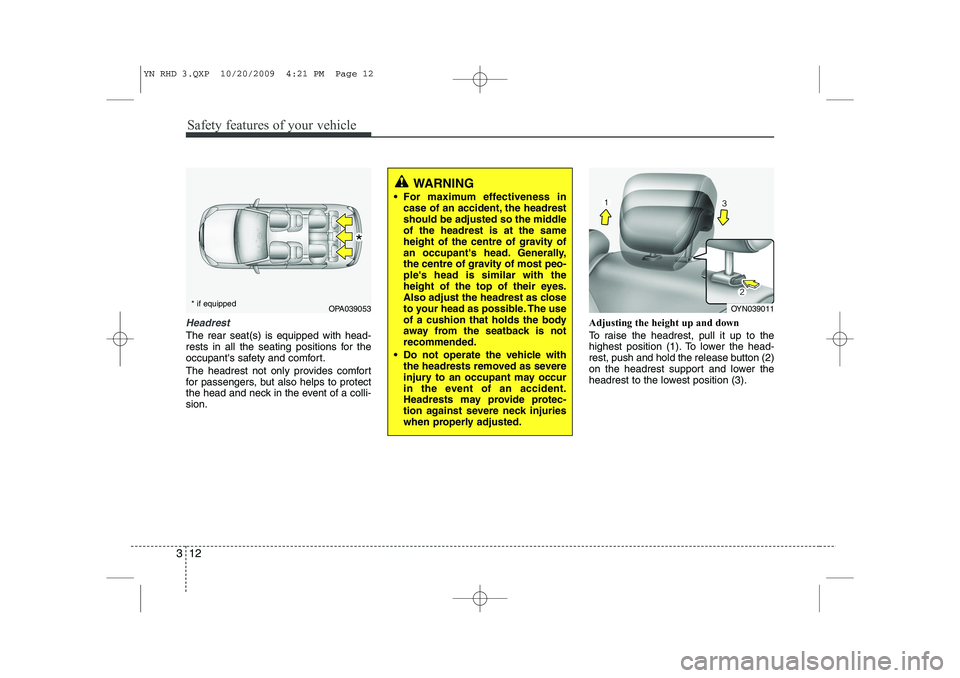
Headrest
The rear seat(s) is equipped with head-
rests in all the seating positions for the
occupant's safety and comfort.
The headrest not only provides comfort
for passengers, but also helps to protect
the head and neck in the event of a colli-sion. Adjusting the height up and down
To raise the headrest, pull it up to the
highest position (1). To lower the head-
rest, push and hold the release button (2)
on the headrest support and lower the
headrest to the lowest position (3).
OPA039053
WARNING
For maximum effectiveness in case of an accident, the headrest
should be adjusted so the middleof the headrest is at the same
height of the centre of gravity of
an occupant's head. Generally,
the centre of gravity of most peo-ple's head is similar with the
height of the top of their eyes.
Also adjust the headrest as close
to your head as possible. The use
of a cushion that holds the body
away from the seatback is notrecommended.
Do not operate the vehicle with the headrests removed as severe
injury to an occupant may occur
in the event of an accident.
Headrests may provide protec-
tion against severe neck injuries
when properly adjusted.
OYN039011
* if equipped
*
YN RHD 3.QXP 10/20/2009 4:21 PM Page 12
Page 375 of 761
313
Safety features of your vehicle
Removal
To remove the headrest, raise it as far as
it can go then press the release button
(1) whilst pulling upward (2).
To reinstall the headrest, put the head- rest poles (3) into the holes whilst press-
ing the release button (1). Then adjust it
to the appropriate height.Armrest (if equipped)
The armrest is located in the centre of
the rear seat. Pull the armrest down from
the seatback.
OYN039012
WARNING
Make sure the headrest locks in
position after adjusting it to proper-
ly protects the occupants.
OYN039015
YN RHD 3.QXP 10/20/2009 4:21 PM Page 13
Page 378 of 761

Safety features of your vehicle
16
3
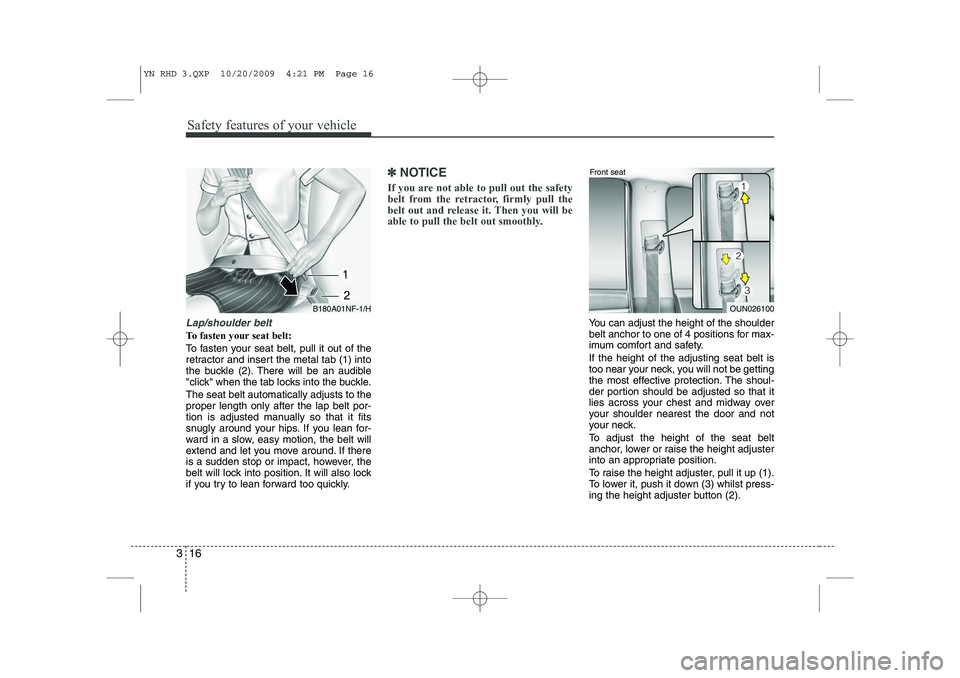
Lap/shoulder belt
To fasten your seat belt:
To fasten your seat belt, pull it out of the
retractor and insert the metal tab (1) into
the buckle (2). There will be an audible
"click" when the tab locks into the buckle. The seat belt automatically adjusts to the proper length only after the lap belt por-
tion is adjusted manually so that it fits
snugly around your hips. If you lean for-
ward in a slow, easy motion, the belt will
extend and let you move around. If there
is a sudden stop or impact, however, the
belt will lock into position. It will also lock
if you try to lean forward too quickly.
✽✽
NOTICE
If you are not able to pull out the safety
belt from the retractor, firmly pull the
belt out and release it. Then you will be
able to pull the belt out smoothly.
You can adjust the height of the shoulder
belt anchor to one of 4 positions for max-
imum comfort and safety. If the height of the adjusting seat belt is
too near your neck, you will not be getting
the most effective protection. The shoul-
der portion should be adjusted so that it
lies across your chest and midway over
your shoulder nearest the door and not
your neck.
To adjust the height of the seat belt
anchor, lower or raise the height adjuster
into an appropriate position.
To raise the height adjuster, pull it up (1).
To lower it, push it down (3) whilst press-
ing the height adjuster button (2).
OUN026100
Front seat
B180A01NF-1/H
YN RHD 3.QXP 10/20/2009 4:21 PM Page 16