2011 KIA VENGA turn signal
[x] Cancel search: turn signalPage 207 of 761

Driving your vehicle
32
5
Hill-start assist control (HAC) (if equipped)
Hill start Assist Control is a comfort func-
tion. The main intend is to prevent the
vehicle from rolling backwards while driv-
ing off uphill on an inclined surface. HAC
holds the braking pressure builtup by
driver during stopping procedure for 2
seconds after releasing brake pedal.
During the pressure-hold period, the
driver has enough time to press the
accelerator pedal to drive off.
The braking pressure is reduced as soon
as the system detects the driver’s inten-
tion to drive off.✽✽
NOTICE
The HAC does not operate when the transaxle shift lever is in the P (Park)
or N (Neutral) position.
The HAC activates even though the
ESP is off but it does not activate
when the ESP has malfunctioned. Emergency Stop Signal (ESS) (if equipped) The Emergency Stop Signal system
alerts the driver behind by blinking the
stop light when the vehicle is braked rap-
idly and severely.
The system is activated when:
The vehicle suddenly stops (vehiclespeed is over 55km/h and the vehicle
deceleration at greater than 7 m/s 2
)
The ABS is activating
When the vehicle deceleration at less than 4 m/s 2
and the ABS deactivates or
the sudden stop situation is over, the
stop light will not blink. You can turn it off
manually by pushing the hazard warning
flasher switch.
WARNING
The HAC is usually activated only
for 2 seconds. The driver should be
careful from the rolling backwardcausing the accident with behind
objects or human, when the driver
may feel the unintended rolling
backward while driving off on hilldue to insufficient brake hold pres-
sure built-up by driver during stop-
ping procedure.
CAUTION
The Emergency Stop Signal (ESS) system will not work if the hazard warning flasher is already on.
Page 229 of 761

Driving your vehicle
54
5
Following distance
Stay at least twice as far behind the vehi-
cle ahead as you would when driving
your vehicle without a trailer. This can
help you avoid situations that require
heavy braking and sudden turns.
Passing
You’ll need more passing distance up
ahead when you’re towing a trailer. And,
because of the increased vehicle length,
you’ll need to go much farther beyond the
passed vehicle before you can return to
your lane.
Backing up
Hold the bottom of the steering wheel
with one hand. Then, to move the trailer
to the left, just move your hand to the left.
To move the trailer to the right, move your
hand to the right. Always back up slowly
and, if possible, have someone guide
you.
Making turns
When you’re turning with a trailer, make
wider turns than normal. Do this so your
trailer won’t strike soft shoulders, curbs,
road signs, trees, or other objects. Avoid
jerky or sudden maneuvers. Signal well
in advance.
Turn signals when towing a trailer
When you tow a trailer, your vehicle has
to have a different turn signal flasher and
extra wiring. The green arrows on your
instrument panel will flash whenever you
signal a turn or lane change. Properly
connected, the trailer lights will also flash
to alert other drivers you’re about to turn,
change lanes, or stop.
When towing a trailer, the green arrows
on your instrument panel will flash for
turns even if the bulbs on the trailer are
burned out. Thus, you may think drivers
behind you are seeing your signals
when, in fact, they are not. It’s important
to check occasionally to be sure the trail-
er bulbs are still working. You must also
check the lights every time you discon-
nect and then reconnect the wires.
Do not connect a trailer lighting system
directly to your vehicle’s lighting system.
Use only an approved trailer wiring har-
ness. An authorized KIA dealer can assist you
in installing the wiring harness.Driving on grades
Reduce speed and shift to a lower gear
before you start down a long or steep
downgrade. If you don’t shift down, you
might have to use your brakes so much
that they would get hot and no longer
operate efficiently.
On a long uphill grade, shift down and
reduce your speed to around 70 km/h (45mph) to reduce the possibility of engine
and transaxle overheating.
If your trailer weighs more than the max-
imum trailer weight without trailer brakes
and you have an automatic transaxle,
you should drive in D (Drive) when tow-
ing a trailer.
Operating your vehicle in D (Drive) when
towing a trailer will minimize heat build up
and extend the life of your transaxle.
WARNING
Failure to use an approved trailer wiring harness could result in dam-
age to the vehicle electrical system
and/or personal injury.
Page 236 of 761

What to do in an emergency
2
6
ROAD WARNING
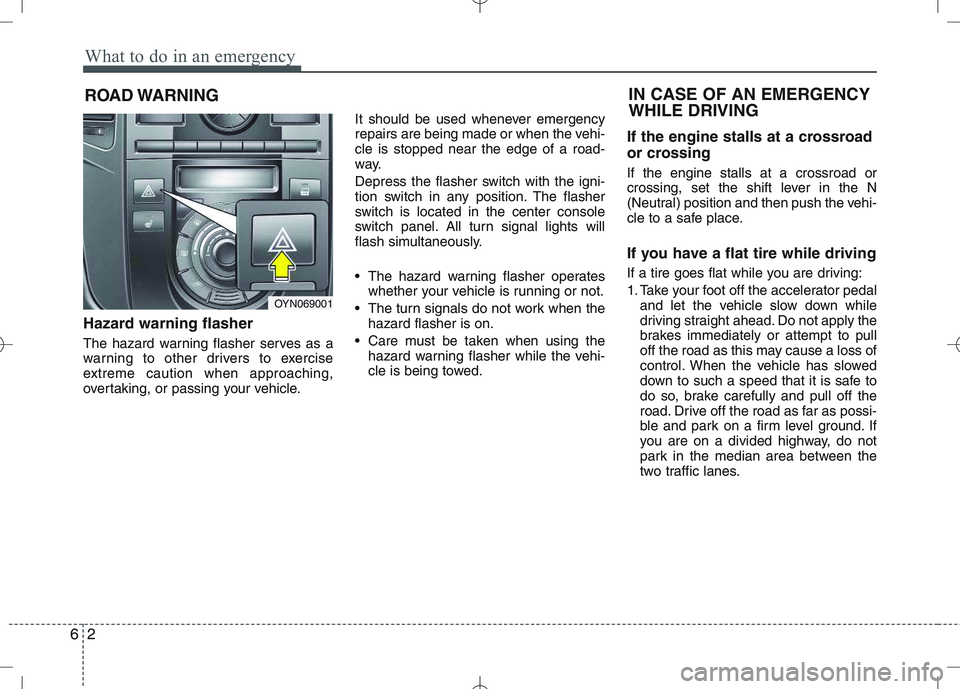
Hazard warning flasher
The hazard warning flasher serves as a
warning to other drivers to exercise
extreme caution when approaching,
overtaking, or passing your vehicle. It should be used whenever emergency
repairs are being made or when the vehi-cle is stopped near the edge of a road-
way.
Depress the flasher switch with the igni-
tion switch in any position. The flasher
switch is located in the center console
switch panel. All turn signal lights will
flash simultaneously.
• The hazard warning flasher operates
whether your vehicle is running or not.
The turn signals do not work when the hazard flasher is on.
Care must be taken when using the hazard warning flasher while the vehi-
cle is being towed. If the engine stalls at a crossroad
or crossing If the engine stalls at a crossroad or
crossing, set the shift lever in the N
(Neutral) position and then push the vehi-
cle to a safe place.
If you have a flat tire while driving
If a tire goes flat while you are driving:
1. Take your foot off the accelerator pedal
and let the vehicle slow down while
driving straight ahead. Do not apply the
brakes immediately or attempt to pull
off the road as this may cause a loss of
control. When the vehicle has slowed
down to such a speed that it is safe to
do so, brake carefully and pull off the
road. Drive off the road as far as possi-
ble and park on a firm level ground. If
you are on a divided highway, do not
park in the median area between the
two traffic lanes.
IN CASE OF AN EMERGENCY WHILE DRIVING
OYN069001
Page 324 of 761

761
Maintenance
LIGHT BULBS
Use only the bulbs of the specifiedwattage.
✽✽ NOTICE
After heavy, driving rain or washing,
headlight and taillight lenses could
appear frosty. This condition is caused by
the temperature difference between the
lamp inside and outside. This is similar
to the condensation on your windows
inside your vehicle during the rain and
doesn’t indicate a problem with your
vehicle. If the water leaks into the lamp
bulb circuitry, have the vehicle checked
by an authorized KIA dealer.
Headlight, position light, turn sig-
nal light, front fog light bulbreplacement
(1) Headlight (Low) (2) Headlight (High)
(3) Position light
(4) Front turn signal light
(5) Front fog light (if equipped)
* The actual lamp in the vehicle may differ from the illustration.
WARNING - Working on
the lights
Prior to working on the light, firmly
apply the parking brake, ensure
that the ignition switch is turned tothe LOCK position and turn off the
lights to avoid sudden movement
of the vehicle and burning your fin-
gers or receiving an electric shock.
CAUTION
Be sure to replace the burned-out bulb with one of the same wattagerating. Otherwise, it may cause
damage to the fuse or electric wiring system.
CAUTION
If you don’t have necessary tools,the correct bulbs and the expertise,
consult an authorized KIA dealer. Inmany cases, it is difficult to replacevehicle light bulbs because other parts of the vehicle must be
removed before you can get to thebulb. This is especially true if youhave to remove the headlight
assembly to
get to the bulb(s).
Removing/installingthe headlight
assembly can result in damage to the vehicle.OYN079027
Page 326 of 761

763
Maintenance
4. Remove the headlight bulb cover byturning it counterclockwise.
5. Disconnect the headlight bulb socket- connector.
6. Unsnap the headlight bulb retaining wire by depressing the end and push-
ing it upward. (if equipped)
7. Remove the bulb from the headlight assembly.
8. Install a new headlight bulb and snap the headlight bulb retaining wire into
position by aligning the wire with the
groove on the bulb.
9. Connect the headlight bulb socket connector. 10. Install the headlight bulb cover by
turning it clockwise.
11. Connect the power connector to the back of the headlight assembly.
12. Reinstall the headlight assembly to the body of the vehicle.
Turn signal light
1. Remove the headlight assembly fromthe body of the vehicle.
2. Remove the socket from the assembly by turning the socket counterclockwise
until the tabs on the socket align with
the slots on the assembly.
3. Remove the bulb from the socket by pressing it in and rotating it counter-
clockwise until the tabs on the bulb
align with the slots in the socket. Pull
the bulb out of the socket
4. Insert a new bulb by inserting it into the socket and rotating it until it locks
into place.
OYN079029OYN079050
Page 329 of 761

Maintenance
66
7
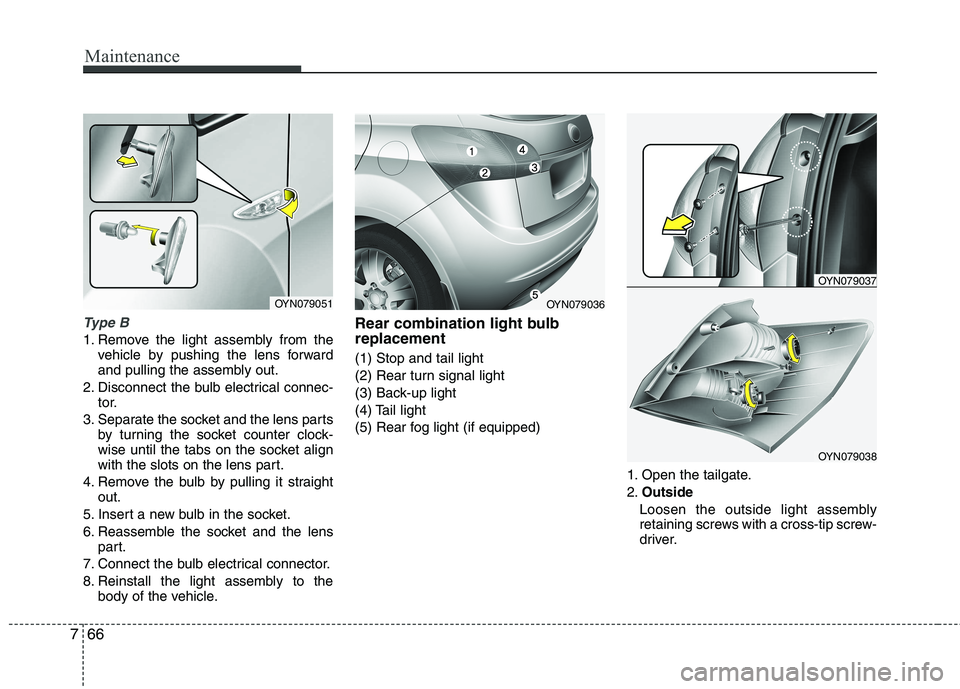
Type B
1. Remove the light assembly from the
vehicle by pushing the lens forward
and pulling the assembly out.
2. Disconnect the bulb electrical connec- tor.
3. Separate the socket and the lens parts by turning the socket counter clock-
wise until the tabs on the socket align
with the slots on the lens part.
4. Remove the bulb by pulling it straight out.
5. Insert a new bulb in the socket.
6. Reassemble the socket and the lens part.
7. Connect the bulb electrical connector.
8. Reinstall the light assembly to the body of the vehicle. Rear combination light bulb replacement (1) Stop and tail light
(2) Rear turn signal light
(3) Back-up light
(4) Tail light
(5) Rear fog light (if equipped)
1. Open the tailgate.2.Outside
Loosen the outside light assembly
retaining screws with a cross-tip screw-
driver.
OYN079051OYN079036
OYN079037
OYN079038
Page 344 of 761

Specifications & Consumer information
2
8
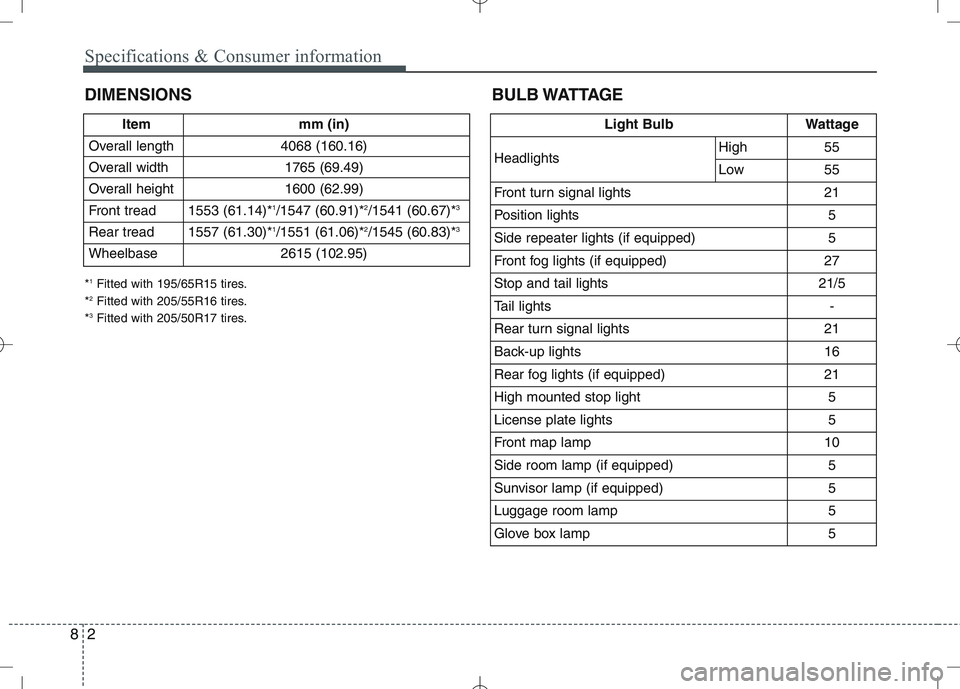
DIMENSIONS BULB WATTAGE
Item mm (in)
Overall length 4068 (160.16)
Overall width 1765 (69.49)
Overall height 1600 (62.99)
Front tread 1553 (61.14)* 1
/1547 (60.91)* 2
/1541 (60.67)* 3
Rear tread 1557 (61.30)* 1
/1551 (61.06)* 2
/1545 (60.83)* 3
Wheelbase 2615 (102.95)
* 1
Fitted with 195/65R15 tires.
* 2
Fitted with 205/55R16 tires.
* 3
Fitted with 205/50R17 tires.
Light BulbWattage
HeadlightsHigh55
Low55
Front turn signal lights21
Position lights5
Side repeater lights (if equipped)5
Front fog lights (if equipped) 27
Stop and tail lights21/5
Tail lights-
Rear turn signal lights 21
Back-up lights16
Rear fog lights (if equipped)21
High mounted stop light5
License plate lights5
Front map lamp10
Side room lamp (if equipped)5
Sunvisor lamp (if equipped)5
Luggage room lamp5
Glove box lamp5
Page 358 of 761

Introduction
6
1
INDICATOR SYMBOLS ON THE INSTRUMENT CLUSTER
Engine coolant temperature
warning light
Seat belt warning light
High beam indicator
Turn signal indicator
ABS warning light*
Parking brake & Brake fluid
warning light
Malfunction indicator*
Immobiliser indicator*
Glow indicator (Diesel only)
Fuel filter warning light (Diesel only)
Tailgate open warning light*
❈ For more detailed explanations, refer to “Instrument cluster” in section 4.
Charging system warning light
Door ajar warning light*
ESP indicator*
ESP OFF indicator*
Front fog light indicator*
Engine oil pressure warning light
Electric power steering (EPS)
system warning light*
Air bag warning light*
Low tyre pressure telltale* / TPMS malfunction indicator*
Rear fog light indicator*
Cruise SET indicator*
Speed limit indicator* AUTO STOP for ISG system indicator*
Cruise indicator*
AUTOSTOP
KEY OUT indicator*KEY
OUT
Light on indicator
Automatic transaxle shift pattern indicator*
Manual transaxle shift pattern indicator*
* if equipped
Door open position indicator*
Low fuel level warning light Low tyre pressure position telltale*
YN RHD 1.QXP 6/1/2010 4:00 PM Page 6