2011 KIA VENGA air condition
[x] Cancel search: air conditionPage 673 of 761
733
Maintenance
AIR CLEANER
Filter replacement
You can clean the filter when inspecting the air cleaner element.
Clean the filter by using compressed air.
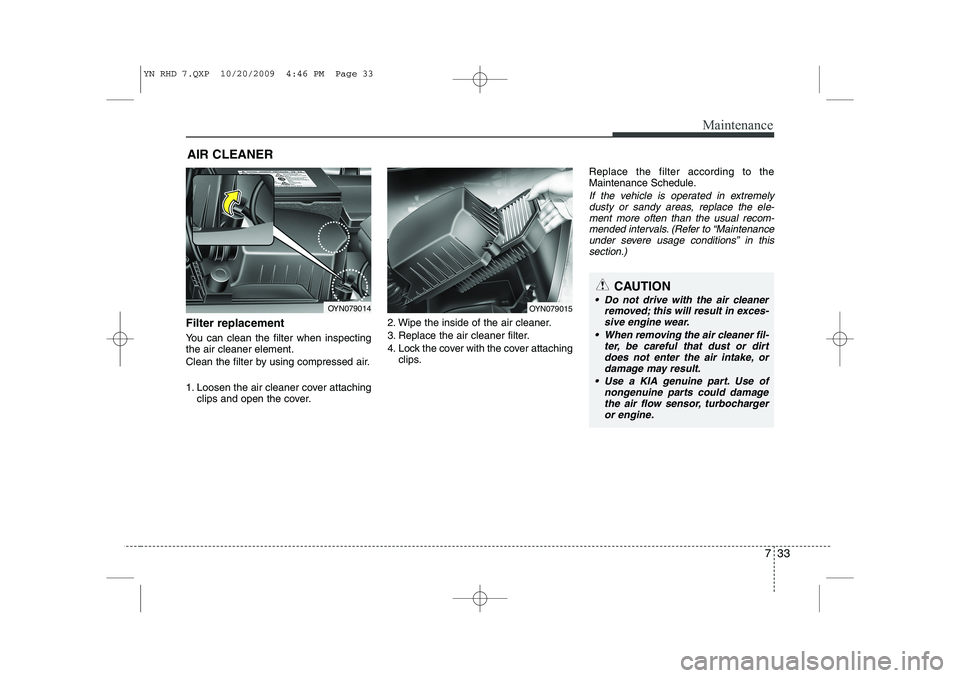
1. Loosen the air cleaner cover attaching clips and open the cover. 2. Wipe the inside of the air cleaner.
3. Replace the air cleaner filter.
4. Lock the cover with the cover attaching
clips. Replace the filter according to the
Maintenance Schedule.
If the vehicle is operated in extremely
dusty or sandy areas, replace the ele- ment more often than the usual recom-
mended intervals. (Refer to “Maintenance under severe usage conditions” in thissection.)
OYN079014OYN079015
CAUTION
Do not drive with the air cleaner
removed; this will result in exces-sive engine wear.
When removing the air cleaner fil- ter, be careful that dust or dirtdoes not enter the air intake, or
damage may result.
Use a KIA genuine part. Use of nongenuine parts could damagethe air flow sensor, turbochargeror engine.
YN RHD 7.QXP 10/20/2009 4:46 PM Page 33
Page 682 of 761
Maintenance
42
7
Remove the valve cap from the tyre
valve stem. Press the tyre gage firm-
ly onto the valve to get a pressure
measurement. If the cold tyre infla-tion pressure matches the recom-mended pressure on the tyre and
loading information label, no further
adjustment is necessary. If the pres-
sure is low, add air until you reachthe recommended amount.
If you overfill the tyre, release air by pushing on the metal stem in the
centre of the tyre valve. Recheck the
tyre pressure with the tyre gage. Be
sure to put the valve caps back on
the valve stems. They help prevent
leaks by keeping out dirt and mois-
ture. Tyre rotation
To equalize tread wear, it is recom- mended that the tyres be rotated
every 12,000 km (7,500 miles) or
sooner if irregular wear develops.
During rotation, check the tyres for
correct balance.
When rotating tyres, check for
uneven wear and damage. Abnormal
wear is usually caused by incorrect
tyre pressure, improper wheel align-
ment, out-of-balance wheels, severe
braking or severe cornering. Look for
bumps or bulges in the tread or side
of tyre. Replace the tyre if you find
either of these conditions. Replace
the tyre if fabric or cord is visible.
After rotation, be sure to bring thefront and rear tyre pressures to spec-
ification and check lug nut tightness.
Refer to “Tyre and wheels” in section 8.
WARNING
Inspect your tyres frequently for proper inflation as well as
wear and damage. Always use
a tyre pressure gauge.
Tyres with too much or too lit- tle pressure wear unevenly
causing poor handling, loss of
vehicle control, and suddentyre failure leading to acci-
dents, injuries, and even death.The recommended cold tyre
pressure for your vehicle can
be found in this manual and onthe tyre label located on the
driver's side centre pillar.
Worn tyres can cause acci- dents. Replace tyres that are
worn, show uneven wear, or
are damaged.
Remember to check the pres- sure of your spare tyre. KIA
recommends that you check
the spare every time you
check the pressure of the
other tyres on your vehicle.
YN RHD 7.QXP 10/20/2009 4:47 PM Page 42
Page 688 of 761
Maintenance
48
7
5. Maximum permissible inflation
pressure
This number is the greatest amount of air pressure that should be put in
the tyre. Do not exceed the maximum
permissible inflation pressure. Refer
to the Tyre and Loading Information
label for recommended inflation
pressure.
6. Maximum load rating
This number indicates the maximum
load in kilograms and pounds that
can be carried by the tyre. When
replacing the tyres on the vehicle,
always use a tyre that has the same
load rating as the factory installed
tyre.
7. Uniform tyre quality grading
Quality grades can be found where
applicable on the tyre sidewall
between tread shoulder and maxi-
mum section width.
For example:
TREAD wear 200
TRACTION AA
TEMPERATURE A
Tread wear
The tread wear grade is a compara-
tive rating based on the wear rate ofthe tyre when tested under controlled
conditions on a specified govern-
ment test course. For example, a tyre
graded 150 would wear one-and-a-
half times (1½) as well on the gov-
ernment course as a tyre graded100.
The relative performance of tyres depends upon the actual conditions
of their use, however, and may
depart significantly from the norm
due to variations in driving habits,
service practices and differences in
road characteristics and climate. These grades are molded on the
side-walls of passenger vehicle
tyres. The tyres available as standard
or optional equipment on your vehi-
cle may vary with respect to grade.
Traction - AA, A, B & C
The traction grades, from highest to
lowest, are AA, A, B and C. Those
grades represent the tyre’s ability to
stop on wet pavement measuredunder controlled conditions on spec-
ified government test surfaces of
asphalt and concrete. A tyre marked
C may have poor traction perform-
ance.
WARNING
The traction grade assigned to this tyre is based on straight-ahead braking traction tests,
and does not include accelera-
tion, cornering, hydroplaning,
or peak traction characteristics.
YN RHD 7.QXP 10/20/2009 4:47 PM Page 48
Page 698 of 761

Maintenance
58
7
Engine compartment fuse panel (Diesel engine only) Description Fuse rating
Protected component
FUEL HTR30AFuel Filter Heater(Diesel)
A/CON 110AAir Conditioning System Relay
A/CON 210AAir Conditioning System
ECU 3 10A Immobiliser, Stop Switch, IMV, MPROP
ECU 2 30A ECU 4 10A, Main Relay, Fuse-ECU 1 20A, ECU 3 10A, SENSOR 10A, INJECTOR 15A
DRL 10A Daytime Running Light
SENSOR 10A Petrol - Air Conditioning System Relay, Cooling Fan Relay(High, Low), Camshaft Position, Sensor,
Immobiliser, Canister Purge Solenoid Valve, Oxygen Sensor Up/Down
Diesel - Air Conditioning System Relay, Cooling Fan Relay(High, Low), Lambda Sensor
INJECTOR 15A Petrol - Injector #1~#4, Fuel Pump Relay, Oil Control Valve
Diesel - Electrical EGR Actuator, Immobiliser, VGT Actuator, Crank Position Sensor, Glow Plug Relay,
PTC HTR 1 Relay
Description Fuse rating Protected component
GLOW 80A Glow Plug
PTC HTR 1 50A PTC Heater 1
PTC HTR 2 50A PTC Heater 2
PTC HTR 3 50A PTC Heater 3
YN RHD 7.QXP 10/20/2009 4:49 PM Page 58
Page 711 of 761
771
Maintenance
Corrosion protection
Protecting your vehicle from corrosion
By using the most advanced design and
construction practices to combat corro-
sion, we produce vehicles of the highest
quality. However, this is only part of the
job. To achieve the long-term corrosion
resistance your vehicle can deliver, the
owner's cooperation and assistance isalso required.
Common causes of corrosion The most common causes of corrosion
on your vehicle are:
Road salt, dirt and moisture that isallowed to accumulate underneath the
vehicle.
Removal of paint or protective coatings by stones, gravel, abrasion or minor
scrapes and dents which leave unpro-
tected metal exposed to corrosion. High-corrosion areas
If you live in an area where your vehicle
is regularly exposed to corrosive materi-
als, corrosion protection is particularly
important. Some of the common causes
of accelerated corrosion are road salts,
dust control chemicals, ocean air and
industrial pollution.
Moisture breeds corrosion Moisture creates the conditions in which
corrosion is most likely to occur. For
example, corrosion is accelerated by
high humidity, particularly when tempera-
tures are just above freezing. In such
conditions, the corrosive material is kept
in contact with the vehicle’s surface by
moisture that slowly evaporates.
Mud is particularly corrosive because it
dries slowly and holds moisture in con-
tact with the vehicle. Although the mud
appears to be dry, it can still retain mois-ture and promote corrosion.
High temperatures can also accelerate
corrosion of parts that are not properly
ventilated so the moisture can be dis-
persed. For all these reasons, it is par-
ticularly important to keep your vehicle
clean and free of mud or accumulations
of other materials. This applies not only
to the visible surfaces but particularly to
the underside of the vehicle.
YN RHD 7.QXP 10/20/2009 4:50 PM Page 71
Page 717 of 761
777
Maintenance
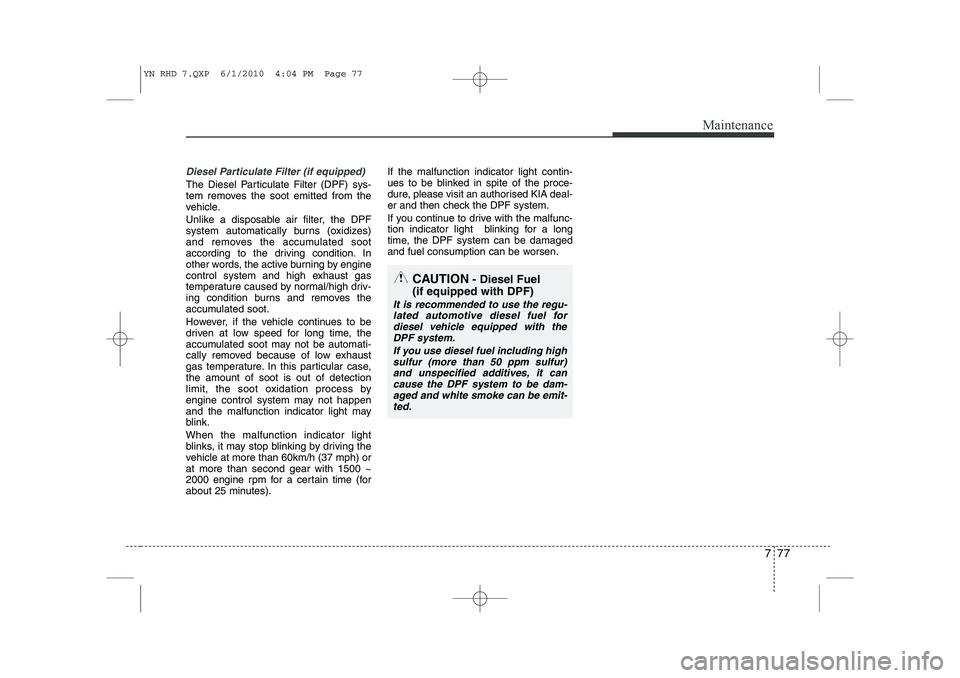
Diesel Particulate Filter (if equipped)
The Diesel Particulate Filter (DPF) sys-
tem removes the soot emitted from the
vehicle.
Unlike a disposable air filter, the DPF
system automatically burns (oxidizes)
and removes the accumulated soot
according to the driving condition. In
other words, the active burning by engine
control system and high exhaust gas
temperature caused by normal/high driv-
ing condition burns and removes the
accumulated soot.
However, if the vehicle continues to be
driven at low speed for long time, the
accumulated soot may not be automati-
cally removed because of low exhaust
gas temperature. In this particular case,the amount of soot is out of detection
limit, the soot oxidation process by
engine control system may not happen
and the malfunction indicator light may
blink. When the malfunction indicator light
blinks, it may stop blinking by driving the
vehicle at more than 60km/h (37 mph) orat more than second gear with 1500 ~
2000 engine rpm for a certain time (for
about 25 minutes).If the malfunction indicator light contin-
ues to be blinked in spite of the proce-
dure, please visit an authorised KIA deal-
er and then check the DPF system.
If you continue to drive with the malfunc-
tion indicator light blinking for a long
time, the DPF system can be damaged
and fuel consumption can be worsen.
CAUTION
- Diesel Fuel
(if equipped with DPF)
It is recommended to use the regu- lated automotive diesel fuel for
diesel vehicle equipped with the DPF system.
If you use diesel fuel including highsulfur (more than 50 ppm sulfur) and unspecified additives, it can
cause the DPF system to be dam- aged and white smoke can be emit-ted.
YN RHD 7.QXP 6/1/2010 4:04 PM Page 77
Page 760 of 761
4131
Features of your vehicle
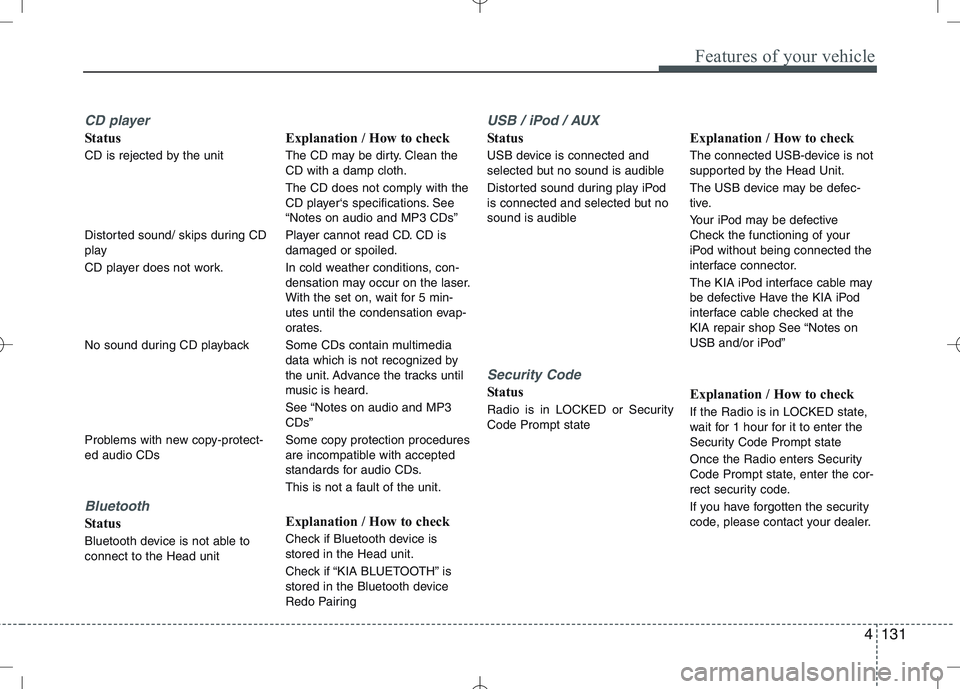
CD player
Status
CD is rejected by the unit
Distorted sound/ skips during CD
play
CD player does not work.
No sound during CD playback
Problems with new copy-protect- ed audio CDs
Bluetooth
Status
Bluetooth device is not able to connect to the Head unitExplanation / How to check
The CD may be dirty. Clean the CD with a damp cloth. The CD does not comply with the
CD player‘s specifications. See“Notes on audio and MP3 CDs”
Player cannot read CD. CD is damaged or spoiled.
In cold weather conditions, con-
densation may occur on the laser.
With the set on, wait for 5 min-
utes until the condensation evap-
orates.
Some CDs contain multimedia
data which is not recognized by
the unit. Advance the tracks until
music is heard.
See “Notes on audio and MP3 CDs”
Some copy protection procedures
are incompatible with accepted
standards for audio CDs.
This is not a fault of the unit.
Explanation / How to check
Check if Bluetooth device is stored in the Head unit.
Check if “KIA BLUETOOTH” is
stored in the Bluetooth device
Redo Pairing
USB / iPod / AUX
Status
USB device is connected and
selected but no sound is audible
Distorted sound during play iPod
is connected and selected but no
sound is audible
Security Code
Status
Radio is in LOCKED or Security Code Prompt state
Explanation / How to check
The connected USB-device is not
supported by the Head Unit.
The USB device may be defec-
tive.
Your iPod may be defective
Check the functioning of your
iPod without being connected the
interface connector.
The KIA iPod interface cable may
be defective Have the KIA iPod
interface cable checked at the
KIA repair shop See “Notes on
USB and/or iPod”
Explanation / How to check
If the Radio is in LOCKED state,
wait for 1 hour for it to enter the
Security Code Prompt state
Once the Radio enters Security
Code Prompt state, enter the cor-
rect security code.
If you have forgotten the security
code, please contact your dealer.