Page 89 of 356
417
Features of your vehicle
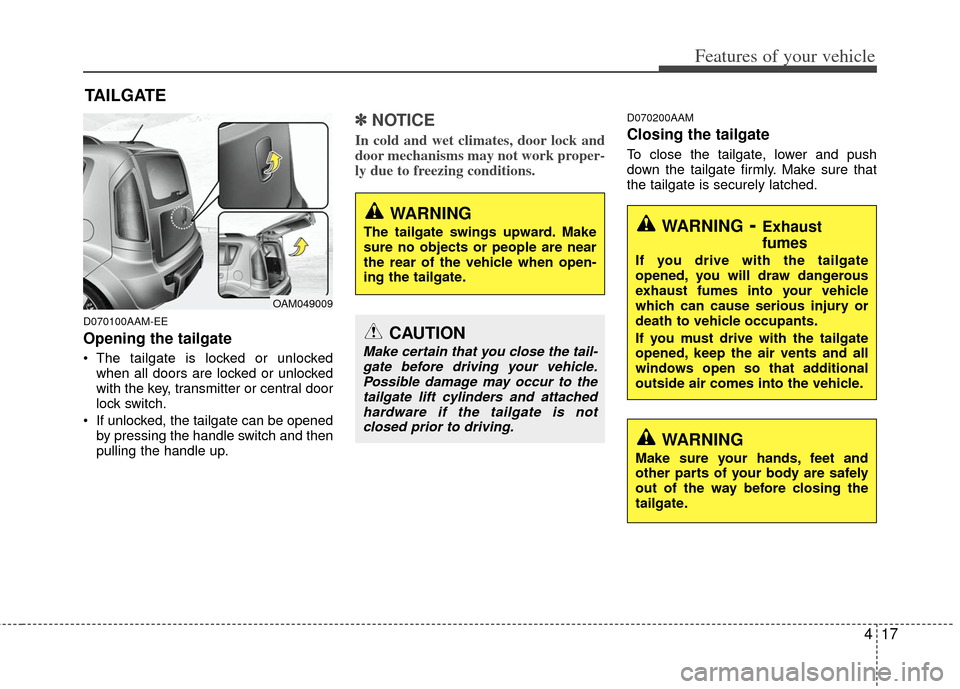
D070100AAM-EE
Opening the tailgate
The tailgate is locked or unlockedwhen all doors are locked or unlocked
with the key, transmitter or central door
lock switch.
If unlocked, the tailgate can be opened by pressing the handle switch and then
pulling the handle up.
✽ ✽ NOTICE
In cold and wet climates, door lock and
door mechanisms may not work proper-
ly due to freezing conditions.
D070200AAM
Closing the tailgate
To close the tailgate, lower and push
down the tailgate firmly. Make sure that
the tailgate is securely latched.
TAILGATE
OAM049009
WARNING
The tailgate swings upward. Make
sure no objects or people are near
the rear of the vehicle when open-
ing the tailgate.
CAUTION
Make certain that you close the tail-
gate before driving your vehicle.Possible damage may occur to thetailgate lift cylinders and attachedhardware if the tailgate is not closed prior to driving.
WARNING
Make sure your hands, feet and
other parts of your body are safely
out of the way before closing the
tailgate.
WARNING- Exhaust
fumes
If you drive with the tailgate
opened, you will draw dangerous
exhaust fumes into your vehicle
which can cause serious injury or
death to vehicle occupants.
If you must drive with the tailgate
opened, keep the air vents and all
windows open so that additional
outside air comes into the vehicle.
Page 90 of 356
Features of your vehicle
18
4
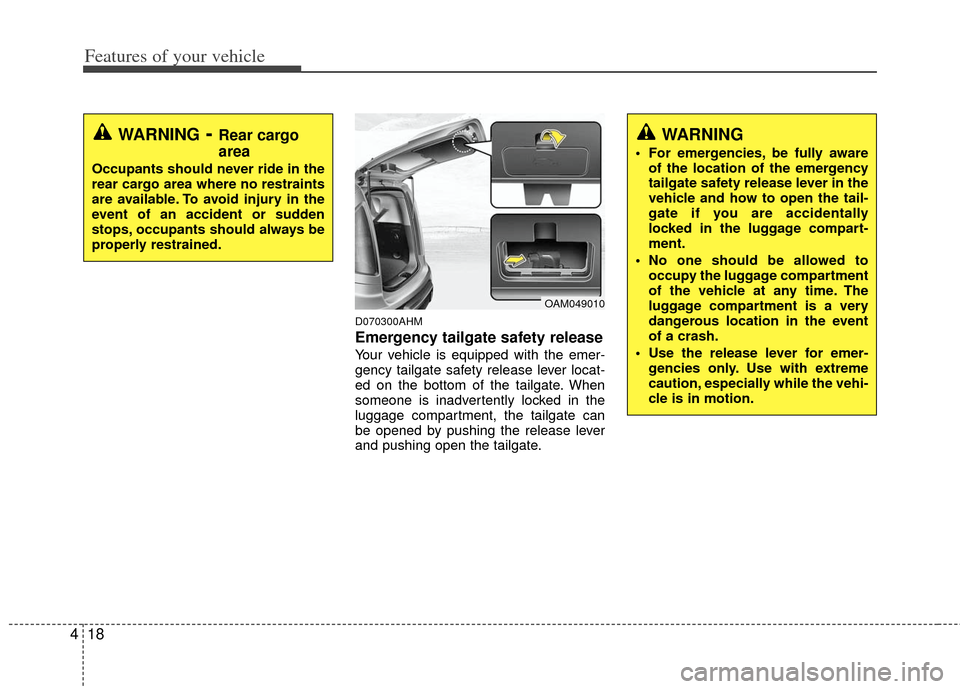
D070300AHM
Emergency tailgate safety release
Your vehicle is equipped with the emer-
gency tailgate safety release lever locat-
ed on the bottom of the tailgate. When
someone is inadvertently locked in the
luggage compartment, the tailgate can
be opened by pushing the release lever
and pushing open the tailgate.
WARNING
For emergencies, be fully aware
of the location of the emergency
tailgate safety release lever in the
vehicle and how to open the tail-
gate if you are accidentally
locked in the luggage compart-
ment.
No one should be allowed to occupy the luggage compartment
of the vehicle at any time. The
luggage compartment is a very
dangerous location in the event
of a crash.
Use the release lever for emer- gencies only. Use with extreme
caution, especially while the vehi-
cle is in motion.
OAM049010
WARNING- Rear cargo
area
Occupants should never ride in the
rear cargo area where no restraints
are available. To avoid injury in the
event of an accident or sudden
stops, occupants should always be
properly restrained.
Page 91 of 356
419
Features of your vehicle
D080000AUN
(1) Driver’s door power window switch
(2) Front passenger’s door power win-dow switch
(3) Rear door (left) power window switch
(4) Rear door (right) power window
switch
(5) Window opening and closing
(6) Automatic power window down (Driver’s window)
(7) Power window lock switch
✽ ✽ NOTICE
In cold and wet climates, power windows
may not work properly due to freezing
conditions.
WINDOWS
OAM049011
Page 92 of 356
Features of your vehicle
20
4
D080100AAM
Power windows
The ignition switch must be in the ON
position for power windows to operate.
Each door has a power window switch
that controls the door's window. The driv-
er has a power window lock button which
can block the operation of passenger
windows. The power windows can be
operated for approximately 30 seconds
after the ignition key is removed or turned
to the ACC or LOCK position. However, if
the front doors are opened, the power
windows cannot be operated even within
the 30 second period.
✽ ✽
NOTICE
While driving with the rear windows
down or with the sunroof (if equipped)
in an open (or partially open) position,
your vehicle may demonstrate a wind
buffeting or pulsation noise. This noise
is a normal occurrence and can be
reduced or eliminated by taking the fol-
lowing actions. If the noise occurs with
one or both of the rear windows down,
partially lower both front windows
approximately one inch. If you experi-
ence the noise with the sunroof open,
slightly reduce the size of the sunroof
opening.
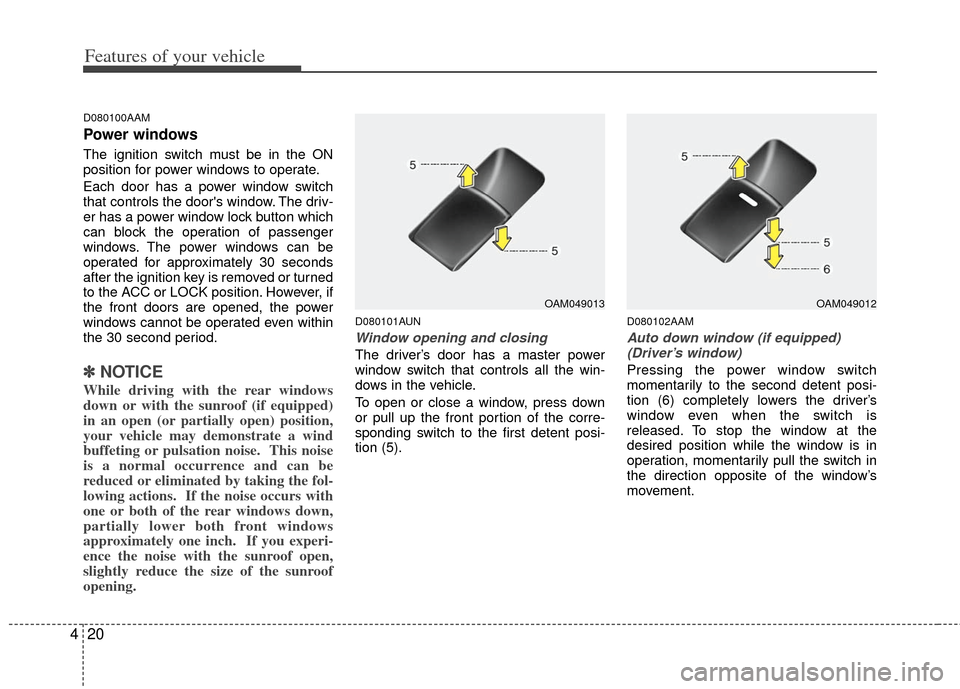
D080101AUN
Window opening and closing
The driver’s door has a master power
window switch that controls all the win-
dows in the vehicle.
To open or close a window, press down
or pull up the front portion of the corre-
sponding switch to the first detent posi-
tion (5).
D080102AAM
Auto down window (if equipped)
(Driver’s window)
Pressing the power window switch
momentarily to the second detent posi-
tion (6) completely lowers the driver’s
window even when the switch is
released. To stop the window at the
desired position while the window is in
operation, momentarily pull the switch in
the direction opposite of the window’s
movement.
OAM049013OAM049012
Page 93 of 356
421
Features of your vehicle
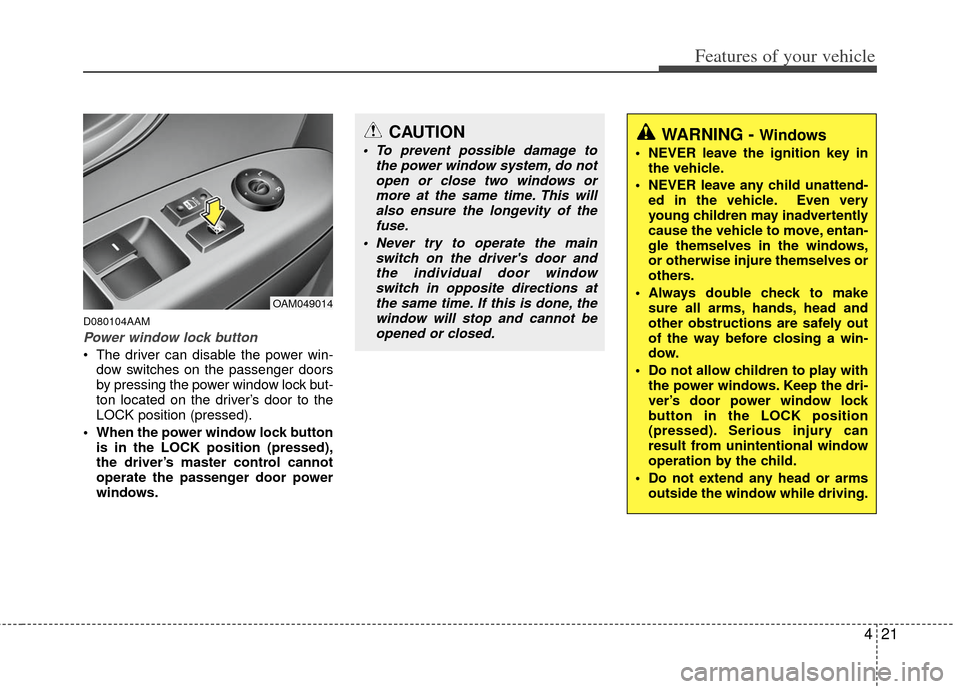
D080104AAM
Power window lock button
The driver can disable the power win-dow switches on the passenger doors
by pressing the power window lock but-
ton located on the driver’s door to the
LOCK position (pressed).
When the power window lock button is in the LOCK position (pressed),
the driver’s master control cannot
operate the passenger door power
windows.
CAUTION
To prevent possible damage to the power window system, do notopen or close two windows ormore at the same time. This willalso ensure the longevity of the fuse.
Never try to operate the main switch on the driver's door andthe individual door windowswitch in opposite directions atthe same time. If this is done, thewindow will stop and cannot beopened or closed.WARNING - Windows
NEVER leave the ignition key in the vehicle.
NEVER leave any child unattend- ed in the vehicle. Even very
young children may inadvertently
cause the vehicle to move, entan-
gle themselves in the windows,
or otherwise injure themselves or
others.
Always double check to make sure all arms, hands, head and
other obstructions are safely out
of the way before closing a win-
dow.
Do not allow children to play with the power windows. Keep the dri-
ver’s door power window lock
button in the LOCK position
(pressed). Serious injury can
result from unintentional window
operation by the child.
Do not extend any head or arms outside the window while driving.
OAM049014
Page 95 of 356
423
Features of your vehicle
D090200AAM
Closing the hood
1. Before closing the hood, check the fol-lowing:
ment must be correctly installed.
bustible material must be removed
from the engine compartment.
2. Return the support rod to its clip to prevent it from rattling.
3. Lower the hood until it is about 30 cm (1 ft.) above the closed position and let
it drop. Make sure that it locks into
place.WARNING
Before closing the hood, ensurethat all obstructions are removed
from the hood opening. Closing
the hood with an obstruction
present in the hood opening may
result in property damage or
severe personal injury.
Do not leave gloves, rags or any other combustible material in the
engine compartment. Doing so
may cause a heat-induced fire.
WARNING
Always double check to be surethat the hood is firmly latched
before driving away. If it is not
latched, the hood could open
while the vehicle is being driven,
causing total loss of visibility,
which might result in an accident.
The support rod must be inserted completely into the hole provided
whenever you inspect the engine
compartment. This will prevent
the hood from falling and possi-
bly injuring you.
Do not move the vehicle with the hood raised. The view will be
blocked and the hood could fall
or get damaged.
Page 96 of 356

Features of your vehicle
24
4
D100100AAM
Opening the fuel filler door
The fuel filler door must be opened from
inside the vehicle by pulling up the fuel
filler door opener lever.
✽ ✽
NOTICE
If the fuel filler door does not open
because ice has formed around it, tap
lightly or push on the door to break the
ice and release the door. Do not pry on
the door. If necessary, spray around the
door with an approved de-icer fluid (do
not use radiator anti-freeze) or move the
vehicle to a warm place and allow the ice
to melt.
1. Stop the engine.
2. To open the fuel filler door, pull the fuel
filler door opener (if equipped) up.
3. Pull open the fuel filler door (1).
4. To remove the cap, turn the fuel filler cap (2) counterclockwise.
5. Refuel as needed.
D100200AAM
Closing the fuel filler lid
1. To install the cap, turn it clockwise until it “clicks”. This indicates that the cap is
securely tightened.
2. Close the fuel filler lid and push it in lightly making sure that it is securely
closed.
D100300AAM-EC
FUEL FILLER DOOR
WARNING - Refueling
If pressurized fuel sprays out, itcan cover your clothes or skin
and subject you to the risk of fire
and burns. Always remove the
fuel cap carefully and slowly. If
the cap is venting fuel or if you
hear a hissing sound, wait until
the condition stops before com-
pletely removing the cap.
Do not "top off" after the nozzle automatically shuts off when
refueling.
Tighten the cap until it clicks one time, otherwise the Check Engine light will illuminate.
Always check that the fuel cap is installed securely to prevent fuel
spillage in the event of an acci-
dent.OHD046014OAM049089
(if equipped)
Page 103 of 356

431
Features of your vehicle
D130100AHM-EU-U1
Power steering
Power steering uses energy from the
engine to assist you in steering the vehi-
cle. If the engine is off or if the power
steering system becomes inoperative,
the vehicle may still be steered, but it will
require increased steering effort.
Should you notice any change in the
effort required to steer during normal
vehicle operation, have the power steer-
ing checked by an authorized KIA dealer.
✽ ✽NOTICE
If the power steering drive belt breaks
or if the power steering pump malfunc-
tions, steering effort will greatly
increase.
✽ ✽NOTICE
If the vehicle is parked for extended
periods outside in cold weather (below
-10°C/14°F), the power steering may
require increased effort when the
engine is first started. This is caused by
increased fluid viscosity due to the cold
weather and does not indicate a mal-
function.
When this happens, increase the engine
RPM by depressing the accelerator until
the RPM reaches 1,500 rpm then release
or let the engine idle for two or three
minutes to warm up the fluid.
D130300AUN
Tilt steering
Tilt steering allows you to adjust the
steering wheel before you drive. You can
also raise the steering wheel to give your
legs more room when you exit and enter
the vehicle.
The steering wheel should be positioned
so that it is comfortable for you to drive,
while permitting you to see the instru-
ment panel warning lights and gauges.
STEERING WHEEL
CAUTION
Never hold the steering wheel to the
extreme right or left for more than 5 seconds with the engine running.Holding the steering wheel for morethan 5 seconds in either positionmay cause damage to the powersteering pump.WARNING
Never adjust the angle of the steering wheel while driving. You
may lose steering control and
cause severe personal injury,
death or accidents.
After adjusting, push the steering wheel both up and down to be
certain it is locked in position.