2011 KIA Soul battery
[x] Cancel search: batteryPage 116 of 356

Features of your vehicle
44
4
✽
✽
NOTICE
• If the vehicle is not on level ground or
the battery power has been interrupt-
ed, the “Distance to empty” function
may not operate correctly.
The trip computer may not register
additional fuel if less than 6 liters (1.6
gallons) of fuel are added to the vehi-
cle.
• The fuel consumption and distance to empty values may vary significantly
based on driving conditions, driving
habits, and condition of the vehicle.
• The distance to empty value is an esti- mate of the available driving distance.
This value may differ from the actual
driving distance available.
ECOMINDERTMINDICATOR
ECO ON/OFF mode (if equipped)
You can turn the ECOMINDER
TMindica-
tor on/off on the instrument cluster in this
mode. If you push the TRIP button more than 1
second in the ECO ON mode, ECOMIN-
DER
TMOFF is displayed in the screen
and the ECO indicator turns off.
If you want to display the ECO indicator
again, press the TRIP button more than 1
second in the ECO OFF mode and then
ECO ON mode is displayed in the
screen.
When you press the TRIP button less
than 1 second in the ECO mode, the
mode is changed to odometer.
D150300AAM
Warnings and indicators
All warning lights are checked by turning
the ignition switch ON (do not start the
engine). Any light that does not illuminate
should be checked by an authorized KIA
dealer.
After starting the engine, check to make
sure that all warning lights are off. If any
warning lights are still on, this indicates a
situation that needs attention. When
releasing the parking brake, the brake
system warning light should go off. The
fuel warning light will stay on if the fuel
level is low.
OAM049105N
Type A
OAM040277
Type B
Page 127 of 356

455
Features of your vehicle
LCD display warning (if equipped)
Key is not in vehicle
If the smart key is not in the vehicle and
if any door is opened or closed with the
ENGINE START/STOP button in the
ACC, ON, or START position, the warn-
ing illuminates on the LCD display. Also,
the chime sounds for 5 seconds when
the smart key is not in the vehicle and the
door is closed.
Always have the smart key with you.
Key is not detected
If the smart key is not in the vehicle or is
not detected and you press the ENGINE
START/STOP button, the warning illumi-
nates on the LCD display for 10 seconds.
Also, the immobilizer indicator and the
key holder light blinks for 10 seconds.
Low key battery
If the ENGINE START/STOP button turns
to the OFF position when the smart key
in the vehicle discharges, the warning
illuminates on the LCD display for about
10 seconds. Also, the warning chime
sounds once.
Replace the battery with a new one.Press brake pedal to start engine
If the ENGINE START/STOP button turns
to the ACC position twice by pressing the
button repeatedly without depressing the
brake pedal, the warning illuminates on
the LCD display for about 10 seconds to
indicate that you should depress the
brake pedal to start the engine.
Press clutch pedal to start engine
(if equipped)
If the ENGINE START/STOP button turns
to the ACC position twice by pressing the
button repeatedly without depressing the
clutch pedal, the warning illuminates on
the LCD display for about 10 seconds to
indicate that you should depress the
clutch pedal to start the engine.
Shift to "P" position
If you try to turn off the engine without the
shift lever in the P (Park) position, the
ENGINE START/STOP button will turn to
the ACC position. If the button is pressed
once more it will turn to the ON position.
The warning illuminates on the LCD dis-
play for about 10 seconds to indicate that
you should press the ENGINE
START/STOP button with the shift lever
in the P (Park) position to turn off the
engine.
Also, the warning chime sounds for about
10 seconds. (if equipped)
Remove key
When you turn off the engine with the
smart key in the smart key holder, the
warning illuminates on the LCD display
for about 10 seconds. Also, the smart key
holder light blinks for about 10 seconds.
To remove the smart key push the smart
key once and pull it out from the smart
key holder.
Page 130 of 356
Features of your vehicle
58
4
D190100APB
Battery saver function
The purpose of this feature is to pre-
vent the battery from being dis-
charged. The system automatically
turns off the parking lights when the
driver removes the ignition key and
opens the driver-side door (in that
order).
With this feature, the parking lights will turn off automatically if the driver parks
on the side of the road at night.
If necessary, to keep the lights on
when the ignition key is removed, per-
form the following:
1) Open the driver-side door.
2) Turn the parking lights OFF and ON again using the light switch on the
steering column.
D190400AUN-C1
Lighting control
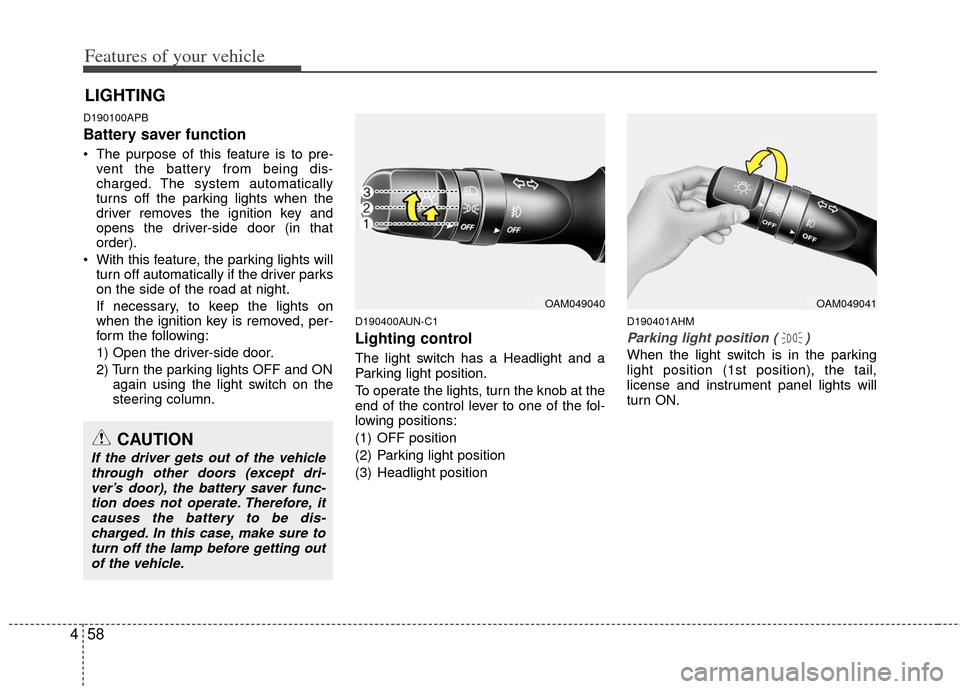
The light switch has a Headlight and a
Parking light position.
To operate the lights, turn the knob at the
end of the control lever to one of the fol-
lowing positions:
(1) OFF position
(2) Parking light position
(3) Headlight position
D190401AHM
Parking light position ( )
When the light switch is in the parking
light position (1st position), the tail,
license and instrument panel lights will
turn ON.
LIGHTING
OAM049041OAM049040
CAUTION
If the driver gets out of the vehicle
through other doors (except dri-ver’s door), the battery saver func- tion does not operate. Therefore, itcauses the battery to be dis-charged. In this case, make sure toturn off the lamp before getting outof the vehicle.
Page 131 of 356
459
Features of your vehicle
D190402AHM
Headlight position ( )
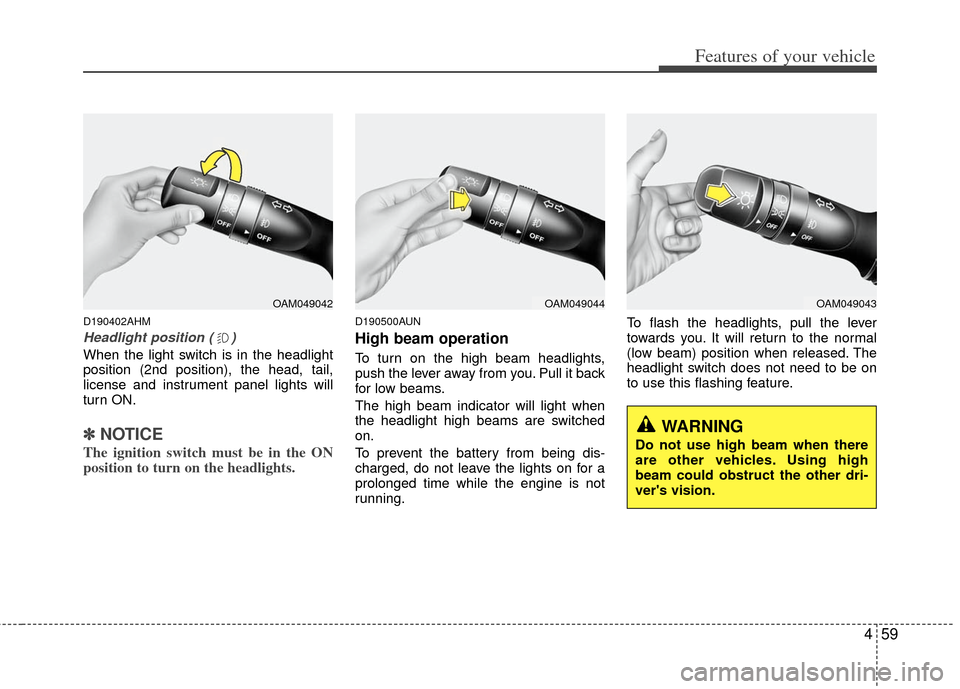
When the light switch is in the headlight
position (2nd position), the head, tail,
license and instrument panel lights will
turn ON.
✽ ✽NOTICE
The ignition switch must be in the ON
position to turn on the headlights.
D190500AUN
High beam operation
To turn on the high beam headlights,
push the lever away from you. Pull it back
for low beams.
The high beam indicator will light when
the headlight high beams are switched
on.
To prevent the battery from being dis-
charged, do not leave the lights on for a
prolonged time while the engine is not
running. To flash the headlights, pull the lever
towards you. It will return to the normal
(low beam) position when released. The
headlight switch does not need to be on
to use this flashing feature.
OAM049042OAM049044OAM049043
WARNING
Do not use high beam when there
are other vehicles. Using high
beam could obstruct the other dri-
ver's vision.
Page 137 of 356
465
Features of your vehicle
D210000AEND210200AAM-EU
Room lamp
Type A
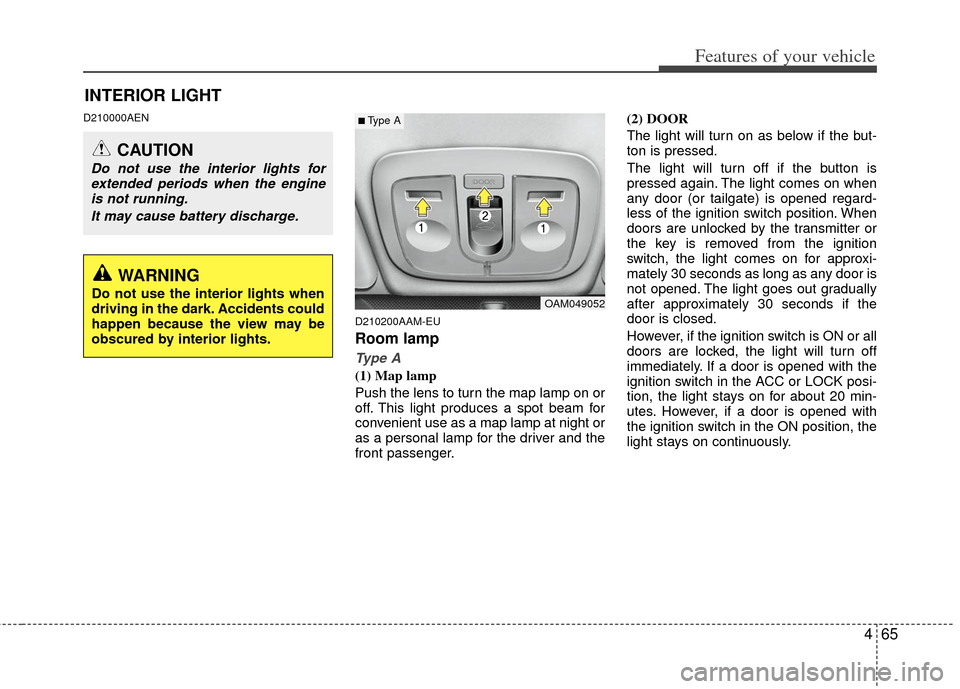
(1) Map lamp
Push the lens to turn the map lamp on or
off. This light produces a spot beam for
convenient use as a map lamp at night or
as a personal lamp for the driver and the
front passenger.(2) DOOR
The light will turn on as below if the but-
ton is pressed.
The light will turn off if the button is
pressed again. The light comes on when
any door (or tailgate) is opened regard-
less of the ignition switch position. When
doors are unlocked by the transmitter or
the key is removed from the ignition
switch, the light comes on for approxi-
mately 30 seconds as long as any door is
not opened. The light goes out gradually
after approximately 30 seconds if the
door is closed.
However, if the ignition switch is ON or all
doors are locked, the light will turn off
immediately. If a door is opened with the
ignition switch in the ACC or LOCK posi-
tion, the light stays on for about 20 min-
utes. However, if a door is opened with
the ignition switch in the ON position, the
light stays on continuously.
INTERIOR LIGHT
CAUTION
Do not use the interior lights for
extended periods when the engineis not running.
It may cause battery discharge.
OAM049052
■Type A
WARNING
Do not use the interior lights when
driving in the dark. Accidents could
happen because the view may be
obscured by interior lights.
Page 153 of 356
481
Features of your vehicle
Temperature conversion
If the battery has been discharged or dis-
connected, the temperature mode dis-
play will reset to Centigrade.
This is normal condition. You can switch
the temperature mode between
Centigrade to Fahrenheit as follows;
While depressing the AUTO button,
depress the OFF button for 3 seconds or
more. The display will change from
Centigrade to Fahrenheit, or from
Fahrenheit to Centigrade.
D240203AFD
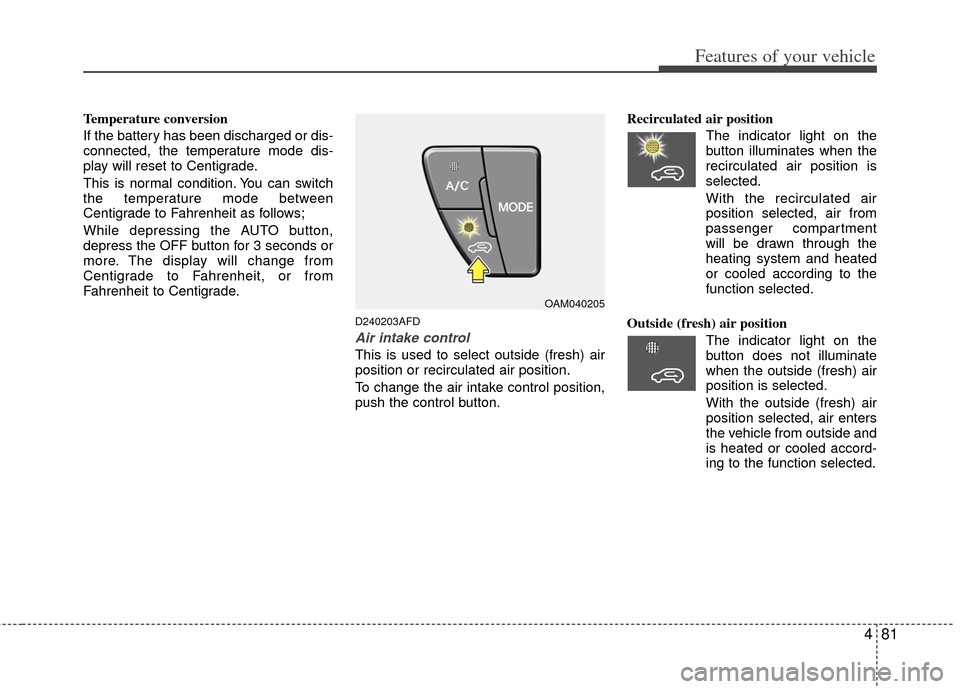
Air intake control
This is used to select outside (fresh) air
position or recirculated air position.
To change the air intake control position,
push the control button.Recirculated air position
The indicator light on the
button illuminates when the
recirculated air position is
selected.
With the recirculated air position selected, air from
passenger compartment
will be drawn through the
heating system and heated
or cooled according to the
function selected.
Outside (fresh) air position The indicator light on the
button does not illuminate
when the outside (fresh) air
position is selected.
With the outside (fresh) air
position selected, air enters
the vehicle from outside and
is heated or cooled accord-
ing to the function selected.
OAM040205
Page 158 of 356
Features of your vehicle
86
4
D250300AUN-U1
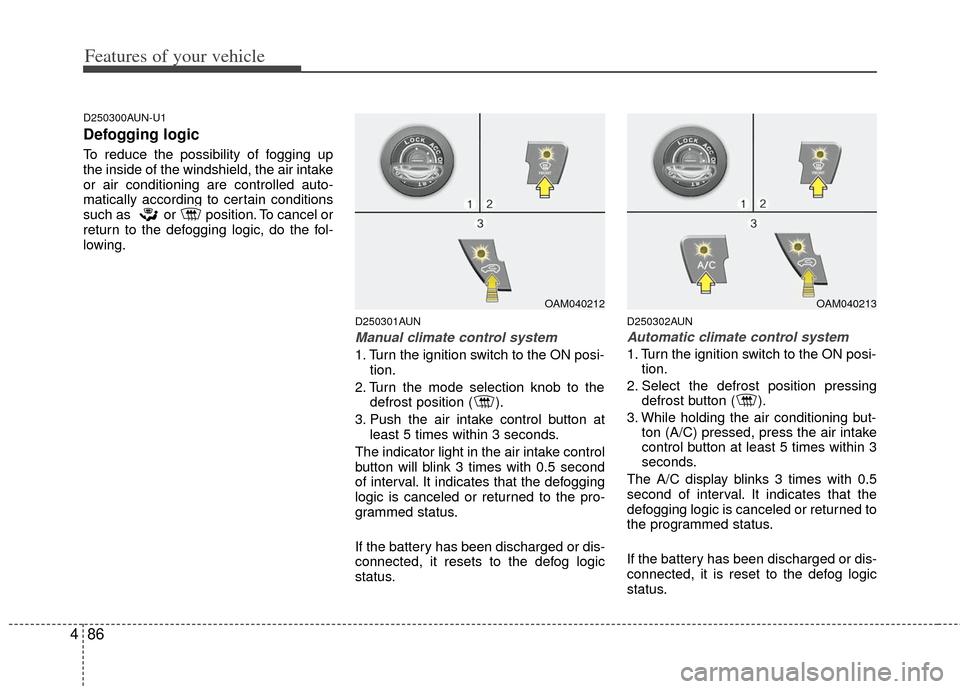
Defogging logic
To reduce the possibility of fogging up
the inside of the windshield, the air intake
or air conditioning are controlled auto-
matically according to certain conditions
such as or position. To cancel or
return to the defogging logic, do the fol-
lowing.
D250301AUN
Manual climate control system
1. Turn the ignition switch to the ON posi-
tion.
2. Turn the mode selection knob to the defrost position ( ).
3. Push the air intake control button at least 5 times within 3 seconds.
The indicator light in the air intake control
button will blink 3 times with 0.5 second
of interval. It indicates that the defogging
logic is canceled or returned to the pro-
grammed status.
If the battery has been discharged or dis-
connected, it resets to the defog logic
status.
D250302AUN
Automatic climate control system
1. Turn the ignition switch to the ON posi- tion.
2. Select the defrost position pressing defrost button ( ).
3. While holding the air conditioning but- ton (A/C) pressed, press the air intake
control button at least 5 times within 3
seconds.
The A/C display blinks 3 times with 0.5
second of interval. It indicates that the
defogging logic is canceled or returned to
the programmed status.
If the battery has been discharged or dis-
connected, it is reset to the defog logic
status.
OAM040212OAM040213
Page 169 of 356
497
Features of your vehicle
1. OFF : The light turns off.
2. MUSIC : The light blinks or changesshade according to the
sound of the audio.
If the audio is not turned on,
the light does not turn on.
3. MOOD : The light shade changes
automatically at regular inter-
val.
4. COLOR : If the button is pushed, it changes the color of speak-
er to red, green, blue, sky-
blue, purple and yellow.
5. +/- : When the lights are on, push the illumination button to adjust the
light intensity.
If low lighting grade is selected,
the intensity of light may be
weak or may not illuminate
according to the audio volume
or selected condition.
✽ ✽ NOTICE
The lighting around the front speaker
may not illuminate when the sound of
the audio is low.
D300800AAM
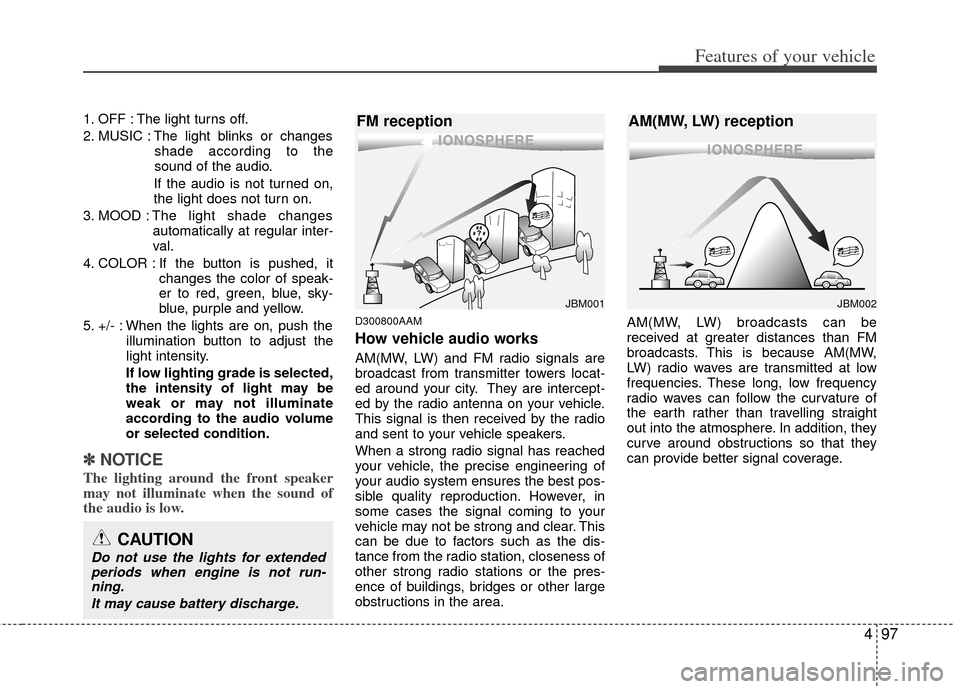
How vehicle audio works
AM(MW, LW) and FM radio signals are
broadcast from transmitter towers locat-
ed around your city. They are intercept-
ed by the radio antenna on your vehicle.
This signal is then received by the radio
and sent to your vehicle speakers.
When a strong radio signal has reached
your vehicle, the precise engineering of
your audio system ensures the best pos-
sible quality reproduction. However, in
some cases the signal coming to your
vehicle may not be strong and clear. This
can be due to factors such as the dis-
tance from the radio station, closeness of
other strong radio stations or the pres-
ence of buildings, bridges or other large
obstructions in the area. AM(MW, LW) broadcasts can be
received at greater distances than FM
broadcasts. This is because AM(MW,
LW) radio waves are transmitted at low
frequencies. These long, low frequency
radio waves can follow the curvature of
the earth rather than travelling straight
out into the atmosphere. In addition, they
curve around obstructions so that they
can provide better signal coverage.
JBM002
AM(MW, LW) reception
JBM001
FM reception
CAUTION
Do not use the lights for extended
periods when engine is not run-ning.
It may cause battery discharge.