2011 KIA Soul radiator
[x] Cancel search: radiatorPage 13 of 356

Your vehicle at a glance
42
ENGINE COMPARTMENT
B030000AUN-C1
OAM019003N
* The actual engine compartment in the vehicle may differ from the illustration.1. Engine Coolant Reservoir ................7-15
2. Engine Oil Filler Cap ........................7-14
3. Brake Fluid Reservoir.......................7-18
4. Air Cleaner .......................................7-23
5. Fuse Box ..........................................7-43
6. Negative Battery Terminal ..........6-4/7-27
7. Positive Battery Terminal............6-4/7-27
8. Radiator Cap ..............................6-6/7-17
9. Engine Oil Dipstick ...........................7-14
10. Windshield Washer Fluid Reservoir ..7-22
11. Power Steering Fluid Reservoir* ....7-19
* : if equipped
Page 96 of 356

Features of your vehicle
24
4
D100100AAM
Opening the fuel filler door
The fuel filler door must be opened from
inside the vehicle by pulling up the fuel
filler door opener lever.
✽ ✽
NOTICE
If the fuel filler door does not open
because ice has formed around it, tap
lightly or push on the door to break the
ice and release the door. Do not pry on
the door. If necessary, spray around the
door with an approved de-icer fluid (do
not use radiator anti-freeze) or move the
vehicle to a warm place and allow the ice
to melt.
1. Stop the engine.
2. To open the fuel filler door, pull the fuel
filler door opener (if equipped) up.
3. Pull open the fuel filler door (1).
4. To remove the cap, turn the fuel filler cap (2) counterclockwise.
5. Refuel as needed.
D100200AAM
Closing the fuel filler lid
1. To install the cap, turn it clockwise until it “clicks”. This indicates that the cap is
securely tightened.
2. Close the fuel filler lid and push it in lightly making sure that it is securely
closed.
D100300AAM-EC
FUEL FILLER DOOR
WARNING - Refueling
If pressurized fuel sprays out, itcan cover your clothes or skin
and subject you to the risk of fire
and burns. Always remove the
fuel cap carefully and slowly. If
the cap is venting fuel or if you
hear a hissing sound, wait until
the condition stops before com-
pletely removing the cap.
Do not "top off" after the nozzle automatically shuts off when
refueling.
Tighten the cap until it clicks one time, otherwise the Check Engine light will illuminate.
Always check that the fuel cap is installed securely to prevent fuel
spillage in the event of an acci-
dent.OHD046014OAM049089
(if equipped)
Page 111 of 356

439
Features of your vehicle
When the door is opened, or if the engine
is not started within 1 minute, the
tachometer pointer may move slightly in
the ON position with the engine OFF.
This movement is normal and will not
affect the accuracy of the tachometer
once the engine is running.
D150203AUN
Engine temperature gauge
This gauge shows the temperature of the
engine coolant when the ignition switch
is ON.
Do not continue driving with an overheat-
ed engine. If your vehicle overheats, refer
to “If the engine overheats” in section 6.
CAUTION
If the gauge pointer moves beyondthe normal range area toward the“H” position, it indicates overheat- ing that may damage the engine.
CAUTION
Do not operate the engine withinthe tachometer's RED ZONE.
This may cause severe engine dam-age.
WARNING
Never remove the radiator cap
when the engine is hot. The engine
coolant is under pressure and
could cause severe burns. Wait
until the engine is cool before
adding coolant to the reservoir.OAM049033
OAM040033
Type A
Type B
Page 257 of 356

What to do in an emergency
66
IF THE ENGINE OVERHEATS
F050000AAM
If your temperature gauge indicates over-
heating, you experience a loss of power,
or hear loud pinging or knocking, the
engine will probably be too hot. If this
happens, you should:
1. Pull off the road and stop as soon as itis safe to do so.
2. Place the shift lever in P (Park, auto- matic transaxle) or Neutral (manual
transaxle) and set the parking brake. If
the air conditioning is on, turn it off.
3. If engine coolant is running out under the vehicle or steam is coming out
from underneath the hood, stop the
engine. Do not open the hood until the
coolant has stopped running or the
steaming has stopped. If there is no
visible loss of engine coolant and no
steam, leave the engine running and
check to be sure the engine cooling
fan is operating. If the fan is not run-
ning, turn the engine off. 4. Check to see if the water pump drive
belt is missing. If it is not missing,
check to see that it is tight. If the drive
belt seems to be satisfactory, check for
coolant leaking from the radiator,
hoses or under the vehicle. (If the air
conditioning had been in use, it is nor-
mal for cold water to be draining from
it when you stop).
5. If the water pump drive belt is broken or engine coolant is leaking out, stop
the engine immediately and call the
nearest authorized KIA dealer for
assistance. 6. If you cannot find the cause of the
overheating, wait until the engine tem-
perature has returned to normal. Then,
if coolant has been lost, carefully add
coolant to the reservoir to bring the
fluid level in the reservoir up to the
halfway mark.
7. Proceed with caution, keeping alert for further signs of overheating. If over-
heating happens again, call an author-
ized KIA dealer for assistance.
WARNING
While the engine is running, keep
hair, hands and clothing away from
moving parts such as the fan and
drive belts to prevent injury.
WARNING
Do not remove the radiator cap
when the engine is hot. This may
result in coolant being blown out of
the opening and cause serious
burns.
CAUTION
Serious loss of coolant indicates
there is a leak in the cooling systemand this should be checked as soonas possible by an authorized KIAdealer.
Page 282 of 356

Maintenance
27
ENGINE COMPARTMENT
G010000AAM-EU
OAM019003N
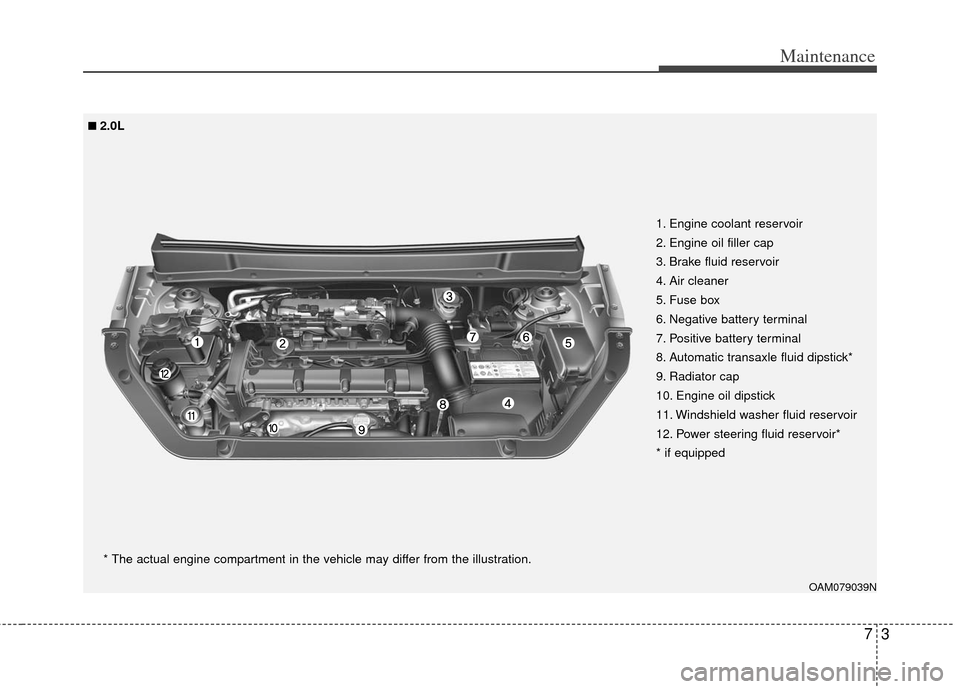
1. Engine coolant reservoir
2. Engine oil filler cap
3. Brake fluid reservoir
4. Air cleaner
5. Fuse box
6. Negative battery terminal
7. Positive battery terminal
8. Radiator cap
9. Engine oil dipstick
10. Windshield washer fluid reservoir
11. Power steering fluid reservoir*
* if equipped
* The actual engine compartment in the vehicle may differ from the illustration.
■ ■1.6L
Page 283 of 356

73
Maintenance
OAM079039N
1. Engine coolant reservoir
2. Engine oil filler cap
3. Brake fluid reservoir
4. Air cleaner
5. Fuse box
6. Negative battery terminal
7. Positive battery terminal
8. Automatic transaxle fluid dipstick*
9. Radiator cap
10. Engine oil dipstick
11. Windshield washer fluid reservoir
12. Power steering fluid reservoir*
* if equipped
■ ■2.0L* The actual engine compartment in the vehicle may differ from the illustration.
Page 286 of 356

Maintenance
67
G030102AAM
While operating your vehicle:
Note any changes in the sound of theexhaust or any smell of exhaust fumes
in the vehicle.
Check for vibrations in the steering wheel. Notice any increased steering
effort or looseness in the steering
wheel, or change in its straight-ahead
position.
Notice if your vehicle constantly turns slightly or “pulls” to one side when trav-
eling on smooth, level road.
When stopping, listen and check for unusual sounds, pulling to one side,
increased brake pedal travel or “hard-
to-push” brake pedal.
If any slipping or changes in the oper- ation of your transaxle occurs, check
the transaxle fluid level.
Check the automatic transaxle P (Park) function.
Check the parking brake.
Check for fluid leaks under your vehicle (water dripping from the air condition-
ing system during or after use is nor-
mal).
G030103AHM
At least monthly:
Check the coolant level in the enginecoolant reservoir.
Check the operation of all exterior lights, including the stoplights, turn sig-
nals and hazard warning flashers.
Check the inflation pressures of all tires including the spare.
G030104AHM
At least twice a year (i.e., every Spring and Fall):
Check the radiator, heater and air con- ditioning hoses for leaks or damage.
Check the windshield washer spray and wiper operation. Clean the wiper
blades with clean cloth dampened with
washer fluid.
Check the headlight alignment.
Check the muffler, exhaust pipes, shields and clamps.
Check the lap/shoulder belts for wear and function.
Check for worn tires and loose wheel lug nuts.
G030105AHM-C1
At least once a year:
Clean the body and door drain holes.
Lubricate the door hinges and checks,and hood hinges.
Lubricate the door and hood locks and latches.
Lubricate the door rubber weather- strips.
Check the air conditioning system.
Check the power steering fluid level.
Inspect and lubricate the automatic transaxle linkage and controls.
Clean the battery and terminals.
Check the brake/clutch fluid level.
Page 292 of 356

Maintenance
12
7
G050800AUN
Air cleaner filter
A Genuine KIA air cleaner filter is recom-
mended when the filter is replaced.
G050900AUN
Spark plugs
Make sure to install new spark plugs of
the correct heat range.
G051000AHM
Valve clearance (if equipped)
Inspect for excessive valve noise and/or
engine vibration and adjust if necessary.
An authorized KIA dealer should perform
the operation.
G051100AHM
Cooling system
Check the cooling system components,
such as the radiator, coolant reservoir,
hoses and connections for leakage and
damage. Replace any damaged parts.
G051200AUN
Coolant
The coolant should be changed at the
intervals specified in the maintenance
schedule.
G051300AUN
Manual transaxle fluid
(if equipped)
Inspect the manual transaxle fluid
according to the maintenance schedule.
G051400AUN
Automatic transaxle fluid
(if equipped)
The fluid level should be in the "HOT"
range of the dipstick, after the engine
and transaxle are at normal operating
temperature. Check the automatic
transaxle fluid level with the engine run-
ning and the transaxle in neutral, with the
parking brake properly applied.
G051500AUN
Brake hoses and lines
Visually check for proper installation,
chafing, cracks, deterioration and any
leakage. Replace any deteriorated or
damaged parts immediately.
G051600AAM
Brake/Clutch (if equipped) fluid
Check the brake fluid level in the brake
fluid reservoir. The level should be
between “MIN” and “MAX” marks on the
side of the reservoir. Use only hydraulic
brake fluid conforming to DOT 3 or DOT
4 specification.
G051700AUN
Parking brake
Inspect the parking brake system includ-
ing the parking brake lever and cables.
G051900AUN
Brake discs, pads, calipers and
rotors
Check the pads for excessive wear, discs
for run out and wear, and calipers for fluid
leakage.