Page 95 of 394

Features of your vehicle
24
4
Opening the hood
1. Pull the release lever to unlatch the
hood. The hood should pop open
slightly.
Open the hood after turning off the
engine on a flat surface, shifting the shift
lever to the P(Park) position for automat-
ic transaxle and to the 1st(First) gear or
R(Reverse) for manual transaxle, and
setting the parking brake. 2. Go to the front of the vehicle, raise the
hood slightly, pull the secondary latch
(1) inside of the hood center and lift
the hood (2).
3. Raise the hood. It will raise completely by itself after it has been raised about
halfway.
Closing the hood
1. Before closing the hood, check the fol-lowing:
must be correctly installed.
bustible material must be removed
from the engine compartment. 2. Lower the hood until it is about 1 ft. (30
cm) above the closed position and let
it drop. Make sure that it locks into
place.
HOOD
OTF040024OTF040025N
WARNING
Before closing the hood, ensurethat all obstructions are removed
from the hood opening. Closing
the hood with an obstruction
present in the hood opening may
result in property damage or
severe personal injury.
Do not leave gloves, rags or any other combustible material in the
engine compartment. Doing so
may cause a heat-induced fire.
WARNING
Always double check to be surethat the hood is firmly latched
before driving away. If it is not
latched, the hood could fly open
while the vehicle is being driven,
causing a total loss of visibility,
which might result in an accident.
Do not move the vehicle with the hood raised. The view will be
blocked and the hood could fall
or be damaged.
Page 96 of 394

425
Features of your vehicle
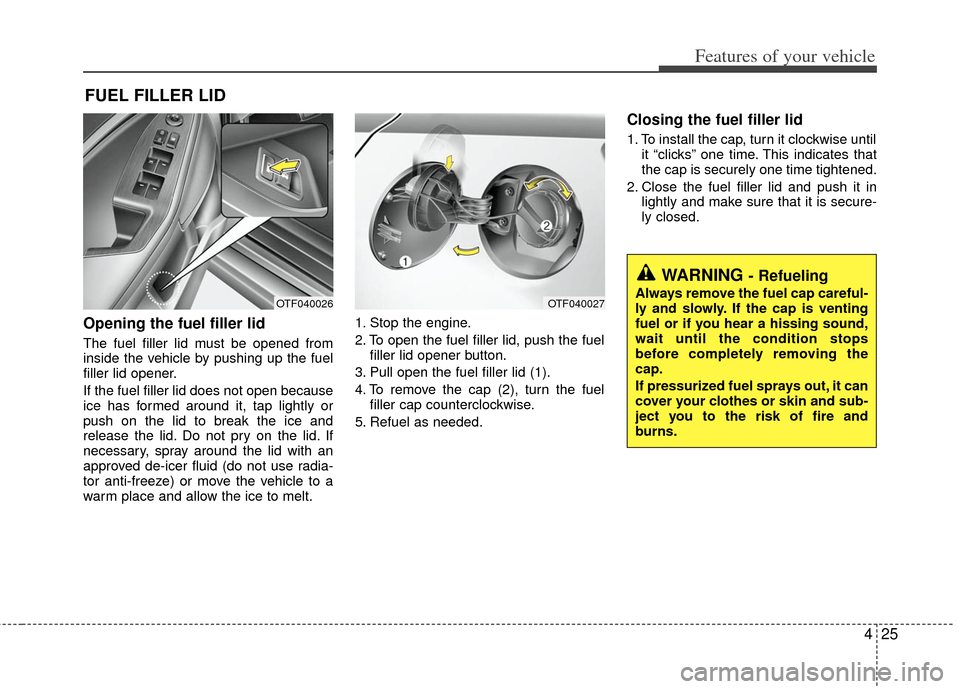
Opening the fuel filler lid
The fuel filler lid must be opened from
inside the vehicle by pushing up the fuel
filler lid opener.
If the fuel filler lid does not open because
ice has formed around it, tap lightly or
push on the lid to break the ice and
release the lid. Do not pry on the lid. If
necessary, spray around the lid with an
approved de-icer fluid (do not use radia-
tor anti-freeze) or move the vehicle to a
warm place and allow the ice to melt.1. Stop the engine.
2. To open the fuel filler lid, push the fuel
filler lid opener button.
3. Pull open the fuel filler lid (1).
4. To remove the cap (2), turn the fuel filler cap counterclockwise.
5. Refuel as needed.
Closing the fuel filler lid
1. To install the cap, turn it clockwise until it “clicks” one time. This indicates that
the cap is securely one time tightened.
2. Close the fuel filler lid and push it in lightly and make sure that it is secure-
ly closed.
FUEL FILLER LID
WARNING - Refueling
Always remove the fuel cap careful-
ly and slowly. If the cap is venting
fuel or if you hear a hissing sound,
wait until the condition stops
before completely removing the
cap.
If pressurized fuel sprays out, it can
cover your clothes or skin and sub-
ject you to the risk of fire and
burns.OTF040026OTF040027
Page 98 of 394

427
Features of your vehicle
Make sure to refuel your vehicle accord-
ing to the "Fuel requirements" suggested
in section 1.
If the fuel filler cap requires replacement,
use only a genuine Kia cap or the equiv-
alent specified for your vehicle. An incor-
rect fuel filler cap can result in a serious
malfunction of the fuel system or emis-
sion control system.
CAUTION- Exterior paint
Do not spill fuel on the exterior sur-faces of the vehicle. Any type of fuelspilled on painted surfaces maydamage the paint.
WARNING - Refueling& Vehicle fires
When refueling, always shut the
engine off. Sparks produced by
electrical components related to
the engine can ignite fuel vapors
causing a fire. Once refueling is
complete, check to make sure the
filler cap and filler door are secure-
ly closed, before starting the
engine.
WARNING - Smoking
DO NOT use matches or a lighter
and DO NOT SMOKE or leave a lit
cigarette in your vehicle while at a
gas station especially during refu-
eling. Automotive fuel is highly
flammable and can, when ignited,
result in fire.
Page 102 of 394
431
Features of your vehicle
Resetting the sunroof
Whenever the vehicle battery is discon-
nected or discharged, or related fuse is
blown, you must reset your sunroof sys-
tem as follows:
1. Turn the ignition switch to the ON posi-tion and close the sunroof completely.
2. Release the control lever.
3. Push and hold the control lever forward (for more than 10 seconds) until the
sunroof tilts and slightly moves. Then,
release the lever.
4. Push the sunroof control lever forward in the direction of close until the sun-
roof operates as follows;
SUNSHADE OPEN → TILT OPEN →
SLIDE OPEN → SLIDE CLOSE →
SUNSHADE CLOSE
Then, release the control lever.
When this is complete, the sunroof
system is reset. ❈
For more detailed information, contact
an authorized Kia dealer.
✽ ✽
NOTICE
If the sunroof is not reset when the vehi-
cle battery is disconnected or dis-
charged, or related fuse is blown, the
sunroof may operate improperly.
Page 105 of 394

Features of your vehicle
34
4
Electric power steering
Power steering uses the motor to assist
you in steering the vehicle. If the engine
is off or if the power steering system
becomes inoperative, the vehicle may
still be steered, but it will require
increased steering effort.
The motor driven power steering is con-
trolled by the power steering control unit
which senses the steering wheel torque
and vehicle speed to command the
motor.
The steering wheel becomes heavier as
the vehicle’s speed increases and
becomes lighter as the vehicle’s speed
decreases for better control of the steer-
ing wheel.
Should you notice any change in the
effort required to steer during normal
vehicle operation, have the power steer-
ing checked by an authorized Kia dealer.
✽ ✽
NOTICE
The following symptoms may occur dur-
ing normal vehicle operation:
• The steering effort is high immediate-
ly after turning the ignition switch on.
This happens as the system performs
the EPS system diagnostics. When the
diagnostics is completed, the steering
wheel will return to its normal condi-
tion.
• A click noise may be heard from the EPS relay after the ignition switch is
turned to the ON or LOCK position.
• Motor noise may be heard when the vehicle is at a stop or at a low driving
speed.
• The steering effort increases if the steering wheel is rotated continuously
when the vehicle is not in motion.
However, after a few minutes, it will
return to its normal conditions.
• When you operate the steering wheel in low temperature, abnormal noise
could occur. If temperature rises, the
noise will disappear. This is a normal
condition.
If the Electric Power Steering System
does not operate normally, the warning
light will illuminate on the instrument
cluster. The steering wheel may become
difficult to control or operate abnormally.
Take your vehicle to an authorized Kia
dealer and have the vehicle checked as
soon as possible.
STEERING WHEEL
Page 106 of 394

435
Features of your vehicle
Tilt and telescoping (if equipped)
steering
Tilt steering allows you to adjust the
steering wheel before you drive. You can
also raise it to give your legs more room
when you exit and enter the vehicle.
The steering wheel should be positioned
so that it is comfortable for you to drive,
while permitting you to see the instru-
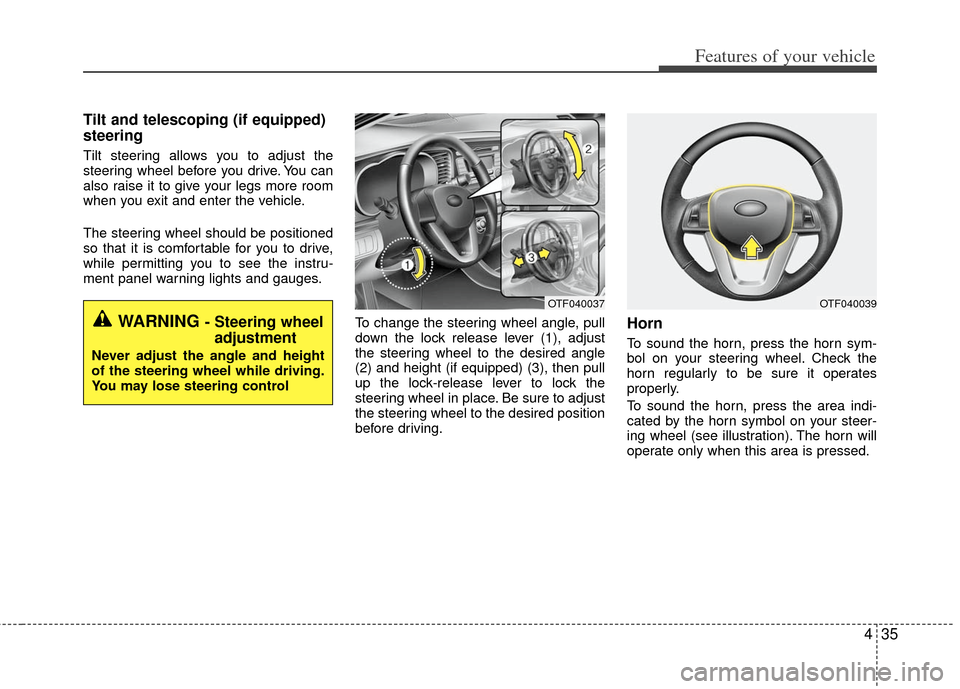
ment panel warning lights and gauges.To change the steering wheel angle, pull
down the lock release lever (1), adjust
the steering wheel to the desired angle
(2) and height (if equipped) (3), then pull
up the lock-release lever to lock the
steering wheel in place. Be sure to adjust
the steering wheel to the desired position
before driving.
Horn
To sound the horn, press the horn sym-
bol on your steering wheel. Check the
horn regularly to be sure it operates
properly.
To sound the horn, press the area indi-
cated by the horn symbol on your steer-
ing wheel (see illustration). The horn will
operate only when this area is pressed.
WARNING - Steering wheeladjustment
Never adjust the angle and height
of the steering wheel while driving.
You may lose steering control
OTF040037OTF040039
Page 108 of 394

437
Features of your vehicle
Inside rearview mirror
Adjust the rearview mirror so that the
center view through the rear window is
seen. Make this adjustment before you
start driving.
Do not place objects in the rear seat
which would interfere with your vision
through the rear window.
Day/night rearview mirror (if equipped)
Make this adjustment before you start
driving and while the day/night lever is in
the day position.
Pull the day/night lever toward you to
reduce the glare from the headlights of
the vehicles behind you during night driv-
ing.
Remember that you lose some rearviewclarity in the night position. Electric chromic mirror (ECM) with
HomeLink
®system and compass
(if equipped)
Your vehicle may be equipped with a
Gentex Automatic-Dimming Mirror with a
Z-Nav™ Electronic Compass Display
and an Integrated HomeLink
®Wireless
Control System. During nighttime driving,
this feature will automatically detect and
reduce rearview mirror glare while the
compass indicates the direction the vehi-
cle is pointed. The HomeLink
®Universal
Transceiver allows you to activate your
garage door(s), electric gate, home light-
ing, etc.
MIRRORS
WARNING - Mirror
adjustment
Do not adjust the rearview mirror
while the vehicle is moving. This
could result in loss of control.OTF040040
Day Night
Page 109 of 394

Features of your vehicle
38
4
(1) Channel 1 button
(2) Channel 2 button
(3) Status indicator LED
(4) Channel 3 button
(5) Rear light sensor
(6) Dimming ON/OFF button
(7) Compass control button
(8) Compass display Automatic-Dimming Night Vision Safety
®
(NVS®) Mirror
The NVS®Mirror in your vehicle is the
most advanced way to reduce annoying
glare in the rearview mirror during any
driving situation. For more information
regarding NVS
®mirrors and other appli-
cations, please refer to the Gentex web-
site:
www.gentex.com Automatic-dimming function
Your mirror will automatically dim upon
detecting glare from the vehicles travel-
ing behind you. The auto-dimming func-
tion can be controlled by the Dimming
ON/OFF Button:
1. Pressing the button turns the auto-
dimming function OFF which is indicat-
ed by the green Status Indicator LED
turning off.
2. Pressing the button again turns the auto-dimming function ON which is
indicated by the green Status Indicator
LED turning on.
✽ ✽NOTICE
The mirror defaults to the ON position
each time the vehicle is started.
CAUTION
The NVS®Mirror automatically
reduces glare during driving condi- tions based upon light levels moni-tored in front of the vehicle andfrom the rear of the vehicle. Theselight sensors are visible throughopenings in the front and rear of the mirror case. Any object thatobstructs either light sensor willdegrade the automatic dimmingcontrol feature.OYF049230C