2011 KIA Optima Hybrid reset
[x] Cancel search: resetPage 148 of 394

477
Features of your vehicle
Parking assist warning
Displays the area an obstacle is detected
while moving rearward.Low washer liquid
This warning light illuminates for 12 sec-
onds when the washer fluid reservoir is
nearly empty. To turn off the warning light
immediately, press the RESET button for
more than 1 second. Refill the washer
fluid as soon as possible.Check brake
'Check brake' is displayed when the
brake function is not well or the regener-
ative brake system is not operated with
brake system malfunction. Refer to the
page 4-62 for the related information.
Have the system checked by an author-
ized Kia dealer as soon as possible.
OTFH040099NOTFH040211N
WARNING
Driving with the 'check brake' on is
dangerous. Have the system
checked by an authorized Kia dealer
as soon as possible.
OTFH040100N
Page 172 of 394

4101
Features of your vehicle
Adjusting the driver and passenger side
temperature individually
1. Press the DUAL button to operate thedriver and passenger side temperature
individually. Pressing the right temper-
ature control button will automatically
switch to the DUAL mode as well.
2. Operate the left temperature control to adjust the driver side temperature.
Operate the right temperature control
to adjust the passenger side tempera-
ture.
When the driver side temperature is set
to the highest (HIGH) or lowest (LOW)
temperature setting, the DUAL mode is
deactivated for maximum heating or
cooling. Adjusting the driver and passenger side
temperature equally
1. Press the DUAL button again to deac-
tivate DUAL mode. The passenger
side temperature will be set to the
same temperature as the driver side
temperature.
2. Operate the driver side temperature control switch. The driver and passen-
ger side temperature will be adjusted
equally. Temperature conversion
You can switch the temperature mode
between Fahrenheit to Centigrade as fol-
lows:
While pressing the MODE, press the
DUAL button for 3 seconds or more.
The display will change from Fahrenheit
to Centigrade, or from Centigrade to
Fahrenheit.
If the battery has been discharged or dis-
connected, the temperature mode dis-
play will reset to Fahrenheit.
OTF040137
Page 180 of 394

4109
Features of your vehicle
To defrost outside windshield
1. Set the fan speed to the highest posi-tion.
2. Set the temperature to the extreme hot (HI) position.
3. Press the defroster button ( ).
4. The outside (fresh) air position will be selected automatically.
Defogging logic
To reduce the probability of fogging up
inside of the windshield, the air intake or
air conditioning are controlled automati-
cally according to certain conditions such
as or position. To cancel or
return to the defogging logic, do the fol-
lowings:
Automatic climate control system
1. Turn the engine start/stop button to theON position.
2. Select the defroster position pressing the defroster button ( ).
3. While pressing the air conditioning button (A/C), press the air intake con-
trol button ( ) at least 5 times with-
in 3 seconds.
The A/C display blinks 3 times with 0.5
second of interval. It indicates that the
defogging logic is canceled or returned to
the programmed status.
If the battery has been discharged or dis-
connected, it resets to the defog logic
status.
OTF040146N-1OTFH041148N
Page 181 of 394

Features of your vehicle
110
4
Auto defogging system (Only for
automatic climate control system, ifequipped)
Auto defogging reduces the probability of
fogging up the inside of the windshield by
automatically sensing the moisture of
inside the windshield.
The auto defogging system operates
when the heater or air conditioning is on. This indicator illuminates
when the auto defogging
system senses the moisture
of inside the windshield and
operates.
If more moisture is in the vehicle, higher
steps operate as follow. For example if
auto defogging does not defog inside the
windshield at step 1 Outside air position,
it tries to defog again at step 2 Blowing
air toward the windshield.
Step 1 : Outside air position
Step 2 :Blowing air toward the windshield
Step 3 : Increasing air flow toward the windshield
Step 4 : Operating the air conditioning
Step 5 : Maximizing the air conditioning
If your vehicle is equipped with the auto
defogging system, it is automatically acti-
vated when the conditions are met.
However, if you would like to cancel the
auto defogging system, press the front
defroster button 4 times within 2 seconds
while pressing the AUTO button. The
indicator will blink 3 times to notify you
that the system is cancelled. To use the
auto defogging system again, follow the
procedures mentioned above. If the battery has been disconnected or
discharged, it resets to the auto defog-
ging status.
✽ ✽
NOTICE
If the A/C off or recirculated air position
is manually selected while the auto
defogging system is on, the auto defog-
ging indicator will blink 3 times to give
notice that manual operation is can-
celed.
OTF040178NCAUTION
Do not remove the sensor cover
located on the upper end of the driver side windshield glass.Damage to the system parts could occur and may not be covered byyour vehicle warranty.
Page 186 of 394

4115
Features of your vehicle
Digital clock
Whenever the battery terminals or relat-
ed fuses are disconnected, you must
reset the time.
When the ignition switch is in the ACC or
ON position, the clock buttons operate as
follows:
Pressing the H button will advance the
time display by one hour.
Pressing the M button will advance the
time display by one minute.
To change the 12 hour format to the 24
hour format, press the H and M button
at the same time for more than 5 sec-
onds.
For example, if the time is 10:15 p.m.,
the display will change to 22:15.
Clothes hanger (if equipped)
To use the hanger, pull down the upper
portion of hanger.
WARNING
Do not adjust the clock while driv-
ing. You may lose your steering
control and cause severe personal
injury or accidents.CAUTION - Hanging clothing
Do not hang heavy clothes, since
those may damage the hook.
OUN026348OTF040162
Page 189 of 394

Features of your vehicle
118
4
Steering wheel audio controls
(if equipped)
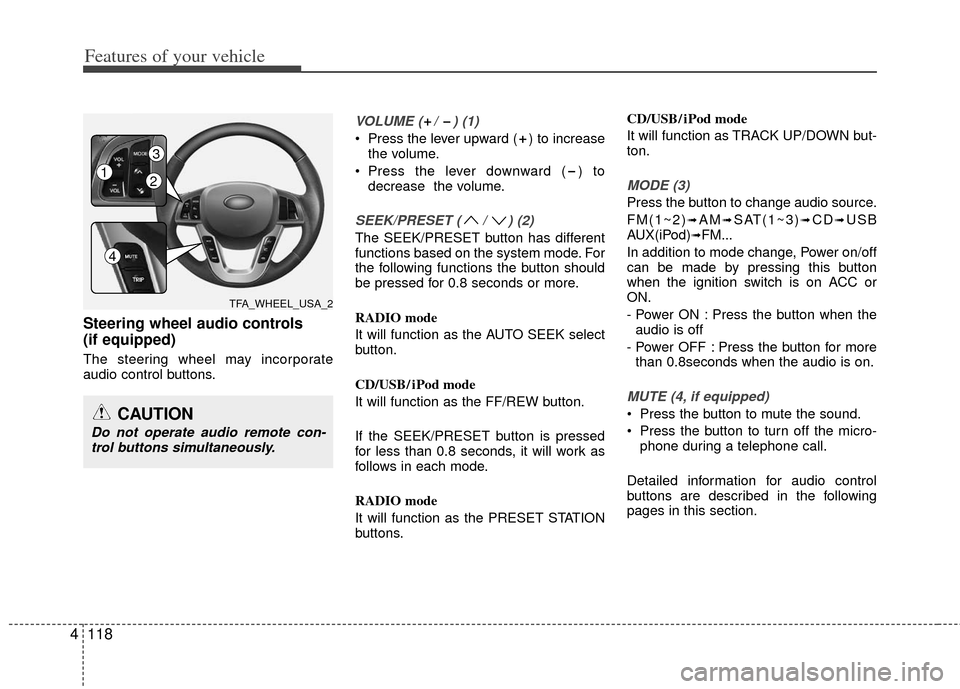
The steering wheel may incorporate
audio control buttons.
VOLUME ( / ) (1)
Press the lever upward ( ) to increase
the volume.
Press the lever downward ( ) to decrease the volume.
SEEK/PRESET ( / ) (2)
The SEEK/PRESET button has different
functions based on the system mode. For
the following functions the button should
be pressed for 0.8 seconds or more.
RADIO mode
It will function as the AUTO SEEK select
button.
CD/USB/ iPod mode
It will function as the FF/REW button.
If the SEEK/PRESET button is pressed
for less than 0.8 seconds, it will work as
follows in each mode.
RADIO mode
It will function as the PRESET STATION
buttons. CD/USB/ iPod mode
It will function as TRACK UP/DOWN but-
ton.
MODE (3)
Press the button to change audio source.
FM(1~2)
➟AM➟SAT(1~3)➟CD➟USB
AUX(iPod)➟FM...
In addition to mode change, Power on/off
can be made by pressing this button
when the ignition switch is on ACC or
ON.
- Power ON : Press the button when the audio is off
- Power OFF : Press the button for more than 0.8seconds when the audio is on.
MUTE (4, if equipped)
Press the button to mute the sound.
Press the button to turn off the micro- phone during a telephone call.
Detailed information for audio control
buttons are described in the following
pages in this section.CAUTION
Do not operate audio remote con- trol buttons simultaneously.
TFA_WHEEL_USA_2
12
3
4
Page 195 of 394

Features of your vehicle
124
4
Using RADIO, SETUP, VOLUME
and AUDIO CONTROL
1. Button
The FM/AM button toggles between FM
and AM. Listed below are the paths as
the system switches from FM to AM and
back to FM.
FM/AM : FM1
➟FM2➟AM➟FM1...
2. Button & Knob
Turns the audio system on/off when
the ignition switch is on ACC or ON.
If the knob is turned clockwise/counter- clockwise, the volume will increase
/decrease.
3. Button
When the is pressed, it will
automatically tune to the next lower
station.
When the is pressed, it will
automatically tune to the next higher
station.
4. Button
When the button is pressed, it auto- matically scans the radio stations
upwards.
The SCAN feature steps through each station, starting from the initial station,
for 5 seconds.
Press the button again to stop the scan feature and to listen to the
currently selected channel.
5. Button
When the button is pressed, stops sound
and “Audio Mute” is displayed on LCD.
6. PRESET Buttons
Press ~ buttons lessthan 0.8 seconds to play the station
saved in each button. Press ~ button more
than 0.8 seconds or longer to save the
current station to the respective button
with a beep.
7. Button
Press this button to enter SETUP mode,
If no action is taken for 8 seconds, it will
return to previous mode.
In “SETUP” mode, rotate the TUNE knob
to move the cursor between items, and
push the TUNE knob to select.
SETUP
61
61
MUTE
SCAN
SCAN
SEEK
SEEK
SEEK
VOLPOWER
FM/AM
TF_USA_RADIOTF_USA_RADIO
TF_USA_RADIO
Page 205 of 394

Features of your vehicle
134
4
✽
✽
NOTICE FOR USING THE
iPod®DEVICE
• Some iPod models might not sup-
port the communication protocol
and the files will not be played.
Supported iPod models:
- iPod Mini
- iPod 4th(Photo)~ 6th(Classic)generation
- iPod Nano 1st~4th generation
- iPod Touch 1st~2nd generation
• The order of search or playback of songs in the iPod can be different
from the order searched in the
audio system.
• If the iPod disabled due to its own malfunction, reset the iPod. (Reset:
Refer to iPod manual)
• An iPod may not operate normally on low battery.
• Some iPod devices, such as the iPone
®, can be connected through the
Bluetooth®wireless technology inter-
face. The device must have audio
Bluetooth
®wireless technology capa-
bility (such as for stereo headphone
Bluetooth
®wireless technology). The
device can play, but it will not be con-
trolled by the audio system.
CAUTION IN USING THE
iPod®DEVICE
The Kia iPod Power Cable is
needed in order to operate iPodwith the audio buttons on theaudio system. The USB cable pro-vided by Apple may cause mal-function and should not be usedfor Kia vehicles.
❋ The Kia iPod Power Cable maybe purchased through your KiaDealership.
When connecting iPod with the iPod Power Cable, insert the con-nector to the multimedia socket completely. If not inserted com-pletely, communications betweeniPod and audio may be interrupted.
When adjusting the sound effects of the iPod and the audio system, thesound effects of both devices willoverlap and might reduce or distort the quality of the sound.
Deactivate (turn off) the equalizer function of an iPod when adjust-ing the audio system’s volume,and turn off the equalizer of theaudio system when using theequalizer of an iPod.
(Continued)
(Continued) When the iPod cable is connected, the system can be switched to AUXmode even without iPod deviceand may cause noise. Disconnect
the iPod cable when you are not using the iPod device.
When not using iPod with car audio, detach the iPod cable fromiPod. Otherwise, iPod may remainin accessory mode, and may notwork properly.