Page 54 of 394

Safety features of your vehicle
40
3
✽
✽
NOTICE
Before you replace a fuse or disconnect
a battery terminal, turn the ignition
switch to the LOCK position and
remove the ignition key. Never remove
or replace the air bag related fuse(s)
when the ignition switch is in the ON
position. Failure to heed this warning
will cause the SRS air bag warning light
to illuminate.
Occupant detection system
Your vehicle is equipped with an occu-
pant detection system in the front pas-
senger's seat.
The occupant detection system is
designed to detect the presence of a
properly-seated front passenger and
determine if the passenger's front air bag
should be enabled (may inflate) or not.
The driver's front air bag is not affected
or controlled by the occupant detection
system.
B240B05L
Passenger’s front air bag
WARNING - Air bag
obstructions
Do not install or place any acces-
sories on the steering wheel,
instrument panel, or on the front
passenger's panel above the glove
box in a vehicle Such objects may
become dangerous projectiles if
the air bag deploys.
OTF030047N
Page 55 of 394

341
Safety features of your vehicle
Main components of occupant detec-tion system
A detection device located within the front passenger seat track.
Electronic system to determine whether passenger air bag systems
should be activated or deactivated.
An indicator light located on the instru- ment panel which illuminates the
words PASSENGER AIR BAG “OFF”
indicating the front passenger air bag
system is deactivated.
The instrument panel air bag warning light is interconnected with the occu-
pant detection system. If the front passenger seat is occupied by
a person that the system determines to
be of adult size, and he/she sits properly
(sitting upright with the seatback in an
upright position, centered on the seat
cushion with their seat belt on, legs com-
fortably extended and their feet on the
floor), the PASSENGER AIR BAG “OFF”
indicator will turn off and the front pas-
senger's air bag will be able to inflate, if
necessary, in frontal crashes.
You will find the PASSENGER AIR BAG
“OFF” indicator on the center facia panel.
This system detects the conditions 1~4
in the following table and activates or
deactivates the front passenger air bag
based on these conditions.
Always be sure that you and all vehicle
occupants are seated and restrained
properly (sitting upright with the seat in
an upright position, centered on the seat
cushion, with the person’s legs comfort-
ably extended, feet on the floor, and
wearing the safety belt properly) for the
most effective protection by the air bag
and the safety belt. The ODS (Occupant Detection System)
may not function properly if the passen-
ger takes actions which can defeat the
detection system. These include:
(1) Failing to sit in an upright position.
(2) Leaning against the door or center console.
(3) Sitting towards the sides or the front of the seat.
(4) Putting legs on the dashboard or rest- ing them on other locations which
reduce the passenger weight on the
front seat.
(5) Improperly wearing the safety belt.
(6) Reclining the seat back.
Page 59 of 394

345
Safety features of your vehicle
Any child age 12 and under should ride
in the rear seat. Children too large for
child restraints should use the available
lap/shoulder belts. No matter what type
of crash, children of all ages are safer
when restrained in the rear seat.
✽ ✽NOTICE
Do not modify or replace the front pas-
senger seat. Don't place anything on or
attach anything such as a blanket, front
seat covers or after market seat heater
to the front passenger seat. This can
adversely affect the occupant detection
system.
If the occupant detection system is not
working properly, the SRS air bag warn-
ing light on the instrument panel will
illuminate because the passenger's front
air bag is connected with the occupant
detection system. If there is a malfunc-
tion of the occupant detection system,
the PASSENGER AIR BAG “OFF” indica-
tor will not illuminate and the passenger's
front air bag will inflate in frontal impact
crashes even if there is no occupant in
the front passenger's seat.
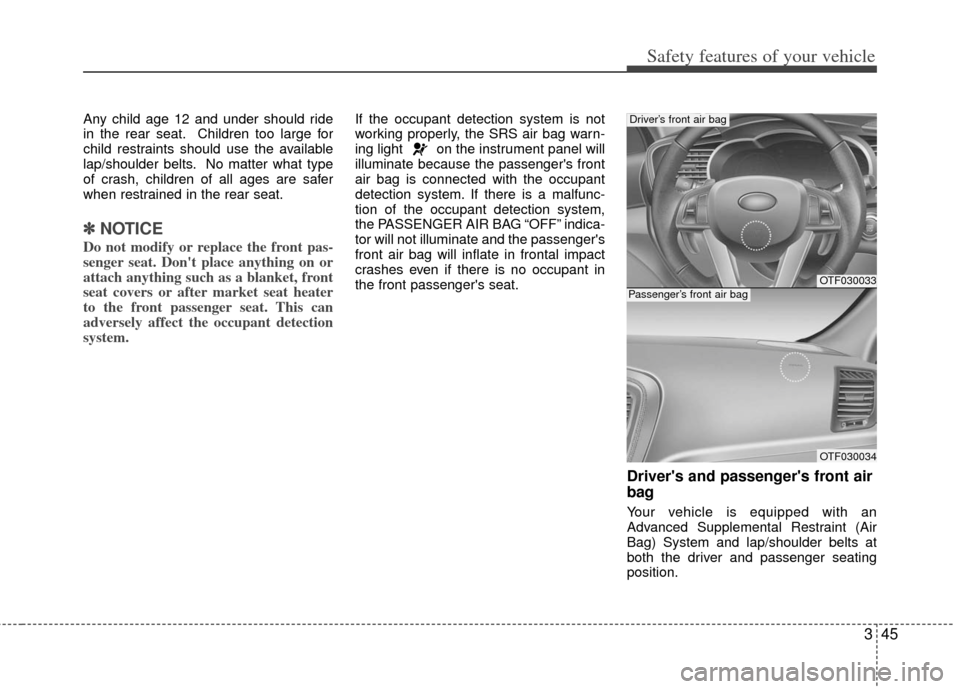
Driver's and passenger's front air
bag
Your vehicle is equipped with an
Advanced Supplemental Restraint (Air
Bag) System and lap/shoulder belts at
both the driver and passenger seating
position.
OTF030033
OTF030034
Driver’s front air bag
Passenger’s front air bag
Page 60 of 394

Safety features of your vehicle
46
3
The indications of the system's presence
are the letters "AIR BAG" embossed on
the air bag pad cover in the steering
wheel and the passenger's side front
panel pad above the glove box.
The SRS consists of air bags installed
under the pad covers in the center of the
steering wheel and the passenger's side
front panel above the glove box.
The purpose of the SRS is to provide the
vehicle's driver and/or the front passen-
ger with additional protection than that
offered by the seat belt system alone in
case of a frontal impact of sufficient
severity. The SRS uses sensors to gath-
er information about the driver's seat
position, the driver's and front passen-
ger's seat belt usage and impact severi-
ty. The advanced SRS offers the ability to
control the air bag inflation with two lev-
els. A first stage level is provided for mod-
erate-severity impacts. A second stage
level is provided for more severe impacts.
The passenger’s front air bag is designed
to help reduce the injury of children sit-
ting close to the instrument panel in low
speed collisions. However, children are
safer if they are restraint in the rear seat.
According to the impact severity, seating
position and seat belt usage, the SRSCM
(SRS Control Module) controls the air
bag inflation. Failure to properly wear
seat belts can increase the risk or sever-
ity of injury in an accident.
Additionally, your vehicle is equipped
with an occupant detection system in the
front passenger's seat. The occupant
detection system detects the presence of
a passenger in the front passenger's seat
and will turn off the front passenger's air
bag under certain conditions. For more
detail, see "Occupant detection system"
in this section.
Do not place any objects that may cause
magnetic fields near the front seat. These
may cause a malfunction of the seat
track position sensor.
Page 119 of 394
Features of your vehicle
48
4
Instrument panel illumination
The instrument panel illumination intensi-
ty can be adjusted by pressing the con-
trol switch with the headlight switch in
any position when the engine start/stop
button is in the ON position.
The illumination intensity is shown on the
instrument cluster LCD display.
Gauges
Odometer (km or mi.)
The odometer indicates the total dis-
tance the vehicle has been driven.
You will also find the odometer useful to
determine when periodic maintenance
should be performed.
The odometer is always displayed until
the display is turned off.
Speedometer
The speedometer indicates the forward
speed of the vehicle.
The speedometer is calibrated in kilome-
ters per hour and/or kilometers per hour.
OTF040052
OTFH040098N
OTFH042054COTFH042060
Page 158 of 394
487
Features of your vehicle
Lighting control
The light switch has a Headlight and a
Parking light position.
To operate the lights, turn the knob at the
end of the control lever to one of the fol-
lowing positions:
(1) OFF position
(2) Parking light position
(3) Headlight position
(4) Auto light position (if equipped)
Parking light position ( )
When the light switch is in the parking
light position (1st position), the tail, posi-
tion, license and instrument panel lights
will turn ON.
Headlight position ( )
When the light switch is in the headlight
position (2nd position) the head, tail,
position, license and instrument panel
lights will turn ON.
The ignition switch must be in the ON
position to turn on the headlights.
OAM049041OAM049042OXM049110
Page 159 of 394

Features of your vehicle
88
4
Auto light position (if equipped)
When the light switch is in the AUTO light
position, the taillights and headlights will
turn ON or OFF automatically depending
on the amount of light outside the vehi-
cle.
Never place anything over sensor (1)
located on the instrument panel. This will
ensure better auto-light system control.
Don’t clean the sensor using a window
cleaner. The cleaner may leave a light
film which could interfere with sensor
operation.
If your vehicle has window tint or other
types of metallic coating on the front
windshield, the Auto light system may not
work properly.
High beam operation
To turn on the high beam headlights, push
the lever away from you. Pull it back for
low beams.
The high-beam indicator will light when
the headlight high beams are switched on.
To prevent the battery from being dis-
charged, do not leave the lights on for a
prolonged time while the engine is not
running. To flash the headlights, pull the lever
towards you. It will return to the normal
(low-beam) position when released. The
headlight switch does not need to be on
to use this flashing feature.
OAM049044
WARNING- High beams
Do not use high beam when there
are other vehicles. Using high
beam could obstruct the other dri-
ver's vision.
OAM049043OVG049181
Page 160 of 394

489
Features of your vehicle
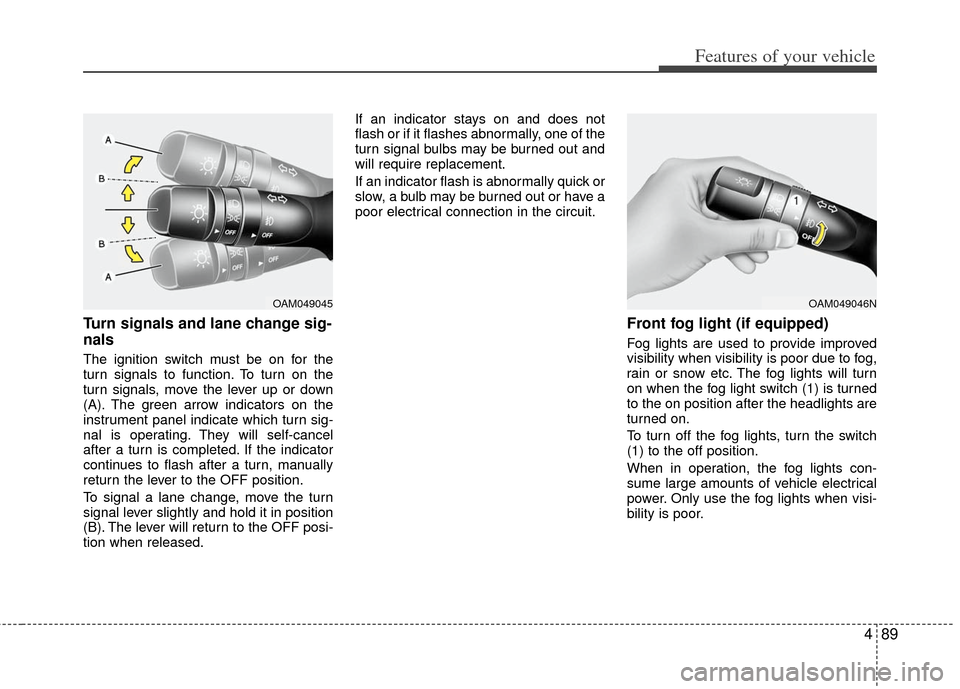
Turn signals and lane change sig-
nals
The ignition switch must be on for the
turn signals to function. To turn on the
turn signals, move the lever up or down
(A). The green arrow indicators on the
instrument panel indicate which turn sig-
nal is operating. They will self-cancel
after a turn is completed. If the indicator
continues to flash after a turn, manually
return the lever to the OFF position.
To signal a lane change, move the turn
signal lever slightly and hold it in position
(B). The lever will return to the OFF posi-
tion when released.If an indicator stays on and does not
flash or if it flashes abnormally, one of the
turn signal bulbs may be burned out and
will require replacement.
If an indicator flash is abnormally quick or
slow, a bulb may be burned out or have a
poor electrical connection in the circuit.
Front fog light (if equipped)
Fog lights are used to provide improved
visibility when visibility is poor due to fog,
rain or snow etc. The fog lights will turn
on when the fog light switch (1) is turned
to the on position after the headlights are
turned on.
To turn off the fog lights, turn the switch
(1) to the off position.
When in operation, the fog lights con-
sume large amounts of vehicle electrical
power. Only use the fog lights when visi-
bility is poor.
OAM049046NOAM049045