Page 207 of 394
Features of your vehicle
136
4
7. Button
Displays the information of the file cur-
rently played in the order of
TITLE ➟ARTIST ➟ALBUM ➟NORMAL
DISPLAY ➟TITLE... (Displays no informa-
tion if the file has no song information.)
8.Knob & Button
When you rotate the knob clockwise, it
will display the songs (category) ahead
of the song currently played (category in
the same level).
Also, when you rotate the knob counter-
clockwise, it will display the songs (cate-
gory) before the song currently played
(category in the same level). To listen to the song displayed in the
song category, press the button to skip to
and play the selected song.
Pressing the button changes the BASS,
MIDDLE, TREBLE, FADER and BAL-
ANCE TUNE mode. The mode selected
is shown on the display. After selecting
each mode, rotate the Audio control knob
clockwise or counterclockwise.
ENTERTUNE
INFO
TF_USA_iPod
Page 210 of 394

4139
Features of your vehicle
5. Button
Displays the information of the current
channel as below when the button is
pressed each time.
When default display is
CAT(Category)/CH(Channel) ➟ Artist/Title
➟Composer (if available) ➟ Category/Channel...
When default display is ART(Artist)/TITLE(Title)
➟ Category/Channel
➟ Composer(if available) ➟ Artist/Title...
✽ ✽ Troubleshooting
1. Antenna Error
If this message is displayed, the anten-
na or antenna cable is broken or
unplugged. Please consult with your
Kia dealership. 2. Acquiring Signal
If this message is displayed, it means
that the antenna is covered and that
the SIRIUS Satellite Radio signal is
not available. Ensure the antenna is
uncovered and has a clear view of the
sky.
6. Knob & Button Rotate clockwise to increase the chan-
nel number or to scroll down the cate-
gory list.
Rotate counterclockwise to decrease the channel number or to scroll up the
category list.
Press this to make selection of chan- nels or items.
7. PRESET Buttons
Press ~ buttons lessthan 0.8 seconds to play the channel
saved in each button.
Press ~ buttons for 0.8 seconds or longer to save current
channel to the respective button with a
beep.
61
61
ENTERTUNE
INFO
TF_USA_SIRIUS
TF_USA_RADIO
Page 280 of 394
What to do in an emergency
14
6
Do not allow anyone to remain in the
vehicle while it is on the jack.
Make sure any children present are
in a secure place away from the road
and from the vehicle to be raised with
the jack.
Removing and storing the spare
tire
Turn the tire hold-down wing bolt
counterclockwise.
Store the tire in the reverse order of
removal.
To prevent the spare tire and tools
from “rattling” while the vehicle is in
motion, store them properly.
Changing tires
1. Park on a level surface and apply the parking brake firmly.
2. Shift the shift lever into R (Reverse) for manual transaxle or
P (Park) for automatic transaxle.
3. Activate the hazard warning flash- er.
OED066033
WARNING- Runningvehicle on
jack
Do not start or run the engine of
the vehicle while the vehicle is
on the jack as this may cause
the vehicle to fall off the jack.ONF068004
Page 281 of 394
615
What to do in an emergency
4. Remove the wheel lug nut wrench,jack, jack handle, and spare tire
from the vehicle.
5. Block both the front and rear of the wheel that is diagonally opposite
the jack position. To prevent vehicle movement while
changing a tire, always set the park-
ing brake fully, and always block the
wheel diagonally opposite the wheel
being changed.
We recommend that the wheels of
the vehicle be chocked, and that no
person remain in a vehicle that is
being jacked.
6. Loosen the wheel lug nuts coun-terclockwise one turn each, but do
not remove any nut until the tire
has been raised off the ground.
1JBA6504OTFH062004
Page 282 of 394

What to do in an emergency
16
6
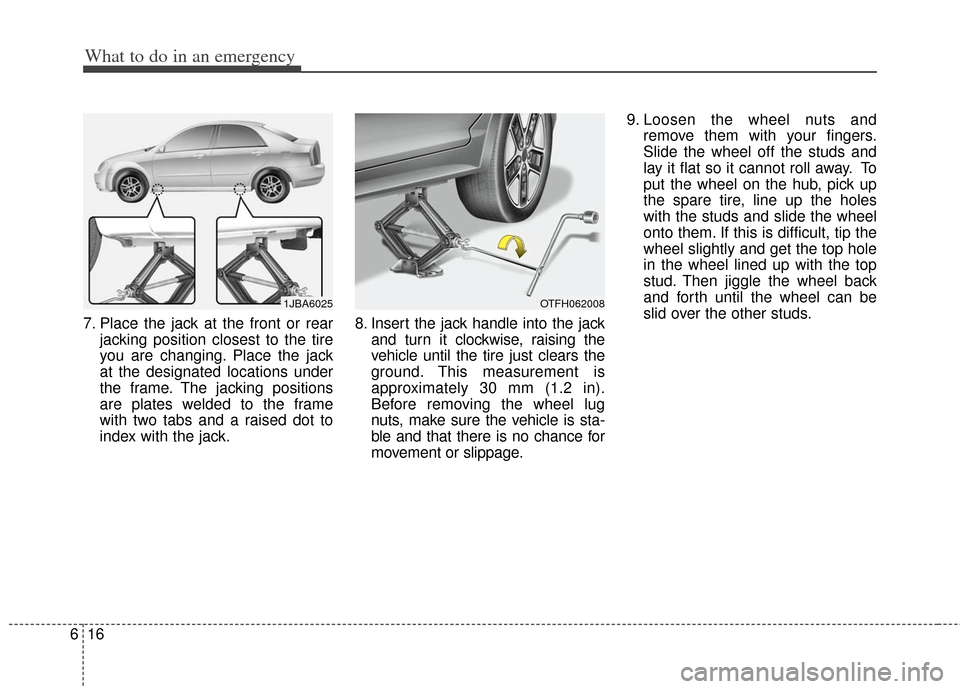
7. Place the jack at the front or rear
jacking position closest to the tire
you are changing. Place the jack
at the designated locations under
the frame. The jacking positions
are plates welded to the frame
with two tabs and a raised dot to
index with the jack. 8. Insert the jack handle into the jack
and turn it clockwise, raising the
vehicle until the tire just clears the
ground. This measurement is
approximately 30 mm (1.2 in).
Before removing the wheel lug
nuts, make sure the vehicle is sta-
ble and that there is no chance for
movement or slippage. 9. Loosen the wheel nuts and
remove them with your fingers.
Slide the wheel off the studs and
lay it flat so it cannot roll away. To
put the wheel on the hub, pick up
the spare tire, line up the holes
with the studs and slide the wheel
onto them. If this is difficult, tip the
wheel slightly and get the top hole
in the wheel lined up with the top
stud. Then jiggle the wheel back
and forth until the wheel can be
slid over the other studs.
1JBA6025OTFH062008
Page 283 of 394

617
What to do in an emergency
Wheels and wheel covers may have
sharp edges. Handle them carefully
to avoid possible injury. Before put-
ting the wheel into place, be sure
that there is nothing on the hub or
wheel (such as mud, tar, gravel, etc.)
that prevents with the wheel from fit-
ting solidly against the hub.10. To install the wheel, hold it on the
studs, put the wheel nuts on the
studs and tighten them finger
tight. Jiggle the tire to be sure it is
completely seated, then tighten
the nuts as much as possible
with your fingers again.
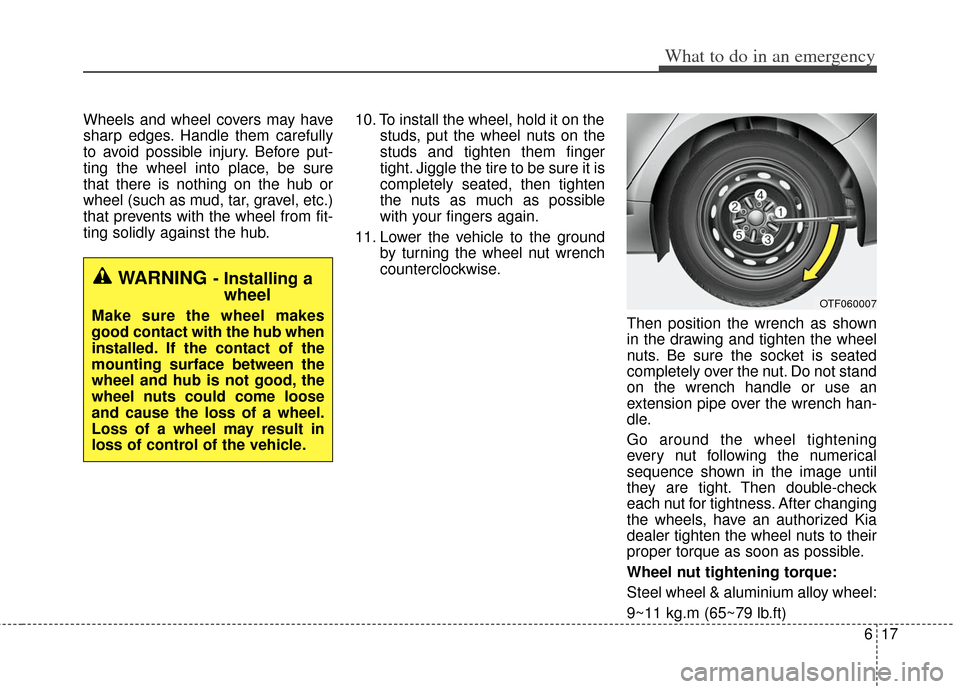
11. Lower the vehicle to the ground by turning the wheel nut wrench
counterclockwise.
Then position the wrench as shown
in the drawing and tighten the wheel
nuts. Be sure the socket is seated
completely over the nut. Do not stand
on the wrench handle or use an
extension pipe over the wrench han-
dle.
Go around the wheel tightening
every nut following the numerical
sequence shown in the image until
they are tight. Then double-check
each nut for tightness. After changing
the wheels, have an authorized Kia
dealer tighten the wheel nuts to their
proper torque as soon as possible.
Wheel nut tightening torque:
Steel wheel & aluminium alloy wheel:
9~11 kg.m (65~79 lb.ft)
WARNING- Installing awheel
Make sure the wheel makes
good contact with the hub when
installed. If the contact of the
mounting surface between the
wheel and hub is not good, the
wheel nuts could come loose
and cause the loss of a wheel.
Loss of a wheel may result in
loss of control of the vehicle.OTF060007
Page 318 of 394

725
Maintenance
Check the condition and connections of
all cooling system hoses and heater
hoses. Replace any swollen or deterio-
rated hoses.
The coolant level should be filled
between F and L marks on the side of the
coolant reservoir when the engine is
cool.
If the coolant level is low, add enough
distilled (deionized) water to provide pro-
tection against freezing and corrosion.
Bring the level to F, but do not overfill. If
frequent additions are required, see an
authorized Kia dealer for a cooling sys-
tem inspection.
(Continued)
The engine coolant level is influ-enced by hybrid system tempera-
ture. Before filling the engine
coolant and/or inverter coolant,
turn the hybrid vehicle off, fill the
engine coolant and/or inverter
coolant carefully.
Turn the engine off and wait until it cools down. Use extreme care
when removing the radiator cap.
Wrap a thick towel around it, and
turn it counterclockwise slowly to
the first stop. Step back while the
pressure is released from the
cooling system. When you are
sure all the pressure has been
released, press down on the cap,
using a thick towel, and continue
turning counterclockwise to
remove it.
Even if the engine is not operat- ing, do not remove the radiator
cap and/or inverter or the drain
plug while the engine and radia-
tor are hot. Hot coolant and
steam may still blow out under
pressure, causing serious injury.
OYFH071005N
WARNING
The electronic motor
(cooling fan) is con-
trolled by engine
coolant temperature,
refrigerant pressure and
vehicle speed. It may sometimes
operate even when the engine is
not running. Use extreme caution
when working near the blades of
the cooling fan so that you are not
injured by the rotating fan blades.
As the engine coolant temperature
decreases, the electric motor will
automatically shut off. This is a nor-
mal condition.
Page 330 of 394

737
Maintenance
Battery recharging
Your vehicle has a maintenance-free,
calcium-based battery.
If the battery becomes discharged in ashort time (because, for example, the
headlights or interior lights were left on
while the vehicle was not in use),
recharge it by slow charging (trickle)
for 10 hours.
If the battery gradually discharges because of high electric load while the
vehicle is being used, recharge it at 20-
30A for two hours. When recharging the battery, observe
the following precautions:
The battery must be removed from the
vehicle and placed in an area with
good ventilation.
Watch the battery during charging, and stop or reduce the charging rate if the
battery cells begin gassing (boiling)
violently or if the temperature of the
electrolyte of any cell exceeds 49°C
(120°F).
Wear eye protection when checking the battery during charging.
Disconnect the battery charger in the following order.
1. Turn off the battery charger main switch.
2. Unhook the negative clamp from the negative battery terminal.
3. Unhook the positive clamp from the positive battery terminal.
Before performing maintenance or recharging the battery, turn off all
accessories and stop the engine.
The negative battery cable must be removed first and installed last when
the battery is disconnected.
Reset items
Items should be reset after the battery
has been discharged or the battery has
been disconnected.
Auto down window (See section 4)
Sunroof (See section 4)
Trip computer (See section 4)
Climate control system (See section 4)
Clock (See section 4)
Audio (See section 4)