Page 96 of 342

Features of your vehicle
22
4
D080200AFD
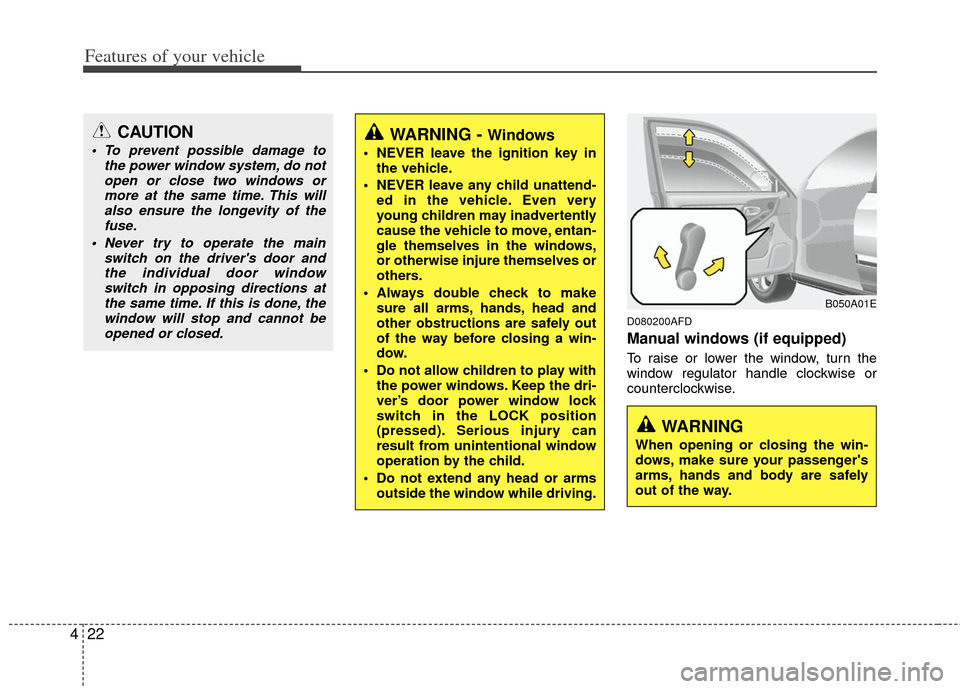
Manual windows (if equipped)
To raise or lower the window, turn the
window regulator handle clockwise or
counterclockwise.
CAUTION
To prevent possible damage to
the power window system, do notopen or close two windows ormore at the same time. This willalso ensure the longevity of the fuse.
Never try to operate the main switch on the driver's door andthe individual door windowswitch in opposing directions atthe same time. If this is done, thewindow will stop and cannot beopened or closed.WARNING - Windows
NEVER leave the ignition key in the vehicle.
NEVER leave any child unattend- ed in the vehicle. Even very
young children may inadvertently
cause the vehicle to move, entan-
gle themselves in the windows,
or otherwise injure themselves or
others.
Always double check to make sure all arms, hands, head and
other obstructions are safely out
of the way before closing a win-
dow.
Do not allow children to play with the power windows. Keep the dri-
ver’s door power window lock
switch in the LOCK position
(pressed). Serious injury can
result from unintentional window
operation by the child.
Do not extend any head or arms outside the window while driving.
WARNING
When opening or closing the win-
dows, make sure your passenger's
arms, hands and body are safely
out of the way.
B050A01E
Page 98 of 342

Features of your vehicle
24
4
D090200AAM
Closing the hood
1. Before closing the hood, check the fol-
lowing:
ment must be correctly installed.
bustible material must be removed
from the engine compartment.
2. Return the support rod to its clip to prevent it from rattling.
3. Lower the hood until it is about 30 cm (1 ft.) above the closed position and let
it drop. Make sure that it locks into
place.
WARNING - Hood
Before closing the hood, ensurethat all obstructions are removed
from the hood opening. Closing
the hood with an obstruction
present in the hood opening may
result in property damage or
severe personal injury.
Do not leave gloves, rags or any other combustible material in the
engine compartment. Doing so
may cause a heat-induced fire.
WARNING
Always double check to be surethat the hood is firmly latched
before driving away. If it is not
latched, the hood could open
while the vehicle is being driven,
causing a total loss of visibility,
which might result in an accident.
The support rod must be inserted completely into the hole whenev-
er you inspect the engine com-
partment. This will prevent the
hood from falling and possibly
injuring you.
Do not move the vehicle with the hood raised. The view will be
blocked and the hood could fall
or be damaged.
Page 102 of 342

Features of your vehicle
28
4
D110000AHM-EE
If your vehicle is equipped with a sunroof,
you can slide or tilt your sunroof with the
sunroof control lever located on the over-
head console.
The sunroof can only be opened, closed,
or tilted when the ignition switch is in the
ON position.
✽ ✽
NOTICE
• In cold and wet climates, the sunroof
may not work properly due to freez-
ing conditions.
• After the vehicle is washed or in a rainstorm, be sure to wipe off any
water that is on the sunroof before
operating it.
✽ ✽ NOTICE
The sunroof cannot slide when it is in
the tilt position nor can it be tilted while
in an open or slide position.
SUNROOF (IF EQUIPPED)
OTD049015
CAUTION
Do not continue to press the sun-
roof control lever after the sunroofis fully opened, closed, or tilted.Damage to the motor or systemcomponents could occur.
WARNING
Never adjust the sunshade or sun-
roof while driving. This could result
in loss of control and an accident
that may cause death, serious
injury, or property damage.
Page 104 of 342

Features of your vehicle
30
4
D110200ATD
Tilting the sunroof
To open the sunroof, push the control
lever (3) on the overhead console.
The sunroof will tilt only while the control
lever is pushed.
To close the sunroof, push the sunroof
control lever forward (2).
D110300ATD
Sunshade
The sunshade will automatically open
when the glass panel is moved. Close it
manually if you want it closed.
OBK049019
WARNING - Sunroof
Be careful that no heads, hands
and body parts are not obstruct-
ed by a closing sunroof.
Do not extend the face, neck, arms or body outside the sunroof
while driving.
Make sure your hand and face are safely out of the way before clos-
ing a sunroof.
OTD049017
CAUTION
Periodically remove any dirt that may accumulate on the guide rail.
If you try to open the sunroof when the temperature is belowfreezing or when the sunroof iscovered with snow or ice, the glass or the motor could be dam-aged.
While using sunroof for a long time, a dust between sunroof androof panel can make a noise.
Open the sunroof and removeregularly the dust using cleancloth.
Page 107 of 342

433
Features of your vehicle
✽
✽NOTICE
The following symptoms may occur dur-
ing normal vehicle operation:
• The EPS warning light does not illu-
minate.
• The steering wheel becomes heavier after turning the ignition switch on.
This happens as the system performs
the EPS system diagnostics. When the
diagnostics is completed, the steering
wheel will return to its normal condi-
tion.
• Click noise may be heard from the EPS relay after the ignition switch is
turned to the ON or LOCK position.
• Motor noise may be heard when the vehicle is at a stop or at a low driving
speed.
• If the Electric Power Steering System does not operate normally, the warn-
ing light will illuminate on the instru-
ment cluster. The steering wheel may
become difficult to control or operate
abnormally. Take your vehicle to an
authorized KIA dealer and have the
vehicle checked as soon as possible.
• When you operate the steering wheel in low temperature, abnormal noise
could occur. If temperature rises, the
noise will disappear. This is a normal
condition.
D130300AFD
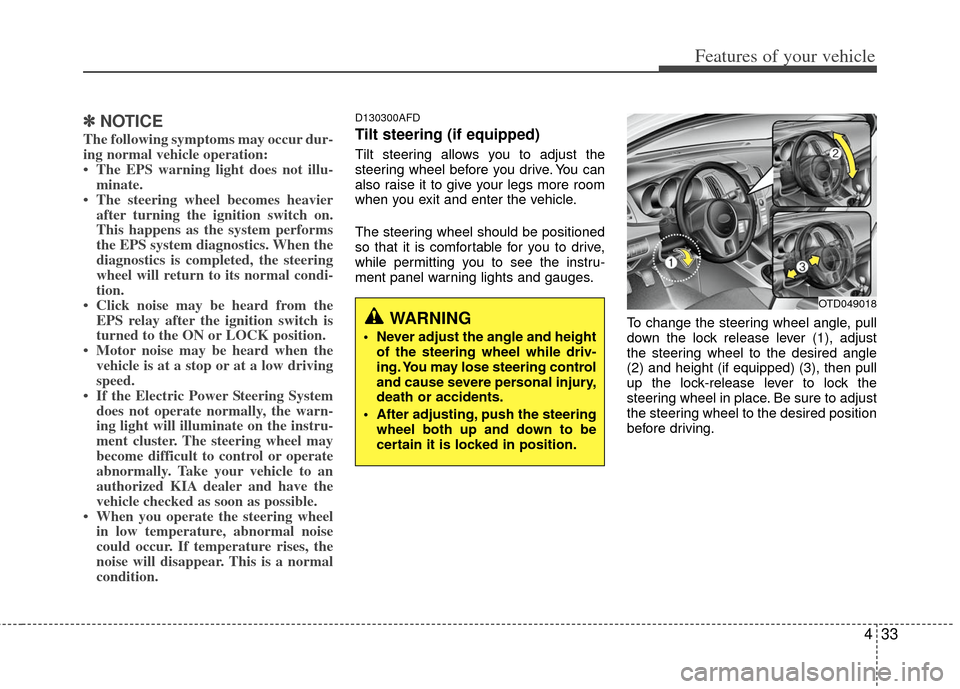
Tilt steering (if equipped)
Tilt steering allows you to adjust the
steering wheel before you drive. You can
also raise it to give your legs more room
when you exit and enter the vehicle.
The steering wheel should be positioned
so that it is comfortable for you to drive,
while permitting you to see the instru-
ment panel warning lights and gauges.
To change the steering wheel angle, pull
down the lock release lever (1), adjust
the steering wheel to the desired angle
(2) and height (if equipped) (3), then pull
up the lock-release lever to lock the
steering wheel in place. Be sure to adjust
the steering wheel to the desired position
before driving.
WARNING
Never adjust the angle and heightof the steering wheel while driv-
ing. You may lose steering control
and cause severe personal injury,
death or accidents.
After adjusting, push the steering wheel both up and down to be
certain it is locked in position.
OTD049018
Page 109 of 342

435
Features of your vehicle
D140100ATD
Inside rearview mirror
Adjust the rearview mirror so that the
center view through the rear window is
seen. Make this adjustment before you
start driving.
D140101AHM
Day/night rearview mirror (if equipped)
Make this adjustment before you start
driving and while the day/night lever is in
the day position.
Pull the day/night lever toward you to
reduce the glare from the headlights of
the vehicles behind you during night driv-
ing.
Remember that you lose some rearviewclarity in the night position.
D140102ATD
Electric chromic mirror (ECM)(if equipped)
The electric rearview mirror automatical-
ly controls the glare from the headlights
of the vehicle behind you in nighttime or
low light driving conditions. The sensor
mounted in the mirror senses the light
level around the vehicle, and automati-
cally controls the headlight glare from
vehicles behind you.
When the engine is running, the glare is
automatically controlled by the sensor
mounted in the rearview mirror.
Whenever the shift lever is shifted into
reverse (R), the mirror will automatically
go to the brightest setting in order to
improve the drivers view behind the vehi-
cle.
MIRRORS
WARNING - Rear visibility
Do not place objects in the rear
seat which would interfere with
your vision through the rear win-
dow.
OMG035072
CAUTION
When cleaning the mirror, use a paper towel or similar materialdampened with glass cleaner. Do not spray glass cleaner directly onthe mirror. It may cause the liquid cleaner to enter the mirror housing.
WARNING
Do not adjust the rearview mirror
while the vehicle is moving. This
could result in loss of control, and
an accident which could cause
death, serious injury or property
damage.
Night
Day
Page 110 of 342

Features of your vehicle
36
4
To operate the electric rearview mirror
Press the ON/OFF button (1) to turn
the automatic dimming function on.
The mirror indicator light will illuminate.
Press the ON/OFF button to turn the
automatic dimming function off. The
mirror indicator light will turn off.
The mirror defaults to the ON position whenever the ignition switch is turned
on.
D140200ATD-EU
Outside rearview mirror
Be sure to adjust the mirror angles
before driving.
Your vehicle is equipped with both left-
hand and right-hand outside rearview
mirrors. The mirrors can be adjusted
remotely with the remote switch (if
equipped). The mirror heads can be fold-
ed to prevent damage during an auto-
matic car wash or when passing through
a narrow street.
WARNING - Rearview mir-
rors
The right outside rearview mirroris convex. Objects seen in the
mirror are closer than they
appear.
Use your interior rearview mirror or direct observation to deter-
mine the actual distance of fol-
lowing vehicles when changing
lanes.
CAUTION
Do not scrape ice off the mirrorface; this may damage the surfaceof the glass. If ice should restrict movement of the mirror, do notforce the mirror for adjustment. To remove ice, use a deicer spray, or asponge or soft cloth with very warmwater.
OTD049020
IndicatorSensor
Page 115 of 342

441
Features of your vehicle
D150204ATD
Fuel gauge
The fuel gauge indicates the approxi-
mate amount of fuel remaining in the fuel
tank. The fuel tank capacity is given in
section 8. The fuel gauge is supplement-
ed by a low fuel warning light, which will
illuminate when the fuel tank is nearly
empty.
On inclines or curves, the fuel gauge
pointer may fluctuate or the low fuel
warning light may come on earlier than
usual due to the movement of fuel in the
tank.
D150205ATD-EU
Odometer
Odometer
The odometer indicates the total dis-
tance the vehicle has been driven.
You will also find the odometer useful to
determine when periodic maintenance
should be performed.
OTD049056
WARNING- Fuel gauge
Running out of fuel can expose
vehicle occupants to danger.
You must stop and obtain addition-
al fuel as soon as possible after the
warning light comes on or when the
gauge indicator comes close to the
E level.
CAUTION
Avoid driving with extremely lowfuel level. Running out of fuel couldcause the engine to misfire, damag-ing the catalytic converter.
OTD049058C
■Type A
OTD049200
■Type B