Page 158 of 390

487
Features of your vehicle
For maximum defrosting, set the tem-perature control to the extreme
right/hot position and the fan speedcontrol to the highest speed.
If warm air to the floor is desired while defrosting or defogging, set the modeto the floor-defrost position.
Before driving, clear all snow and ice from the windshield, rear window, out-
side rear view mirrors, and all side win-
dows.
Clear all snow and ice from the hood and air inlet in the cowl grill to improveheater and defroster efficiency and to
reduce the probability of fogging upinside of the windshield. Manual climate control system
To defog inside windshield
1. Select any fan speed except “0” posi-
tion.
2. Select desired temperature.
3. Select the or position.
4. The outside (fresh) air and air condi- tioning will be selected automatically.
If the air conditioning and outside (fresh) air position are not selected automatical-
ly, press the corresponding button manu-
ally.
WINDSHIELD DEFROSTING AND DEFOGGING
WARNING - Windshield
heating
Do not use the or position during cooling operation in
extremely humid weather. The dif-
ference between the temperature ofthe outside air and that of the wind-shield could cause the outer sur-
face of the windshield to fog up,
causing loss of visibility. In this
case, set the mode selection knob
or button to the position and
fan speed control knob or button to
the lower speed.
OED040064
ED(FL) ENG 4(~103).QXP 10/28/2010 6:59 PM Page 87
Page 161 of 390

Features of your vehicle
90
4
These compartments can be used to
store small items.
Center console storage
These compartments can be used to
store small items required by the driver
or front passenger.
To open either of the console storage
compartments, pull up on the locking tab1 or 2.Glove box
To open the glove box, pull the handle
and the glove box will automatically
open. Close the glove box after use.
STORAGE COMPARTMENT
OED040351
WARNING
To reduce the risk of injury in an
accident or sudden stop, always
keep the glove box door closedwhile driving.
OED036053
WARNING - Flammable
materials
Do not store cigarette lighters,
propane cylinders, or other flamma-
ble/explosive materials in the vehi-
cle. These items may catch fire
and/or explode if the vehicle is
exposed to hot temperatures for
extended periods.
CAUTION
To avoid possible theft, do not leave valuables in the storagecompartment.
Always keep the storage com- partment covers closed whiledriving. Do not attempt to place
so many items in the storagecompartment that the storage compartment cover cannot close
securely.
ED(FL) ENG 4(~103).QXP 10/28/2010 7:00 PM Page 90
Page 164 of 390

493
Features of your vehicle
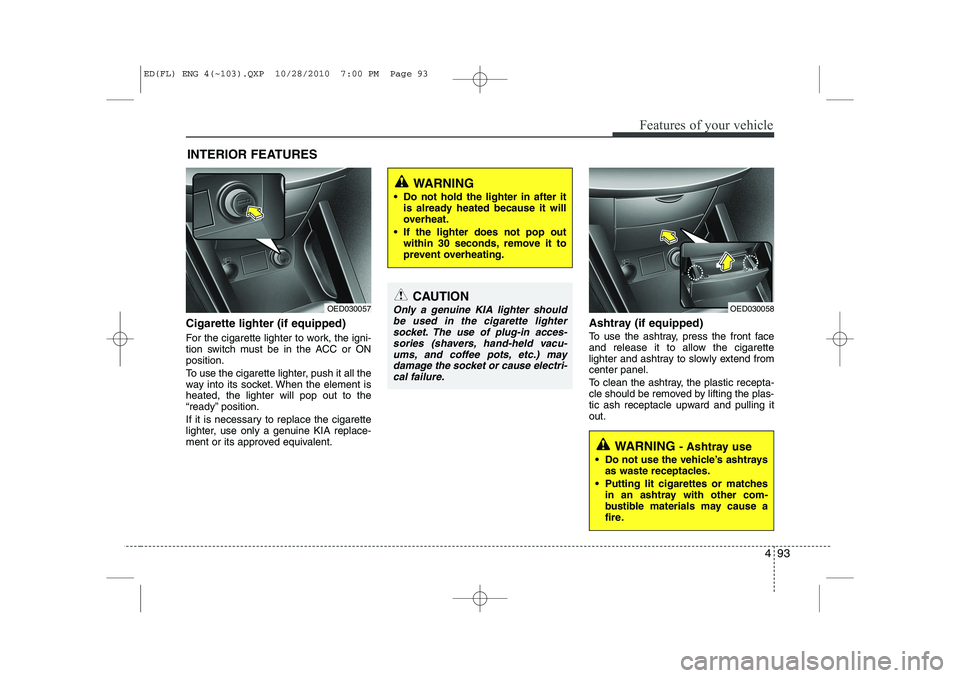
Cigarette lighter (if equipped)
For the cigarette lighter to work, the igni-
tion switch must be in the ACC or ONposition.
To use the cigarette lighter, push it all the
way into its socket. When the element isheated, the lighter will pop out to the
“ready” position.
If it is necessary to replace the cigarette
lighter, use only a genuine KIA replace-
ment or its approved equivalent.Ashtray (if equipped)
To use the ashtray, press the front face
and release it to allow the cigarette
lighter and ashtray to slowly extend fromcenter panel.
To clean the ashtray, the plastic recepta-
cle should be removed by lifting the plas-
tic ash receptacle upward and pulling itout.
INTERIOR FEATURES
CAUTION
Only a genuine KIA lighter should
be used in the cigarette lightersocket. The use of plug-in acces- sories (shavers, hand-held vacu-
ums, and coffee pots, etc.) may damage the socket or cause electri-cal failure.
WARNING
Do not hold the lighter in after it is already heated because it will
overheat.
If the lighter does not pop out within 30 seconds, remove it to
prevent overheating.
OED030057
WARNING - Ashtray use
Do not use the vehicle’s ashtrays as waste receptacles.
Putting lit cigarettes or matches in an ashtray with other com-
bustible materials may cause a
fire.
OED030058
ED(FL) ENG 4(~103).QXP 10/28/2010 7:00 PM Page 93
Page 165 of 390
Features of your vehicle
94
4
Cup holder
Front
Cups or small beverage cans may be
placed in the cup holders.
Rear (if equipped)
To use the cup holders in rear seat, push
the button. Push the cover to close after
use.
✽✽
NOTICE
Do not place heavy cups or cans in cup holders. Cup holders could be damaged.
WARNING - Hot liquids
Do not place uncovered cups with hot liquid in the cup holder
while the vehicle is in motion. If
the hot liquid spills, you burn
yourself. Such a burn to the driv-
er could lead to loss of control of
the vehicle.
To reduce the risk of personal injury in the event of sudden stop
or collision, do not place uncov-
ered or unsecured bottles, glass-
es, cans, etc., in the cup holder
while the vehicle is in motion.
OED036059OED036060
ED(FL) ENG 4(~103).QXP 10/28/2010 7:00 PM Page 94
Page 167 of 390

Features of your vehicle
96
4
Aux, USB and iPod port (if equipped)
If your vehicle has an aux and/or
USB(universal serial bus) port or iPod
port, you can use an aux port to connect
audio devices and an USB port to plug in
an USB and also an iPod port to plug in
an iPod.
✽✽
NOTICE
When using a portable audio device
connected to the power outlet, noise may
occur during playback. If this happens,
use the power source of the portableaudio device.
❈ iPod is a trademark of Apple Inc.
CAUTION
Use the power outlet only when
the engine is running and remove
the accessory plug after use.Using the accessory plug for pro-longed periods of time with the engine off could cause the bat-
tery to discharge.
Only use 12V electric accessories which are less than 10A in elec-tric capacity.
Adjust the air-conditioner or heater to the lowest operatinglevel when using the power outlet.
Close the cover when not in use. Some electronic devices can cause electronic interference
when plugged into a vehicle’spower outlet. These devices maycause excessive audio static and malfunctions in other electronic
systems or devices used in yourvehicle.
WARNING
Do not put a finger or a foreign ele-
ment (pin, etc.) into a power outlet
and do not touch with a wet hand.
You may get an electric shock.
OED030062
OED030062-1
Type B
Type A
ED(FL) ENG 4(~103).QXP 10/28/2010 7:00 PM Page 96
Page 168 of 390

497
Features of your vehicle
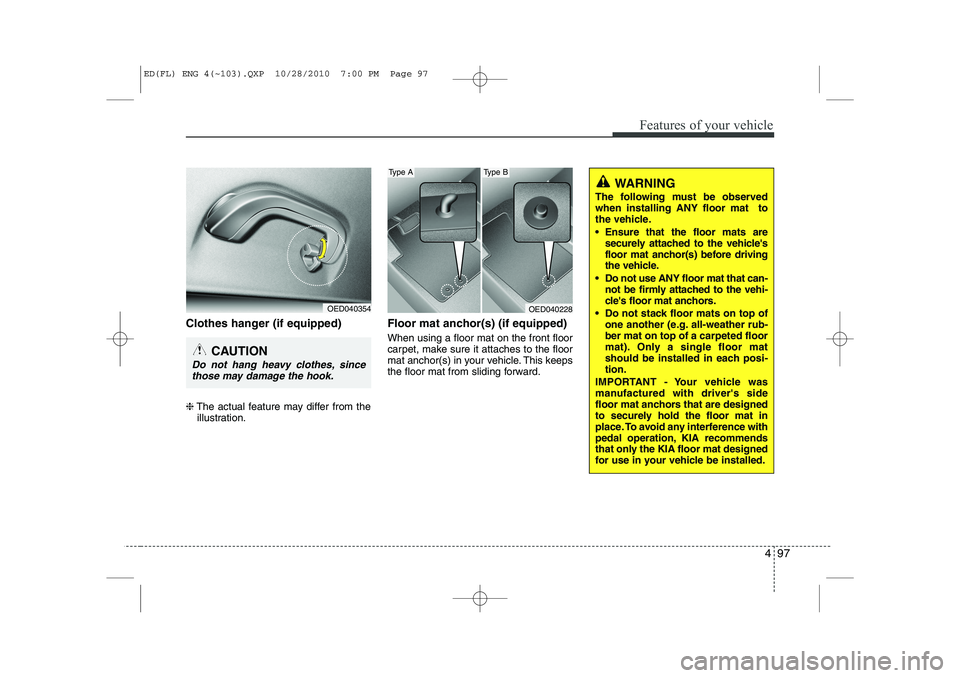
Clothes hanger (if equipped) ❈The actual feature may differ from the
illustration. Floor mat anchor(s) (if equipped) When using a floor mat on the front floor
carpet, make sure it attaches to the floor
mat anchor(s) in your vehicle. This keeps
the floor mat from sliding forward.
OED040354
CAUTION
Do not hang heavy clothes, since
those may damage the hook.
WARNING
The following must be observed when installing ANY floor mat to
the vehicle.
Ensure that the floor mats are securely attached to the vehicle's
floor mat anchor(s) before driving
the vehicle.
Do not use ANY floor mat that can- not be firmly attached to the vehi-
cle's floor mat anchors.
Do not stack floor mats on top of one another (e.g. all-weather rub-ber mat on top of a carpeted floor
mat). Only a single floor mat
should be installed in each posi-tion.
IMPORTANT - Your vehicle was
manufactured with driver's side
floor mat anchors that are designed
to securely hold the floor mat in
place. To avoid any interference with
pedal operation, KIA recommends
that only the KIA floor mat designed
for use in your vehicle be installed.
OED040228
Type AType B
ED(FL) ENG 4(~103).QXP 10/28/2010 7:00 PM Page 97
Page 169 of 390
Features of your vehicle
98
4
Luggage net holder (if equipped)
To keep items from shifting in the cargo
area, you can use the 4 holders located inthe cargo area to attach the luggage net. If necessary, contact your authorized KIAdealer to obtain a luggage net.
MMSA3066
CAUTION
To prevent damage to the goods or
the vehicle, care should be takenwhen carrying fragile or bulky
objects in the luggage compart-ment.
WARNING
Avoid eye injury. DO NOT over-
stretch the luggage net, ALWAYS
keep your face and body out of the
luggage net’s recoil path. DO NOT
use when the strap has visible
signs of wear or damage.
ED(FL) ENG 4(~103).QXP 10/28/2010 7:01 PM Page 98
Page 171 of 390

Features of your vehicle
100
4
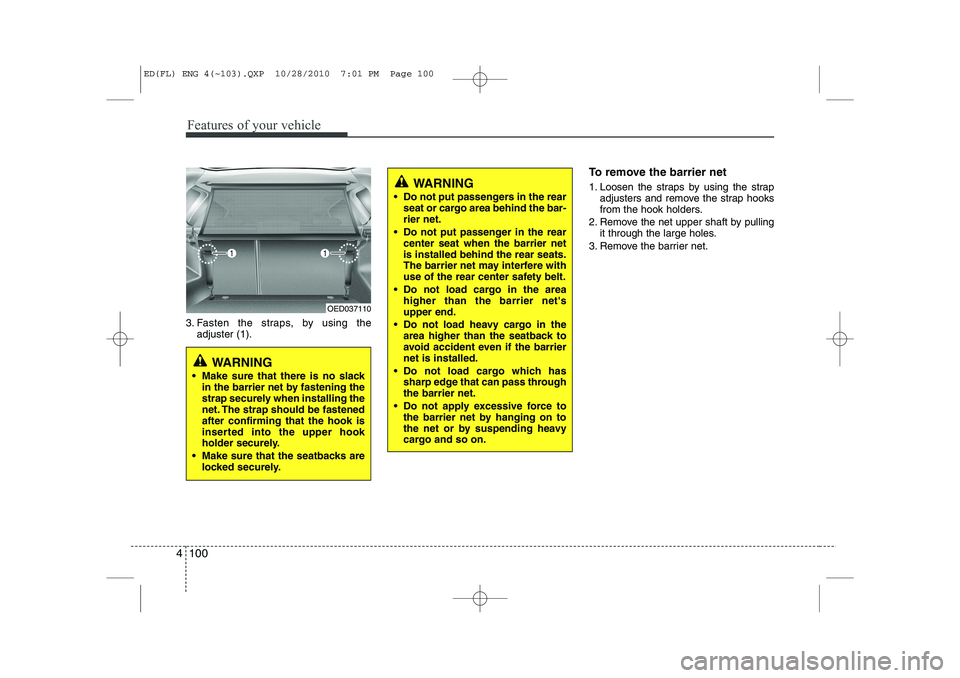
3. Fasten the straps, by using the
adjuster (1). To remove the barrier net
1. Loosen the straps by using the strap
adjusters and remove the strap hooks
from the hook holders.
2. Remove the net upper shaft by pulling it through the large holes.
3. Remove the barrier net.
OED037110
WARNING
Make sure that there is no slack in the barrier net by fastening the
strap securely when installing the
net. The strap should be fastenedafter confirming that the hook is
inserted into the upper hook
holder securely.
Make sure that the seatbacks are locked securely.
WARNING
Do not put passengers in the rear seat or cargo area behind the bar- rier net.
Do not put passenger in the rear center seat when the barrier netis installed behind the rear seats.
The barrier net may interfere with
use of the rear center safety belt.
Do not load cargo in the area higher than the barrier net'supper end.
Do not load heavy cargo in the area higher than the seatback to
avoid accident even if the barriernet is installed.
Do not load cargo which has sharp edge that can pass throughthe barrier net.
Do not apply excessive force to the barrier net by hanging on to
the net or by suspending heavy
cargo and so on.
ED(FL) ENG 4(~103).QXP 10/28/2010 7:01 PM Page 100