2011 KIA Borrego instrument panel
[x] Cancel search: instrument panelPage 154 of 464

Features of your vehicle
74
4
D190403AHM
Auto light position (if equipped)
When the light switch is in the AUTO light
position, the taillights and headlights will
turn ON or OFF automatically depending
on the amount of light outside the vehi-
cle.
D190500BUN
High beam operation
To turn on the high beam headlights,
push the lever away from you. Pull it back
for low beams.
The high beam indicator will light when
the headlight high beams are switched
on.
To prevent the battery from being dis-
charged, do not leave the lights on for a
prolonged time while the engine is not
running.
OHM049069L
CAUTION
Never place anything over sensor
(1) located on the instrumentpanel. This will ensure betterauto-light system control.
Don’t clean the sensor using a window cleaner. The cleaner mayleave a light film which could interfere with sensor operation.
If your vehicle has window tint or other types of metallic coating onthe front windshield, the Autolight system may not work prop-erly.
OHM048067L
WARNING
Do not use high beam when there
are other vehicles. Using high
beam could obstruct the other dri-
ver's vision.
Page 155 of 464

475
Features of your vehicle
To flash the headlights, pull the lever
towards you. It will return to the normal
(low beam) position when released. The
headlight switch does not need to be on
to use this flashing feature.D190600AHM
Turn signals and lane change sig-
nals
The ignition switch must be on for the
turn signals to function. To turn on the
turn signals, move the lever up or down
(A). The green arrow indicators on the
instrument panel indicate which turn sig-
nal is operating. They will self-cancel
after a turn is completed. If the indicator
continues to flash after a turn, manually
return the lever to the OFF position.To signal a lane change, move the turn
signal lever slightly and hold it in position
(B). The lever will return to the OFF posi-
tion when released.
If an indicator stays on and does not
flash or if it flashes abnormally, one of the
turn signal bulbs may be burned out and
will require replacement.
One-touch lane change function
To activate an one-touch lane change
function, move the turn signal lever
slightly for less than 0.5 second and then
release it. The lane change signals will
blink 3 times.
✽ ✽
NOTICE
If an indicator flash is abnormally quick
or slow, a bulb may be burned out or
have a poor electrical connection in the
circuit.
OHM048070LOHM048068L
Page 169 of 464

489
Features of your vehicle
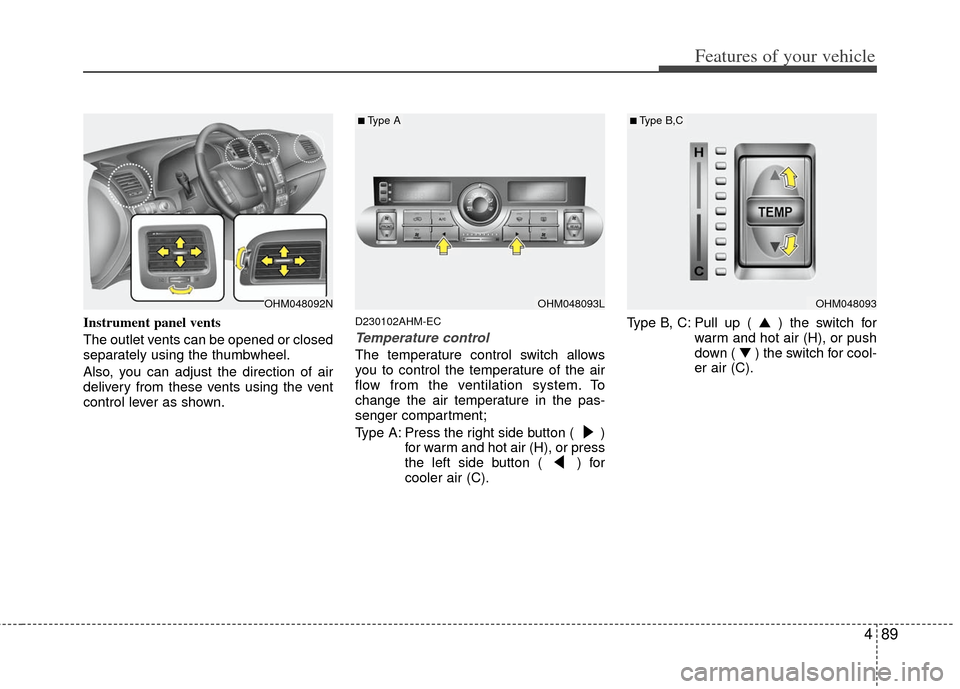
Instrument panel vents
The outlet vents can be opened or closed
separately using the thumbwheel.
Also, you can adjust the direction of air
delivery from these vents using the vent
control lever as shown.D230102AHM-EC
Temperature control
The temperature control switch allows
you to control the temperature of the air
flow from the ventilation system. To
change the air temperature in the pas-
senger compartment;
Type A: Press the right side button ( )for warm and hot air (H), or press
the left side button ( ) for
cooler air (C). Type B, C: Pull up ( ▲
) the switch for
warm and hot air (H), or push
down ( ▼ ) the switch for cool-
er air (C).
OHM048092NOHM048093L
■Type A
OHM048093
■Type B,C
Page 180 of 464

Features of your vehicle
100
4
D240100AHM-EU
Automatic heating and air condi-
tioning
The automatic climate control system is
controlled by simply setting the desired
temperature.
The Full Automatic Temperature Control
(FATC) system automatically controls the
heating and cooling system as follows;
1. Press the AUTO button. The modes,
fan speeds, air intake and air-condi-
tioning will be controlled automatically
by setting the temperature. 2. Set the temperature switch to the
desired temperature.
If the temperature is set to the lowest
setting (Lo), the air conditioning sys-
tem will operate continuously.
3. To turn the automatic operation off, select any button or switch of the fol-
lowing:
The selected function will be controlled manually while other functions operate
automatically.
For your convenience and to improve the
effectiveness of the climate control, use
the AUTO button and set the temperature
to 23°C (73°F).
✽ ✽ NOTICE
Never place anything over the sensor
located on the instrument panel to
ensure better control of the heating and
cooling system.
OHM048103OHM040102
Page 182 of 464

Features of your vehicle
102
4
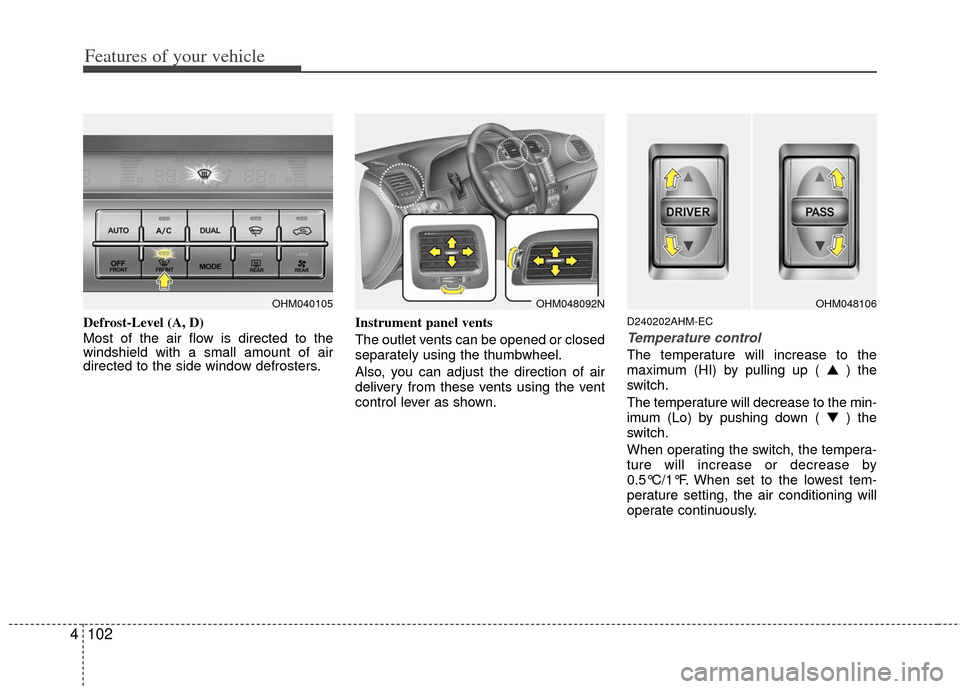
Defrost-Level (A, D)
Most of the air flow is directed to the
windshield with a small amount of air
directed to the side window defrosters. Instrument panel vents
The outlet vents can be opened or closed
separately using the thumbwheel.
Also, you can adjust the direction of air
delivery from these vents using the vent
control lever as shown.D240202AHM-EC
Temperature control
The temperature will increase to the
maximum (HI) by pulling up ( ▲
) the
switch.
The temperature will decrease to the min-
imum (Lo) by pushing down ( ▼) the
switch.
When operating the switch, the tempera-
ture will increase or decrease by
0.5°C/1°F. When set to the lowest tem-
perature setting, the air conditioning will
operate continuously.
OHM040105OHM048092NOHM048106
Page 358 of 464

557
Driving your vehicle
E140405AHM-EU
Turn signals when towing a trailer
When you tow a trailer, your vehicle has
to have a different turn signal flasher and
extra wiring. The green arrows on your
instrument panel will flash whenever you
signal a turn or lane change. Properly
connected, the trailer lights will also flash
to alert other drivers you’re about to turn,
change lanes, or stop.
When towing a trailer, the green arrows
on your instrument panel will flash for
turns even if the bulbs on the trailer are
burned out. Thus, you may think drivers
behind you are seeing your signals
when, in fact, they are not. It’s important
to check occasionally to be sure the trail-
er bulbs are still working. You must also
check the lights every time you discon-
nect and then reconnect the wires.Do not connect a trailer lighting system
directly to your vehicle’s lighting system.
Use only an approved trailer wiring har-
ness.
An authorized KIA dealer can assist you
in installing the wiring harness.
E140406AHM
Driving on grades
Reduce speed and shift to a lower gear
before you start down a long or steep
downgrade. If you don’t shift down, you
might have to use your brakes so much
that they would get hot and no longer
operate efficiently.
On a long uphill grade, shift down and
reduce your speed to around 70 km/h (45
mph) to reduce the possibility of engine
and transmission overheating.
If your trailer weighs more than the max-
imum trailer weight without trailer brakes
and you have an automatic transmission,
you should drive in D (Drive) when tow-
ing a trailer.
Operating your vehicle in D (Drive) when
towing a trailer will minimize heat build up
and extend the life of your transmission.
CAUTION -Electrical cur-
rent limit of the light
Current of the trailer's light load
- Left turn & stop light: max. 5 A- Right turn & stop light: max.5 A- Back up light: max.15 A - Tail light: max. 15 AIf the current limit is exceeded, thetrailer light may not work properly.
WARNING
Failure to use an approved trailer
wiring harness could result in dam-
age to the vehicle electrical system
and/or personal injury.
Page 439 of 464

747
Maintenance
Inner fuse panel (Instrument panel)
Description Fuse ratingProtected component
AUDIO15A Audio, Rear Monitor, RSE Control Box, DVD Player Can
MEMORY 7.5AFront A/C Control Module, Rear A/C Control Module, Instrument Cluster (IND.), RF Receiver, FAM, RAM, Driver
Door Module, Assistant Door Module, Tilt & Telescopic Module, IMS Control Module
Front A/C Control Module, Incar Temperature Sensor, PDM, Multifunction Switch (Wiper/Washer),
IG2-1 7.5A Driver/Passenger Seat Warmer Module, Front Blower Relay, Electro Chromic Mirror, Rear Blower Relay,
AC Inverter Switch, Trailer Relay, C/FAN HI/LOW Relay
IG2-2 7.5ARear A/C Control Module, Driver Door Module, FAM, Assistant Door Module, IMS Control Module,
Tilt & Telescopic Module
SMART KEY 7.5A Start Stop Button Switch, PDM,Smart Key Control Module, Fob Holder
ROOM 7.5AElectronic Chrome Mirror, Map Lamp, Vanity Lamp Switch LH/RH, Front/Rear A/C Control Module,
Center Room Lamp, Rear Room Lamp
KEY LOCK 7.5A Sport Mode Switch, Ignition Lock Switch
ILLUMI 7.5A IPM
RR S/WARMER 20A Rear Seat Warmer Relay
FRT S/WARMER 20A Driver Seat Warmer Module, Passenger Seat Warmer Module
SUNROOF 25A Sunroof Module
TPMS 7.5A Tire Pressure Monitoring Module, Data Link Connector, Multipurpose Check Connector
PEDAL 15A Adjustable Pedal Relay
F/PWR OUTLET 15A Front Power Outlet
S/TILT & TELE 20A Tilt & Telescopic Module
PASS P/SEAT 20A Passenger Power Seat Switch
DRIVER P/SEAT 30A Driver Power Seat Switch, Lumbar Support Switch, IMS Control Module
ACC 7.5A Audio, Front A/C Control Module, Rear monitor, RSE Control Box, Smart Key Control Module, DVD Player Can
Page 463 of 464

I3
Index
If the engine will not start ··················\
··················\
···········6-3
If you have a flat tire ··················\
··················\
·················6-12\
In case of an emergency while driving ··················\
··········6-2
Indicator symbols on the instrument cluster ··················\
·1-6
Instrument cluster ··················\
··················\
··················\
····4-48
Instrument panel overview··················\
··················\
···········2-3
Interior features··················\
··················\
··················\
······4-115
Interior light ··················\
··················\
··················\
·············4-80
Interior overview··················\
··················\
··················\
········2-2
Key positions ··················\
··················\
··················\
·············5-4
Keys ··················\
··················\
··················\
··················\
·········4-3
Lighting··················\
··················\
··················\
··················\
··4-72
Maintenance services ··················\
··················\
··················\
·7-4
Manual climate control system··················\
··················\
··4-85
Mirrors ··················\
··················\
··················\
··················\
···4-39
Owner maintenance ··················\
··················\
··················\
···7-5Parking brake ··················\
··················\
··················\
··········7-20
Power adjustable pedals··················\
··················\
·············4-36
Power steering fluid ··················\
··················\
··················\
·7-19
Rear parking assist system··················\
··················\
·········4-68
Rear seat entertainment system (RSE) ··················\
······4-154
Rearview camera··················\
··················\
··················\
······4-71
Recommended lubricants and capacities ··················\
·······8-4
Remote keyless entry ··················\
··················\
·················4-10\
Road warning ··················\
··················\
··················\
·············6-2
Seat belts ··················\
··················\
··················\
··················\
3-17
Seats ··················\
··················\
··················\
··················\
·········3-2
Smart key ··················\
··················\
··················\
··················\
·4-7
Special driving conditions ··················\
··················\
·········5-47
Starting the engine ··················\
··················\
··················\
·····5-9
Steering wheel ··················\
··················\
··················\
·········4-37
Storage compartment ··················\
··················\
···············4-112
Sunroof··················\
··················\
··················\
··················\
···4-30
Tailgate··················\
··················\
··················\
··················\
···4-19
K
L
M
O
P
R
S
T