Page 181 of 464

4101
Features of your vehicle
D240200AHM
Manual heating and air condition-
ing
The heating and cooling system can be
controlled manually by pressing buttons
other than the AUTO button. In this case,
the system works sequentially according
to the order of buttons selected.
1. Start the engine.
2. Set the mode to the desired position.For improving the effectiveness of
heating and cooling;
- Heating:
- Cooling:
3. Set the temperature control to the desired position.
4. Set the air intake control to the outside (fresh) air position.
5. Set the fan speed control to the desired speed.
6. If air conditioning is desired, turn the air conditioning system on.
Press the AUTO button in order to con-
vert to full automatic control of the sys-
tem.
D240201AHM
Mode selection
The mode selection button controls the
direction of the air flow through the venti-
lation system.
The air flow outlet port is converted as
follows:
Refer to the illustration in the “Manual cli-
mate control system”. Face-Level (B, C, D, E, F)
Air flow is directed toward the upper body
and face. Additionally, each outlet can be
controlled to direct the air discharged
from the outlet.
Bi-Level (B, D, E, C, F)
Air flow is directed towards the face and
the floor.
Floor-Level (C, A, D, E)
Most of the air flow is directed to the
floor, with a small amount of the air being
directed to the windshield and side win-
dow defrosters.
Floor/Defrost-Level (A, C, D, E)
Most of the air flow is directed to the floor
and the windshield with a small amount
directed to the side window defrosters.
OHM040104
Page 185 of 464
4105
Features of your vehicle
D240205AHM
Fan speed control
The fan speed can be set to the desired
speed by operating the fan speed control
switch.
To change the fan speed, pull up ( ▲) the
switch for higher speed ( ), or push
down ( ▼ ) the switch for lower speed
( ). To turn the fan speed control off,
press the front blower OFF button.
D240206AUN
Air conditioning
Press the A/C button to turn the air con-
ditioning system on (indicator light will
illuminate).
Press the button again to turn the air
conditioning system off.
D240208AHM-EE
OFF mode
Press the front blower OFF button to turn
off the front air climate control system.
However, you can still operate the mode
and air intake buttons as long as the igni-
tion switch is in the ON position.
OHM048109OHM040110OHM048111
Page 199 of 464

4119
Features of your vehicle
D280600AEN
Digital clock
Whenever the battery terminals or relat-
ed fuses are disconnected, you must
reset the time.
When the ignition switch is in the ACC or
ON position, the clock buttons operate as
follows:
D280601AHM
Hour (1)
Pressing the H button will advance the
time displayed by one hour.
D280602AHM
Minute (2)
Pressing the M button will advance the
time displayed by one minute.
D280603AHM
Reset (3)
To clear away minutes, press the R but-
ton. Then the clock will be set precisely
on the hour.
For example, if the R button is pressed
while the time is between 9:01 and 9:29,
the display will reset to 9:00.
9:01 ~ 9:29 display changed to 9:00
9:30 ~ 9:59 display changed to 10:00
D280604AHM
Display conversion
To change the 12 hour format to the 24
hour format, press the R button until the
display blinks.
For example, if the R button is pressed
while the time is 10:15 p.m., the display
will change to 22:15.
OHM048137
OHM048136
■Type A
■ Type B
WARNING
Do not adjust the clock while driv-
ing. You may lose your steering
control and cause an accident that
results in severe personal injury or
death.
Page 205 of 464

4125
Features of your vehicle
D300200AEN
Steering wheel audio control
(if equipped)
The steering wheel audio control button
is installed to promote safe driving.
D300204AHM
VOLUME (VOL / ) (1)
• Pull the up button ( ) to increase thevolume.
Pull the down button ( ) to decrease the volume.
D300203AHM
SEEK/PRESET ( / ) (2)
The SEEK/PRESET button has different
functions based on the system mode. For
the following functions the button should
be pressed for 0.8 second or more.
RADIO mode
It will function as the AUTO SEEK select
button.
CDP mode
It will function as the FF/REW button.
CDC mode
It will function as the DISC UP/DOWN
button. If the SEEK/PRESET button is pressed
for less than 0.8 second, it will work as
follows in each mode.
RADIO mode
It will function as the PRESET STATION
select buttons.
CDP mode
It will function as the TRACK UP/DOWN
button.
CDC mode
It will function as the TRACK UP/DOWN
button.
OHM048146N
CAUTION
Do not operate audio remote con-
trol buttons simultaneously.
Page 206 of 464
Features of your vehicle
126
4
D300202AHM
MODE (3)
Press the button to select Radio, CD
(compact disc), AUX or USB (iPod).
If there is no CD or the auxiliary device is
not connected, the mode may not be
converted to the CD, AUX or USB (iPod)
mode.
D300205AHM
MUTE (4)
Pull the MUTE button to cancel the
sound.
Pull the MUTE button again to activate the sound.
Detailed information for audio control
buttons is described in the following
pages in this section.
D300600AHM-EE
Aux, USB and iPod®*
(if equipped)
If your vehicle has an aux and/or USB
(universal serial bus) port or iPod port,
you can use an aux port to connect audio
devices and an USB port to plug in an
USB and also an iPod port to plug in an
iPod.
✽ ✽ NOTICE
When using a portable audio device
connected to the power outlet, noise may
occur during playback. If this happens,
use the power source of the portable
audio device.
*iPod®is a trademark of Apple Inc.
OHM048151
Page 214 of 464

Features of your vehicle
134
4
How to Activate RADIO,
SET UP, VOLUME Control
1. FM/AM Selection Button The FM/AM button toggles between FM
and AM. Listed below are the paths as
the system switches from FM to AM and
back to FM.
FM/AM : FM1
➟FM2➟AM➟FM1...
FM : FM1
➟FM2➟FM1...
2. Power ON/OFF Button & Volume Control Knob
Turns the audio system on/off when
the ignition switch is on ACC or ON.
If the knob is turned clockwise/counter- clockwise, the volume will increase
/decrease.
3. Automatic Channel Selection Button
When the [TRACK ] is pressed, it
will automatically tune to the next lower
station.
When the [SEEK ] is pressed, it will automatically tune to the next higher
station.
4. SCAN Selection Button
When the button is pressed, it auto-matically scans the radio stations
upwards.
The SCAN feature steps through each station, starting from the initial station,
for ten seconds.
Press the [SCAN] button again to stop the scan feature and to listen to the
currently selected channel.
5. Preset Selection Button
Press [1]~[6] buttons less than 0.8 sec-ond to play the station saved in each
button.
Press [1]~[6] b utton more than 0.8 sec-
ond or longer to save the current station
to the respective button with a beep.
6. TUNE/AUDIO Knob
If the knob is turned clockwise/counter-
clockwise, the frequency will increase/
decrease.
(AM 10kHz, FM 200kHz)
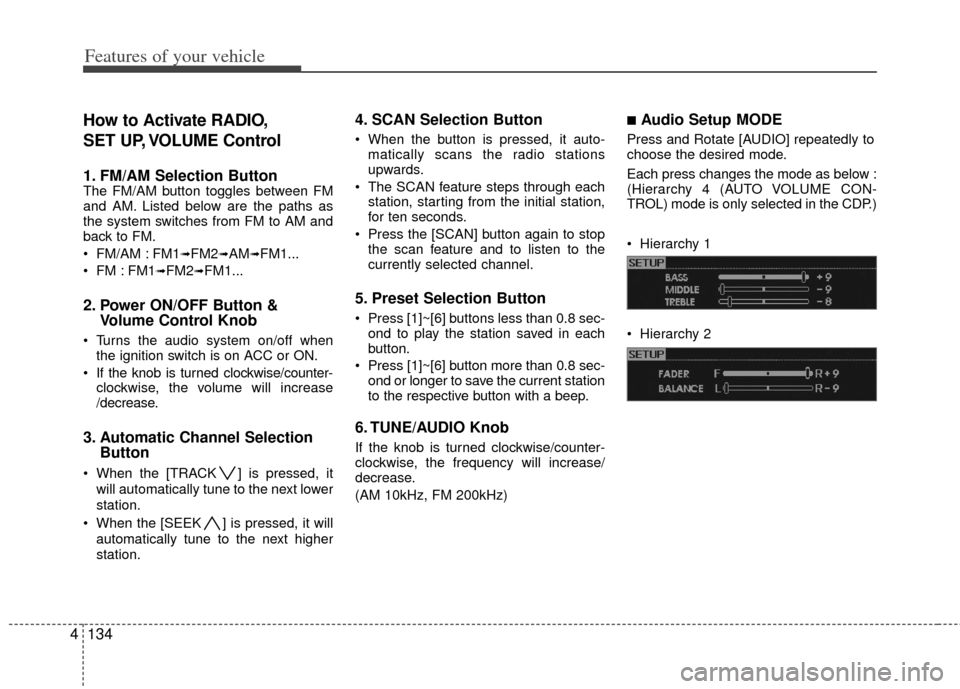
■Audio Setup MODE
Press and Rotate [AUDIO] repeatedly to
choose the desired mode.
Each press changes the mode as below :
(Hierarchy 4 (AUTO VOLUME CON-
TROL) mode is only selected in the CDP.)
Hierarchy 1
Hierarchy 2
Page 228 of 464

Features of your vehicle
148
4
✽
✽
NOTICE - Using iPod device
• Some iPod models might not support
the communication protocol and the
files will not be played. (iPod models
supported: Mini, 4G, Photo, Nano,
5G)
• The order of search or playback of songs in the iPod can be different
from the order searched in the audio
system.
• If the iPod crashes due to its own trou- ble, reset iPod. (Reset: Refer to iPod
manual)
• iPod may not operate normally on low battery.
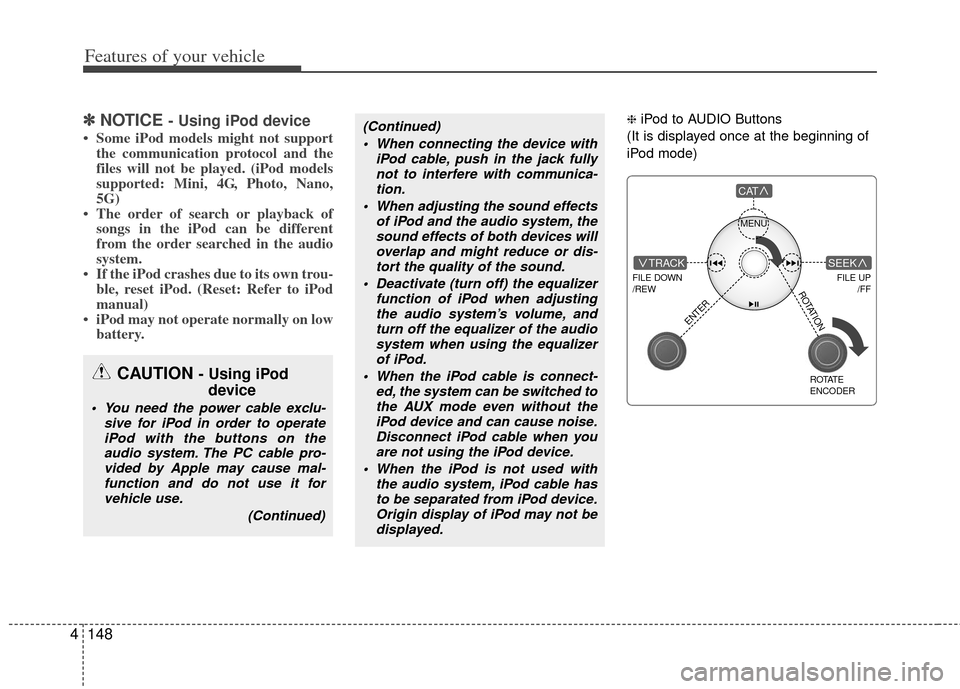
❈ iPod to AUDIO Buttons
(It is displayed once at the beginning of
iPod mode)(Continued) When connecting the device with iPod cable, push in the jack fullynot to interfere with communica-tion.
When adjusting the sound effects of iPod and the audio system, thesound effects of both devices willoverlap and might reduce or dis-tort the quality of the sound.
Deactivate (turn off) the equalizer function of iPod when adjustingthe audio system’s volume, andturn off the equalizer of the audio system when using the equalizerof iPod.
When the iPod cable is connect- ed, the system can be switched tothe AUX mode even without theiPod device and can cause noise.Disconnect iPod cable when you are not using the iPod device.
When the iPod is not used with the audio system, iPod cable hasto be separated from iPod device.Origin display of iPod may not bedisplayed.
CAUTION - Using iPod device
You need the power cable exclu-
sive for iPod in order to operateiPod with the buttons on theaudio system. The PC cable pro-vided by Apple may cause mal-function and do not use it forvehicle use.
(Continued)
MENU
FILE DOWN
/REW
FILE UP /FFTRACK
CAT
ENTER
ROTATE
ENCODER
SEEK
ROTATION
Page 235 of 464

4155
Features of your vehicle
How to Use SIRIUS Satellite
Radio
Your Kia vehicle is equipped with a 3
month complimentary period of SIRIUS
Satellite Radio so you have access to
over 130 channels of music, information,
and entertainment programming.
Activation
In order to extend or reactivate your sub-
scription to SIRIUS Satellite Radio, you
will need to contact SIRIUS Customer
Care at 888-539-7474. Have your 12 digit
SID (Sirius Identification Number)/ESN
(Electronic Serial Number) ready. To
retrieve the SID/ESN, turn on the radio,
press the [SAT] button, and tune to chan-
nel zero. Please note that the vehicle will
need to be turned on, in Sirius mode, and
have an unobstructed view of the sky in
order for the radio to receive the activa-
tion signal.
1. SATELLITE RADIO SelectionButton (SIRIUS Satellite Radio)
Press the [SAT] button to switch to SIR-
IUS Satellite Radio. It cycles through the
different bands as noted below.
SAT1
➟SAT2➟SAT3➟SAT1➟...
2. Channel Selection Button
Press [TRACK ] or [SEEK ] but-
ton for less than 0.8 second to select
previous or next channel.
Press [TRACK ] or [SEEK ] but- ton for 0.8 second or longer to continu-
ously move to previous or next chan-
nel.
if "CATEGORY" Icon is displayed at the top of the screen, channel up/down is
done through the channels within cur-
rent category.
3. Preset Selection Button
Press [1]~[6] buttons less than 0.8 sec-ond to play the channel saved in each
button.
Press [1]~[6] button for 0.8 second or longer to save current channel to the
respective button with a beep.
4. SCAN Selection Button
When the [SCAN] button is pressed, itautomatically scans the radio stations
upwards.
The SCAN feature steps through every channel, starting from the initial chan-
nel, for ten seconds.
Press the [SCAN] button again to stop the scan feature and to listen to the
currently selected channel.
if "CATEGORY" Icon is displayed at the top of the screen, channel changing is
done through the channels within cur-
rent category.
5. Tune Knob and Enter Button
Rotate clockwise to increase the chan-nel number or to scroll down the cate-
gory list.
Rotate counterclockwise to decrease the channel number or to scroll up the
category list.
Press this button to make selection of channels or items.