2011 JEEP WRANGLER steering
[x] Cancel search: steeringPage 3 of 88

INTRODUCTION/WELCOME
Welcome From Chrysler Group LLC....2
CONTROLS AT A GLANCE
Driver Cockpit................4
Instrument Cluster .............6
GETTING STARTED
KeyFOB ..................8
Remote Start................8
Theft Alarm .................9
Seat Belt ..................9
Supplemental Restraint System (SRS) —
Airbags .................. 10
Child Restraints .............. 11
Front Seats ................ 13
Rear Seats ................ 15
Tilt Steering Column ........... 16
Heated Seats ............... 16
OPERATING YOUR VEHICLETurn Signal/Lights Lever ......... 18
Wiper/Washer Lever ........... 19
Speed Control .............. 19
Manual Climate Controls ......... 21
Automatic Temperature Controls (ATC) . . 21
Soft Top And Sunrider
®.......... 23
Hard Top And Freedom Top®....... 27
Wind Buffeting .............. 29
ELECTRONICSYour Vehicle's Sound System ...... 30
Non-Touch-Screen Radios ........ 32
Touch-Screen Radio ........... 35
Steering Wheel Audio Controls ...... 41
Uconnect™ Phone ............ 41
Uconnect™ Voice Command ...... 43
iPod
®/USB/MP3 Control ......... 44
Electronic Vehicle Information Center
(EVIC) ................... 45
Programmable Features ......... 46
Power Inverter .............. 47
Power Outlets ............... 48
OFF-ROAD CAPABILITIESCommand-Trac®/Rock-Trac®...... 49 Axle Lock (Tru-Lok
®) Rubicon Only
.... 49
Electronic Sway Bar Disconnect –
Rubicon Only ............... 49
UTILITYTrailer Towing Weights (Maximum Trailer
Weight Ratings) .............. 50
Overdrive Off Switch ........... 52
Recreational Towing (Behind
Motorhome) ................ 52
WHAT TO DO IN EMERGENCIES24-Hour Towing Assistance ....... 54
Instrument Cluster Warning Lights .... 54
If Your Engine Overheats ......... 58
Jacking And Tire Changing ........ 59
Jump-Starting .............. 62
Emergency Tow Hooks .......... 64
Shift Lever Override ............ 64
Towing A Disabled Vehicle ........ 65
Freeing A Stuck Vehicle .......... 65
Event Data Recorder (EDR) ........ 66
MAINTAINING YOUR VEHICLEOpening The Hood............ 67
Engine Compartment ........... 68
Fluids And Capacities ........... 69
Maintenance Chart ............ 70
Fuses ................... 73
Tire Pressures ............... 76
Wheel And Wheel Trim Care ....... 77
Exterior Bulbs ............... 77
CONSUMER ASSISTANCEChrysler Group LLC Customer Center . . 78
Chrysler Canada Inc. Customer
Center................... 78
Assistance For The Hearing Impaired . . 78
Publications Ordering ........... 78
Reporting Safety Defects In The
50 United States And
Washington, D.C. ............. 79
MOPAR ACCESSORIESAuthentic Accessories By MOPAR®... 80
INDEX.................. 81
TABLE OF CONTENTS
Page 12 of 88

WARNING!
In a collision, you and your passengers can suffer much greater injuries if you are
not buckled up properly. You can strike the interior of your vehicle or other
passengers, or you can be thrown out of the vehicle. Always be sure you and
others in your vehicle are buckled up properly.
SUPPLEMENTAL RESTRAINT SYSTEM (SRS) — AIRBAGS
• This vehicle has Advanced Front Airbags for both the driver and right frontpassenger as a supplement to the seat belt restraint system. The Advanced Front
Airbags will not deploy in every type of collision.
• Advanced Front Airbags are designed to provide additional protection by supplementing the seat belts in certain frontal collisions depending on the severity
and type of collision. Advanced Front Airbags are not expected to reduce the risk of
injury in rear, side, or rollover collisions.
• This vehicle may be equipped with Supplemental Seat-Mounted Side Airbags to provide enhanced protection to help protect an occupant during a side impact.
• If the Airbag Warning Light
is not on during starting, stays on, or turns on while
driving, have the vehicle serviced by an authorized service center immediately.
• Refer to the Owner's Manual on the DVD for further details regarding the Supplemental Restraint System (SRS).
WARNING!
• Relying on the airbags alone could lead to more severe injuries in a collision.The airbags work with your seat belt to restrain you properly. In some
collisions, the airbags won't deploy at all. Always wear your seat belts even
though you have airbags.
• Being too close to the steering wheel or instrument panel during Advanced Front Airbag deployment could cause serious injury, including death. Airbags
need room to inflate. Sit back, comfortably extending your arms to reach the
steering wheel or instrument panel.
• Supplemental Seat-Mounted Side Airbags need room to inflate. Do not lean against the door or window. Sit upright in the center of the seat.
• Being too close to the Seat-Mounted Side Airbag during deployment could cause you to be severely injured or killed.
• Do not drive your vehicle after the airbags have deployed. If you are involved in another collision, the airbags will not be in place to protect you.
• After any collision, the vehicle should be taken to an authorized dealer immediately.
GETTING STARTED
10
Page 18 of 88

TILT STEERING COLUMN
• The tilt lever is located on the steeringcolumn, below the turn signal lever.
• Push down on the lever to unlock the steering column.
• With one hand firmly on the steering wheel, move the steering column up or
down as desired.
• Pull upward on the lever to lock the column firmly in place.
WARNING!
Do not adjust the steering column while driving. Adjusting the steering column
while driving, or driving with the steering column unlocked, could cause the driver
to lose control of the vehicle. Be sure the steering column is locked before driving
your vehicle. Failure to follow this warning may result in you or others being
severely injured or killed.
HEATED SEATS
Front Heated Seats
• The controls for front heated seats arelocated near the bottom center of the
instrument panel (below the heater/air
conditioning controls).
• Press the switch once to select High-level heating. Press the switch a
second time to select Low-level
heating. Press the switch a third time to
shut the heating elements Off.
• If the High-level setting is selected, the system will automatically switch to Low-level after approximately 30 minutes. The Low-level setting will turn Off automatically after
approximately 30 minutes.
CAUTION!
Repeated overheating of the seat could damage the heating element and/or
degrade the material of the seat.
GETTING STARTED
16
Page 21 of 88

Turn Signals/Lane Change Assist
• Tap the lever up or down once and the turn signal (right or left) will flash three timesand automatically turn off.
WIPER/WASHER LEVER
Front Wipers
Intermittent, Low And High Operation
• Rotate the end of the lever to the first detent position for one of five intermittent settings, the second detent for low wiper operation and the third detent for high
wiper operation.
Washer Operation
• Pull the lever toward you and hold for as long as spray is desired.
Mist
• Pull down on the lever and release when a single wipe is desired.
Rear Wiper
Wiper Operation• Rotate the center portion of the lever forward to the first detent for rear wiper operation.
Washer Operation
• Rotate the center portion of the lever past the first detent to activate the rear washer.
SPEED CONTROL
• The speed control switches are located on the steering wheel.
OPERATING YOUR VEHICLE
19
Page 40 of 88

USB Port
• The USB Port on the radio allows you to copy songs from a connected USB drive orsupported media device onto your Media Center hard drive. You can also playback
music from your USB device through the USB Port on the radio. The USB Port on a
Media Center 730N allows you to support iPod
®devices or USB drives for music
playback, charging, control through radio or steering wheel buttons, voice
commands and song selection by voice.
• The USB port located in the center console also offers the ability to play songs from connected USB drives, or supported media devices. Supported devices may be
controlled through the vehicles steering wheel or radio controls, or even with voice
commands, and may be charged through the USB port. If equipped, you may also
select songs by name.
Navigation – Media Center 730N (Sales Code RHR) Only
• Navigation radios require digital data from a navigation database. The data in thenavigation database is licensed from Navigation Technologies®. Not all roads are
digitized.
• For software updates, visit http://www.navteq.com website, or contact your authorized dealer for the latest available software.
NOTE: Many features of this radio are speed dependent. For your own safety, it is not
possible to use the touch-screen keyboard to enter a name (e.g., street name) while the
vehicle is in motion. Pull over at a safe location to complete your task or use Voice
Command.
• The Navigation system receives GPS signals from satellites to display the position ofyour vehicle.
Map • Press the NAV hard-key to access the Navigation Main Menu.
• Touch the MAP soft-key to display a map of your current position.
New Destination • Press the NAV hard-key to access the Navigation Main Menu.
• Touch the NEW DESTINATION soft-key to program a destination, then select the destination soft-key of your choice.
• Media Center 730N allows destinations to be input by voice while in motion. Press the Voice Command button on the radio to begin.
Program/Storing Home Address • Press the NAV hard-key to access the Navigation Main Menu.
• Touch the GUIDE ME HOME soft-key, then touch the STREET ADDRESS soft-key.
• Touch the STATE soft-key, then enter your state name into the speller; select your state from the list and press the CHANGE soft-key.
•
Touch the INPUT STREET NAME soft-key and enter your street name into the speller.
• Touch the CONTINUE soft-key and enter your address into the speller; touch the CONTINUE soft-key again.
• Touch the city name and touch the SAVE soft-key to complete programming.
ELECTRONICS
38
Page 43 of 88

• View detailed weather conditions at your current location.
• Ski Info
• View ski and snowboarding conditions at ski resorts.
• Fuel Prices
• Check detailed price information for fuel stations near your current location.
• Movie Listings
• Check which movies (includes start times, ratings, run lengths and summaries) are
playing at theaters near your current location.
• Sports Scores
• View scores and upcoming events for all major sports.
• Your favorite location, theater and sports teams can be stored for quick access.
• Refer to your Media Center 730N (RHR) User's Manual or Media Center 430/430N (RBZ/RHB) User's Manual for more details.
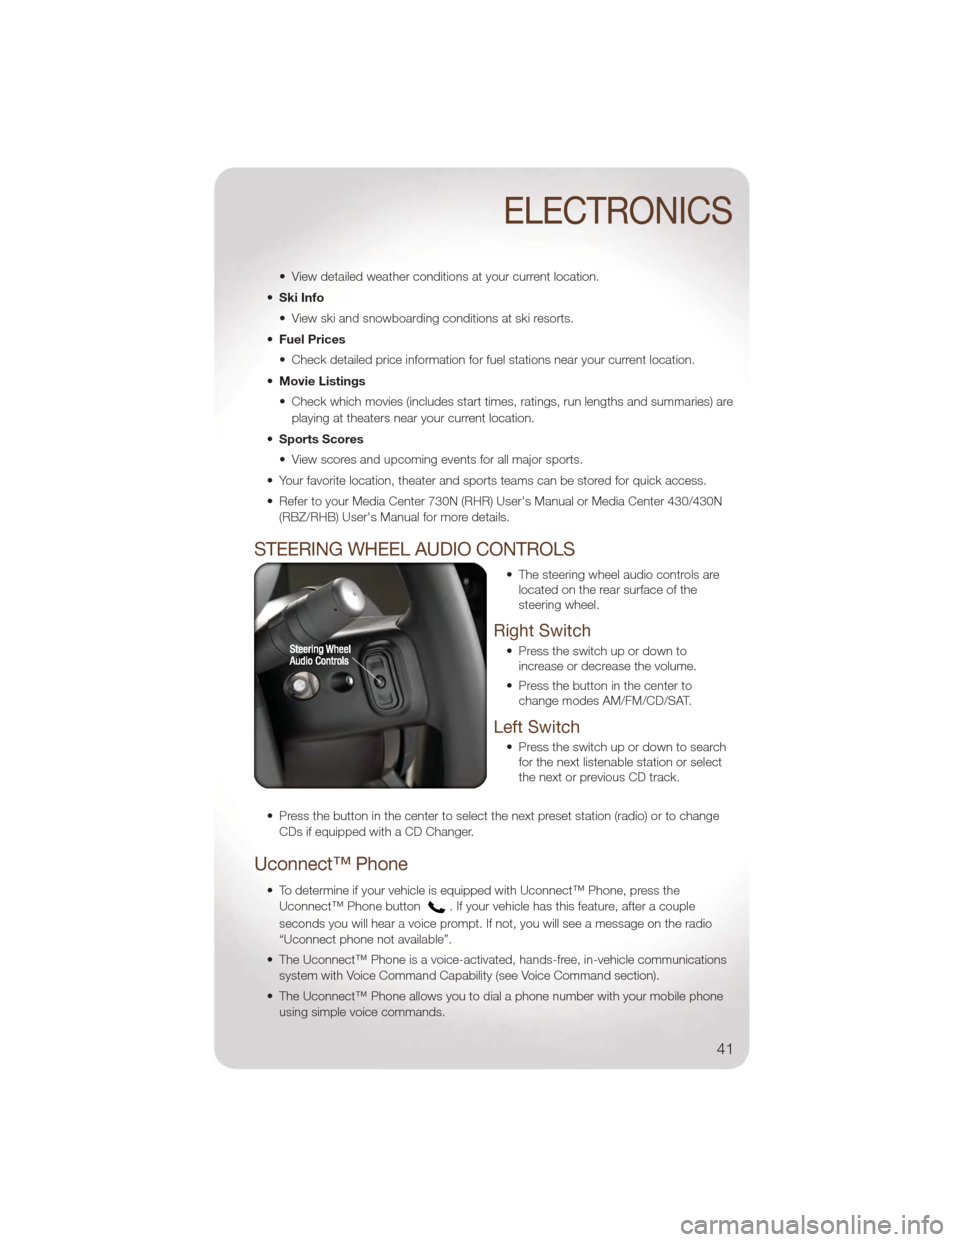
STEERING WHEEL AUDIO CONTROLS
• The steering wheel audio controls arelocated on the rear surface of the
steering wheel.
Right Switch
• Press the switch up or down toincrease or decrease the volume.
• Press the button in the center to change modes AM/FM/CD/SAT.
Left Switch
• Press the switch up or down to searchfor the next listenable station or select
the next or previous CD track.
• Press the button in the center to select the next preset station (radio) or to change CDs if equipped with a CD Changer.
Uconnect™ Phone
• To determine if your vehicle is equipped with Uconnect™ Phone, press theUconnect™ Phone button
. If your vehicle has this feature, after a couple
seconds you will hear a voice prompt. If not, you will see a message on the radio
“Uconnect phone not available”.
• The Uconnect™ Phone is a voice-activated, hands-free, in-vehicle communications system with Voice Command Capability (see Voice Command section).
• The Uconnect™ Phone allows you to dial a phone number with your mobile phone using simple voice commands.
ELECTRONICS
41
Page 45 of 88

Mute (Or Unmute) Microphone During Call
• During a call, press the Voice Command button.
• (After the BEEP), say “mute” (or “mute off”).
Transfer Ongoing Call Between Handset And Vehicle
• During a call, press the Voice Command button.
• (After the BEEP), say “transfer call”.
Changing The Volume
• Start a dialogue by pressing the Phone button, then adjust the volume during a
normal call.
• Use the radio ON/OFF VOLUME rotary knob to adjust the volume to a comfortable level while the Uconnect™ system is speaking. Please note the volume setting for
Uconnect™ is different than the audio system.
NOTE: To access the tutorial, press the Uconnect™ hard-key. After the BEEP, say
“tutorial”. Press any hard-key/button or touch the display (Touch-Screen radio) to cancel
the tutorial.
WARNING!
• Any voice commanded system should be used only in safe driving conditions following local laws and phone use. All attention should be kept on the
roadway ahead. Failure to do so may result in a collision causing you and
others to be severely injured or killed.
• In an emergency, to use Uconnect™ Phone, your mobile phone must be: • turned on,
• paired to Uconnect™ Phone,
• and have network coverage.
Uconnect™ VOICE COMMAND
• The Uconnect™ Voice Command system allows you to control your AM, FM radio,satellite radio, disc player, Uconnect™ Phone, a memo recorder, and supported
portable media devices. The Voice Command system also provides limited capability
to select and play music by artist, song, album, music, genre, or playlist from your
compatible iPod
®device (this capability is available for Media Center 430/430N
when connected to the USB port).
• When you press the Voice Command button
located on the radio faceplate
or steering wheel, you will hear a beep. The beep is your signal to give a command.
If you do not say a command within a few seconds, the system will present you with
a list of options. If you ever wish to interrupt the system while it lists options, press
the Voice Command button
, listen for the BEEP, and say your command.
ELECTRONICS
43
Page 47 of 88

• When connected to this feature:• The iPod®can be controlled using the radio buttons to Play, Browse, and List the
iPod®or external devices contents. Refer to the Owner's Manual on the DVD for
details.
• The iPod
®battery charges when plugged into the USB port (if supported by the
specific audio device).
• Compatible iPod
®devices may also be controllable using voice commands
(Media Center 430/430N with Uconnect™ Phone required). Refer to the Owner's
Manual on the DVD for details.
NOTE:
• The USB port supports certain Mini, Classic, Nano, Touch, and iPhone
®devices. The
USB port also supports playing music from compatible external USB Mass Storage
Class memory devices. For supported audio file formats, refer to the USB Port section
in the Owner's Manual on the DVD. Refer to www.jeep.com/uconnect website for a list
of tested iPod
®s. Some iPod®software versions may not fully support the USB port
features. Please visit Apple’s website for iPod®software updates.
Bluetooth®Streaming Audio
If equipped with Uconnect™ Voice Command, your bluetooth-equipped iPod®devices,
cellphones or other media players, may also be able to stream music to your vehicle's
speakers. Your connected device must be bluetooth-compatible, and paired with your
Media Center radio (see Uconnect™ Phone for pairing instructions). Press the AUX
button on the radio faceplate until "BT" is displayed on the radio screen.
WARNING!
Do not plug in or remove the iPod®or external device while driving. Failure to
follow this warning could result in a collision.
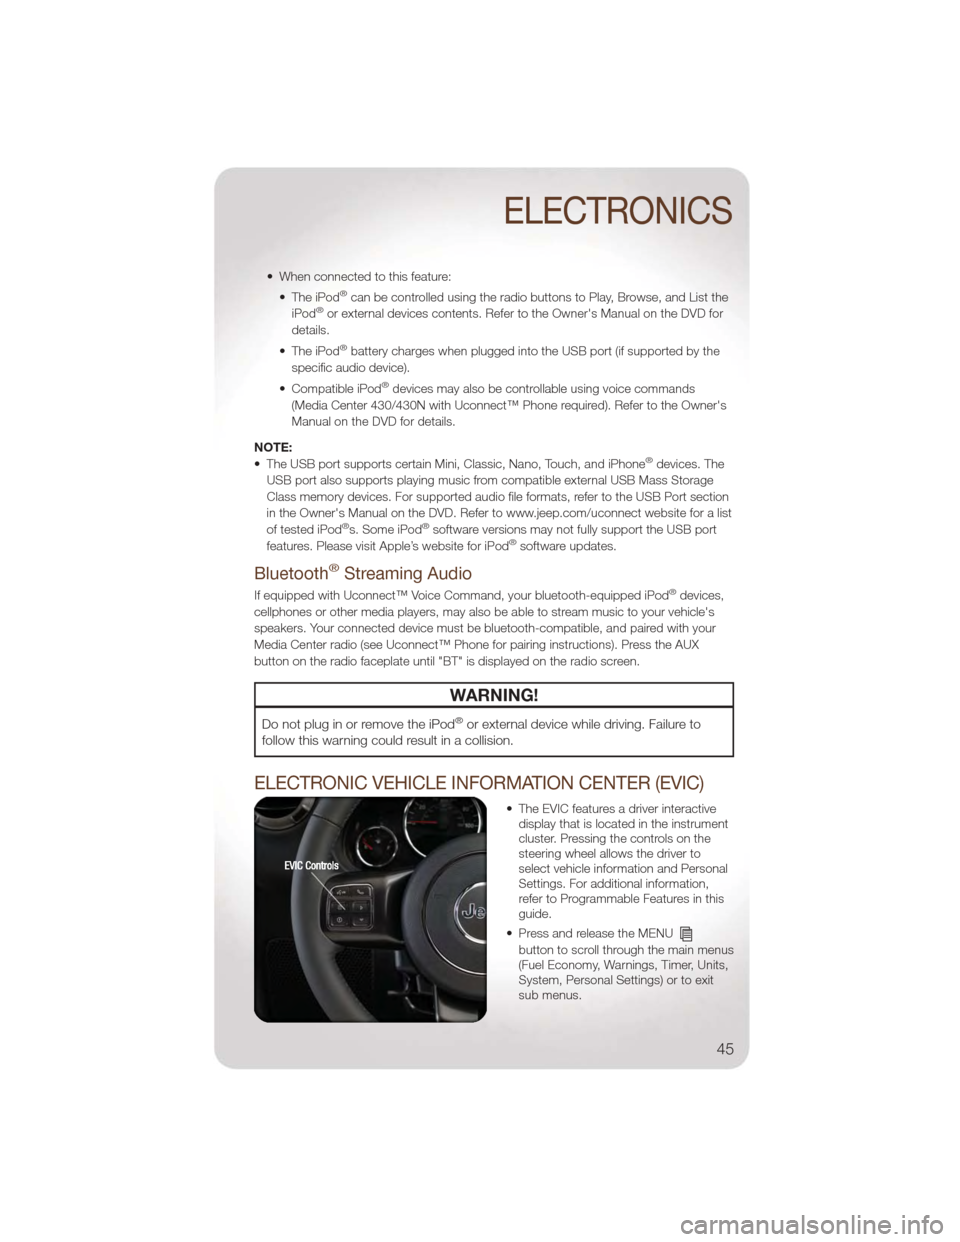
ELECTRONIC VEHICLE INFORMATION CENTER (EVIC)
• The EVIC features a driver interactive display that is located in the instrument
cluster. Pressing the controls on the
steering wheel allows the driver to
select vehicle information and Personal
Settings. For additional information,
refer to Programmable Features in this
guide.
• Press and release the MENU
button to scroll through the main menus
(Fuel Economy, Warnings, Timer, Units,
System, Personal Settings) or to exit
sub menus.
ELECTRONICS
45