Page 426 of 542
WARNING! (Continued)
•The jack is designed to be used as a tool for
changing tires only. The jack should not be used to
lift the vehicle for service purposes. The vehicle
should be jacked on a firm level surface only.
Avoid ice or slippery areas.
Jack Location
The scissor-type jack and tire changing tools are located
in the cargo compartment behind a trim cover on the left
rear trim panel. The latch is located at the bottom of the
trim cover.
Spare Tire Stowage
The spare tire is stowed underneath the rear of the
vehicle and is held in place by a cable winch mechanism.
Jack Storage Location
424 WHAT TO DO IN EMERGENCIES
Page 431 of 542

and enough clearance is obtained to install the spare tire.
Minimum tire lift provides maximum stability.
WARNING!
Raising the vehicle higher than necessary can make
the vehicle less stable and cause a collision. It could
slip off the jack and hurt someone near it. Raise the
vehicle only enough to remove the tire.
6. Remove the lug nuts and wheel.
7. Position the spare wheel/tire on the vehicle and install
lug nuts with the cone-shaped end toward the wheel.
Lightly tighten the nuts.
WARNING!
To avoid the risk of forcing the vehicle off the jack,
do not tighten the wheel nuts fully until the vehicle
has been lowered. 8. Lower the vehicle by turning the jack screw to the left,
and remove the jack.
9. Finish tightening the lug nuts. Push down on the
wrench while tightening for increased leverage. Alternate
nuts until each nut has been tightened twice. The correct
wheel nut tightness is 95 ft lb (130 N·m). If in doubt about
the correct tightness, have them checked with a torque
wrench by your authorized dealer or at a service station.
10. Lower the jack to it’s fully closed position.
11. Secure the tire, jack, and tools in their proper loca-
tions.
WARNING!
A loose tire or jack, thrown forward in a collision or
hard stop, could endanger the occupants of the ve-
hicle. Always stow the jack parts and the spare tire in
the places provided.
6
WHAT TO DO IN EMERGENCIES 429
Page 438 of 542
3. Turn the ignition to the ON/RUN position without
starting the engine.
4. Press and maintain firm pressure on the brake pedal.
5. Using a screwdriver, reach into the opening and press
and hold the shift override lever down.6. Move the shift lever into the NEUTRAL position.
7. The vehicle may then be started in NEUTRAL.
8. Reinstall the shift lever override access cover.
TOWING A DISABLED VEHICLE
This section describes procedures for towing a disabled
vehicle using a commercial wrecker service. If the trans-
mission and drivetrain are operable, disabled vehicles
may also be towed as described under “Recreational
Towing” in the “Starting And Operating” section.
Shift Lever Override Access
436 WHAT TO DO IN EMERGENCIES
Page 439 of 542

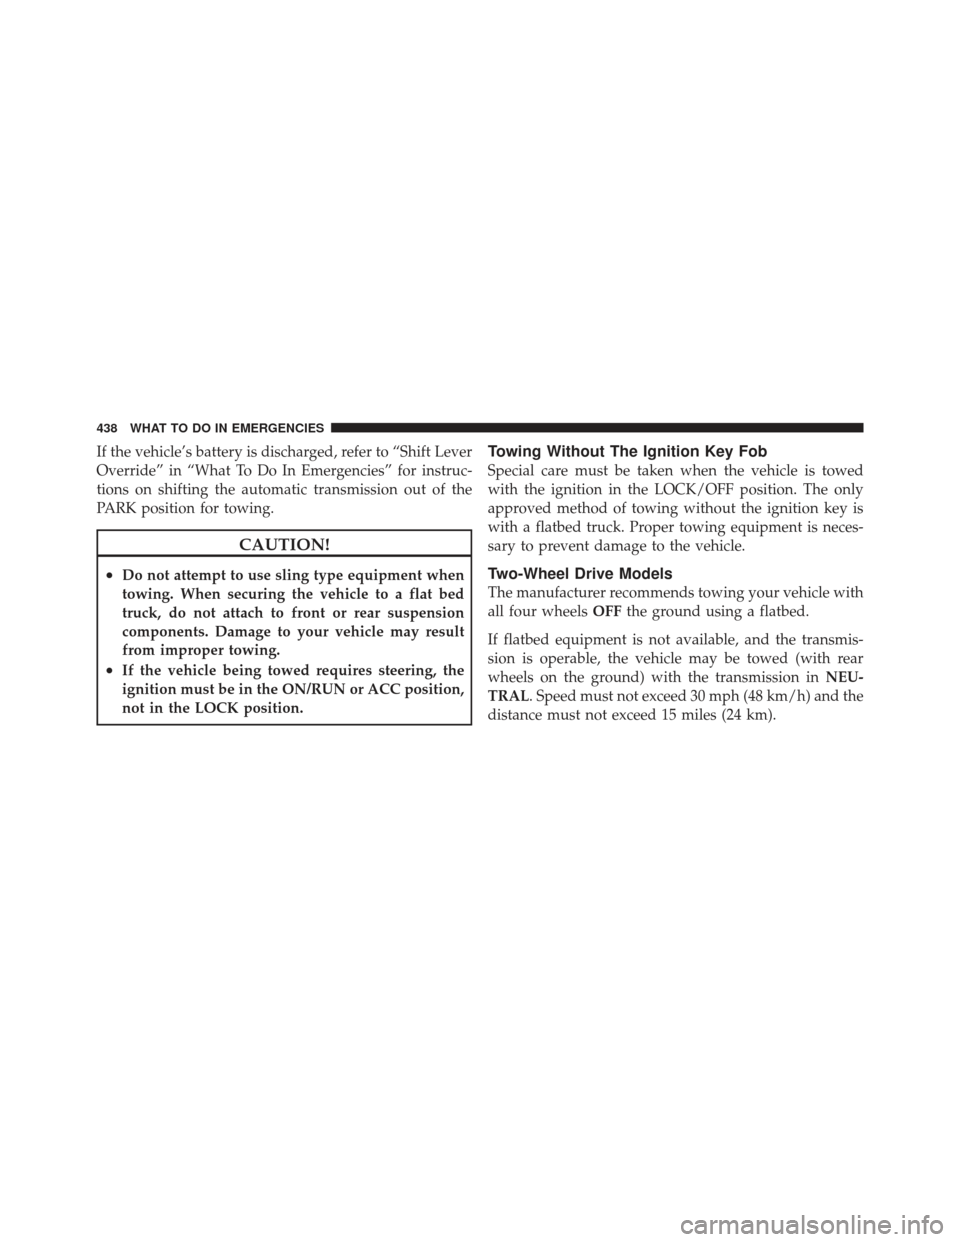
Towing Condition Wheels OFFthe Ground 2WD Models
4WD Models
Flat Tow NONEIf transmission is operable:
•Transmission in
NEUTRAL
•30 mphmax speed(48 km/h)
•15 miles (24 km) maxdistance See instructions in “Recreational Tow-
ing” under “Starting and Operating”
•Transmission in
PARK
•Transfer Case in NEUTRAL
•To w i nforward direction
Wheel Lift or Dolly To w Front
NOT ALLOWED
Rear OK NOT ALLOWED
Flatbed ALL BEST METHOD BEST METHOD
Proper towing or lifting equipment is required to prevent
damage to your vehicle. Use only tow bars and other
equipment designed for the purpose, following equip-
ment manufacturer ’s instructions. Use of safety chains is
mandatory. Attach a tow bar or other towing device to main structural members of the vehicle, not to bumpers
or associated brackets. State and local laws applying to
vehicles under tow must be observed.
If you must use the accessories (wipers, defrosters, etc.)
while being towed, the ignition must be in the ON/RUN
position, not the ACC position.
6
WHAT TO DO IN EMERGENCIES 437
Page 440 of 542

If the vehicle’s battery is discharged, refer to “Shift Lever
Override” in “What To Do In Emergencies” for instruc-
tions on shifting the automatic transmission out of the
PARK position for towing.
CAUTION!
•Do not attempt to use sling type equipment when
towing. When securing the vehicle to a flat bed
truck, do not attach to front or rear suspension
components. Damage to your vehicle may result
from improper towing.
•If the vehicle being towed requires steering, the
ignition must be in the ON/RUN or ACC position,
not in the LOCK position.
Towing Without The Ignition Key Fob
Special care must be taken when the vehicle is towed
with the ignition in the LOCK/OFF position. The only
approved method of towing without the ignition key is
with a flatbed truck. Proper towing equipment is neces-
sary to prevent damage to the vehicle.
Two-Wheel Drive Models
The manufacturer recommends towing your vehicle with
all four wheelsOFFthe ground using a flatbed.
If flatbed equipment is not available, and the transmis-
sion is operable, the vehicle may be towed (with rear
wheels on the ground) with the transmission in NEU-
TRAL. Speed must not exceed 30 mph (48 km/h) and the
distance must not exceed 15 miles (24 km).
438 WHAT TO DO IN EMERGENCIES
Page 441 of 542

CAUTION!
Towing faster than 30 mph (48 km/h) or farther than
15 miles (24 km) with rear wheels on the ground can
cause severe damage to the transmission. Such dam-
age is not covered by the New Vehicle Limited
Warranty.
If the transmission is not operable, or the vehicle must be
towed faster than 30 mph (48 km/h) or farther than
15 miles (24 km), tow with the rear wheels OFFthe
ground (on a flatbed, or with the rear wheels raised using
a wheel lift or towing dolly), or remove the driveshaft.
WARNING!
If the driveshaft is removed, the vehicle can roll even
if the transmission is in PARK, which could cause
serious injury or death.
The parking brake mustbe firmly engaged and the
wheels chocked during driveshaft removal and installa-
tion. The parking brake must remainengaged unless the
vehicle is securely and properly connected to the tow
vehicle, or the driveshaft is completely reinstalled. See
your authorized dealer for proper driveshaft removal
and reinstallation procedures, including flange
orientation/alignment, use of thread-locking compound,
proper bolt torque specifications, etc.
6
WHAT TO DO IN EMERGENCIES 439
Page 442 of 542
Four-Wheel Drive Models
The manufacturer recommends towing with all wheels
OFFthe ground. Acceptable methods are to tow the
vehicle on a flatbed or with one end of vehicle raised and
the opposite end on a towing dolly.
If flatbed equipment is not available, and the transfer
case is operable, the vehicle may be towed (in the
forward direction, with ALLwheels on the ground), IF
the transfer case is in NEUTRAL and the transmission is
in PARK. Refer to “Recreational Towing” in “Starting
And Operating” for detailed instructions.CAUTION!
•Front or rear wheel lifts should not be used.
Internal damage to the transmission or transfer
case will occur if a front or rear wheel lift is used
when towing.
•Failure to follow these towing methods can cause
severe damage to the transmission and/or transfer
case. Such damage is not covered by the New
Vehicle Limited Warranty.
440 WHAT TO DO IN EMERGENCIES
Page 446 of 542

ONBOARD DIAGNOSTIC SYSTEM — OBD II
Your vehicle is equipped with a sophisticated onboard
diagnostic system called OBD II. This system monitors
the performance of the emissions, engine, and automatic
transmission control systems. When these systems are
operating properly, your vehicle will provide excellent
performance and fuel economy, as well as engine emis-
sions well within current government regulations.
If any of these systems require service, the OBD II system
will turn on the “Malfunction Indicator Light (MIL).” It
will also store diagnostic codes and other information to
assist your service technician in making repairs. Al-
though your vehicle will usually be drivable and not
need towing, see your authorized dealer for service as
soon as possible.CAUTION!
•Prolonged driving with the MIL on could cause
further damage to the emission control system. It
could also affect fuel economy and drivability. The
vehicle must be serviced before any emissions
tests can be performed.
•If the MIL is flashing while the engine is running,
severe catalytic converter damage and power loss
will soon occur. Immediate service is required.
Loose Fuel Filler Cap Message
If the vehicle diagnostic system determines that the fuel
filler cap is loose, improperly installed, or damaged, a
“gASCAP” message will display in the odometer or a
“CHECK gASCAP” message will be displayed in the
Electronic Vehicle Information Center (EVIC). Refer to
444 MAINTAINING YOUR VEHICLE