2011 JAGUAR XF belt
[x] Cancel search: beltPage 15 of 225

R
(FM8) SEMCON JLR OWNER GUIDE VER 1.00 EURO
LANGUAGE: english-en; MARQUE: jaguar; MODEL: XF
Front seats
15
DRIVING POSITION MEMORY
1. Memory presets.
2. Memory set button.
Once you have adjusted the driver's seat,
steering column (see 22, ADJUSTING THE
STEERING WHEEL ) and exterior mirrors (see
44, EXTERIOR MIRRORS ), the vehicle can
memorise these setti ngs using the driver
memory buttons.
Once the passenger seat has been adjusted as
desired, these settings can be memorised
using the passenge r memory buttons.
1. Press the memory set button to activate
the memory function.
2. Press one of the preset buttons within 5
seconds to memorise the current settings.
For the driver’s settings, MEMORY 1 (or 2)
SETTINGS SAVED will be displayed on the
message centre accompanied by an
audible chime to conf irm the settings have
been memorised.
A seat position can only be memorised during
the five second period.
Any existing settings for a memory preset will
be over-written when programming a memory
position.
RECALLING A MEMORISED
POSITION
Press the appropriate memory preset button
(for the driver’s settings, MEMORY 1 (or 2)
SETTINGS RECALLED will be displayed in the
message centre).
SITTING IN THE CORRECT POSITION
The driver and front passenger must
not ride with the seat fully reclined.
Do not adjust the seat while the
vehicle is moving.
The seat, head restraint, seat belt and airbags,
all contribute to the protection of the user.
Correct use of these co mponents will give you
greater protection, therefore you should
observe the following points:
1. Sit in an upright position with the base of
your spine as far back as possible and the
seat back reclined no more than 30
degrees.
Page 16 of 225
L
(FM8) SEMCON JLR OWNER GUIDE VER 1.00 EURO
LANGUAGE: english-en; MARQUE: jaguar; MODEL: XF
Front seats
16
2. Do not move the driver's seat too close to
the steering wheel. Ideally, a minimum
distance of 254 mm (10 inches) is
recommended between the breastbone
and the steering wheel airbag cover. Hold
the steering wheel in the correct position
with your arms slightly bent.
• Adjust the head restraint so that the top of
the head restraint is above the centre line of
the head.
• Position the seat belt so that it is mid-way
between your neck a nd your shoulder. Fit
the strap tightly across your hips, not
across your stomach.
• Ensure that your driving position is
comfortable and enables you to maintain
full control of the vehicle.
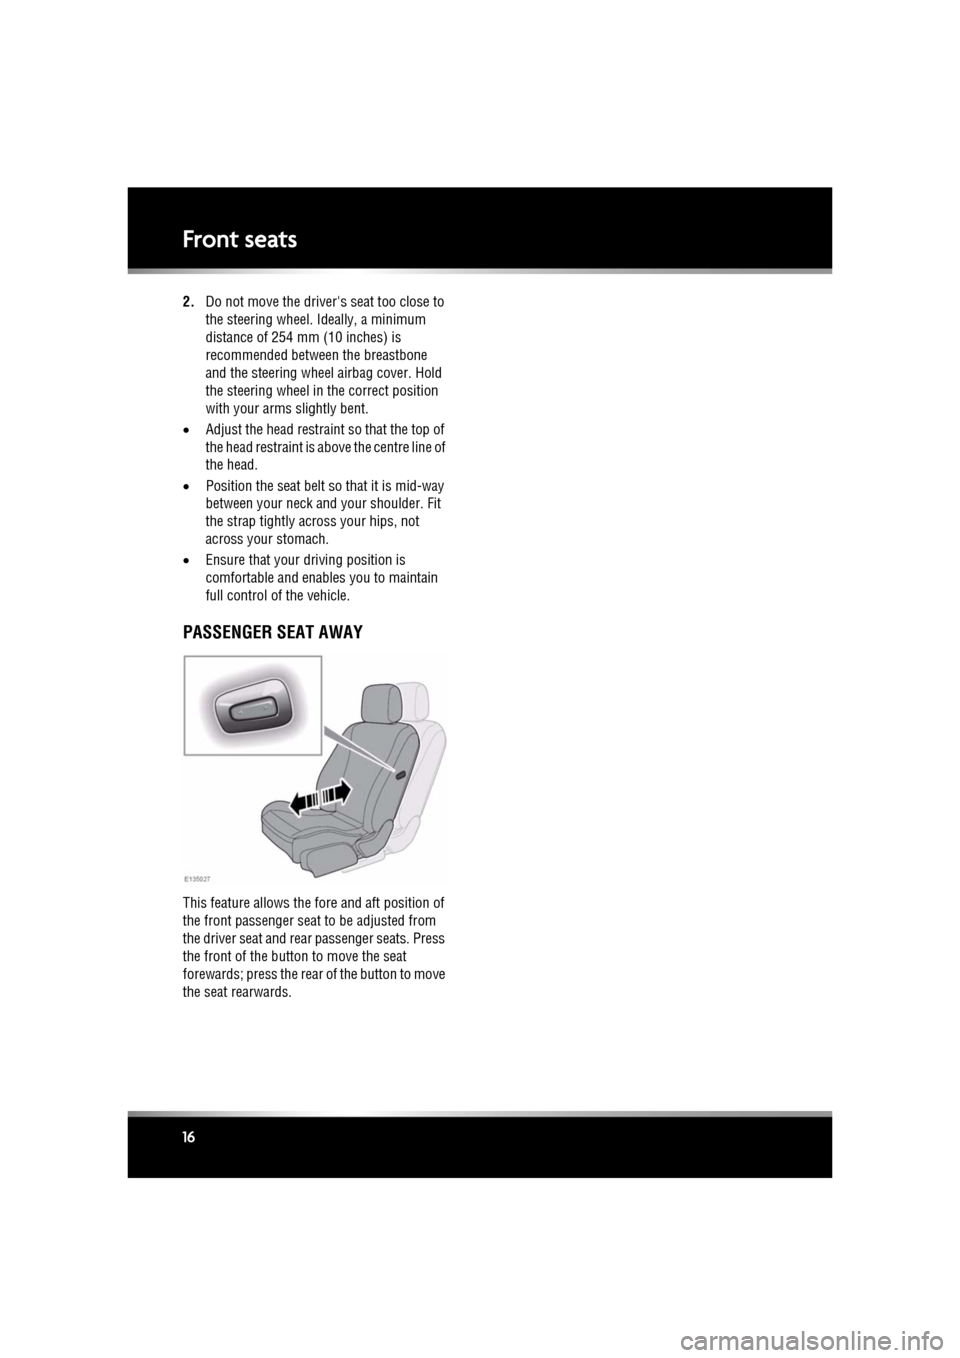
PASSENGER SEAT AWAY
This feature allows the fore and aft position of
the front passenger seat to be adjusted from
the driver seat and rear passenger seats. Press
the front of the button to move the seat
forewards; press the rear of the button to move
the seat rearwards.
Page 17 of 225
R
(FM8) SEMCON JLR OWNER GUIDE VER 1.00 EURO
LANGUAGE: english-en; MARQUE: jaguar; MODEL: XF
Rear seats
17
Rear seatsREAR SEAT SAFETY
All vehicle occupants should be
seated correctly, and wear a seat belt
at all times when the vehicle is in
motion.
FOLDING THE REAR SEATS
All items carried in the vehicle should
be properly secured. See 68,
LUGGAGE ANCHOR POINTS.
Unsecured items can cause death or
serious injury in the event of an
impact or sudden manoeuvre.
When using seat belts to restrain
items other than occupants, ensure
that the belts are not damaged or
exposed to sharp edges.
Never allow passengers to travel in
the luggage compartment under any
circumstances.
Always take note of safety warnings
and labels attached to the rear seats.
The labels give advice on safely
folding and erec ting the seats.
Ensure that the removed head
restraints are stored securely. Never
leave them loose in the vehicle, as
they can cause serious injury or death
in the event of an accident, heavy
braking or sudden manoeuvre.
Page 18 of 225
L
(FM8) SEMCON JLR OWNER GUIDE VER 1.00 EURO
LANGUAGE: english-en; MARQUE: jaguar; MODEL: XF
Rear seats
18
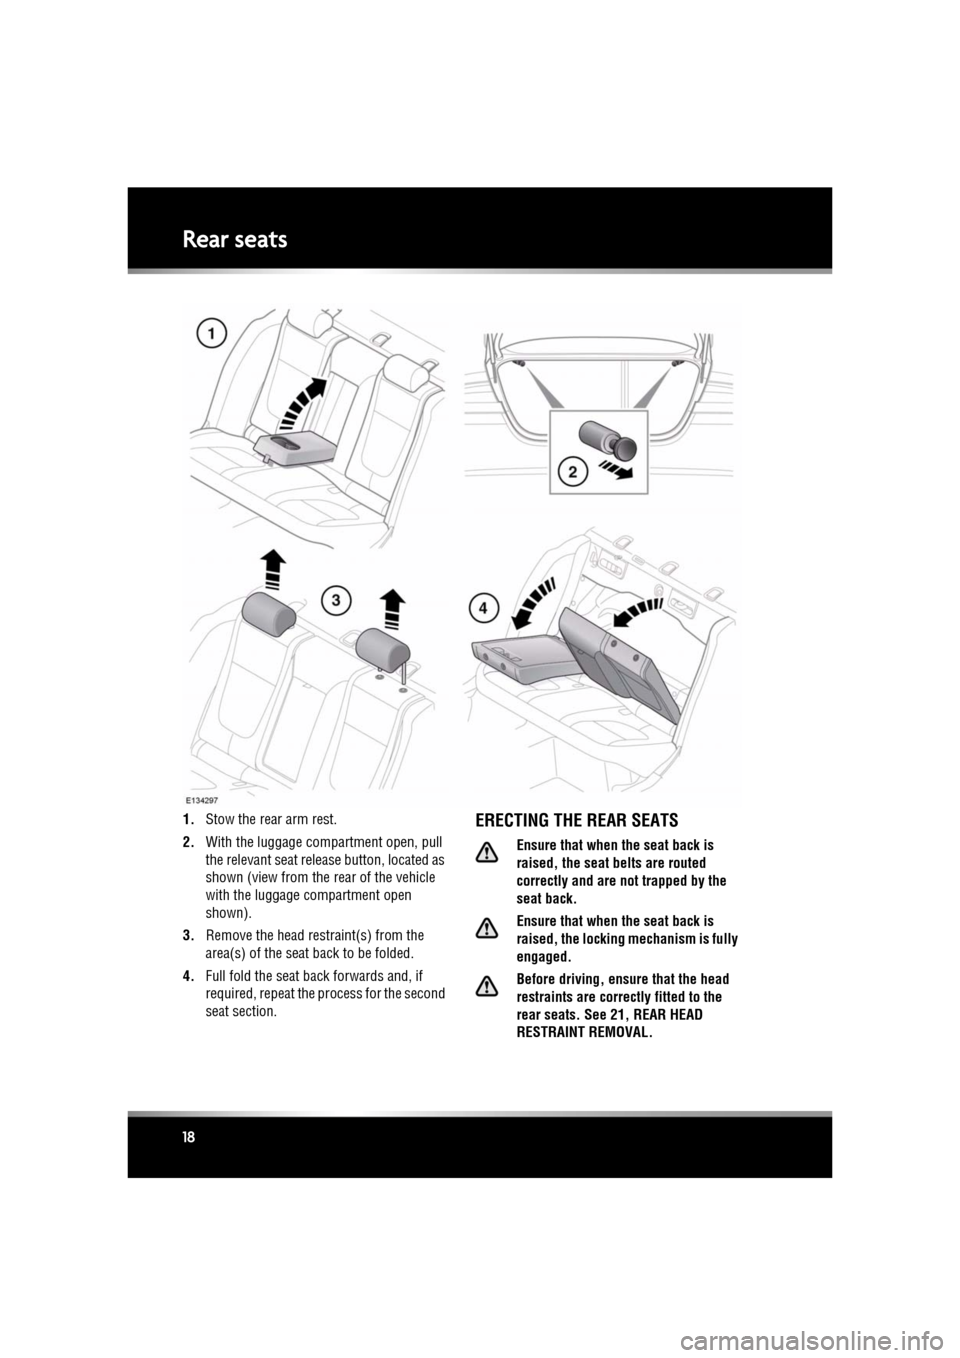
1. Stow the rear arm rest.
2. With the luggage compartment open, pull
the relevant seat release button, located as
shown (view from the rear of the vehicle
with the luggage compartment open
shown).
3. Remove the head restraint(s) from the
area(s) of the seat back to be folded.
4. Full fold the seat back forwards and, if
required, repeat the process for the second
seat section.ERECTING THE REAR SEATS
Ensure that when the seat back is
raised, the seat belts are routed
correctly and are not trapped by the
seat back.
Ensure that when the seat back is
raised, the locking mechanism is fully
engaged.
Before driving, ensure that the head
restraints are correctly fitted to the
rear seats. See 21, REAR HEAD
RESTRAINT REMOVAL.
Page 19 of 225
R
(FM8) SEMCON JLR OWNER GUIDE VER 1.00 EURO
LANGUAGE: english-en; MARQUE: jaguar; MODEL: XF
Rear seats
19
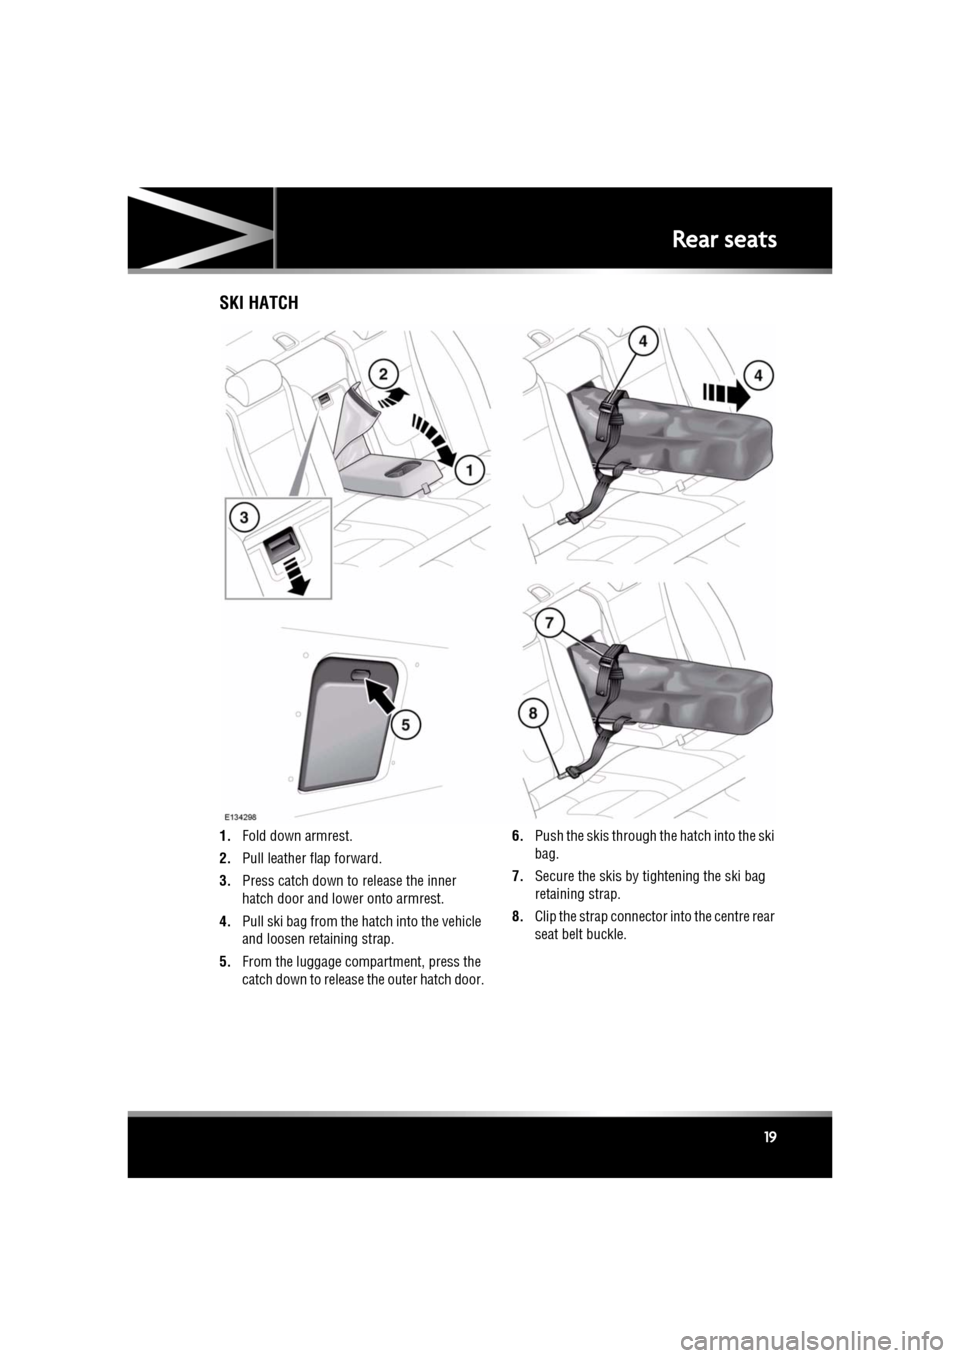
SKI HATCH
1. Fold down armrest.
2. Pull leather flap forward.
3. Press catch down to release the inner
hatch door and lower onto armrest.
4. Pull ski bag from the hatch into the vehicle
and loosen retaining strap.
5. From the luggage compartment, press the
catch down to release the outer hatch door. 6.
Push the skis through the hatch into the ski
bag.
7. Secure the skis by tightening the ski bag
retaining strap.
8. Clip the strap connector into the centre rear
seat belt buckle.
Page 23 of 225

R
(FM8) SEMCON JLR OWNER GUIDE VER 1.00 EURO
LANGUAGE: english-en; MARQUE: jaguar; MODEL: XF
Occupant safety
23
Occupant safety
SEAT BELT SAFETY
Care should be taken to avoid
contamination of the webbing with
polishes, oils and chemicals, and
particularly battery acid. Cleaning
may safely be carried out using mild
soap and water.
The belt should be replaced if
webbing becomes frayed,
contaminated or damaged.
It is essential to replace the entire
assembly after it has been worn in a
severe impact, even if damage to the
assembly is not obvious.
Do not carry hard, fragile or sharp
items between your person and the
seat belt.
Seat belts should be worn by all
vehicle occupants, for every journey,
no matter how short.
When using seat belts to restrain
items other than occupants, take care
to ensure that t he belts are not
damaged, or exposed to sharp edges.
The use of comfort clips, or devices
that would create slackness in the
seat belt system, is not advised.
SEAT BELT CHECKS
Note: If the vehicle is parked on an incline, the
seat belt mechanism may lock. This is a safety
feature and the belt shoul d be gently eased out
from the upper anchorage.
The seat belts should be inspected regularly to
check for fraying, cuts or wear to the webbing,
and the condition and security of the mechanism, buckles, ad
justers, and mounting
points.
• With the seat belt fastened, give the
webbing near the buckle a quick upward
pull. The buckle must remain securely
locked.
• With the seat belt unfastened, unreel the
seat belt to the limit of its travel. Check that
it unreels smoothly with no snatches or
snags. Allow the belt to fully retract, again
checking for smooth operation.
• Partially unreel the se at belt, then hold the
tongue plate and give a quick forward pull.
The mechanism must lock and prevent any
further unreeling.
If any of the seat belts fail to meet those
criteria, immediately contact your Dealer/
Authorised Repairer.
Page 24 of 225
L
(FM8) SEMCON JLR OWNER GUIDE VER 1.00 EURO
LANGUAGE: english-en; MARQUE: jaguar; MODEL: XF
Occupant safety
24
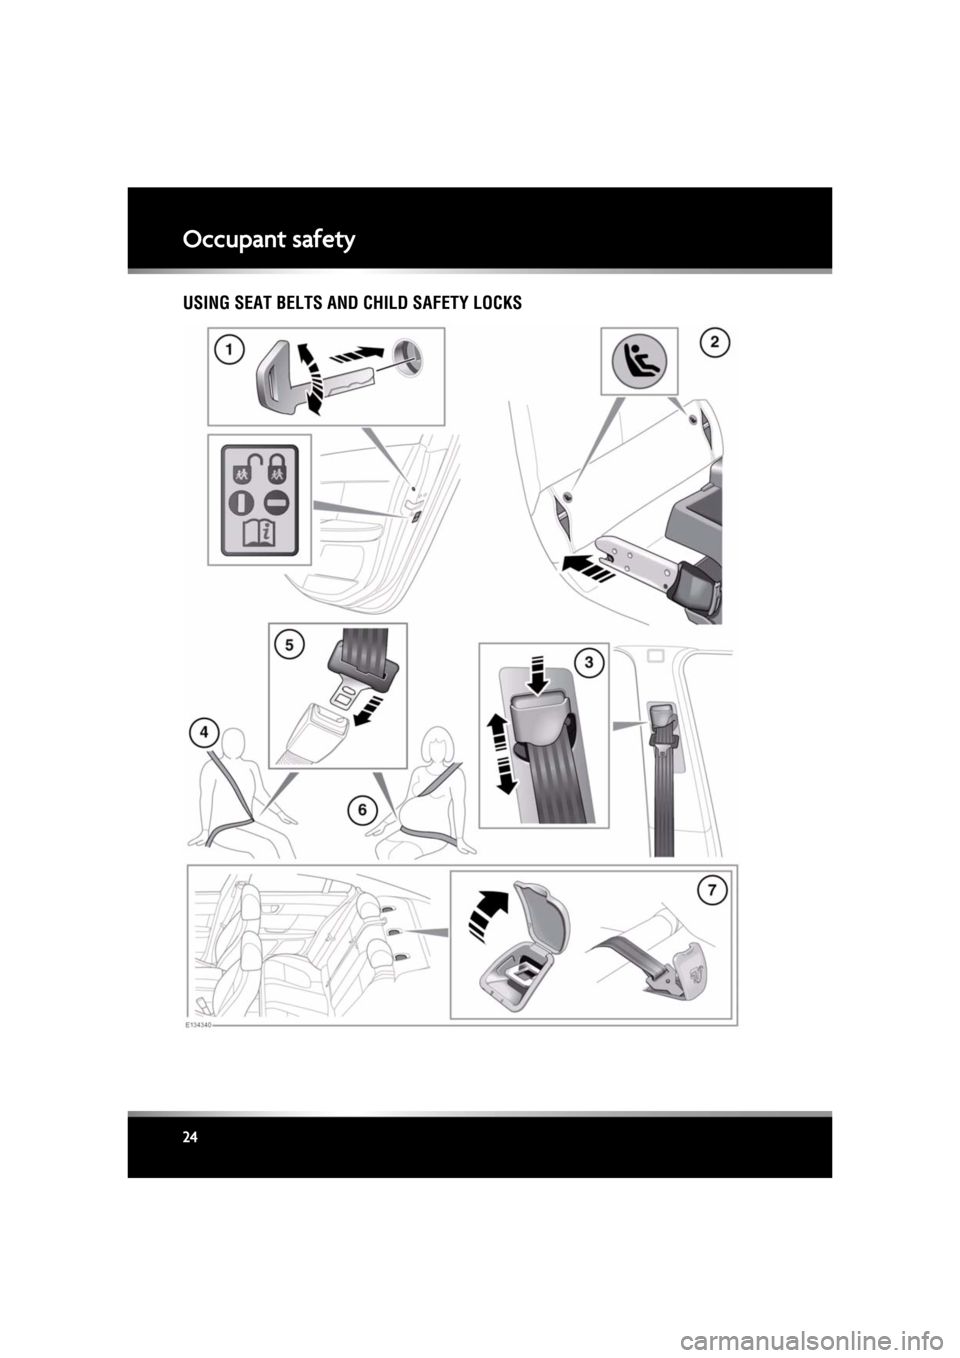
USING SEAT BELTS AND CHILD SAFETY LOCKS
Page 25 of 225

R
(FM8) SEMCON JLR OWNER GUIDE VER 1.00 EURO
LANGUAGE: english-en; MARQUE: jaguar; MODEL: XF
Occupant safety
25
1. If children are to be carried in the rear seat
positions, it is recommended that the rear
door interior handles are disabled.
To change the child lock settings:-
•Open the door to access the child
safety lock.
• Insert the emergency key into the slot
and rotate a quarter of a turn, to enable
or disable the interior door handle, as
required.
2. To install an ISOFIX child seat (not
Australia):-
•Raise the head restraint on the relevant
seat.
• Locate the lower anchor bars which are
accessible through the gap between
the seat back and seat base. Insert the
protective guides supplied with the
child seat as shown. The insertion
positions for the guides are identified
by the ISOFIX labels.
• Slide the child seat locking mechanism
into the protective sleeves and onto the
anchor bars.
• Test the security of the child restraint.
To do this, attempt to pull the restraint
away from the vehicle seat and twist
the restraint from side to side. Even if
the restraint appears secure you
should always check the anchor points
visually to ensure correct attachment.
Note: Always ensure that if an upper tether
is provided, it is fitted and tightened
correctly.
3. To adjust the seat belt height:-
•Press to release the catch.
• With the catch depressed slide the
mechanism up or down to the required
height. Release the catch and ensure
the locking mechanism has engaged. The use of comfort clips or devices
that would create sl
ack in the seat
belt system, is not advised.
No modifications or additions
should be made by the user which
will either prevent the seat belt
adjusting devices from operating
to remove slack, or prevent the
seat belt assembly from being
adjusted to remove slack.
4. Draw the belt out smoothly, ensure that the
belt height, the seat , and your position on
the seat are correct.
Seat belts are designed to bear
upon the bony structure of the
body, and should be worn low
across the front of the pelvis or the
pelvis, chest and shoulders, as
applicable; wearing the lap
section of the belt across the
abdominal area must be avoided.
Seat belts should be adjusted as
firmly as possible, consistent with
comfort, to provide the protection
for which they have been
designed. A slack belt will greatly
reduce the protection afforded to
the wearer.
Belts should not be worn with the
straps twisted.
Each belt assembly must only be
used by one occupant; it is
dangerous to put a belt around a
child being carried on the
occupant's lap.
The occupants of the front seats
should not travel with the seat
back at more than 30 degrees from
upright. Doing so will reduce the
protection afforded by the seat
belt.