2011 JAGUAR XF Rfa
[x] Cancel search: RfaPage 72 of 225

L
(FM8) SEMCON JLR OWNER GUIDE VER 1.00 EURO
LANGUAGE: english-en; MARQUE: jaguar; MODEL: XF
Storage compartments
72
Storage compartmentsSTORAGE COMPARTMENTS
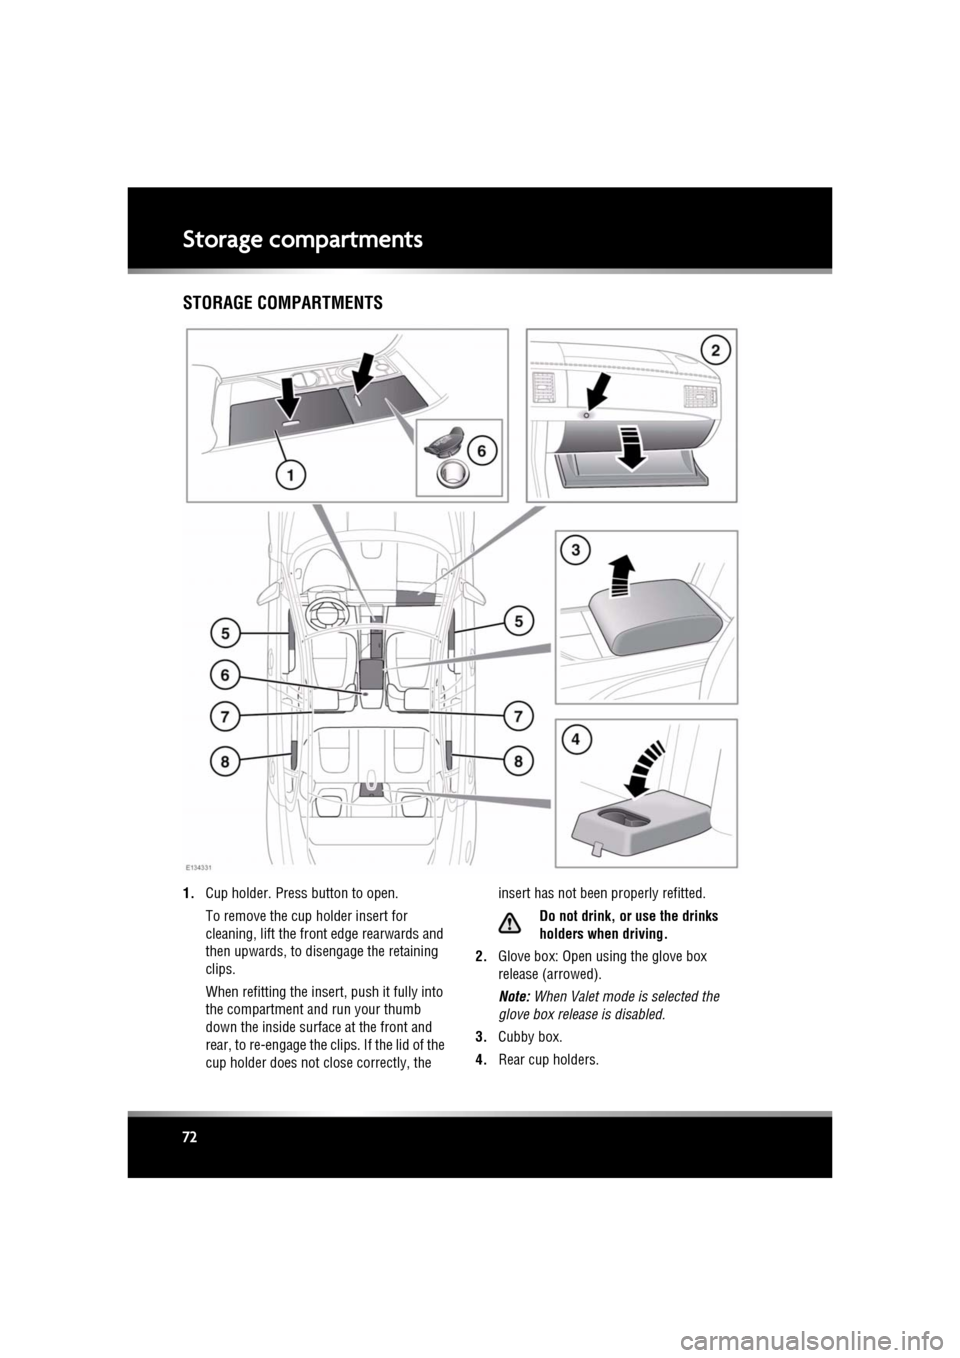
1. Cup holder. Press button to open.
To remove the cup holder insert for
cleaning, lift the front edge rearwards and
then upwards, to disengage the retaining
clips.
When refitting the insert , push it fully into
the compartment and run your thumb
down the inside surface at the front and
rear, to re-engage the clips. If the lid of the
cup holder does not close correctly, the insert has not been properly refitted.
Do not drink, or use the drinks
holders when driving.
2. Glove box: Open using the glove box
release (arrowed).
Note: When Valet mode is selected the
glove box relea se is disabled.
3. Cubby box.
4. Rear cup holders.
Page 83 of 225

R
(FM8) SEMCON JLR OWNER GUIDE VER 1.00 EURO
LANGUAGE: english-en; MARQUE: jaguar; MODEL: XF
Stability control
83
Stability controlWINTER MODE
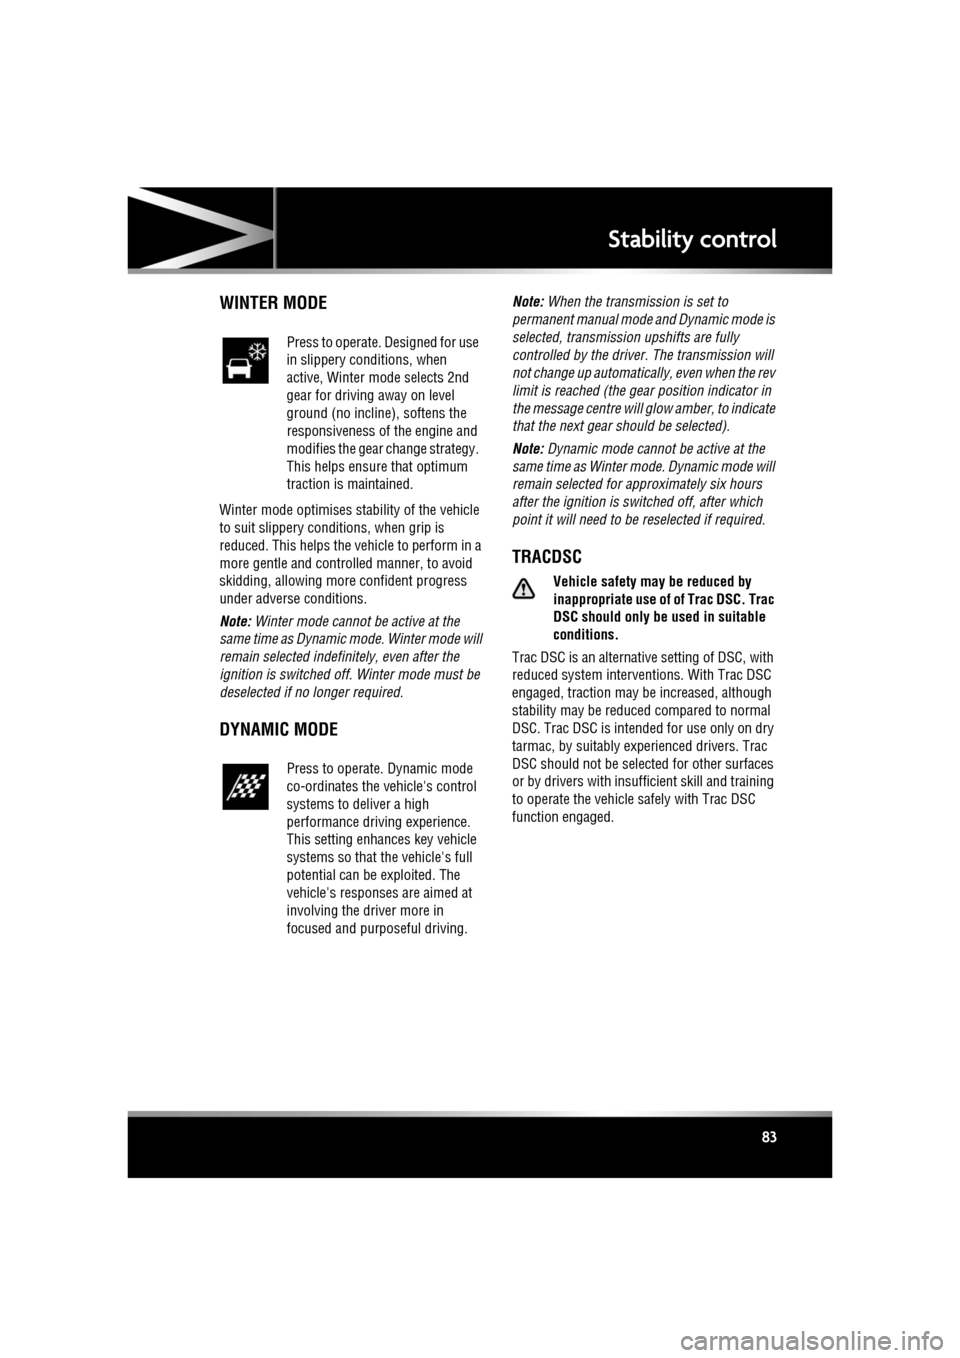
Winter mode optimises stability of the vehicle
to suit slippery conditions, when grip is
reduced. This helps the vehicle to perform in a
more gentle and controlled manner, to avoid
skidding, allowing more confident progress
under adverse conditions.
Note: Winter mode cannot be active at the
same time as Dynamic m ode. Winter mode will
remain selected indefinitely, even after the
ignition is switched off. Winter mode must be
deselected if no longer required.
DYNAMIC MODE
Note: When the transmission is set to
permanent manual mode and Dynamic mode is
selected, transmission upshifts are fully
controlled by the driver . The transmission will
not change up automatically, even when the rev
limit is reached (the ge ar position indicator in
the message centre will gl ow amber, to indicate
that the next gear should be selected).
Note: Dynamic mode cannot be active at the
same time as Winter mode. Dynamic mode will
remain selected for approximately six hours
after the ignition is switched off, after which
point it will need to be reselected if required.
TRACDSC
Vehicle safety may be reduced by
inappropriate use of of Trac DSC. Trac
DSC should only be used in suitable
conditions.
Trac DSC is an alternative setting of DSC, with
reduced system interventions. With Trac DSC
engaged, traction may be increased, although
stability may be reduced compared to normal
DSC. Trac DSC is intended for use only on dry
tarmac, by suitably experienced drivers. Trac
DSC should not be selected for other surfaces
or by drivers with insuff icient skill and training
to operate the vehicle safely with Trac DSC
function engaged.
Press to operate. Designed for use
in slippery conditions, when
active, Winter mode selects 2nd
gear for driving away on level
ground (no incline), softens the
responsiveness of the engine and
modifies the gear change strategy.
This helps ensure that optimum
traction is maintained.
Press to operate. Dynamic mode
co-ordinates the vehicle's control
systems to deliver a high
performance driving experience.
This setting enhances key vehicle
systems so that the vehicle's full
potential can be exploited. The
vehicle's responses are aimed at
involving the driver more in
focused and purposeful driving.
Page 85 of 225

R
(FM8) SEMCON JLR OWNER GUIDE VER 1.00 EURO
LANGUAGE: english-en; MARQUE: jaguar; MODEL: XF
Stability control
85
ACTIVE DIFFERENTIAL CONTROL
(Supercharged vehicles only)
The Active differential control (E-diff) improves
traction on uneven road surfaces and can also
improve stability in oversteer situations.
If the warning message EDIFF SYSTEM FAULT
is displayed and DSC is of f, then Trac DSC will
be automatically selected. The vehicle can still
be driven and DSC mode s can be selected, but
seek qualified assistan ce as soon as possible.
If the warning message EDIFF NOT AVAILABLE
is displayed, the system has temporarily shut
down to prevent overheating. The vehicle can
still be driven and the E-di ff will be operational
again when the system has cooled sufficiently.
Page 86 of 225

L
(FM8) SEMCON JLR OWNER GUIDE VER 1.00 EURO
LANGUAGE: english-en; MARQUE: jaguar; MODEL: XF
Stability control
86
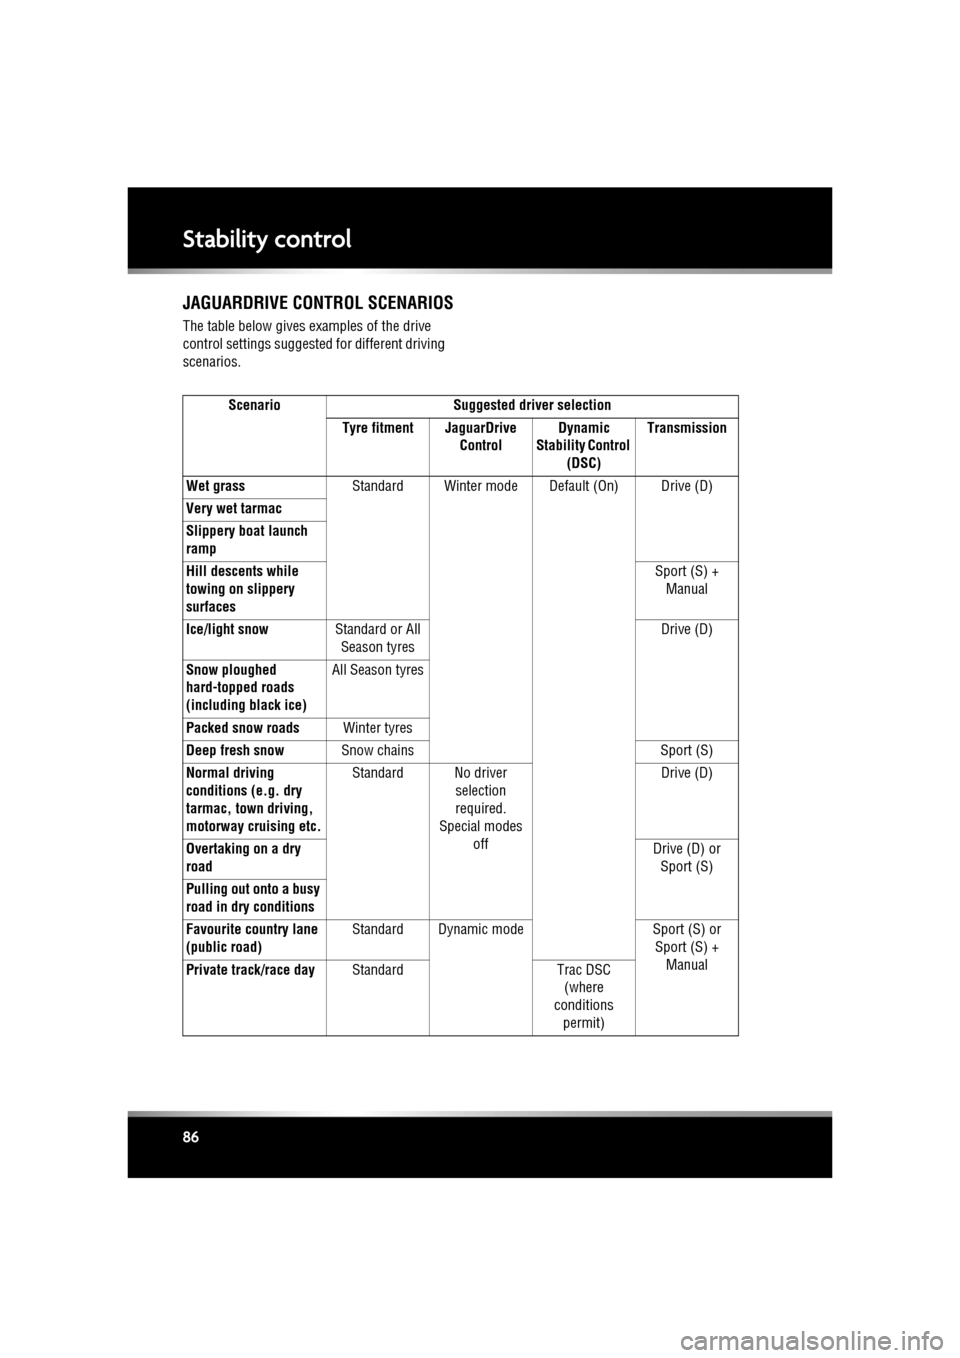
JAGUARDRIVE CONTROL SCENARIOS
The table below gives examples of the drive
control settings suggested for different driving
scenarios.
Scenario Suggested driver selection
Tyre fitment JaguarDrive ControlDynamic
Stability Control (DSC) Transmission
Wet grass Standard Winter mode Default (On) Drive (D)
Very wet tarmac
Slippery boat launch
ramp
Hill descents while
towing on slippery
surfaces Sport (S) +
Manual
Ice/light snow Standard or All
Season tyres Drive (D)
Snow ploughed
hard-topped roads
(including black ice) All Season tyres
Packed snow roads Winter tyres
Deep fresh snow Snow chains Sport (S)
Normal driving
conditions (e.g. dry
tarmac, town driving,
motorway cruising etc. Standard No driver
selection
required.
Special modes
off Drive (D)
Overtaking on a dry
road Drive (D) or
Sport (S)
Pulling out onto a busy
road in dry conditions
Favourite country lane
(public road) Standard Dynamic mode
Sport (S) or
Sport (S) +
Manual
Private track/race day Standard Trac DSC
(where
conditions
permit)
Page 92 of 225

L
(FM8) SEMCON JLR OWNER GUIDE VER 1.00 EURO
LANGUAGE: english-en; MARQUE: jaguar; MODEL: XF
Parking aids
92
Parking aidsPARKING AID OPERATION
1. Rear view camera. See 93, REAR VIEW
CAMERA .
2. Parking aid switch: Press to turn the
parking aid on and off.
3. Approximately 600 mm (24 inches).
4. Approximately 800 mm (31 inches).
5. Approximately 1800mm (71 inches).
It remains the driver’s responsibility
to detect obstacles and estimate the
vehicle’s distance from them. Some
overhanging objects, barriers, small
children, animals, thin obstructions or
painted surfaces may not be detected
by the system. Systems using the same frequency
band as the front parking sensors, may
cause irregular tones to be emitted.
Note: The sensors are active when the gear
selector is in neutral, and in drive after moving
from reverse. Therefore , if an obstacle is
detected an audible warning tone will sound.
REAR FITTED ACCESSORIES
Particular care must be taken when reversing
with rear fitted accessories, as the rear parking
aid will only indicate the distance from the
bumper to the obstacle.
Page 117 of 225

R
(FM8) SEMCON JLR OWNER GUIDE VER 1.00 EURO
LANGUAGE: english-en; MARQUE: jaguar; MODEL: XF
Portable media
117
PLAYING A PORTABLE DEVICE
If you are using a USB mass storage device or
approved iPod, you can control playback using
the touch screen controls.
If you are using a Blue tooth® device, you can
control playback using the touch screen, but
some controls are unavailable.
If you are using any portable media device via
the AUX socket, then you must control
playback from the device itself.
Jaguar does not recommend the use of
a Hard Disc Drive via the USB link while
the vehicle is in motion. These devices
are not designed for in car use and may
be damaged.
CONNECTING MULTIPLE DEVICES
Do not plug non-audio devices into the
USB port.
You can connect multiple devices
simultaneously to the portable media interface
and switch between th em using the touch
screen. Select iPod, USB , Bluetooth or AUX, to
switch between modes.
The device docked first will remain the active
device until you choose to change.
If, after changing to the newly-docked device,
you change back to the first device, play will
resume at the point you left it (USB and iPod
only).
Note: You cannot use a USB hub to connect
more than one USB devi ce to the audio unit.
Note: Devices connected to the iPod and USB
ports will be charged, but devices that are fully
discharged will not play.
Note: Options such as Repeat and Shuffle
relate to the device curre ntly playing, they will
not apply to any subsequent device.
PAIRING AND CONNECTING USING
THE MEDIA PLAYER
For further information on Bluetooth®, see
129, BLUETOOTH® INFORMATION .
Note: The process of pairing and connecting
your media device with the vehicle, using the
media device, will vary depending on the type
of media device.
1. Switch on the ignition and ensure the touch
screen is active.
2. From the Home menu, select Audio/Video,
then My Music .
3. A menu will appear. Select Search new.
4. Select Device to vehicle option.
Note: The vehicle’s Bluetooth® system is
only discoverable for 3 minutes.
5. Using the media device, search for
Bluetooth® devices. On some media
devices, this is referred to as new paired
device. See your medi a device’s operating
instructions for further information.
6. When the vehicle’s Bluetooth® system is
discovered, follow the on-screen
instructions. Select Yes when prompted, to
confirm the pairing.
Either your device or the vehicle system
will ask for a PIN (Personal Identification
Number). When prompted, enter a PIN of
your choice and select OK to confirm.
7. Enter the same PIN into the other device.
8. Once your device is paired and connected
to the system, a confirmation message will
be displayed, before switching to the My
music: Bluetooth screen.
Note: Some media devices do not
automatically connect and need to be
manually connected, via the device or by
using the Change device option.
Page 150 of 225

L
(FM8) SEMCON JLR OWNER GUIDE VER 1.00 EURO
LANGUAGE: english-en; MARQUE: jaguar; MODEL: XF
Tyre repair kit
150
10. Set the compressor switch to the on ( I)
position.
11. Inflate the tyre to a minimum of 1.9 bar
(26 psi) and a maximum of 3.5 bar
(51 psi).
•When pumping the sealant through the
tyre valve, the pressure may rise up to
6 bar (87 psi). The pressure will drop
again after approx imately 30 seconds.
12. During the inflation, switch the
compressor off briefly, to check the tyre
pressure using the gauge mounted on the
compressor.
•It should not take longer than 7
minutes to inflate the tyre. If, after 7
minutes, the tyre ha s not yet reached
minimum pressure, the tyre should not
be used.
13. Once the tyre has been inflated, switch off
the compressor. If desired, the engine may
be turned off after the compressor has
been turned off.
14. Remove the power connector from the
auxiliary power socket.
15. Remove the inflation hose from the tyre
valve, by unscrewing it as quickly as
possible (anticlockwise).
16. Replace the inflation hose protective cap
and the tyre valve cap.
17. Ensure that the tyre repair kit (including the
bottle and receiver caps) are placed
securely in the vehicle. You will need to use
the kit to check the tyre pressure after
approximately 3 km (2 miles), so ensure
they are easily accessible.
18. Immediately drive the vehicle for
approximately 3 km (2 miles), to allow the
sealant to coat the inner surface of the tyre
and form a seal at the puncture.CHECKING THE TYRE PRESSURE
AFTER A REPAIR
When driving the vehicle, if you
experience vibrations, abnormal
steering, or noises, reduce speed
immediately. Drive with extreme
caution and reduced speed, to the first
safe place to stop the vehicle. Visually
examine the tyre and check its
pressure. If there are any signs of
damage or deformity to the tyre, or the
tyre pressure is below 1.3 bar (19
psi), do not continue driving.
Consult a tyre repair centre or your
Dealer/Authorised Repairer, for
advice concerning the replacement of
a tyre after using a tyre repair kit.
1. Drive the vehicle for 3 km (2 miles) then
stop in a safe place. Carry out a visual
examination of the tyre’s condition.
2. Make sure that the sealant container
section is in its original position.
3. Screw the inflation hos e connector firmly
onto the tyre valve.
4. Read the tyre pressure from the gauge.
5. If the pressure of the sealant filled tyre is
above 1.3 bar (19 psi) adjust the pressure
to the correct value.
6. Ensure that the compressor switch is in the
Off ( O) position and insert the power cable
connector into the au xiliary power socket.
If the vehicle is in a well ventilated area,
start the engine.
7. Switch the compressor to On ( I) and inflate
the tyre to the correct pressure.
8. To check the tyre pressure, turn off the
compressor then read the pressure from
the gauge.
Page 161 of 225

R
(FM8) SEMCON JLR OWNER GUIDE VER 1.00 EURO
LANGUAGE: english-en; MARQUE: jaguar; MODEL: XF
Maintenance
161
ENGINE COMPARTMENT OVERVIEW
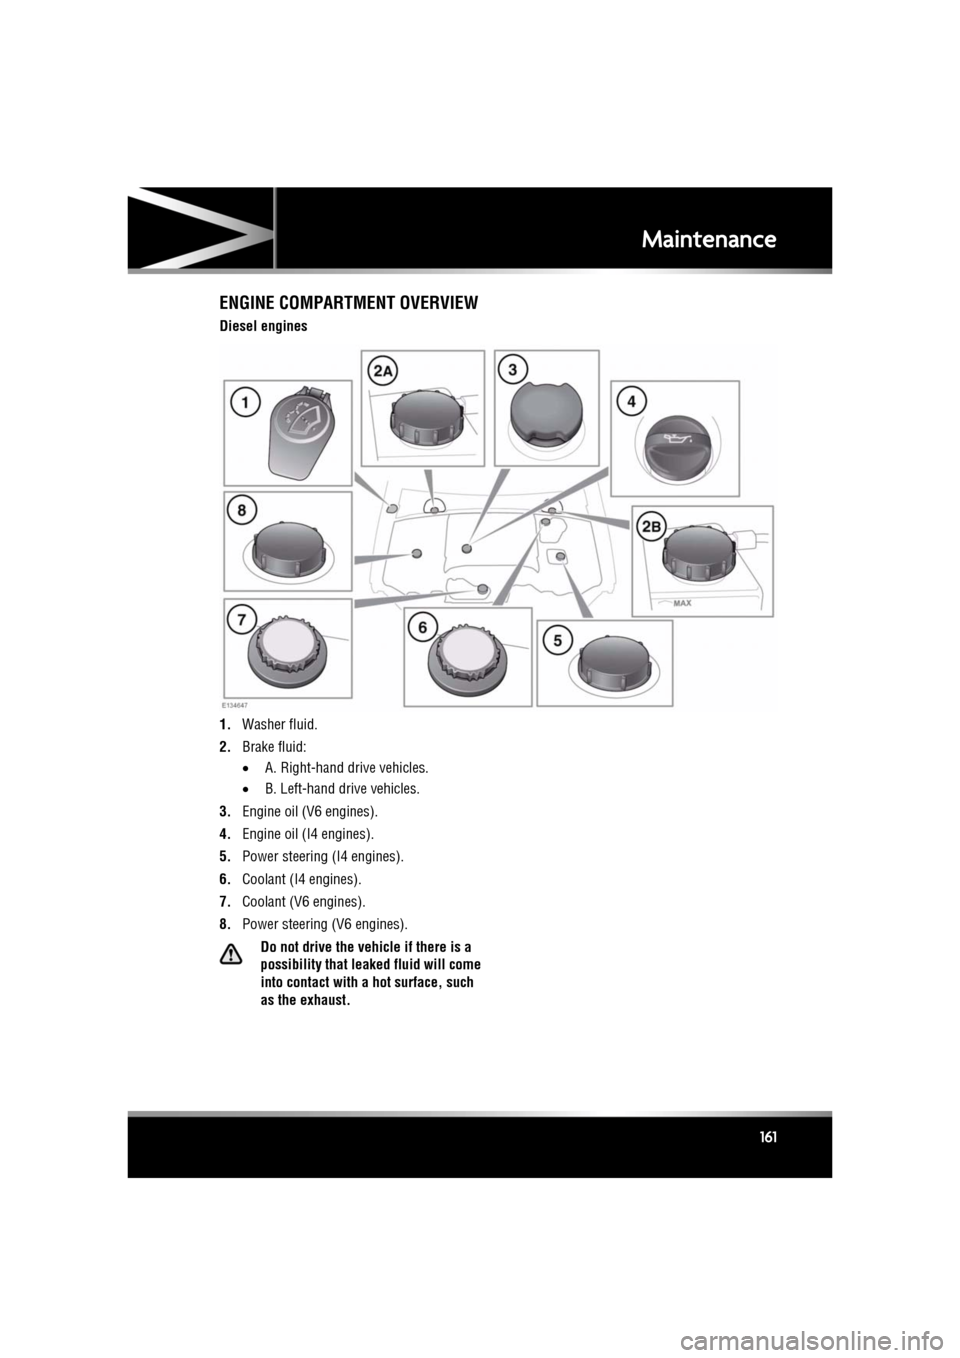
Diesel engines
1. Washer fluid.
2. Brake fluid:
•A. Right-hand drive vehicles.
• B. Left-hand dr ive vehicles.
3. Engine oil (V6 engines).
4. Engine oil (I4 engines).
5. Power steering (I4 engines).
6. Coolant (I4 engines).
7. Coolant (V6 engines).
8. Power steering (V6 engines).
Do not drive the vehicle if there is a
possibility that leak ed fluid will come
into contact with a hot surface, such
as the exhaust.