Page 314 of 468

●The trunk area is not included in the operat-
ing range but the Intelligent Key may func-
tion.
● If the Intelligent Key is placed on the instru-
ment panel, rear parcel shelf, inside the
glove box or door pocket, the Intelligent Key
may not function.
● If the Intelligent Key is placed near the door
or window outside the vehicle, the Intelli-
gent Key may function.
PUSH-BUTTON IGNITION SWITCH
OPERATION
When the ignition switch is pushed without
depressing the brake pedal (automatic trans-
mission model) or the clutch pedal (manual
transmission model), the ignition switch posi-
tion will change as follows:
● Push center once to change to ACC.
● Push center two times to change to ON.
● Push center three times to change to OFF.
(No position illuminates.)
● Push center four times to return to ACC.
● Open or close any door to return to LOCK
during the OFF position. The ignition lock is designed so that the ignition
switch position cannot be switched to LOCK
until the selector lever is moved to the P (Park)
position (Automatic Transmission models).
When the ignition switch cannot be switched
toward the LOCK position, proceed as follows:
Move the selector lever into the P (Park) posi-
tion (Automatic Transmission models).
1. Push the ignition switch to the OFF posi-
tion. The ignition switch position indicator
will not illuminate.
2. Open the door. The ignition switch will change to the LOCK position.
The selector lever can be moved from the P
(Park) position if the ignition switch is in the ON
position and the brake pedal is depressed
(Automatic Transmission models).
STEERING LOCK (if so equipped)
In order for the steering wheel to be locked, it
must be turned about 1/8 of a right or left turn
from the straight up position.
To lock the steering wheel, push the ignition
switch to the OFF position. To unlock the steer-
ing wheel, push the ignition switch.
If the steering lock release malfunction indica-
tor appears on the dot matrix liquid crystal
display, push the push-button ignition switch
SSD1021
Starting and driving5-9
Page 331 of 468

VEHICLE-TO-VEHICLE DISTANCE
CONTROL MODE OPERATION
Always pay attention to the operation of the
vehicle and be ready to manually control the
proper following distance. The vehicle-to-
vehicle distance control mode of the Intelligent
Cruise Control (ICC) system may not be able to
maintain the selected distance between ve-
hicles (following distance) or selected vehicle
speed under some circumstances.
The vehicle-to-vehicle distance control mode
uses a sensor
�Alocated on the front of the
vehicle to detect vehicles traveling ahead. The sensor generally detects the signals returned
from the reflectors on a vehicle ahead. There-
fore, if the sensor cannot detect the reflector on
the vehicle ahead, the ICC system may not
maintain the selected distance.
The following are some conditions in which the
sensor cannot detect the signals:
●
When the reflector of the vehicle ahead is
positioned high on the vehicle (trailer, etc.)
● When the reflector on the vehicle ahead is
missing, damaged or covered
● When the reflector of the vehicle ahead is
covered with dirt, snow and road spray
● When the snow or road spray from traveling
vehicles reduces the sensor’s visibility
● When dense exhaust or other smoke (black
smoke) from vehicles reduces the sensor’s
visibility
● When excessively heavy baggage is loaded
in the rear seat or the trunk of your vehicle
The ICC system is designed to automatically
check the sensor’s operation within the limita-
tions of the system. When the sensor is covered
with dirt or obstructs, the system will automati-
cally be canceled. If the sensor is covered with
ice, a transparent or translucent vinyl bag, etc.,
the ICC system may not detect them. In these
Sedan
SSD0926
Coupe — Type A
SSD1170
Coupe — Type B
SSD1169
5-26Starting and driving
Page 367 of 468
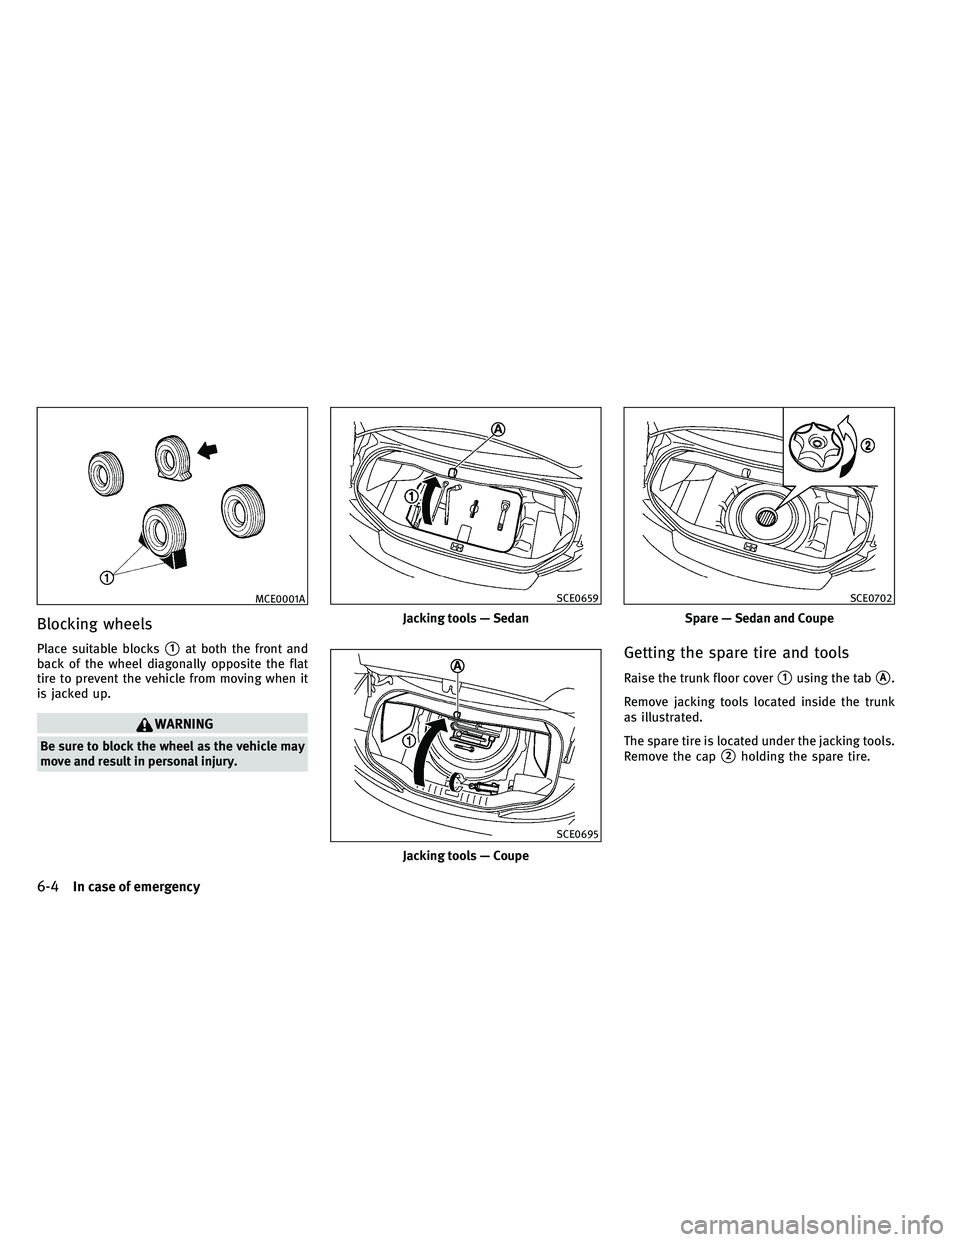
Blocking wheels
Place suitable blocks�1at both the front and
back of the wheel diagonally opposite the flat
tire to prevent the vehicle from moving when it
is jacked up.
WARNING
Be sure to block the wheel as the vehicle may
move and result in personal injury.
Getting the spare tire and tools
Raise the trunk floor cover�1using the tab�A.
Remove jacking tools located inside the trunk
as illustrated.
The spare tire is located under the jacking tools.
Remove the cap
�2holding the spare tire.
MCE0001A
Jacking tools — Sedan
SCE0659
Jacking tools — Coupe
SCE0695
Spare — Sedan and Coupe
SCE0702
6-4In case of emergency
Page 371 of 468

5. Securely store the flat tire and jackingequipment in the vehicle.
6. Place the spare tire cover and the trunk floor carpeting over the damaged tire.
7. Close the trunk.
WARNING
● Always make sure that the spare tire and
jacking equipment are properly secured af-
ter use. Such items can become dangerous
projectiles in an accident or sudden stop.
● The T-type spare tire and small size spare
tire are designed for emergency use. See
specific instructions under the heading
“WHEELS AND TIRES” in the “8. Maintenance
and do-it-yourself” section.
If needed, Roadside Assistance is available.
Please see your Warranty Information Booklet
or Roadside Assistance I.D. Card for the toll-free
number to call (U.S.) or Warranty Information
Booklet (Canada). To start your engine with a booster battery, the
instructions and precautions below must be
followed.
WARNING
●
If done incorrectly, jump starting can lead to
a battery explosion, resulting in severe in-
jury or death. It could also damage your
vehicle.
● Explosive hydrogen gas is always present in
the vicinity of the battery. Keep all sparks
and flames away from the battery.
● Do not allow battery fluid to come into con-
tact with eyes, skin, clothing or painted sur-
faces. Battery fluid is a corrosive sulphuric
acid solution which can cause severe burns.
If the fluid should come into contact with
anything, immediately flush the contacted
area with water.
● Keep the battery out of the reach of children.
● The booster battery must be rated at 12
volts. Use of an improperly rated battery can
damage your vehicle. ●
Whenever working on or near a battery, al-
ways wear suitable eye protectors (for ex-
ample, goggles or industrial safety spec-
tacles) and remove rings, metal bands, or
any other jewelry. Do not lean over the bat-
tery when jump starting.
● Do not attempt to jump start a frozen battery.
It could explode and cause serious injury.
● Your vehicle has an automatic engine cool-
ing fan. It could come on at any time. Keep
hands and other objects away from it.
If needed, Roadside Assistance is available.
Please see your Warranty Information Booklet
or Roadside Assistance I.D. Card for the toll-free
number to call (U.S.) or Warranty Information
Booklet (Canada).
JUMP STARTING
6-8In case of emergency
Page 415 of 468
SEDAN
1. Front turn signal light and clearance light
2. Headlight (high- and low-beam)
3. Front side marker light
4. Map light
5. Rear personal light
6. Fog light
7. Step light
8. High-mounted stop light (on the rear par-cel shelf or in the rear spoiler)*
9. Trunk light
10. License plate light
11. Back-up light
12. Rear combination light (rear turn signal/ tail/stop/side marker light)
*: Note that when the factory spoiler is installed, the rear parcel shelf high-
mounted stop light is still present, but it
is disabled and replaced by the rear
spoiler high-mounted stop light.
SDI2501
LIGHTS
8-26Maintenance and do-it-yourself
Page 416 of 468
COUPE
1. Clearance light
2. Headlight (high- and low-beam)
3. Front turn signal light
4. Map light
5. Fog light
6. Front side marker light
7. Step light
8. High-mounted stop light (on the rear par-cel shelf or in the rear spoiler)*
9. Trunk light
10. License plate light
11. Back-up light
12. Rear combination light (rear turn signal/ tail/stop/side marker light)
*: Note that when the factory spoiler is installed, the rear parcel shelf high-
mounted stop light is still present, but it
is disabled and replaced by the rear
spoiler high-mounted stop light.
SDI2702
Maintenance and do-it-yourself8-27
Page 417 of 468

HEADLIGHTS
Replacing
Xenon headlight bulb :
WARNING
HIGH VOLTAGE
When xenon headlights are on, they produce a
high voltage. To prevent an electric shock,
never attempt to modify or disassemble. Al-
ways have your xenon headlights replaced at
an INFINITI retailer. For additional information,
see “HEADLIGHT AND TURN SIGNAL SWITCH” in
the “2. Instruments and controls” section.
Use the same number and wattage shown in the
following chart as originally installed.
If replacement is required, see an INFINITI re-
tailer.
Fog may temporarily form inside the lens of the
exterior lights in the rain or in a car wash. A
temperature difference between the inside and
the outside of the lens causes the fog. This is
not a malfunction. If large drops of water collect
inside the lens, contact an INFINITI retailer.
EXTERIOR AND INTERIOR LIGHTS
Sedan
Item Wattage (W)Bulb No.
Headlight* High/Low beams (xenon) 35D2S
Front turn signal light* 287444NA
Front fog light* 35H8
Clearance light* 87444NA
Front side marker light* 5WY5W
Rear combination light* back-up 16W16W
turn signal 21W21W
stop/tail/side marker LED—
License plate light* 5W5W
Map light 8—
Rear personal light 8—
Vanity mirror light 2—
Step light* 8—
Trunk light* 3.4—
High-mounted stop light* LED—
*: See an INFINITI retailer for replacement.
NOTE: Always check with the Parts Department at an INFINITI retailer for the latest information about
parts.
8-28Maintenance and do-it-yourself
Page 418 of 468
Coupe
ItemWattage (W)Bulb No.
Headlight* High/Low beams (xenon) 35D2S
Front turn signal light* 21WY21W
Front fog light* 55H11
Clearance light* 5W5W
Front side marker light* 5W5W
Rear combination light* back-up 16W16W
turn signal 21W21W
stop/tail/side marker LED—
License plate light* 5W5W
Map light 8—
Vanity mirror light 2—
Step light* 8—
Trunk light* 3.4—
High-mounted stop light* LED—
*: See an INFINITI retailer for replacement.
NOTE: Always check with the Parts Department at an INFINITI retailer for the latest information about
parts.
Replacement procedures
All other lights are either type A, B, C, D, E or F.
When replacing a bulb, first remove the lens
and/or cover.
Maintenance and do-it-yourself8-29

3. Front side marker light
4. Map light
5. Rear personal light
6. Fog light
7. Step light
8. High-mounted stop li")

3. Front turn signal light
4. Map light
5. Fog light
6. Front side marker light
7. Step light
8. High-mounted stop light (on the rear par-cel")
Bulb No.
Headlight* High/Low beams (xenon) 35D2S
Front turn signal light* 21WY21W
Front fog light* 55H11
Clearance light* 5W5W
Front side marker light* 5W5W
Rear combination light")