2011 Hyundai Sonata ESP
[x] Cancel search: ESPPage 123 of 380

443
Features of your vehicle
Reprogramming a single HomeLink
®
button
To program a new device to a previously
trained HomeLink
®button, follow these
steps:
1. Press and hold the desired HomeLink
®
button. Do NOT release until step 4
has been completed.
2. When the indicator light begins to flash slowly (after 20 seconds), position the
handheld transmitter 1 to 3 inches
away from the HomeLink
®surface.
3. Press and hold the handheld transmit- ter button. The HomeLink®indicator
light will flash, first slowly and then rap-
idly.
4. When the indicator light begins to flash rapidly, release both buttons.
5. Press and hold the just-trained HomeLink
®button and observe the red
Status Indicator LED. If the indicator
light stays on constantly, programming
is complete and your new device
should activate. Erasing HomeLink
®buttons
Individual buttons cannot be erased.
However, to erase all three programmed
buttons:
1. Press and hold the two outer HomeLink
®buttons until the indicator
light begins to flash-after 20 seconds.
2. Release both buttons. Do not hold for longer than 30 seconds.
The Integrated HomeLink
®
Wireless
Control System is now in the training
(learn) mode and can be programmed at
any time following the appropriate steps
in the Programming sections above. FCC ID: NZLZTVHL3
IC: 4112A-ZTVHL3
This device complies with Part 15 of
the FCC Rules.
Operation is subject to the following two
conditions:
1. this device may not cause harmful
interference, and
2. This device must accept any interfer- ence received, including interference
that may cause undesired operation.
NVS
®is a registered trademark and Z-
Nav™ is a trademark of the Gentex
Corporation, Zeeland, Michigan.
HomeLink
®is a registered trademark
owned by Johnson Controls,
Incorporated, Milwaukee, Wisconsin.
WARNING
The transceiver has been tested
and complies with FCC and
Industry Canada rules. Changes or
modifications not expressly
approved by the party responsible
for compliance could void the
user's authority to operate the
device.
YF HMA 4-103.QXP 12/24/2009 5:12 PM Page 43
Page 124 of 380

Features of your vehicle44
4Outside rearview mirror Be sure to adjust mirror angles before
driving.
Your vehicle is equipped with both left-
hand and right-hand outside rearview
mirrors. The mirrors can be adjusted
remotely with the remote switch. The mir-
ror heads can be folded back to prevent
damage during an automatic car wash or
when passing in a narrow street.
Remote controlThe electric remote control mirror switch
allows you to adjust the position of the
left and right outside rearview mirrors. To
adjust the position of either mirror, the
ignition switch should be in the ACC or
ON position, or engine is running. Push
the switch (1) to R or L to select the right
side mirror or the left side mirror, then
press a corresponding point on the mirror
adjustment control to position the select-
ed mirror up, down, left or right.
After the adjustment, put the switch into
the neutral (center) position to prevent
inadvertent adjustment.
WARNING -
Rearview mir-
rors
• The right outside rearview mirror
is convex. Objects seen in the
mirror are closer than they
appear.
• Use your interior rearview mirror or direct observation to deter-
mine the actual distance of fol-
lowing vehicles when changing
lanes.
CAUTION
Do not scrape ice off the mirrorface; this may damage the surfaceof the glass. If ice should restrictmovement of the mirror, do notforce the mirror for adjustment. Toremove ice, use a deicer spray, or asponge or soft cloth with warmwater.
CAUTION
If the mirror is jammed with ice, do not adjust the mirror by force. Usean approved spray de-icer (not radi- ator antifreeze) to release thefrozen mechanism or move thevehicle to a warm place and allow the ice to melt.
WARNING
Do not adjust or fold the outside
rearview mirrors while the vehicle
is moving. This could result in loss
of control, and an accident which
could cause death, serious injury
or property damage.
OYF049033
YF HMA 4-103.QXP 12/24/2009 5:12 PM Page 44
Page 147 of 380

467
Features of your vehicle
Low washer fluidThis warning light indicates the washer
fluid reservoir is near empty. Refill the
washer fluid as soon as possible.The rearview camera will activate when
the back-up light is ON with the ignition
switch ON and the shift lever in the R
position.
This system is a supplemental system
that shows behind the vehicle through
the monitor while backing-up.
✽NOTICEThe rearview camera may not operate
normally, in extremely high or low
temperatures (operating temperature :
-13°F~149°F (-20°C~65°C)).
OYF049075N
REAR VIEW CAMERA (IF EQUIPPED)
WARNING
• This system is a supplementary
function only. It is the responsi-
bility of the driver to always
check the inside/outside rearview
mirror and the area behind the
vehicle before and while backing
up.
• Always keep the camera lens clean. If the lens is covered with
foreign matter, the camera may
not operate normally.
OYF049081
OYF049082N
YF HMA 4-103.QXP 12/24/2009 5:13 PM Page 67
Page 149 of 380

469
Features of your vehicle
Headlamp welcome functionWhen the headlight switch is in the ON or
AUTO position and all doors (and trunk)
are closed and locked, if you press the
door unlock button on the transmitter (or
the smart key), the headlights will come
on for about 15 seconds. At this time, if
you press the door lock button on the
transmitter (or smart key) the headlights
will turn off immediately.Daytime running light
(if equipped)Daytime Running Lights (DRL) can make
it easier for others to see the front of your
vehicle during the day. DRL can be help-
ful in many different driving conditions,
and it is especially helpful after dawn and
before sunset.
The DRL system will make the head-
lights turn OFF when:
1. The headlight is ON.
2. Engine stops.
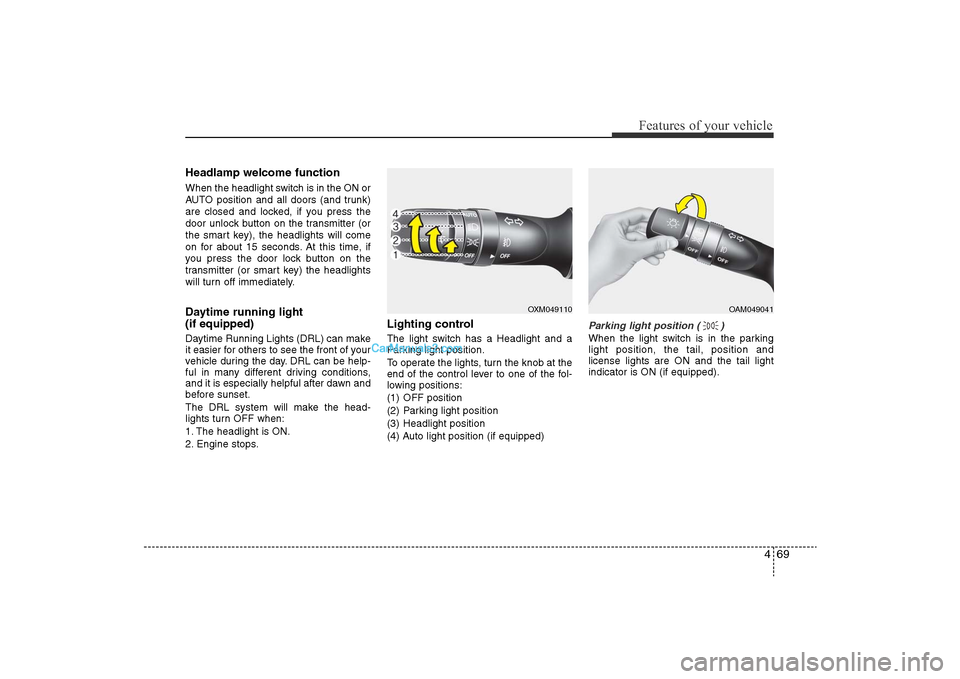
Lighting controlThe light switch has a Headlight and a
Parking light position.
To operate the lights, turn the knob at the
end of the control lever to one of the fol-
lowing positions:
(1) OFF position
(2) Parking light position
(3) Headlight position
(4) Auto light position (if equipped)
Parking light position ( )When the light switch is in the parking
light position, the tail, position and
license lights are ON and the tail light
indicator is ON (if equipped).
OXM049110
OAM049041
YF HMA 4-103.QXP 12/24/2009 5:14 PM Page 69
Page 190 of 380
![Hyundai Sonata 2011 Owners Manual
Features of your vehicle110
41. AM Selection ButtonPressing the [AM] button selects the AM
band. AM Mode is displayed on the LCD.2. FM Selection ButtonTurns to FM mode and toggles FM1and
FM2 when the Hyundai Sonata 2011 Owners Manual
Features of your vehicle110
41. AM Selection ButtonPressing the [AM] button selects the AM
band. AM Mode is displayed on the LCD.2. FM Selection ButtonTurns to FM mode and toggles FM1and
FM2 when the](/manual-img/35/16817/w960_16817-189.png)
Features of your vehicle110
41. AM Selection ButtonPressing the [AM] button selects the AM
band. AM Mode is displayed on the LCD.2. FM Selection ButtonTurns to FM mode and toggles FM1and
FM2 when the button is pressed each
time.3. FM/AM ButtonTurns to FM or AM mode, and toggles in
the order of FM1
➟FM2
➟AM
➟FM1...
when the button is pressed each time.
4.
Power ON/OFF Button & VolumeControl Knob
Turns on/off the set when the IGNITION
SWITCH is on ACC or ON. If the button
is turned to the right, it increases the vol-
ume and left,decreases the volume.
• Adjusts the volume of the car audio system. Rotate clockwise to increase
the volume or counterclockwise to
decrease.
5. Preset ButtonPush [1]~[6] buttons less than 0.8 sec-
ond to play the channel saved in each
button.Push Preset button for 0.8 second
or longer to save current channel to the
respective button with a beep.6. SCAN Button• When the button is pressed, it automat-ically scans the radio stations upwards.
• The SCAN feature steps through each station, starting from the initial station,
for ten seconds.
• press the [SCAN] button again to stop the scan feature and to listen to the cur-
rently selected channel.7. MUTE ButtonPress the button to mute the sound.
8. SETUP Button
Press this button to turn to the XM option
and the other adjustment mode.
If no action is taken for 5 seconds after
pressing the button, it will return to the
play mode.(After entering SEPUP mode,
move between items using the left, right
and PUSH functions of the [TUNE]
knob.)
The setup changes in the order of TEXT
SCROLL
➟AV C
➟BT
➟XM
In case of PA760YF, Using the
[ FOLDER ] and [ENTER] button.
The setup Change in the order of
SOUND
➟XM
➟HD RADIO
➟ AVC
➟ CLOCK
➟SCROLL
➟PHONE
➟RETURN
• SCROLL
ters longer than the LCD text display
and can be turned ON/OFF through the
sound quality control knob.
(For PA760YF, Press the [ FOLDER ]
button.)
YF HMA 4-104~(AUDIO).QXP 12/24/2009 5:21 PM Page 110
Page 194 of 380

Features of your vehicle114
41. CD Loading SlotInsert CD with printed side upward and
gently push in. When the ignition switch is
on ACC or ON and power is off, power is
automatically turned on if the CD is
loaded. This CDP supports only 12cm CD.
If VCD, Data CD are loaded, "Reading
Error" message will appear and CD will be
ejected.2. CD Eject ButtonPush button for less than 0.8 seconds to
eject the CD during CD playback. This but-
ton is enabled when ignition switch is off.
• ALL EJECT(CDC Only)
Press this button for more than 0.8 sec-
onds to eject all discs inside the deck in
respective order.3. CD Selection ButtonIf the CD is loaded, turns to CD mode. If no
CD, it displays "NO Disc" (for PA710YF dis-
plays “NO Media”) for 3 seconds and
returns to th previous mode.
4. Automatic Track Selection
Button• Push [TRACK ] button for less than
0.8 second to play from the beginning
of current song.
• Push [TRACK ] button for less than 0.8 second and press again within 1
seconds to play the previous song.
• Push [TRACK ] button for 0.8 or longer to initiate reverse direction high
speed sound search of current song.
• Push [SEEK ] button for less than 0.8 second to play the next song.
• Push [SEEK ] button for 0.8 or longer to initiate high speed sound
search of current song.5. RANDOM Play ButtonPress this button for less than 0.8 second
to activate ‘RDM’ mode and more than
0.8 seconds to activate ‘ALL RDM’ mode.
• RDM : Only files/tracks in a folder/discare played back in a random sequence.
• ALL RDM(MP3/WMA Only) : All files in a disc are played back in the random
sequence.
6. REPEAT ButtonPress this button for less than 0.8 second
to activate ‘RPT’ mode and more than 0.8
seconds to activate ‘ RPT’ mode.
• RPT : Only a track(file) is repeatedlyplayed back.
• RPT(MP3/WMA Only) : Only files in a folder are repeatedly played back.7. CD Indicator Icon(CDP Only)When car ignition switch is ACC or ON
and if the CD is loaded, this indicator Icon
is on. If the CD is ejected the Icon is off.8. SCAN Play ButtonPlays first 10 seconds of each song in
the DISC. To cancel the mode, press the
button once again.9. INFO ButtonDisplays the information of the current
CD TRACK(FILE) as below when the
button is pressed each time.
• CDDA : DISC TITLE
➟DISC ARTIST
➟
TRACK TITLE
➟TRACK ARTIST
➟TOTAL
TRACK...
YF HMA 4-104~(AUDIO).QXP 12/24/2009 5:21 PM Page 114
Page 205 of 380

4 125
Features of your vehicle
Using XM satellite RadioYour vehicle is equipped with 3 months
complimentary period of XM Satellite
Radio. XM provides access to over 130
channels of music, information, and
entertainment programming.1. XM Selection ButtonTurns to XM Satellite Radio Mode. XM
mode toggles in order to XM1
➟XM2
➟
XM3
➟XM1... when the button is pressed
each time.
2. INFO ButtonDisplays the information of the current
channel in the order of Artist/Song title
➟
Category/Channel name
➟Current Play
Channel
➟Artist/Song title
➟Category/
Channel name... when the button is
pressed each time. The complete text
information is not displayed, rotate the
tune button to see the next page.
3. Automatic Channel Selection Button• Push [TRACK ] button for less than
0.8 second to select previous channel.
• Push [TRACK ] button for 0.8 sec- ond or longer to continuously move to
previous channel. • Push [SEEK ] button for less than
0.8 second to select next channel.
• Push [SEEK ] button for 0.8 second or longer to continuously move to next channel.
• Radio ID : Seek or Tune to XM channel 0 to display the Radio ID.
4. SCAN ButtonPress to hear a brief sampling of all
channel. To cancel the scan mode, press
the button once again.5. CATEGORY Search Button• Push [FOLDER ] button to searchprevious category.
• Push [CAT ] button to search next category. To listen to the displayed cat-
egory, press the TUNE/SETUP but-
ton(for PA760YF, press [ENTER] but-
ton). To scan channel in displayed cat-
egory, press the scan button.
To search channel in displayed catego-
ry, press seek buttons or turn the tune
button clockwise/counterclockwise(for
PA760YF, press [ TUNE ]).
(CATEGORY icon is will be turned on
in Category mode)
6. Manual Channel Selection Button
While listening to XM broadcast, rotate
this control to the right or left to search
other channels while listening to current
channel. (Turn to the right to searchhigh-
er channels and left, lower channels)
In case of PA760YF, press the
[TUNE ] button to search higher chan-
nels and the [ TUNE] button, lower
channels.7. Preset ButtonPush [1]~[6] buttons less than 0.8 sec-
ond to play the channel saved in each
button. Push Preset button for 0.8 sec-
ond or longer to save current channel to
the respective button with a beep.
YF HMA 4-104~(AUDIO).QXP 12/24/2009 5:22 PM Page 125
Page 208 of 380

Features of your vehicle128
4Automatic switching between dig-
ital and analog broadcastingIf the reception of the digital signal is lost,
the system switches automatically to the
analog signal. As soon as the digital sig-
nal is available again it will switch back.
Due to the fact that sub channels are
only broadcasted digital, the system
mutes playback if you have tuned to a
sub channel and the digital signal is lost.
The main line shows the message No
HD signal in place of station name.
After approximately one minute with the
digital signal lost, the system will auto-
matically tune to the analog signal of the
corresponding frequency.Text based informationHD Radio
TM
stations are able to broad-
cast text based information, e.g. station
name, song title and artist name. The
Driver Information System is able to dis-
play this information.
Radio display while receiving a
digital HD Radio
TM
1. Call Sign(Station Name)
2. Channel Name(HD1=main channel, HD2~8=sub channel)
3. Indicator for HD Radio
TM
1.SEEK UP/DOWN Button
Press this button to automatically select
previous or next station.
(HD
➟HD2
➟... HD8
➟107.8MHz
➟...)
2. SCAN Button
Press to hear a brief sampling of all sta-
tion on the frequency band. But no
scaned HD Radio
TMsignal.
When you press this button again at this
moment, you can receive this broadcast-
ing that you choose.
3. INFO Button
Showing details of this currently tuned
HD Radio
TM
station.(Showing the artist
name, song title)
4. Preset Button
• Push [1] ~[6] buttons less than 0.8 sec- ond to play the channel saved in each
button.
• Push preset button for 0.8 second or longer to save current channel to the
respective button with a beep.
5. TUNE Button
When you press the [ TUNE ] but-
ton, the frequency increase or decrease.
But skipped HD Radio
TMsignal.
ex) HD1(107.7MHz)
➟107.8MHz
➟...
YF HMA 4-104~(AUDIO).QXP 12/24/2009 5:22 PM Page 128