Page 303 of 404
What to do in an emergency
24 6
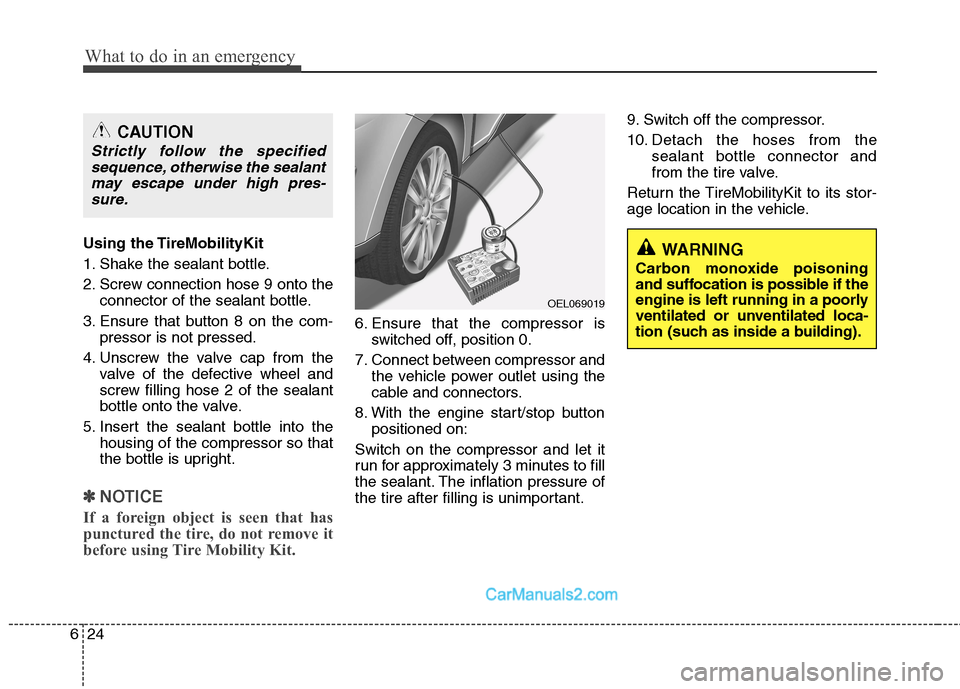
Using the TireMobilityKit
1. Shake the sealant bottle.
2. Screw connection hose 9 onto the
connector of the sealant bottle.
3. Ensure that button 8 on the com-
pressor is not pressed.
4. Unscrew the valve cap from the
valve of the defective wheel and
screw filling hose 2 of the sealant
bottle onto the valve.
5. Insert the sealant bottle into the
housing of the compressor so that
the bottle is upright.
✽ ✽
NOTICE
If a foreign object is seen that has
punctured the tire, do not remove it
before using Tire Mobility Kit.
6. Ensure that the compressor is
switched off, position 0.
7. Connect between compressor and
the vehicle power outlet using the
cable and connectors.
8. With the engine start/stop button
positioned on:
Switch on the compressor and let it
run for approximately 3 minutes to fill
the sealant. The inflation pressure of
the tire after filling is unimportant.9. Switch off the compressor.
10. Detach the hoses from the
sealant bottle connector and
from the tire valve.
Return the TireMobilityKit to its stor-
age location in the vehicle.
WARNING
Carbon monoxide poisoning
and suffocation is possible if the
engine is left running in a poorly
ventilated or unventilated loca-
tion (such as inside a building).
OEL069019
CAUTION
Strictly follow the specified
sequence, otherwise the sealant
may escape under high pres-
sure.
Page 304 of 404
625
What to do in an emergency
Distributing the sealant
11. Immediately drive approximately
3 km (2 miles) to evenly distribute
the sealant in the tire.Producing the tire inflation pres-
sure
12. After driving approximately 3 km
(2 miles), stop at a suitable loca-
tion.
13. Connect connection hose 9 of
the compressor directly to the tire
valve.
14. Connect between compressor
and the vehicle power outlet
using the cable and connectors.
15. Adjust the tire inflation pressure
to 230 kPa (33 psi). With the
engine start/stop button posi-
tioned on, proceed as follows.
- To increase the inflation pres-
sure:Switch on the compressor,
position I. To check the current
inflation pressure setting, briefly
switch off the compressor.✽ ✽
NOTICE
The pressure gauge may show high-
er than actual reading when the
compressor is running. To get an
accurate tire reading, the compres-
sor needs to be turned off.
- To reduce the inflation pres-
sure:Press the button 8 on the
compressor.
16. Remove the speed restriction
label(0) from the sealant bottle(1)
and place it in a highly visible
place in the vehicle such as on
the steering wheel to remind you
not to drive too fast.
WARNING
Do not let the compressor run for
more than 10 minutes, otherwise
the device will overheat and may
be damaged.
CAUTION
Do not exceed a speed of 60
km/h (35 mph). If possible, do
not fall below a speed of 20
km/h (12 mph).
While driving, if you experience
any unusual vibration, ride dis-
turbance or noise, reduce your
speed and drive with caution
until you can safely pull off of
the side of the road.
Call for road side service or tow-
ing.
CAUTION
Be careful not to overinflate the
tire and stay away from the tire
when filling it.
Page 307 of 404
7
Engine compartment / 7-2
Maintenance services / 7-3
Owner maintenance / 7-5
Scheduled maintenance service / 7-7
Explanation of scheduled maintenance items / 7-19
Engine oil / 7-22
Inverter coolant / 7-24
Engine coolant / 7-24
Brake fluid / 7-27
Washer fluid / 7-28
Parking brake / 7-28
Air cleaner / 7-29
Climate control air filter / 7-30
Wiper blades / 7-32
Battery / 7-34
Tires and wheels / 7-37
Fuses / 7-50
Light bulbs / 7-60
Appearance care / 7-69
Emission control system / 7-75
California perchlorate notice / 7-78
Maintenance
Page 308 of 404
Maintenance
2 7
ENGINE COMPARTMENT
OYFH071001
❈The actual engine room in the vehicle may differ from the illustration.1. Sub relay box
2. Engine coolant reservoir
3. Windshield washer fluid reservoir
4. Radiator cap
5. Engine oil dipstick
6. Engine oil filler cap
7. Brake fluid reservoir
8. Air cleaner
9. Fuse box
10. Inverter coolant
* : if equipped
Page 310 of 404
Maintenance
4 7
WARNING- Maintenance
work
Performing maintenance work on
a vehicle can be dangerous. You
can be seriously injured while
performing some maintenance
procedures. If you lack sufficient
knowledge and experience or the
proper tools and equipment to do
the work, have it done by an
authorized HYUNDAI dealer.
Working under the hood with the
engine running is dangerous. It
becomes even more dangerous
when you wear jewelry or loose
clothing. These can become
entangled in moving parts and
result in injury. Therefore, if you
must run the engine while work-
ing under the hood, make certain
that you remove all jewelry (espe-
cially rings, bracelets, watches,
and necklaces) and all neckties,
scarves, and similar loose cloth-
ing before getting near the
engine or cooling fans.
(Continued)
(Continued)
When you open the engine hood,
turn the Hybrid system off. If not,
it may result if death or serious
injury because the high voltage
flows.
If the components of brake sys-
tem passed the brake oil may be
replaced or removed, have the
vehicle checked by an authorized
HYUNDAI dealer. To operate the
brake system, the brake air
should be out. If not, the braking
distance may be long by low per-
formance of brake.
Page 311 of 404
75
Maintenance
OWNER MAINTENANCE
The following lists are vehicle checks and
inspections that should be performed by
the owner or an authorized HYUNDAI
dealer at the frequencies indicated to
help ensure safe, dependable operation
of your vehicle.
Any adverse conditions should be
brought to the attention of your dealer as
soon as possible.
These Owner Maintenance Checks are
generally not covered by warranties and
you may be charged for labor, parts and
lubricants used.Owner maintenance schedule
When you stop for fuel:
Check the engine oil level.
Check coolant level in coolant reser-
voirs (engine and inverter).
Check the windshield washer fluid
level.
Look for low or under-inflated tires.
While operating your vehicle:
Note any changes in the sound of the
exhaust or any smell of exhaust fumes
in the vehicle.
Check for vibrations in the steering
wheel. Notice any increased steering
effort or looseness in the steering
wheel, or change in its straight-ahead
position.
Notice if your vehicle constantly turns
slightly or “pulls” to one side when trav-
eling on smooth, level road.
When stopping, listen and check for
unusual sounds, pulling to one side,
increased brake pedal travel or “hard-
to-push” brake pedal.
If any slipping or changes in the oper-
ation of your transaxle occurs, check
the transaxle fluid level.
Check automatic transaxle P (Park)
function.
Check parking brake.
Check for fluid leaks under your vehicle
(water dripping from the air condition-
ing system during or after use is nor-
mal).
Check inverter coolant.
WARNING
Be careful when checking your
engine coolant level when the
engine is hot. Scalding hot coolant
and steam may blow out under
pressure. This could cause burns
or other serious injury.
Page 312 of 404
Maintenance
6 7
At least monthly:
Check coolant level in the engine
coolant reservoir and inverter coolant.
Check the operation of all exterior
lights, including the stoplights, turn sig-
nals and hazard warning flashers.
Check the inflation pressures of all
tires including the spare.
At least twice a year
(i.e., every Spring and Fall):
Check radiator, heater and air condi-
tioning hoses for leaks or damage.
Check windshield washer spray and
wiper operation. Clean wiper blades
with clean cloth dampened with wash-
er fluid.
Check headlight alignment.
Check muffler, exhaust pipes, shields
and clamps.
Check the lap/shoulder belts for wear
and function.
Check for worn tires and loose wheel
lug nuts.
At least once a year:
Clean body and door drain holes.
Lubricate door hinges and checks, and
hood hinges.
Lubricate door and hood locks and
latches.
Lubricate door rubber weatherstrips.
Check the air conditioning system.
Inspect and lubricate automatic
transaxle linkage and controls.
Clean battery and terminals.
Check the brake fluid level.
Check the drive belt.
Page 314 of 404

Maintenance
8 7
NORMAL MAINTENANCE SCHEDULE
The following maintenance services must be performed to ensure good emission control and performance. Keep receipts for all
vehicle emission services to protect your warranty. Where both mileage and time are shown, the frequency of service is deter-
mined by whichever occurs first.
15,000 miles (24,000 km) or 12 months
❑Inspect air cleaner filter
❑Inspect HSG belt
(15,000 miles (24,000 km) or 24 months)
❑Inspect vacuum hose
❑Inspect air conditioning refrigerant
❑Inspect brake hoses and lines
❑Inspect drive shafts and boots
❑Inspect exhaust pipe and muffler
❑Inspect front brake disc/pads, calipers
❑Inspect rear brake disc/pads
(Continued)
(Continued)
❑Inspect steering gear box, linkage & boots/lower arm ball joint,
upper arm ball joint
❑Inspect suspension mounting bolts
❑Replace climate control air filter (for evaporator and blower unit)
❑Replace engine oil and filter
(15,000 miles (24,000 km) or 24 months)
22,500 miles (36,000 km) or 18 months
❑Inspect air cleaner filter
❑Inspect HSG belt
(22,500 miles (36,000 km) or 36 months)
❑Inspect vacuum hose
❑Replace engine oil and filter
(22,500 miles (36,000 km) or 36 months)
7,500 miles (12,000 km) or 6 months
❑Inspect air cleaner filter
❑Inspect HSG belt
(7,500 miles (12,000 km) or 12 months)
❑Inspect vacuum hose
❑Replace engine oil and filter
(7,500 miles (12,000 km) or 12 months)