2011 Hyundai Sonata Hybrid ignition
[x] Cancel search: ignitionPage 37 of 404

35
Safety features of your vehicle
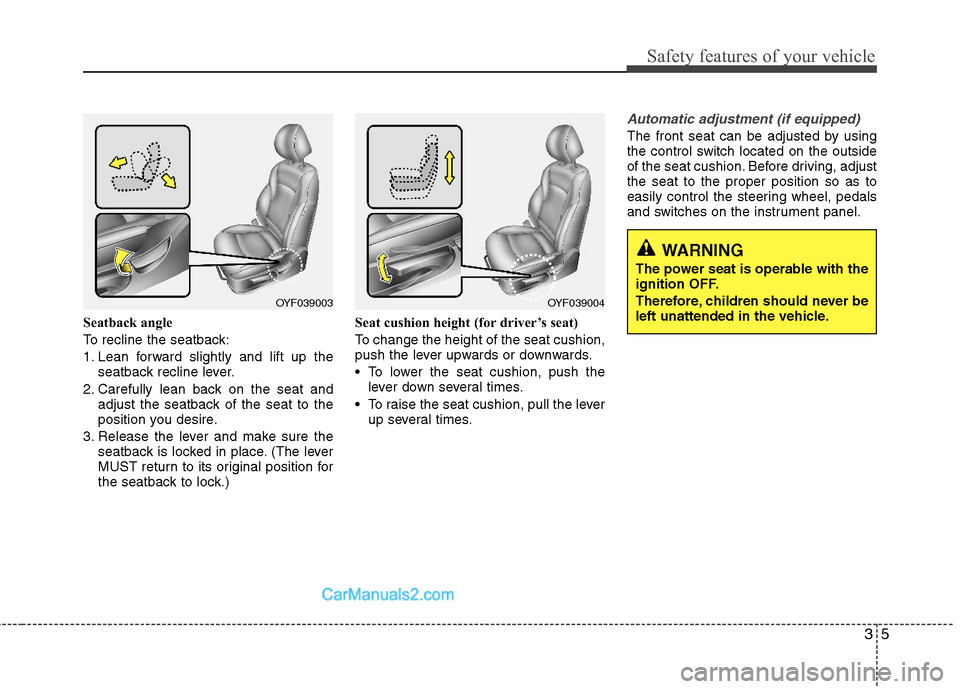
Seatback angle
To recline the seatback:
1. Lean forward slightly and lift up the
seatback recline lever.
2. Carefully lean back on the seat and
adjust the seatback of the seat to the
position you desire.
3. Release the lever and make sure the
seatback is locked in place. (The lever
MUST return to its original position for
the seatback to lock.)Seat cushion height (for driver’s seat)
To change the height of the seat cushion,
push the lever upwards or downwards.
• To lower the seat cushion, push the
lever down several times.
To raise the seat cushion, pull the lever
up several times.
Automatic adjustment (if equipped)
The front seat can be adjusted by using
the control switch located on the outside
of the seat cushion. Before driving, adjust
the seat to the proper position so as to
easily control the steering wheel, pedals
and switches on the instrument panel.
WARNING
The power seat is operable with the
ignition OFF.
Therefore, children should never be
left unattended in the vehicle.
OYF039003OYF039004
Page 69 of 404

337
Safety features of your vehicle
Noise and smoke
When the air bags inflate, they make a
loud noise and leave smoke and powder
in the air inside of the vehicle. This is nor-
mal and is a result of the ignition of the
air bag inflator. After the air bag inflates,
you may feel substantial discomfort in
breathing due to the contact of your
chest with both the seat belt and the air
bag, as well as from breathing the smoke
and powder.Open your doors and/or
windows as soon as possible after
impact in order to reduce discomfort
and prevent prolonged exposure to
the smoke and powder.
Though the smoke and powder are non-
toxic, they may cause irritation to the skin
(eyes, nose and throat, etc). If this is the
case, wash and rinse with cold water
immediately and consult a doctor if the
symptom persists.
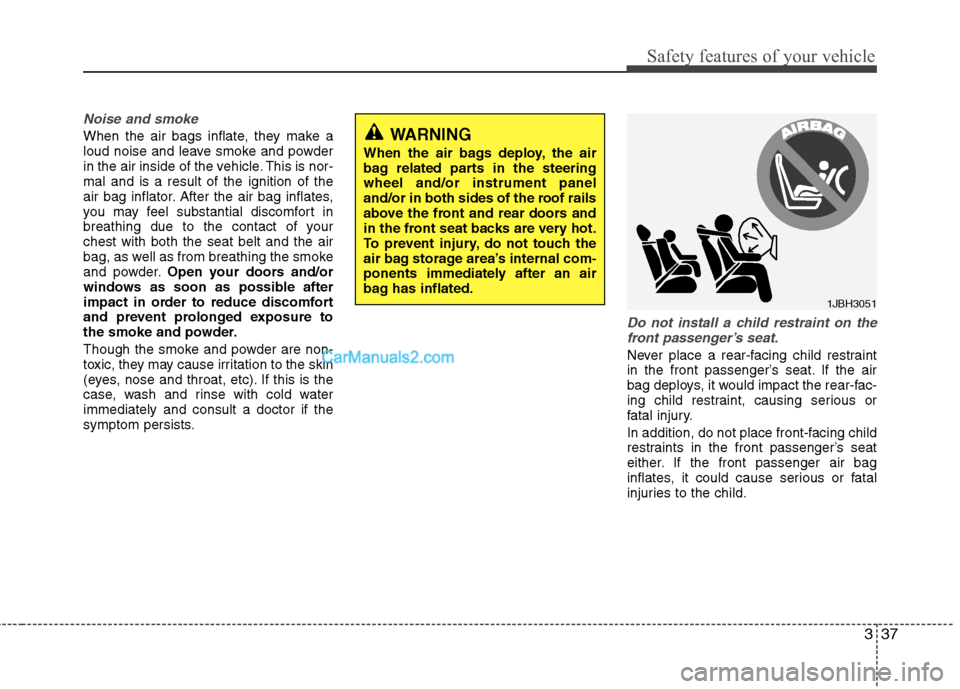
Do not install a child restraint on the
front passenger’s seat.
Never place a rear-facing child restraint
in the front passenger’s seat. If the air
bag deploys, it would impact the rear-fac-
ing child restraint, causing serious or
fatal injury.
In addition, do not place front-facing child
restraints in the front passenger’s seat
either. If the front passenger air bag
inflates, it could cause serious or fatal
injuries to the child.
1JBH3051
WARNING
When the air bags deploy, the air
bag related parts in the steering
wheel and/or instrument panel
and/or in both sides of the roof rails
above the front and rear doors and
in the front seat backs are very hot.
To prevent injury, do not touch the
air bag storage area’s internal com-
ponents immediately after an air
bag has inflated.
Page 70 of 404

Safety features of your vehicle
38 3
Air bag warning light
The purpose of air bag warning light in
your instrument panel is to alert you of a
potential problem with your air bag -
Supplemental Restraint System (SRS).When the engine start/stop button is
turned ON, the indicator light should illu-
minate for approximately 6 seconds, then
go off.
Have the system checked if:
The light does not turn on briefly when
you turn the ignition ON.
The light stays on after illuminating for
approximately 6 seconds.
The light comes on while the vehicle is
in motion.
The light blinks when the engine
start/stop button is in ON position.
WARNING
Extreme Hazard! Do not use a
rearward facing child restraint on
a seat protected by an air bag in
front of it!
Never put a child restraint in the
front passenger’s seat. If the front
passenger air bag inflates, it
would cause serious or fatal
injuries.
When children are seated in the
rear outboard seats of a vehicle
equipped with side air bags, be
sure to install the child restraint
system as far away from the door
side as possible, and securely
lock the child restraint system in
position.
Inflation of side and/or curtain air
bags could cause serious injury
or death to an infant or child.
W7-147
Page 72 of 404

Safety features of your vehicle
40 3
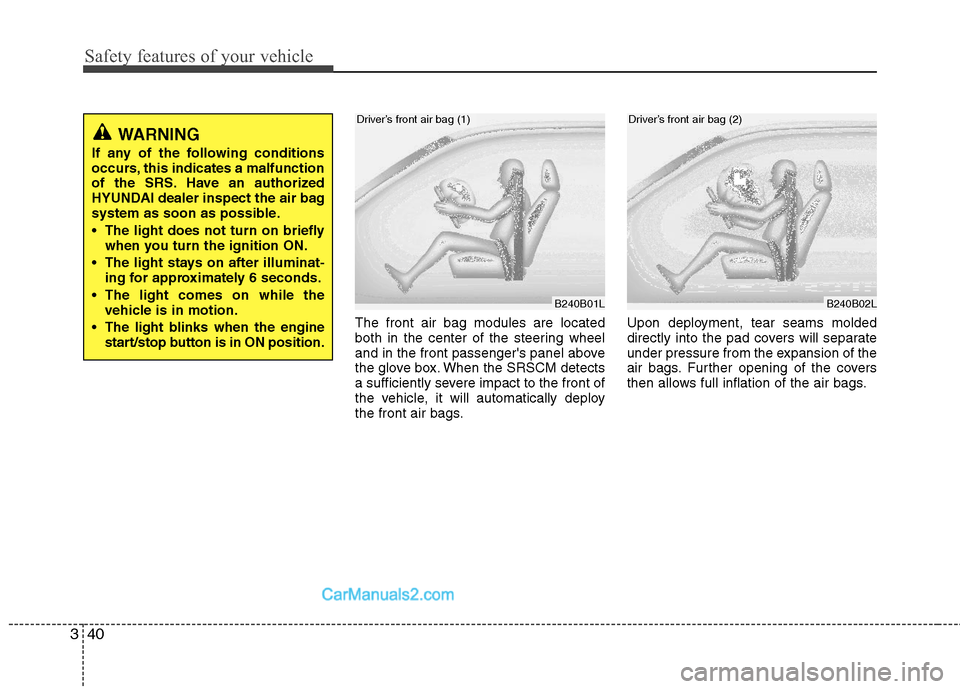
The front air bag modules are located
both in the center of the steering wheel
and in the front passenger's panel above
the glove box. When the SRSCM detects
a sufficiently severe impact to the front of
the vehicle, it will automatically deploy
the front air bags.Upon deployment, tear seams molded
directly into the pad covers will separate
under pressure from the expansion of the
air bags. Further opening of the covers
then allows full inflation of the air bags.
WARNING
If any of the following conditions
occurs, this indicates a malfunction
of the SRS. Have an authorized
HYUNDAI dealer inspect the air bag
system as soon as possible.
The light does not turn on briefly
when you turn the ignition ON.
The light stays on after illuminat-
ing for approximately 6 seconds.
The light comes on while the
vehicle is in motion.
The light blinks when the engine
start/stop button is in ON position.
B240B01L
Driver’s front air bag (1)
B240B02L
Driver’s front air bag (2)
Page 92 of 404

Safety features of your vehicle
60 3
SRS Care
The SRS is virtually maintenance-free
and so there are no parts you can safely
service by yourself. If the SRS air bag
warning light " " does not illuminate,
when you turn the ignition on, or continu-
ously remains on, have your vehicle
immediately inspected by an authorized
HYUNDAI dealer.
Any work on the SRS system, such as
removing, installing, repairing, or any
work on the steering wheel, the front
passenger's panel, front seats and roof
rails must be performed by an authorized
HYUNDAI dealer. Improper handling of
the SRS system may result in serious
personal injury.WARNING
Modification to SRS components
or wiring, including the addition
of any kind of badges to the pad
covers or modifications to the
body structure, can adversely
affect SRS performance and lead
to possible injury.
Modification of the components
where the SRS sensors are
installed and also modification of
other components of the vehicle
may affect SRS performance and
lead to possible injury.
For cleaning the air bag pad cov-
ers, use only a soft, dry cloth or
one which has been moistened
with plain water. Solvents or
cleaners could adversely affect
the air bag covers and proper
deployment of the system.
No objects should be placed over
or near the air bag modules on the
steering wheel, instrument panel,
and the front passenger's panel
above the glove box, because any
such object could cause harm if the
vehicle is in a crash severe enough
to cause the air bags to inflate.
(Continued)
(Continued)
If the air bags inflate, they must
be replaced by an authorized
HYUNDAI dealer.
Do not tamper with or disconnect
SRS wiring, or other components
of the SRS system. Doing so
could result in injury, due to acci-
dental inflation of the air bags or
by rendering the SRS inopera-
tive.
If components of the air bag sys-
tem must be discarded, or if the
vehicle must be scrapped, certain
safety precautions must be
observed. An authorized
HYUNDAI dealer knows these
precautions and can give you the
necessary information. Failure to
follow these precautions and pro-
cedures could increase the risk
of personal injury.
If your car was flooded and has
soaked carpeting or water on the
flooring, you shouldn't try to start
the hybrid system have the car
towed to an authorized HYUNDAI
dealer.
Page 127 of 404

433
Features of your vehicle
Z-Nav™ Compass Display
The NVS™ Mirror in your vehicle is also
equipped with a Z-Nav™ Compass that
shows the vehicle Compass heading in
the Display Window using the 8 basic
cardinal headings (N, NE, E, SE, etc.).
Compass function
The Compass can be turned ON and
OFF and will remember the last state
when the ignition is cycled. To turn the
display feature ON/OFF:
1. Press and release the button to
turn the display feature OFF.
2. Press and release the button again
to turn the display back ON.
Additional options can be set with press
and hold sequences of the button and
are detailed below.
There is a difference between magnetic
north and true north. The compass in the
mirror can compensate for this difference
when it knows the Magnetic Zone in
which it is operating. This is set either by
the dealer or by the user. The operating
Zone Numbers for North America are
shown in the figure on the following sec-
tion.
B520C05NF
Page 211 of 404
![Hyundai Sonata Hybrid 2011 Owners Manual 4117
Features of your vehicle
1. AM Selection Button
Pressing the [AM] button selects the AM
band. AM Mode is displayed on the LCD.
2. FM Selection Button
Turns to FM mode and toggles FM1and
FM2 when Hyundai Sonata Hybrid 2011 Owners Manual 4117
Features of your vehicle
1. AM Selection Button
Pressing the [AM] button selects the AM
band. AM Mode is displayed on the LCD.
2. FM Selection Button
Turns to FM mode and toggles FM1and
FM2 when](/manual-img/35/19652/w960_19652-210.png)
4117
Features of your vehicle
1. AM Selection Button
Pressing the [AM] button selects the AM
band. AM Mode is displayed on the LCD.
2. FM Selection Button
Turns to FM mode and toggles FM1and
FM2 when the button is pressed each
time.
3.Power ON/OFF Button & VolumeControl Knob
Turns on/off the set when the IGNITION
SWITCH is on ACC or ON. If the button
is turned to the right, it increases the vol-
ume and left,decreases the volume.
system. Rotate clockwise to increase
the volume or counterclockwise to
decrease.
4. Preset Button
Push [1]~[6] buttons less than 0.8 sec-
ond to play the channel saved in each
button.Push Preset button for 0.8 second
or longer to save current channel to the
respective button with a beep.
5. SCAN Button
ically scans the radio stations upwards.
station, starting from the initial station,
for ten seconds.
the scan feature and to listen to the cur-
rently selected channel.
6. MUTE Button
Press the button to mute the sound.
7. SETUP Button
Press this button to turn to the XM option
and the other adjustment mode.
If no action is taken for 5 seconds after
pressing the button, it will return to the
play mode.(After entering SEPUP mode,
move between items using the left, right
and PUSH functions of the [TUNE]
knob.)
The setup changes in the order of TEXT
SCROLL
➟AV C➟BT➟XM
This funtion is used to display characters
longer than the LCD text display and can
be turned ON/OFF through the sound
quality control knob.
This funtion automatically adjusts the
volume level according to the speed of
the vehicle and can be turned ON/OFF
through the sound quality control knob.
Page 214 of 404

Features of your vehicle
120 4
1. CD Loading Slot
Insert CD with printed side upward and
gently push in. When the ignition switch is
on ACC or ON and power is off, power is
automatically turned on if the CD is
loaded. This CDP supports only 12cm CD.
If VCD, Data CD are loaded, “Reading
Error” message will appear and CD will be
ejected.
2. CD Eject Button
Push button for less than 0.8 seconds to
eject the CD during CD playback. This but-
ton is enabled when ignition switch is off.
ALL EJECT(CD Changer : PA760YF)
Press this button for more than 0.8 sec-
onds to eject all discs inside the deck in
respective order.
3. CD Selection Button
If the CD is loaded, turns to CD mode. If no
CD, it displays “NO Disc” (for CD Player :
PA710YF displays “NO Media”) for 3 sec-
onds and returns to th previous mode.
4. Automatic Track Selection
Button
Push [TRACK ] button for less than
0.8 second to play from the beginning
of current song.
Push [TRACK ] button for less than
0.8 second and press again within
1 seconds to play the previous song.
Push [TRACK ] button for 0.8 or
longer to initiate reverse direction high
speed sound search of current song.
Push [SEEK ] button for less than
0.8 second to play the next song.
Push [SEEK ] button for 0.8 or
longer to initiate high speed sound
search of current song.
5. RANDOM Play Button
Press this button for less than 0.8 second
to activate ‘RDM’ mode and more than
0.8 seconds to activate ‘ALL RDM’ mode.
RDM : Only files/tracks in a folder/disc
are played back in a random sequence.
ALL RDM(MP3/WMA Only) : All files in
a disc are played back in the random
sequence.
6. REPEAT Button
Press this button for less than 0.8 second
to activate ‘RPT’ mode and more than 0.8
seconds to activate ‘ RPT’ mode.
RPT : Only a track(file) is repeatedly
played back.
RPT(MP3/WMA Only) : Only files
in a folder are repeatedly played back.
7. CD Indicator Icon
When car ignition switch is ACC or ON
and if the CD is loaded, this indicator Icon
is on. If the CD is ejected the Icon is off.