2011 Hyundai Santa Fe belt
[x] Cancel search: beltPage 327 of 408
Maintenance
8
7
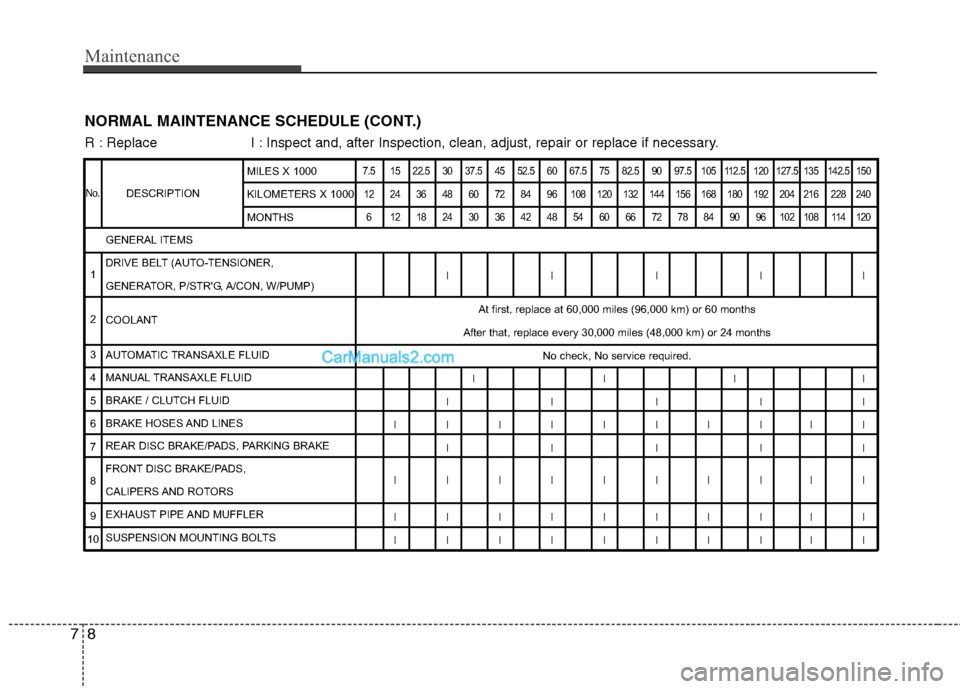
NORMAL MAINTENANCE SCHEDULE (CONT.)
DESCRIPTION
7.5 15 22.5 30 37.5 45 52.5 60 67.5 75 82.5 90 97.5 105 112.5 120 127.5 135 142.5 150
12 24 36 48 60 72 84 96 108 120 132 144 156 168 180 192 204 216 228 240 6 121824303642485460667278849096102108114120
IIIII
At first, replace at 60,000 miles (96,000 km) or 60 months
After that, replace every 30,000 miles (48,000 km) or 24 months No check, No service required.
IIII
IIIII
IIIIIIIIII IIIII
IIIIIIIIII
IIIIIIIIII
IIIIIIIIII
GENERAL ITEMS
DRIVE BELT (AUTO-TENSIONER,
GENERATOR, P/STR'G, A/CON, W/PUMP)
COOLANT
AUTOMATIC TRANSAXLE FLUID
MANUAL TRANSAXLE FLUID
BRAKE / CLUTCH FLUID
BRAKE HOSES AND LINES
REAR DISC BRAKE/PADS, PARKING BRAKE
FRONT DISC BRAKE/PADS,
CALIPERS AND ROTORS
EXHAUST PIPE AND MUFFLER
SUSPENSION MOUNTING BOLTS MILES X 1000
KILOMETERS X 1000
MONTHS
R : Replace I : Inspect and, after Inspection, clean, adjust, repair or replace if neces\
sary.
No.
1
2
3
4
5
6
7
8
9
10
Page 328 of 408
79
Maintenance
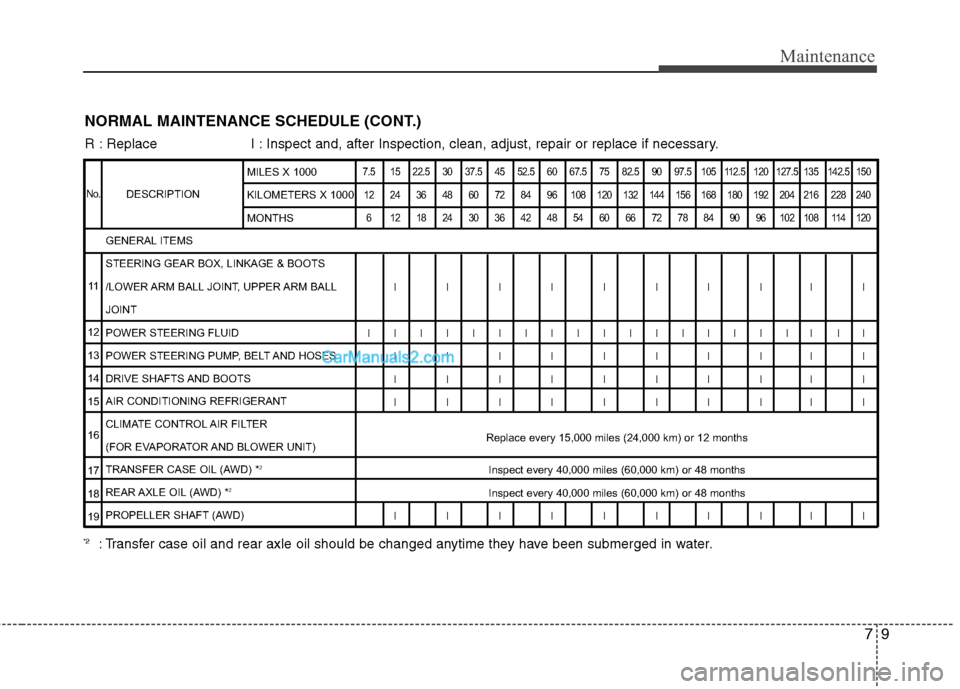
NORMAL MAINTENANCE SCHEDULE (CONT.)
R : Replace I : Inspect and, after Inspection, clean, adjust, repair or replace if neces\
sary.
DESCRIPTION
7.5 15 22.5 30 37.5 45 52.5 60 67.5 75 82.5 90 97.5 105 112.5 120 127.5 135 142.5 15012 24 36 48 60 72 84 96 108 120 132 144 156 168 180 192 204 216 228 240 6 121824303642485460667278849096102108114120
IIIIIIIIII
IIIIIIIIIIIIIIIIII II IIIIIIIIII
IIIIIIIIII
IIIIIIIIII
Replace every 15,000 miles (24,000 km) or 12 months Inspect every 40,000 miles (60,000 km) or 48 months
Inspect every 40,000 miles (60,000 km) or 48 months
IIIIIIIIII
GENERAL ITEMS
STEERING GEAR BOX, LINKAGE & BOOTS
/LOWER ARM BALL JOINT, UPPER ARM BALL
JOINT
POWER STEERING FLUID
POWER STEERING PUMP, BELT AND HOSES
DRIVE SHAFTS AND BOOTS
AIR CONDITIONING REFRIGERANT
CLIMATE CONTROL AIR FILTER
(FOR EVAPORATOR AND BLOWER UNIT)
TRANSFER CASE OIL (AWD) *
2
REAR AXLE OIL (AWD) *2
PROPELLER SHAFT (AWD) MILES X 1000
KILOMETERS X 1000
MONTHS
No.
11
12
13
14
15
16
17
18
19
*2: Transfer case oil and rear axle oil should be changed anytime they have been submerged in water.
Page 330 of 408
711
Maintenance
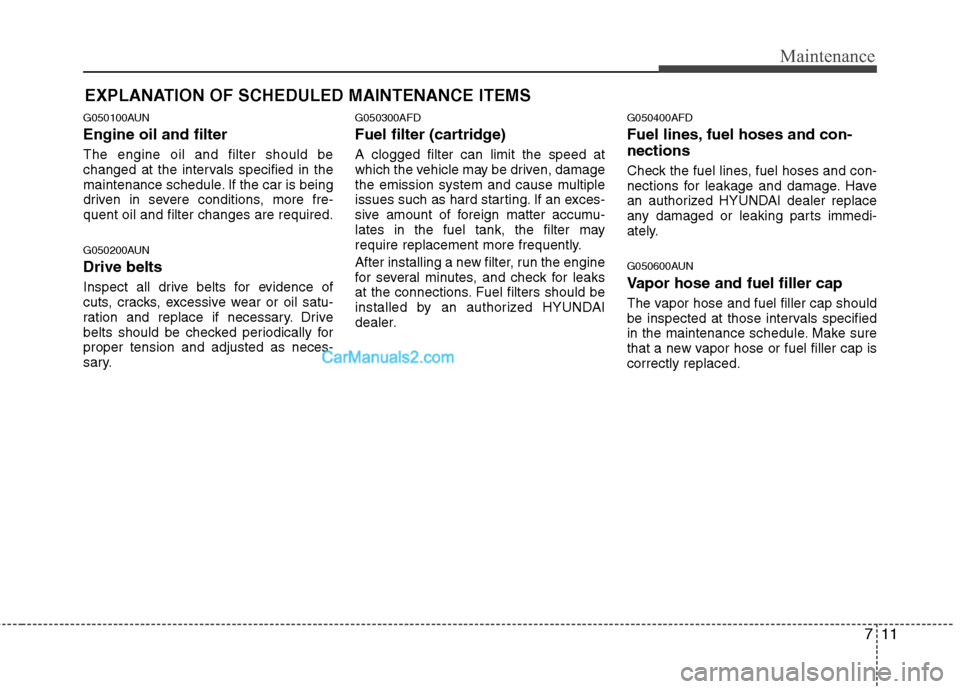
EXPLANATION OF SCHEDULED MAINTENANCE ITEMS
G050100AUN
Engine oil and filter
The engine oil and filter should be
changed at the intervals specified in the
maintenance schedule. If the car is being
driven in severe conditions, more fre-
quent oil and filter changes are required.
G050200AUN
Drive belts
Inspect all drive belts for evidence of
cuts, cracks, excessive wear or oil satu-
ration and replace if necessary. Drive
belts should be checked periodically for
proper tension and adjusted as neces-
sary.
G050300AFD
Fuel filter (cartridge)
A clogged filter can limit the speed at
which the vehicle may be driven, damage
the emission system and cause multiple
issues such as hard starting. If an exces-
sive amount of foreign matter accumu-
lates in the fuel tank, the filter may
require replacement more frequently.
After installing a new filter, run the engine
for several minutes, and check for leaks
at the connections. Fuel filters should be
installed by an authorized HYUNDAI
dealer.
G050400AFD
Fuel lines, fuel hoses and con-
nections
Check the fuel lines, fuel hoses and con-
nections for leakage and damage. Have
an authorized HYUNDAI dealer replace
any damaged or leaking parts immedi-
ately.
G050600AUN
Vapor hose and fuel filler cap
The vapor hose and fuel filler cap should
be inspected at those intervals specified
in the maintenance schedule. Make sure
that a new vapor hose or fuel filler cap is
correctly replaced.
Page 332 of 408
713
Maintenance
G051500AUN
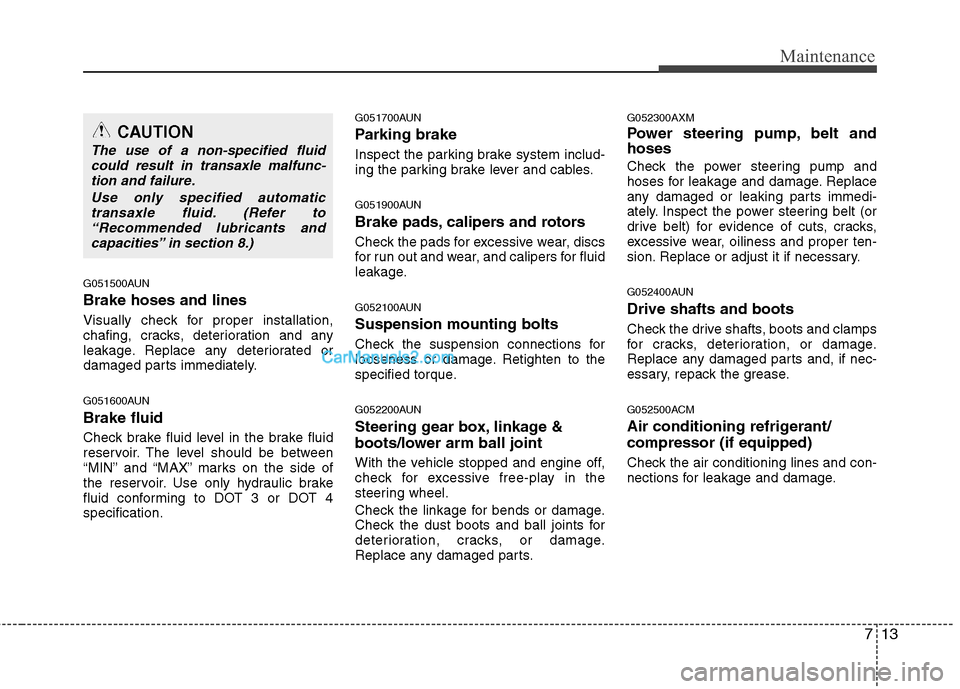
Brake hoses and lines
Visually check for proper installation,
chafing, cracks, deterioration and any
leakage. Replace any deteriorated or
damaged parts immediately.
G051600AUN
Brake fluid
Check brake fluid level in the brake fluid
reservoir. The level should be between
“MIN” and “MAX” marks on the side of
the reservoir. Use only hydraulic brake
fluid conforming to DOT 3 or DOT 4
specification.
G051700AUN
Parking brake
Inspect the parking brake system includ-
ing the parking brake lever and cables.
G051900AUN
Brake pads, calipers and rotors
Check the pads for excessive wear, discs
for run out and wear, and calipers for fluid
leakage.
G052100AUN
Suspension mounting bolts
Check the suspension connections for
looseness or damage. Retighten to the
specified torque.
G052200AUN
Steering gear box, linkage &
boots/lower arm ball joint
With the vehicle stopped and engine off,
check for excessive free-play in the
steering wheel.
Check the linkage for bends or damage.
Check the dust boots and ball joints for
deterioration, cracks, or damage.
Replace any damaged parts.
G052300AXM
Power steering pump, belt and
hoses
Check the power steering pump and
hoses for leakage and damage. Replace
any damaged or leaking parts immedi-
ately. Inspect the power steering belt (or
drive belt) for evidence of cuts, cracks,
excessive wear, oiliness and proper ten-
sion. Replace or adjust it if necessary.
G052400AUN
Drive shafts and boots
Check the drive shafts, boots and clamps
for cracks, deterioration, or damage.
Replace any damaged parts and, if nec-
essary, repack the grease.
G052500ACM
Air conditioning refrigerant/
compressor (if equipped)
Check the air conditioning lines and con-
nections for leakage and damage.
CAUTION
The use of a non-specified fluidcould result in transaxle malfunc-tion and failure.
Use only specified automatictransaxle fluid. (Refer to“Recommended lubricants andcapacities” in section 8.)
Page 359 of 408
Maintenance
40
7
G201004AUN
4. Tire ply composition and material
The number of layers or plies of rub-
ber-coated fabric are in the tire. Tire
manufacturers also must indicate the
materials in the tire, which include
steel, nylon, polyester, and others.
The letter "R" means radial ply con-
struction; the letter "D" means diago-
nal or bias ply construction; and the
letter "B" means belted-bias ply con-
struction.
G201005AUN
5. Maximum permissible inflation
pressure
This number is the greatest amount
of air pressure that should be put in
the tire. Do not exceed the maximum
permissible inflation pressure. Refer
to the Tire and Loading Information
label for recommended inflation
pressure.
G201006AUN
6. Maximum load rating
This number indicates the maximum
load in kilograms and pounds that
can be carried by the tire. When
replacing the tires on the vehicle,
always use a tire that has the same
load rating as the factory installed
tire.
G201007BUN
7. Uniform tire quality grading
Quality grades can be found where
applicable on the tire sidewall
between tread shoulder and maxi-
mum section width.
For example:
TREADWEAR 200
TRACTION AA
TEMPERATURE A
Tread wear
The tread wear grade is a compara-
tive rating based on the wear rate of
the tire when tested under controlled
conditions on a specified govern-
ment test course. For example, a tire
graded 150 would wear one-and-a-
half times (1½) as well on the gov-
ernment course as a tire graded 100.
The relative performance of tires
depends upon the actual conditions
of their use, however, and may
depart significantly from the norm
because of variations in driving
habits, service practices and differ-
ences in road characteristics and cli-
mate.
These grades are molded on the
side-walls of passenger vehicle tires.
The tires available as standard or
optional equipment on your vehicles
may vary with respect to grade.WARNING - Tire age
Tires degrade over time, even
when they are not being used.
Regardless of the remaining
tread, it is recommended that
tires generally be replaced after
six (6) years of normal service.
Heat caused by not climates or
frequent high loading condi-
tions can accelerate the aging
process. Failure to follow this
Warning can result in sudden
tire failure, which could lead to
a loss of control and an acci-
dent involving serious injury or
death.
Page 360 of 408
741
Maintenance
Traction - AA, A, B & C
The traction grades, from highest to
lowest, are AA, A, B and C. Those
grades represent the tires ability to
stop on wet pavement as measured
under controlled conditions on spec-
ified government test surfaces of
asphalt and concrete. A tire marked
C may have poor traction perform-
ance.
Temperature -A, B & C
The temperature grades are A (the
highest), B and C representing the
tire’s resistance to the generation of
heat and its ability to dissipate heat
when tested under controlled condi-
tions on a specified indoor laboratory
test wheel.
Sustained high temperature can
cause the material of the tire to
degenerate and reduce tire life, and
excessive temperature can lead to
sudden tire failure. Grades B and A
represent higher levels of perform-
ance on the laboratory test wheel
than the minimum required by the law.
G201100AEN
Tire terminology and definitions
Air Pressure: The amount of air
inside the tire pressing outward on
the tire. Air pressure is expressed in
pounds per square inch (psi) or kilo-
pascal (kPa).
Accessory Weight : This means the
combined weight of optional acces-
sories. Some examples of optional
accessories are, automatic transaxle
power seats, and air conditioning.
Aspect Ratio : The relationship of a
tire's height to its width.
Belt: A rubber coated layer of cords
that is located between the plies and
the tread. Cords may be made from
steel or other reinforcing materials.
Bead : The tire bead contains steel
wires wrapped by steel cords that
hold the tire onto the rim.
Bias Ply Tire : A pneumatic tire in
which the plies are laid at alternate
angles less than 90 degrees to the
centerline of the tread.
WARNING
The traction grade assigned to
this tire is based on straight-
ahead braking traction tests,
and does not include accelera-
tion, cornering, hydroplaning,
or peak traction characteristics.
WARNING - Tire temperature
The temperature grade for this
tire is established for a tire that
is properly inflated and not
overloaded. Excessive speed,
underinflation, or excessive
loading, either separately or in
combination, can cause heat
build-up and possible sudden
tire failure. This can cause loss
of vehicle control and serious
injury or death.
Page 363 of 408
Maintenance
44
7
Do not drive faster than 75 mph (120
km/h) when your car is equipped with
snow tires.
Tire chains
Tire chains, if necessary, should be
installed on the drive wheels as fol-
lows.
2WD : Front wheels
AWD : All four wheels
If a full set of chains is not
available for a AWD vehicle,
chains may be installed on
the front wheels only.
Be sure that the chains are installed
in accordance with the manufactur-
er's instructions.
To minimize tire and chain wear, do
not continue to use tire chains when
they are no longer needed.Radial-ply tires
Radial-ply tires provide improved
tread life, road hazard resistance and
smoother high speed ride. The radi-
al-ply tires used on this vehicle are of
belted construction, and are selected
to complement the ride and handling
characteristics of your vehicle.
Radial-ply tires have the same load
carrying capacity, as bias-ply or bias
belted tires of the same size, and use
the same recommended inflation
pressure. Mixing of radial-ply tires
with bias-ply or bias belted tires is
not recommended. Any combina-
tions of radial-ply and bias-ply or bias
belted tires when used on the same
vehicle will seriously deteriorate
vehicle handling. The best rule to fol-
low is: Identical radial-ply tires should
always be used as a set of four.
Longer wearing tires can be more
susceptible to irregular tread wear. It
is very important to follow the tire
rotation interval shown in this section
to achieve the tread life potential of
these tires. Cuts and punctures in
radial-ply tires are repairable only in
the tread area, because of sidewall
flexing. Consult your tire dealer for
radial-ply tire repairs.WARNING- Snow or ice
When driving on roads cov- ered with snow or ice, drive at
less than 20 mph (30 km/h).
Use the SAE “S” class or wire chains.
If you hear noise caused by chains contacting the body,
retighten the chain to avoid
contact with the vehicle body.
To prevent body damage, retighten the chains after driv-
ing 0.3~0.6 miles (0.5~1.0 km).
Do not use tire chains on vehicles equipped with alu-
minum wheels. In unavoid-
able circumstance, use a wire
type chain.
Use wire chains less than 0.59 inches (15mm) to prevent
damage to the chain’s con-
nection.
Page 387 of 408
Maintenance
68
7
Interior care
G230201BUN
Interior general precautions
Prevent caustic solutions such as per-
fume and cosmetic oil from contacting
the dashboard because they may cause
damage or discoloration. If they do con-
tact the dashboard, wipe them off imme-
diately. See the instructions that follow for
the proper way to clean vinyl.
G230202AUN
Cleaning the upholstery and interior
trim
Vinyl
Remove dust and loose dirt from vinyl
with a whisk broom or vacuum cleaner.
Clean vinyl surfaces with a vinyl cleaner.
Fabric
Remove dust and loose dirt from fabric
with a whisk broom or vacuum cleaner.
Clean with a mild soap solution recom-
mended for upholstery or carpets.
Remove fresh spots immediately with a
fabric spot cleaner. If fresh spots do not
receive immediate attention, the fabric
can be stained and its color can be
affected. Also, its fire-resistant properties
can be reduced if the material is not
properly maintained.
G230203AUN
Cleaning the lap/shoulder belt web-bing
Clean the belt webbing with any mild
soap solution recommended for cleaning
upholstery or carpet. Follow the instruc-
tions provided with the soap. Do not
bleach or re-dye the webbing because
this may weaken it.
G230204AUN
Cleaning the interior window glass
If the interior glass surfaces of the vehi-
cle become fogged (that is, covered with
an oily, greasy or waxy film), they should
be cleaned with glass cleaner. Follow the
directions on the glass cleaner container.CAUTION
Never allow water or other liquids to come in contact withelectrical/electronic componentsinside the vehicle as this may dam-age them.
CAUTION
Using anything but recommended cleaners and procedures may affectthe fabric’s appearance and fire-resistant properties.
CAUTION
When cleaning leather products (steering wheel, seats etc.), useneutral detergents or low alcoholcontent solutions. If you use high alcohol content solutions oracid/alkaline detergents, the color of the leather may fade or the sur-face may get stripped off.
CAUTION
Do not scrape or scratch the insideof the rear window. This may resultin damage to the rear windowdefroster grid.