2011 Hyundai Santa Fe steering
[x] Cancel search: steeringPage 283 of 408
549
Driving your vehicle
E140400AUN
Driving with a trailer
Towing a trailer requires a certain
amount of experience. Before setting out
for the open road, you must get to know
your trailer. Acquaint yourself with the
feel of handling and braking with the
added weight of the trailer. And always
keep in mind that the vehicle you are
driving is now a good deal longer and not
nearly so responsive as your vehicle is
by itself.
Before you start, check the trailer hitch
and platform, safety chains, electrical
connector(s), lights, tires and mirror
adjustment. If the trailer has electric
brakes, start your vehicle and trailer mov-
ing and then apply the trailer brake con-
troller by hand to be sure the brakes are
working. This lets you check your electri-
cal connection at the same time.
During your trip, check occasionally to be
sure that the load is secure, and that the
lights and any trailer brakes are still work-
ing.
E140401AUN
Following distance
Stay at least twice as far behind the vehi-
cle ahead as you would when driving
your vehicle without a trailer. This can
help you avoid situations that require
heavy braking and sudden turns.
E140402AUN
Passing
You’ll need more passing distance up
ahead when you’re towing a trailer. And,
because of the increased vehicle length,
you’ll need to go much farther beyond the
passed vehicle before you can return to
your lane. Due to the added load to the
engine when going uphill the vehicle may
also take longer to pass than it would on
flat ground.
E140403AUN
Backing up
Hold the bottom of the steering wheel
with one hand. Then, to move the trailer
to the left, just move your hand to the left.
To move the trailer to the right, move your
hand to the right. Always back up slowly
and, if possible, have someone guide
you.
E140404AUN
Making turns
When you’re turning with a trailer, make
wider turns than normal. Do this so your
trailer won’t strike soft shoulders, curbs,
road signs, trees, or other objects near
the edge of the road. Avoid jerky or sud-
den maneuvers. Signal well in advance
before turning or lane changes.
Page 285 of 408
551
Driving your vehicle
E140407AUN-EA
Parking on hills
Generally, if you have a trailer attached to
your vehicle, you should not park your
vehicle on a hill. People can be seriously
or fatally injured, and both your vehicle
and the trailer can be damaged if they
unexpectedly roll down hill.
However, if you ever have to park your
trailer on a hill, here's how to do it:
1. Pull the vehicle into the parking space.Turn the steering wheel in the direction
of the curb (right if headed down hill,
left if headed up hill).
2. If the vehicle has a manual transaxle, place the car in neutral. If the vehicle
has an automatic transaxle, place the
car in P (Park).
3. Set the parking brake and shut off the vehicle. 4. Place chocks under the trailer wheels
on the down hill side of the wheels.
5. Start the vehicle, hold the brakes, shift to neutral, release the parking brake
and slowly release the brakes until the
trailer chocks absorb the load.
6. Reapply the brakes, reapply the park- ing brake and shift the vehicle to R
(Reverse) for manual transaxle or P
(Park) for automatic transaxle.
7. Shut off the vehicle and release the vehicle brakes but leave the parking
brake set.
CAUTION
When towing a trailer on steep grades (in excess of 6%) payclose attention to the enginecoolant temperature gauge toensure the engine does not over- heat.
If the needle of the coolant tem-perature gauge moves across thedial towards “H” (HOT), pull overand stop as soon as it is safe todo so, and allow the engine to idleuntil it cools down. You may pro-ceed once the engine has cooledsufficiently.
You must decide driving speed depending on trailer weight anduphill grade to reduce the possi-bility of engine and transaxleoverheating.
WARNING- Parking on a hill
Parking your vehicle on a hill with a
trailer attached could cause seri-
ous injury or death, should the trail-
er break loose or brake stops work-
ing.
WARNING- Parking brake
It can be dangerous to get out of
your vehicle if the parking brake is
not firmly set.
If you have left the engine running,
the vehicle can move suddenly. You
or others could be seriously or
fatally injured.
Page 318 of 408
What to do in an emergency
24
6
Towing in this manner may be done only
on hard-surfaced roads for a short dis-
tance and at low speed. Also, the wheels,
axles, power train, steering and brakes
must all be in good condition.
Do not use the towing hooks to pull a
vehicle out of mud, sand or other con-
ditions from which the vehicle cannot
be driven out under its own power.
Avoid towing a vehicle heavier than the vehicle doing the towing.
The drivers of both vehicles should communicate with each other frequent-
ly.
Before emergency towing, check thatthe hook is not broken or damaged.
Fasten the towing cable or chain securely to the hook.
Do not jerk the hook. Apply steady and even force.
To avoid damaging the hook, do not pull from the side or at a vertical angle.
Always pull straight ahead.
WARNING
Use extreme caution when towing
the vehicle.
driving maneuvers which would
place excessive stress on the
emergency towing hook and tow-
ing cable or chain. The hook and
towing cable or chain may break
and cause serious injury or dam-
age.
If the disabled vehicle is unable to be moved, do not forcibly con-
tinue the towing. Contact an
authorized HYUNDAI dealer or a
commercial tow truck service for
assistance.
Tow the vehicle as straight ahead as possible.
Keep away from the vehicle dur- ing towing.
CAUTION
Attach a towing strap to the tow hook.
Using a portion of the vehicle other than the tow hooks for tow-ing may damage the body of yourvehicle.
Use only a cable or chain specifi- cally intended for use in towingvehicles. Securely fasten thecable or chain to the towing hook provided.
Page 319 of 408
625
What to do in an emergency
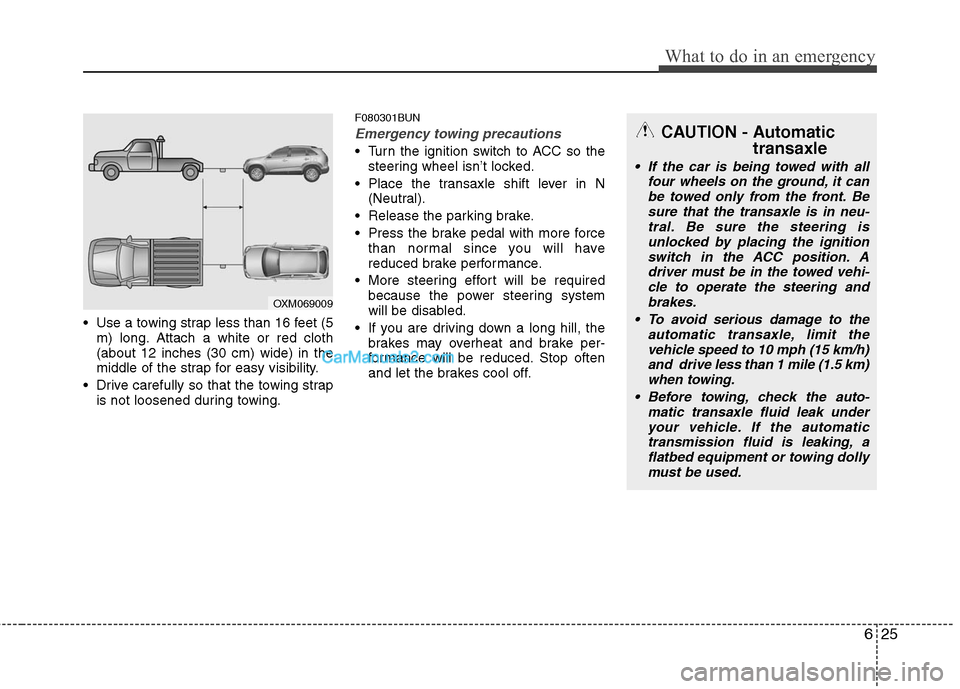
Use a towing strap less than 16 feet (5m) long. Attach a white or red cloth
(about 12 inches (30 cm) wide) in the
middle of the strap for easy visibility.
Drive carefully so that the towing strap is not loosened during towing.
F080301BUN
Emergency towing precautions
Turn the ignition switch to ACC so thesteering wheel isn’t locked.
Place the transaxle shift lever in N (Neutral).
Release the parking brake.
Press the brake pedal with more force than normal since you will have
reduced brake performance.
More steering effort will be required because the power steering system
will be disabled.
If you are driving down a long hill, the brakes may overheat and brake per-
formance will be reduced. Stop often
and let the brakes cool off.
OXM069009
CAUTION - Automatic transaxle
If the car is being towed with all
four wheels on the ground, it canbe towed only from the front. Besure that the transaxle is in neu-tral. Be sure the steering isunlocked by placing the ignition switch in the ACC position. Adriver must be in the towed vehi- cle to operate the steering andbrakes.
To avoid serious damage to the automatic transaxle,limit the
vehicle speed to 10 mph (15 km/h) and drive less than 1 mile (1.5 km)when towing.
Before towing, check the auto- matic transaxle fluid leak underyour vehicle. If the automatictransmission fluid is leaking, aflatbed equipment or towing dollymust be used.
Page 320 of 408
7
Engine compartment / 7-2
Maintenance services / 7-3
Owner maintenance / 7-4
Scheduled maintenance service / 7-6
Explanation of scheduled maintenance items / 7-11
Engine oil / 7-14
Engine coolant / 7-15
Brake fluid / 7-18
Power steering fluid / 7-19
Washer fluid / 7-20
Parking brake / 7-21
Air cleaner / 7-22
Climate control air filter / 7-24
Wiper blades / 7-26
Battery / 7-29
Tires and wheels / 7-32
Fuses / 7-45
Light bulbs / 7-55
Appearance care / 7-63
Emission control system / 7-69
California perchlorate notice / 7-72
Maintenance
Page 321 of 408
Maintenance
2
7
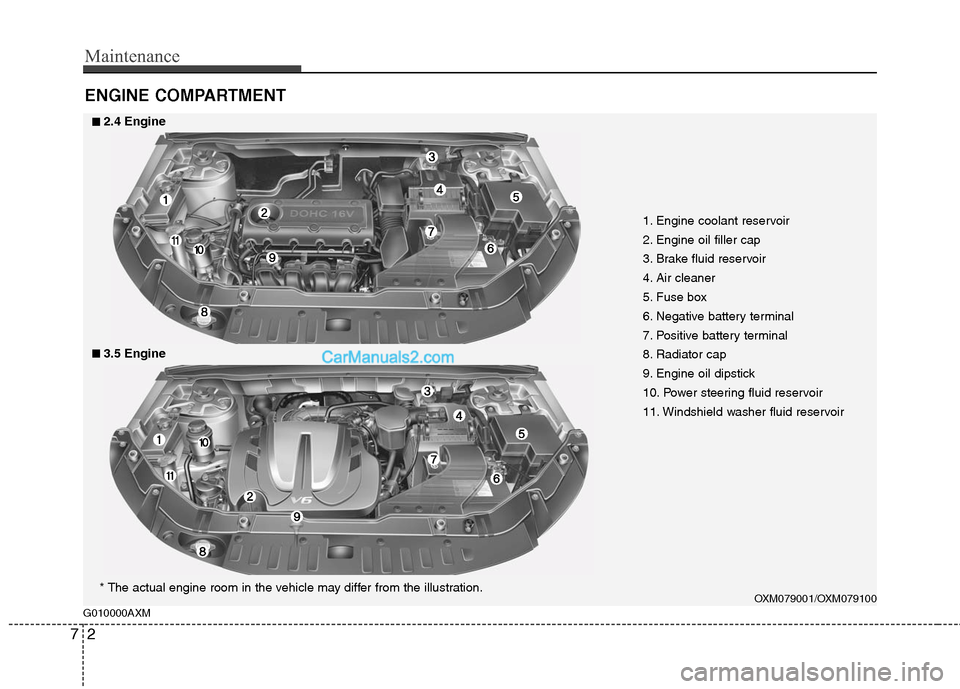
ENGINE COMPARTMENT
1. Engine coolant reservoir
2. Engine oil filler cap
3. Brake fluid reservoir
4. Air cleaner
5. Fuse box
6. Negative battery terminal
7. Positive battery terminal
8. Radiator cap
9. Engine oil dipstick
10. Power steering fluid reservoir
11. Windshield washer fluid reservoir
OXM079001/OXM079100
■
■2.4 Engine
■
■3.5 Engine
* The actual engine room in the vehicle may differ from the illustration.
G010000AXM
Page 324 of 408
75
Maintenance
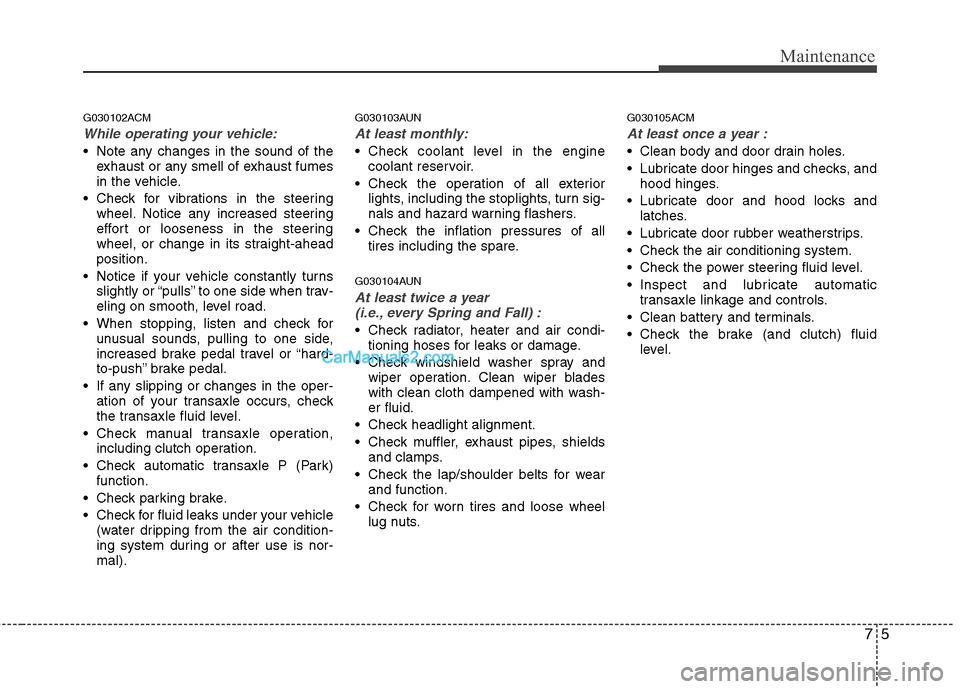
G030102ACM
While operating your vehicle:
Note any changes in the sound of theexhaust or any smell of exhaust fumes
in the vehicle.
Check for vibrations in the steering wheel. Notice any increased steering
effort or looseness in the steering
wheel, or change in its straight-ahead
position.
Notice if your vehicle constantly turns slightly or “pulls” to one side when trav-
eling on smooth, level road.
When stopping, listen and check for unusual sounds, pulling to one side,
increased brake pedal travel or “hard-
to-push” brake pedal.
If any slipping or changes in the oper- ation of your transaxle occurs, check
the transaxle fluid level.
Check manual transaxle operation, including clutch operation.
Check automatic transaxle P (Park) function.
Check parking brake.
Check for fluid leaks under your vehicle (water dripping from the air condition-
ing system during or after use is nor-
mal).
G030103AUN
At least monthly:
Check coolant level in the enginecoolant reservoir.
Check the operation of all exterior lights, including the stoplights, turn sig-
nals and hazard warning flashers.
Check the inflation pressures of all tires including the spare.
G030104AUN
At least twice a year (i.e., every Spring and Fall) :
Check radiator, heater and air condi- tioning hoses for leaks or damage.
Check windshield washer spray and wiper operation. Clean wiper blades
with clean cloth dampened with wash-
er fluid.
Check headlight alignment.
Check muffler, exhaust pipes, shields and clamps.
Check the lap/shoulder belts for wear and function.
Check for worn tires and loose wheel lug nuts.
G030105ACM
At least once a year :
Clean body and door drain holes.
Lubricate door hinges and checks, andhood hinges.
Lubricate door and hood locks and latches.
Lubricate door rubber weatherstrips.
Check the air conditioning system.
Check the power steering fluid level.
Inspect and lubricate automatic transaxle linkage and controls.
Clean battery and terminals.
Check the brake (and clutch) fluid level.
Page 328 of 408
79
Maintenance
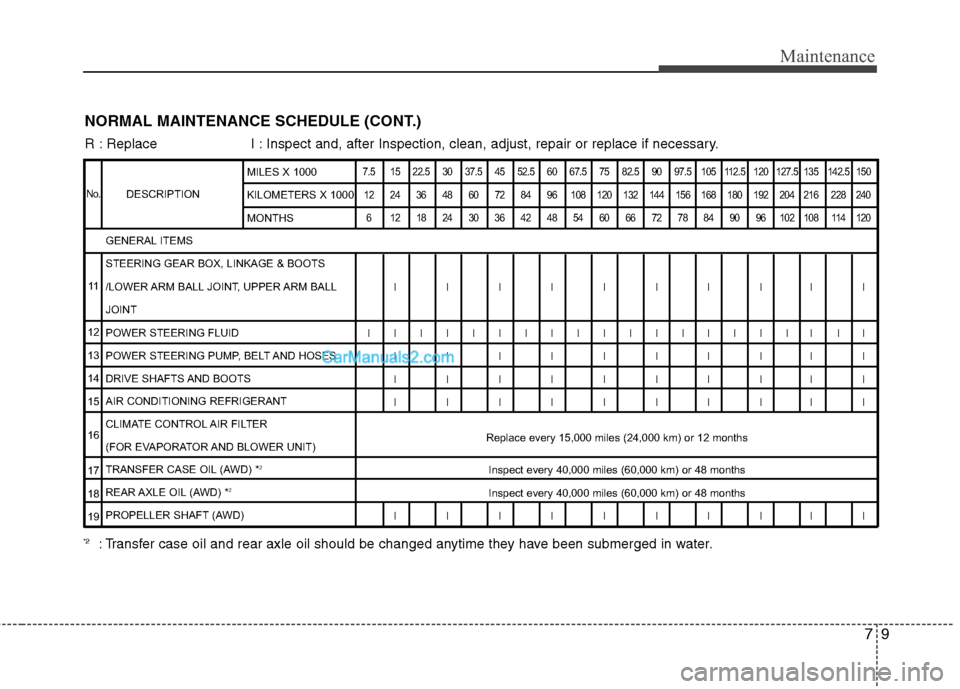
NORMAL MAINTENANCE SCHEDULE (CONT.)
R : Replace I : Inspect and, after Inspection, clean, adjust, repair or replace if neces\
sary.
DESCRIPTION
7.5 15 22.5 30 37.5 45 52.5 60 67.5 75 82.5 90 97.5 105 112.5 120 127.5 135 142.5 15012 24 36 48 60 72 84 96 108 120 132 144 156 168 180 192 204 216 228 240 6 121824303642485460667278849096102108114120
IIIIIIIIII
IIIIIIIIIIIIIIIIII II IIIIIIIIII
IIIIIIIIII
IIIIIIIIII
Replace every 15,000 miles (24,000 km) or 12 months Inspect every 40,000 miles (60,000 km) or 48 months
Inspect every 40,000 miles (60,000 km) or 48 months
IIIIIIIIII
GENERAL ITEMS
STEERING GEAR BOX, LINKAGE & BOOTS
/LOWER ARM BALL JOINT, UPPER ARM BALL
JOINT
POWER STEERING FLUID
POWER STEERING PUMP, BELT AND HOSES
DRIVE SHAFTS AND BOOTS
AIR CONDITIONING REFRIGERANT
CLIMATE CONTROL AIR FILTER
(FOR EVAPORATOR AND BLOWER UNIT)
TRANSFER CASE OIL (AWD) *
2
REAR AXLE OIL (AWD) *2
PROPELLER SHAFT (AWD) MILES X 1000
KILOMETERS X 1000
MONTHS
No.
11
12
13
14
15
16
17
18
19
*2: Transfer case oil and rear axle oil should be changed anytime they have been submerged in water.