2011 Hyundai Santa Fe remote control
[x] Cancel search: remote controlPage 230 of 408
4151
Features of your vehicle
AM, FM1 and FM2 Selection
When you press the SOURCEbutton,
the Source Selection UI will come out,
along with the current available mode.
You can select the Radio mode by the
remote controller. After pressing the
ENTER button, both RSE and front
Radio will play your selection station at
the same time.
All of the RSE control panel and remote
controller navigation functions can be
used to control the front radio when the
vehicle front radio is also playing the
same radio mode.
Viewing Front CD and MP3
Programs
The RSE can be used to control discs
that are loaded and playing in the vehicle
radio. To control these discs, you must
first select the vehicle radio as the
source. Press the SOURCEbutton on
the remote control, or the SRCbutton on
the RSE control panel, Meanwhile, the
Source Change UI will bring out. Use the
four direction arrow buttons to select the
source of vehicle radio. And press the
ENTER button for completing the selec-
tion.
CD/CD-MP3 Control
While the vehicle radio is playing a CD or
MP3 audio disc, all of the RSE control
panel and remote control navigation
functions can be used to control the vehi-
cle radio. This includes:
• Pause/Play
Fast Forward/Reverse
Previous/Next Track (CD) and Previous/Next File (MP3)
See these sections of the Users Manual
for information on using these functions.
All of the RSE control panel and remote
control navigation functions can be used
to control the front radio when the vehicle
front radio is also playing the CD or CD-
MP3 mode.
AUX Audio and Video Input
Controls
This allows you to display the video out-
put on the RSE monitor, and listen to the
audio through the wireless headsets and
the vehicle speakers.
To switch to an external auxiliary device,
press the SOURCE button on the remote
control or SRCon the RSE control panel,
then select the AUX icon button. And
press the ENTERbutton for completing.
Page 231 of 408
Features of your vehicle
152
4
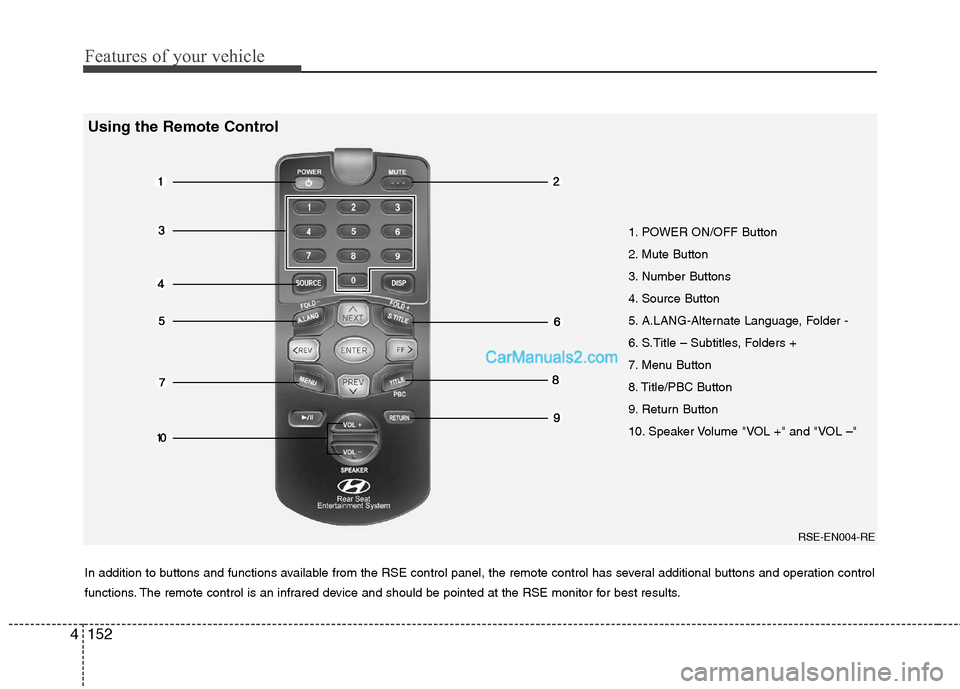
1. POWER ON/OFF Button
2. Mute Button
3. Number Buttons
4. Source Button
5. A.LANG-Alternate Language, Folder -
6. S.Title – Subtitles, Folders +
7. Menu Button
8. Title/PBC Button
9. Return Button
10. Speaker Volume "VOL +" and "VOL –"
In addition to buttons and functions available from the RSE control panel, the remote control has several additional buttons an d operation control
functions. The remote control is an infrared device and should be pointed at the RSE monitor for best results.
RSE-EN004-RE
Using the Remote Control
Page 232 of 408
4153
Features of your vehicle
1. POWER On/Off
Press the RSE control panel POWER
button or the POWER ON/OFF button
on the remote control to turn the
RSE on or off. If a disc is loaded and
playing when the RSE is turned off, when
the RSE is turned back on the disc will
automatically resume playback at the
point where it was stopped.
2. Mute
Press the MUTEbutton to mute the
audio in the vehicle speakers. The MUTE
button has no effect on the wireless
headphones.
While muted, the RSE control panel,
vehicle radio and RSE monitor will all dis-
play " MUTE ." Press the button again, or
adjust the volume at RSE control panel
or vehicle radio, to un-mute the audio.
3. Number Buttons ~
The number buttons ( 0 through 9) can
be used to directly enter information such
as chapters in a DVD, track or file num-
bers for audio CDs, and preset radio.
To select a DVD or VCD chapter, while a
DVD/VCD is playing, press the number
button(s) that correspond to the desired
chapter and press ENTER.
To select a CD track, while a CD is play-
ing press the number button(s) that cor-
respond to the track and press ENTER.
To select an MP3 file, while an MP3 disc
is playing, press the number button(s)
that correspond to the desired file and
press ENTER.
To select a radio station preset, while the
desired band (AM, FM1 or FM2) is
selected, press the numbered button that
corresponds to the preset on the vehicle
radio. There is no need to press ENTER.
4. Source
Pressing this SOURCEbutton will bring
out the Source Change selection opera-
tion. You can select any available mode
by using the four direction arrow buttons
and press the ENTERbutton for com-
pleting the selection.
The RSE control panel will display
"REAR" if the current source is the RSE
player, and will display "FRONT" if the
current source is the vehicle radio.
5. A.LANG - Alternate Language Folder -
Where alternate languages are available
on a DVD, pressing the A.LANGbutton
will allow you to select your preferred lan-
guage. Press the button repeatedly to
cycle through the available languages.
When the desired language is displayed,
press ENTER .
Pressing the A.LANG(or FOLD- ) button
during MP3 normal play will immediately
bring the player to the first file of the pre-
vious folder.
Pressing the A.LANG(or FOLD- ) button
during CD or VCD play will do nothing.
Page 233 of 408
Features of your vehicle
154
4
6. S.Title - Subtitles, Folders +
The S.TITLE button allows you to display
or remove language subtitles while play-
ing DVDs. If no language subtitles are
available, the display will show an invalid
icon. Press the S. TITLEbutton repeat-
edly to cycle through all of the available
languages.
Pressing the S. TITLE(or FOLD+ ) button
during MP3 normal play will immediately
bring the player to the first file of the next
folder.
Pressing the S. TITLE(or FOLD+ ) button
during CD or VCD play will do nothing.
7. Menu
Pressing the MENUbutton during DVD
play will present the DVD menu.
Pressing the MENUbutton during MP3
disc play will display the Song List on the
monitor.
Pressing the MENUbutton during CD or
VCD play has no effect.
Press the button again to return to the
program. After five seconds with no but-
ton press, the menu will automatically
close and the program begin playing.
8. Title/PBC
While viewing a DVD, press the TITLE
button on the remote control to jump to
the top menu. Press the < REW / FF >or
PREV / NEXT buttons to highlight
the desired selection, then press ENTER
to make your selection.
Press TITLE again to return to the DVD.
While viewing a VCD, pressing the
TITLE/PBC button will switch the PBC
function on and off.
9. Return
While viewing any operation, pressing
the RETURN button will exit the current
operation on screen display and resume
last play.
10. Speaker Volume "VOL +" and "VOL -"
If the audio from the RSE is being played
through the vehicle speakers, you can
adjust the volume of the speakers with
the " VOL + " and " VOL -" buttons.
Adjusting the volume in this way will not
adjust the wireless headphone volume.
To adjust the headphones, roll the VOL
control wheel.
Batteries
The remote control requires a CR2025
battery (included).
Page 234 of 408
4155
Features of your vehicle
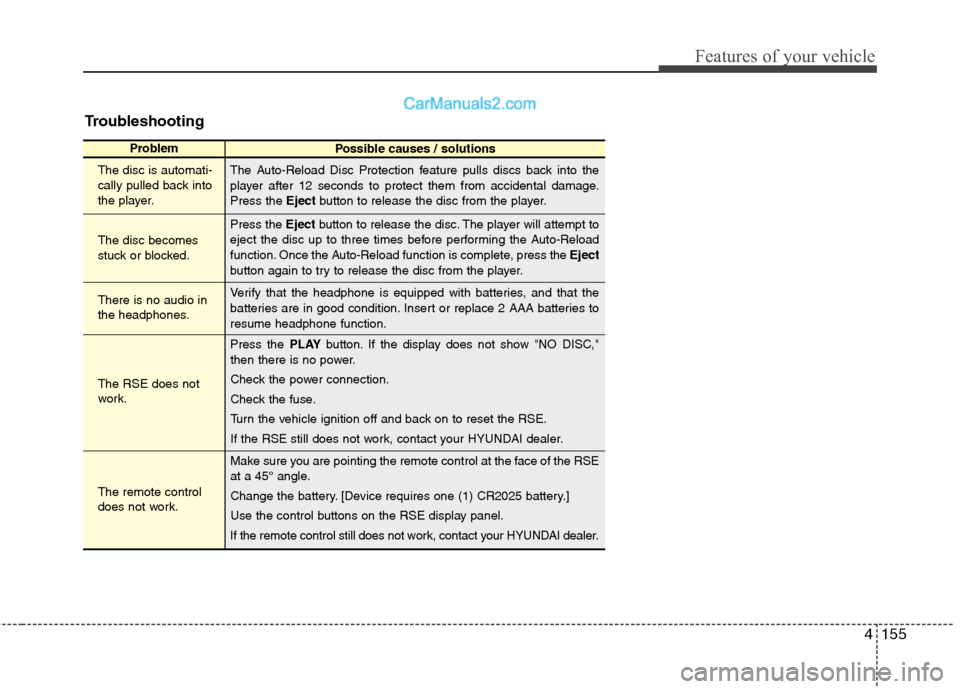
Troubleshooting
ProblemPossible causes / solutions
The disc is automati-
cally pulled back into
the player.
The disc becomes
stuck or blocked.
There is no audio in
the headphones.
The RSE does not
work.
The remote control
does not work. The Auto-Reload Disc Protection feature pulls discs back into the
player after 12 seconds to protect them from accidental damage.
Press the
Ejectbutton to release the disc from the player.
Press the Ejectbutton to release the disc. The player will attempt to
eject the disc up to three times before performing the Auto-Reload
function. Once the Auto-Reload function is complete, press the Eject
button again to try to release the disc from the player.
Verify that the headphone is equipped with batteries, and that the
batteries are in good condition. Insert or replace 2 AAA batteries to
resume headphone function.
Press the PLAYbutton. If the display does not show "NO DISC,"
then there is no power.
Check the power connection.
Check the fuse.
Turn the vehicle ignition off and back on to reset the RSE.
If the RSE still does not work, contact your HYUNDAI dealer.
Make sure you are pointing the remote control at the face of the RSE
at a 45° angle.
Change the battery. [Device requires one (1) CR2025 battery.]
Use the control buttons on the RSE display panel.
If the remote control still does not work, contact your HYUNDAI dealer.
Page 303 of 408
69
What to do in an emergency
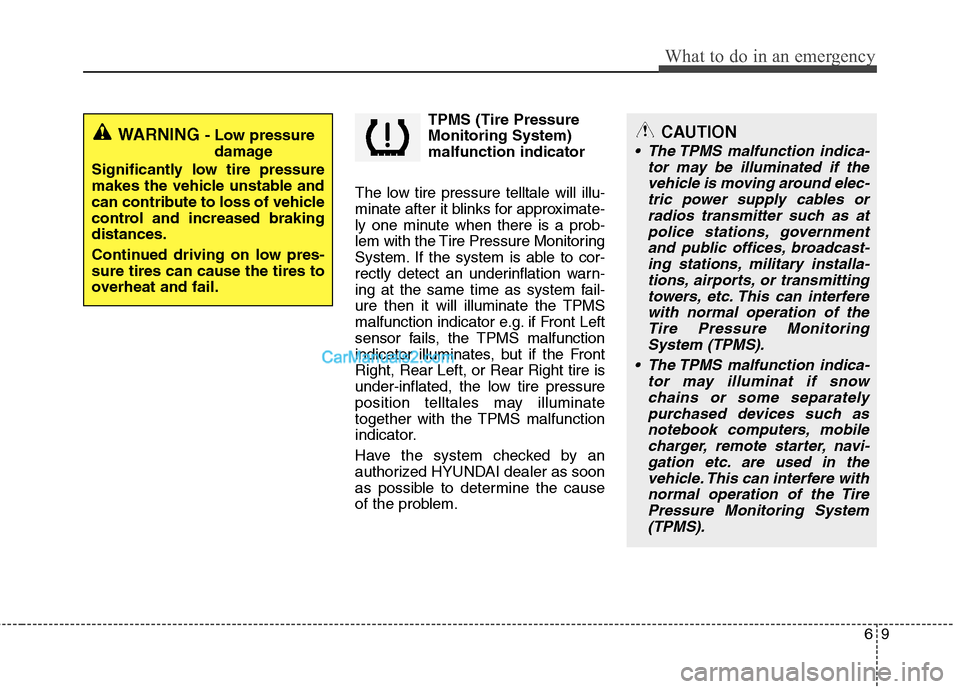
TPMS (Tire Pressure
Monitoring System)
malfunction indicator
The low tire pressure telltale will illu-
minate after it blinks for approximate-
ly one minute when there is a prob-
lem with the Tire Pressure Monitoring
System. If the system is able to cor-
rectly detect an underinflation warn-
ing at the same time as system fail-
ure then it will illuminate the TPMS
malfunction indicator e.g. if Front Left
sensor fails, the TPMS malfunction
indicator illuminates, but if the Front
Right, Rear Left, or Rear Right tire is
under-inflated, the low tire pressure
position telltales may illuminate
together with the TPMS malfunction
indicator.
Have the system checked by an
authorized HYUNDAI dealer as soon
as possible to determine the cause
of the problem.
WARNING - Low pressure damage
Significantly low tire pressure
makes the vehicle unstable and
can contribute to loss of vehicle
control and increased braking
distances.
Continued driving on low pres-
sure tires can cause the tires to
overheat and fail.CAUTION
• The TPMS malfunction indica- tor may be illuminated if thevehicle is moving around elec-tric power supply cables orradios transmitter such as atpolice stations, governmentand public offices, broadcast-ing stations, military installa-tions, airports, or transmittingtowers, etc. This can interferewith normal operation of theTire Pressure MonitoringSystem (TPMS).
The TPMS malfunction indica- tor may illuminat if snowchains or some separatelypurchased devices such asnotebook computers, mobilecharger, remote starter, navi-gation etc. are used in thevehicle. This can interfere withnormal operation of the TirePressure Monitoring System(TPMS).
Page 369 of 408
Maintenance
50
7
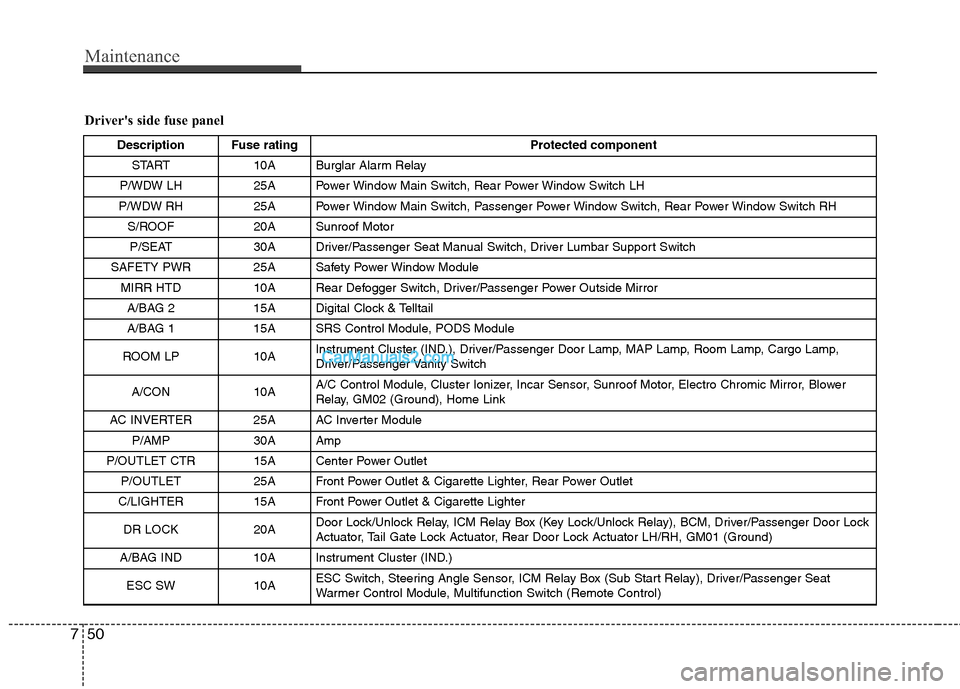
Driver's side fuse panel
Description Fuse rating Protected component
START 10A Burglar Alarm Relay
P/WDW LH 25A Power Window Main Switch, Rear Power Window Switch LH
P/WDW RH 25A Power Window Main Switch, Passenger Power Window Switch, Rear Power Window Switch RH S/ROOF 20A Sunroof MotorP/SEAT 30A Driver/Passenger Seat Manual Switch, Driver Lumbar Support Switch
SAFETY PWR 25A Safety Power Window Module MIRR HTD 10A Rear Defogger Switch, Driver/Passenger Power Outside MirrorA/BAG 2 15A Digital Clock & Telltail
A/BAG 1 15A SRS Control Module, PODS Module
ROOM LP 10A Instrument Cluster (IND.), Driver/Passenger Door Lamp, MAP Lamp, Room Lamp, Cargo Lamp,
Driver/Passenger Vanity Switch
A/CON 10A A/C Control Module, Cluster Ionizer, Incar Sensor, Sunroof Motor, Electro Chromic Mirror, Blower
Relay, GM02 (Ground), Home Link
AC INVERTER 25A AC Inverter Module P/AMP 30A Amp
P/OUTLET CTR 15A Center Power Outlet P/OUTLET 25A Front Power Outlet & Cigarette Lighter, Rear Power Outlet
C/LIGHTER 15A Front Power Outlet & Cigarette Lighter
DR LOCK 20A Door Lock/Unlock Relay, ICM Relay Box (Key Lock/Unlock Relay), BCM, Driver/Passenger Door Lock
Actuator, Tail Gate Lock Actuator, Rear Door Lock Actuator LH/RH, GM01 (Ground)
A/BAG IND 10A Instrument Cluster (IND.)
ESC SW10AESC Switch, Steering Angle Sensor, ICM Relay Box (Sub Start Relay), Driver/Passenger Seat
Warmer Control Module, Multifunction Switch (Remote Control)
Page 406 of 408
I5
Index
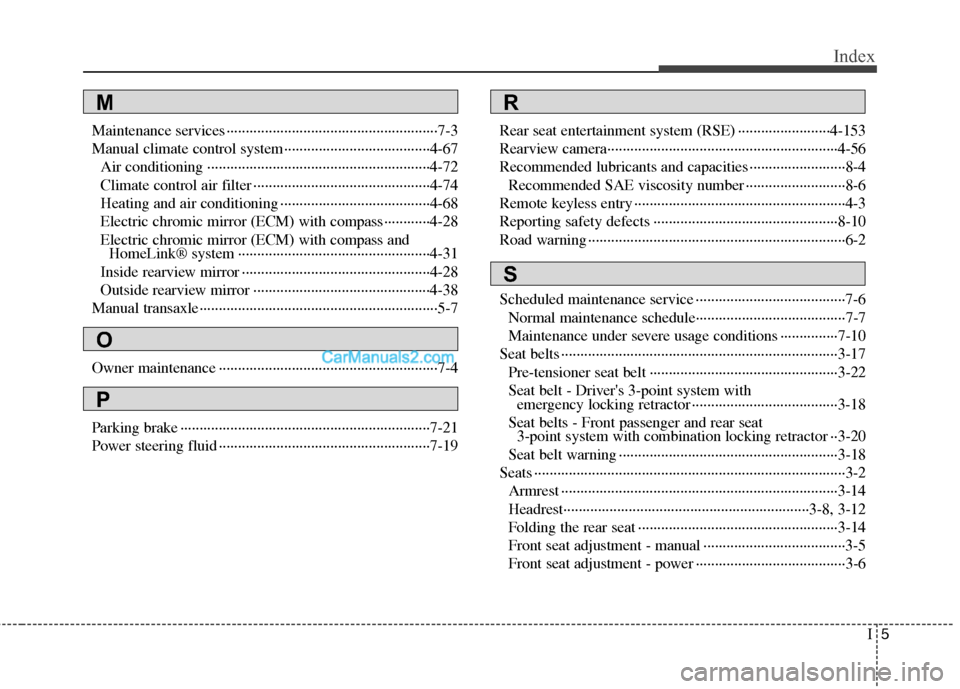
Maintenance services ··················\
··················\
··················\
·7-3
Manual climate control system··················\
··················\
··4-67Air conditioning ··················\
··················\
··················\
····4-72
Climate control air filter ··················\
··················\
··········4-74
Heating and air conditioning ··················\
··················\
···4-68
Electric chromic mirror (ECM) with compass············4-28
Electric chromic mirror (ECM) with compass andHomeLink® system ··················\
··················\
··············4-31
Inside rearview mirror ··················\
··················\
·············4-28
Outside rearview mirror ··················\
··················\
··········4-38
Manual transaxle··················\
··················\
··················\
········5-7
Owner maintenance ··················\
··················\
··················\
···7-4
Parking brake ··················\
··················\
··················\
···········7-21
Power steering fluid ··················\
··················\
··················\
·7-19 Rear seat entertainment system (RSE) ··················\
······4-153
Rearview camera··················\
··················\
··················\
······4-56
Recommended lubricants and capacities ··················\
·······8-4
Recommended SAE viscosity number ··················\
········8-6
Remote keyless entry ··················\
··················\
··················\
·4-3
Reporting safety defects ··················\
··················\
············8-10
Road warning ··················\
··················\
··················\
·············6-2
Scheduled maintenance service ··················\
··················\
···7-6
Normal maintenance schedule··················\
··················\
···7-7
Maintenance under severe usage conditions ···············7-10
Seat belts ··················\
··················\
··················\
··················\
3-17 Pre-tensioner seat belt ··················\
··················\
·············3-22
Seat belt - Driver's 3-point system with emergency locking retractor ··················\
··················\
··3-18
Seat belts - Front passenger and rear seat 3-point system with combination locking retractor ··3-20
Seat belt warning ··················\
··················\
··················\
···3-18
Seats ··················\
··················\
··················\
··················\
·········3-2 Armrest ··················\
··················\
··················\
··················\
3-14
Headrest················\
··················\
··················\
············3-8, 3-12
Folding the rear seat ··················\
··················\
················3-14
Front seat adjustment - manual ··················\
··················\
·3-5
Front seat adjustment - power ··················\
··················\
···3-6
MR
S
O
P