Page 159 of 408
Features of your vehicle
80
4
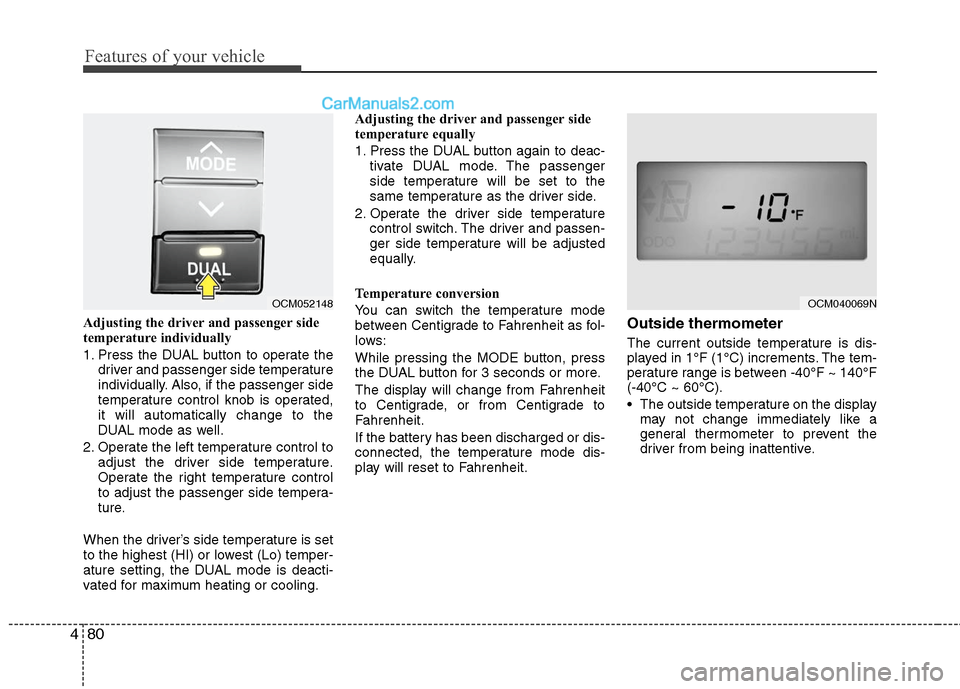
Adjusting the driver and passenger side
temperature individually
1. Press the DUAL button to operate the
driver and passenger side temperature
individually. Also, if the passenger side
temperature control knob is operated,
it will automatically change to the
DUAL mode as well.
2. Operate the left temperature control to adjust the driver side temperature.
Operate the right temperature control
to adjust the passenger side tempera-
ture.
When the driver’s side temperature is set
to the highest (HI) or lowest (Lo) temper-
ature setting, the DUAL mode is deacti-
vated for maximum heating or cooling. Adjusting the driver and passenger side
temperature equally
1. Press the DUAL button again to deac-
tivate DUAL mode. The passenger
side temperature will be set to the
same temperature as the driver side.
2. Operate the driver side temperature control switch. The driver and passen-
ger side temperature will be adjusted
equally.
Temperature conversion
You can switch the temperature mode
between Centigrade to Fahrenheit as fol-
lows:
While pressing the MODE button, press
the DUAL button for 3 seconds or more.
The display will change from Fahrenheit
to Centigrade, or from Centigrade to
Fahrenheit.
If the battery has been discharged or dis-
connected, the temperature mode dis-
play will reset to Fahrenheit.Outside thermometer
The current outside temperature is dis-
played in 1°F (1°C) increments. The tem-
perature range is between -40°F ~ 140°F
(-40°C ~ 60°C).
The outside temperature on the display may not change immediately like a
general thermometer to prevent the
driver from being inattentive.
OCM052148
OCM040069N
Page 164 of 408
485
Features of your vehicle
Defogging logic
To reduce the possibility of fogging up
inside of the windshield, the air intake or
air conditioning are controlled automati-
cally according to certain conditions such
as or position. To cancel or
return to the defogging logic, do the fol-
lowing.
Automatic climate control system
1. Turn the ignition switch to the ON posi-tion.
2. Select the defroster position by press- ing the defroster button ( ).
3. While pressing the air conditioning button (A/C), press the air intake con-
trol button (Recirculated air button) at
least 5 times within 3 seconds.
The A/C display blinks 3 times with 0.5
second of interval. It indicates that the
defogging logic is canceled or returned to
the programmed status.
If the battery has been discharged or dis-
connected, it resets to the defog logic
status.
OCM040165N
Page 173 of 408
Features of your vehicle
94
4
D280600AUN
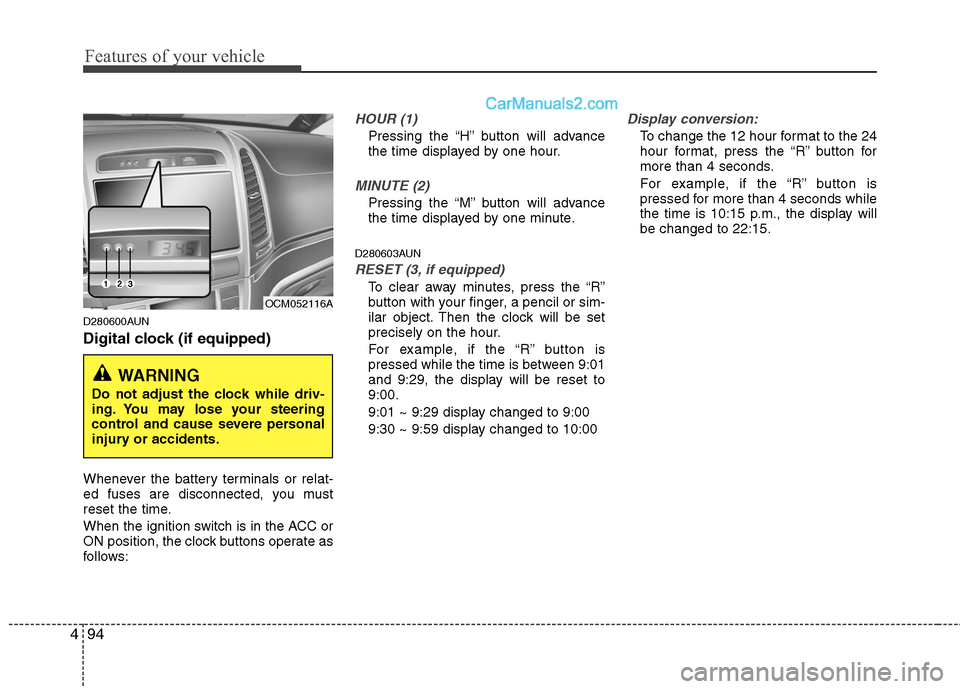
Digital clock (if equipped)
Whenever the battery terminals or relat-
ed fuses are disconnected, you must
reset the time.
When the ignition switch is in the ACC or
ON position, the clock buttons operate as
follows:
HOUR (1)
Pressing the “H” button will advance
the time displayed by one hour.
MINUTE (2)
Pressing the “M” button will advance
the time displayed by one minute.
D280603AUN
RESET (3, if equipped)
To clear away minutes, press the “R”
button with your finger, a pencil or sim-
ilar object. Then the clock will be set
precisely on the hour.
For example, if the “R” button is
pressed while the time is between 9:01
and 9:29, the display will be reset to
9:00.
9:01 ~ 9:29 display changed to 9:00
9:30 ~ 9:59 display changed to 10:00
Display conversion:
To change the 12 hour format to the 24
hour format, press the “R” button for
more than 4 seconds.
For example, if the “R” button is
pressed for more than 4 seconds while
the time is 10:15 p.m., the display will
be changed to 22:15.
WARNING
Do not adjust the clock while driv-
ing. You may lose your steering
control and cause severe personal
injury or accidents.
OCM052116A
Page 179 of 408
Features of your vehicle
100
4
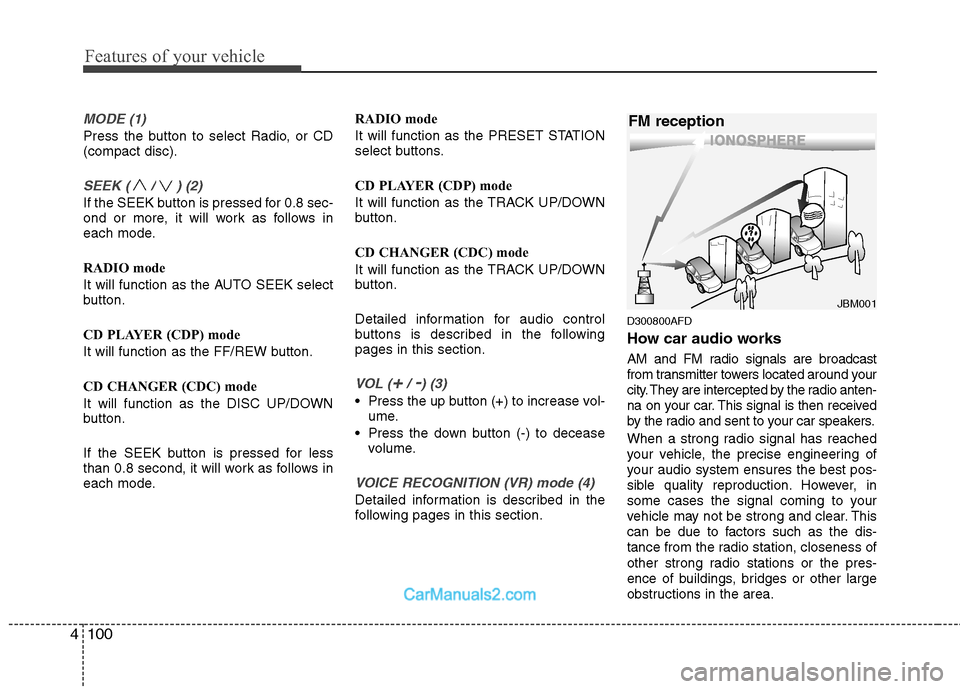
MODE (1)
Press the button to select Radio, or CD
(compact disc).
SEEK ( / ) (2)
If the SEEK button is pressed for 0.8 sec-
ond or more, it will work as follows in
each mode.
RADIO mode
It will function as the AUTO SEEK select
button.
CD PLAYER (CDP) mode
It will function as the FF/REW button.
CD CHANGER (CDC) mode
It will function as the DISC UP/DOWN
button.
If the SEEK button is pressed for less
than 0.8 second, it will work as follows in
each mode. RADIO mode
It will function as the PRESET STATION
select buttons.
CD PLAYER (CDP) mode
It will function as the TRACK UP/DOWN
button.
CD CHANGER (CDC) mode
It will function as the TRACK UP/DOWN
button.
Detailed information for audio control
buttons is described in the following
pages in this section.
VOL (+/ -) (3)
• Press the up button (+) to increase vol-
ume.
Press the down button (-) to decease volume.
VOICE RECOGNITION (VR) mode (4)
Detailed information is described in the
following pages in this section.
D300800AFD
How car audio works
AM and FM radio signals are broadcast
from transmitter towers located around your
city. They are intercepted by the radio anten-
na on your car. This signal is then received
by the radio and sent to your car speakers.
When a strong radio signal has reached
your vehicle, the precise engineering of
your audio system ensures the best pos-
sible quality reproduction. However, in
some cases the signal coming to your
vehicle may not be strong and clear. This
can be due to factors such as the dis-
tance from the radio station, closeness of
other strong radio stations or the pres-
ence of buildings, bridges or other large
obstructions in the area.
¢¢¢
JBM001
FM reception
Page 183 of 408
Features of your vehicle
104
4
1. Power ON/OFF Button & Volume Control
Knob
2. FM Selection Button
3. AM Selection Button
4. Automatic Channel Selection Button
5. Preset Button
6. SCAN Button
7. SETUP Button
8. Manual Channel Selector & Sound Quality Control Knob
RADIO, SET UP, VOLUME, AUDIO CONTROL(PA910)
RADIO, SET UP, VOLUME, AUDIO CONTROL(PA960)
Page 184 of 408
4105
Features of your vehicle
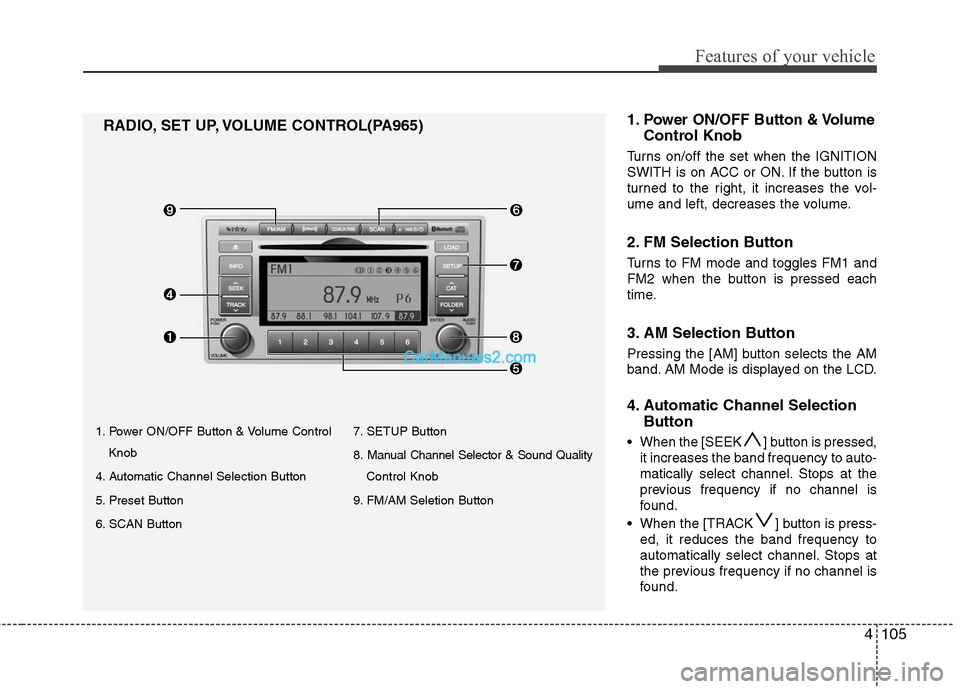
1. Power ON/OFF Button & Volume ControlKnob
4. Automatic Channel Selection Button
5. Preset Button
6. SCAN Button 7. SETUP Button
8. Manual Channel Selector & Sound Quality
Control Knob
9. FM/AM Seletion Button
RADIO, SET UP, VOLUME CONTROL(PA965) 1.Power ON/OFF Button & Volume
Control Knob
Turns on/off the set when the IGNITION
SWITH is on ACC or ON. If the button is
turned to the right, it increases the vol-
ume and left, decreases the volume.
2. FM Selection Button
Turns to FM mode and toggles FM1 and
FM2 when the button is pressed each
time.
3. AM Selection Button
Pressing the [AM] button selects the AM
band. AM Mode is displayed on the LCD.
4. Automatic Channel Selection
Button
When the [SEEK ] button is pressed,
it increases the band frequency to auto-
matically select channel. Stops at the
previous frequency if no channel is
found.
When the [TRACK ] button is press- ed, it reduces the band frequency to
automatically select channel. Stops at
the previous frequency if no channel is
found.
Page 185 of 408
![Hyundai Santa Fe 2011 Owners Manual
Features of your vehicle
106
4
5. Preset Button
Push [1]~[6] buttons less than 0.8 sec-
ond to play the channel saved in each
button. Push Preset button for 0.8 sec-
ond or longer to save current cha Hyundai Santa Fe 2011 Owners Manual
Features of your vehicle
106
4
5. Preset Button
Push [1]~[6] buttons less than 0.8 sec-
ond to play the channel saved in each
button. Push Preset button for 0.8 sec-
ond or longer to save current cha](/manual-img/35/16384/w960_16384-184.png)
Features of your vehicle
106
4
5. Preset Button
Push [1]~[6] buttons less than 0.8 sec-
ond to play the channel saved in each
button. Push Preset button for 0.8 sec-
ond or longer to save current channel to
the respective button with a beep.
6. SCAN Button
If this button is pressed, the frequencies
will become increased and receive the
corresponding broadcasts. This function
will play the frequencies for 5 seconds
(XM MODE:10 seconds) each and find
other broadcasts as the frequency
increases.
Press the button again when desiring to
continue listening to the currently playing
broadcast.
7. SETUP Button
Press this button to turn to the XM option
and the other adjustment mode.
If no action is taken for 5 seconds after
pressing the button, it will return to the
play mode.(After entering SEPUP mode,
move between items using the left, right
and PUSH funtions of the [TUNE] knob.)
■ ■
PA910
The setup change in the order of
SCROLL
➟SDVC➟PHONE➟RETURN
➟P.BASS➟XM...
■ ■
PA960/PA965
The setup changes in the order of
SCROLL
➟SURROUND➟XM➟PHONE...
This function is used to display charac-
ters longer than the LCD text display and
can be turned ON/OFF through the vol-
ume controller.
This function displays the previous
MODE screen.
This function automatically adjusts the
volume level according to the speed of
the vehicle and can be turned ON/OFF
through the volume controller.
Based on psychoacoustic technology, this
technology overcomes BASS limitations
which may occur due to the limited number
and size of speakers to offer dynamic
BASS sound quality. It is possible to
adjust in 3 levels of LOW/MID/HIGH.
OFF ➟LOW ➟MID ➟HIGH
Modes: CD/FM/AUX/IPOD/USB (exclud-
ing MW, LW Mode)
8. Manual Channel Selector
& Sound Quality Control Knob
Turn this control while listening to a radio
channel to manually adjust frequency.
Turn clockwise to increase frequency and
counterclockwise to reduce frequency.
Pressing the button changes the BASS,
MIDDLE, TREBLE, FADER and BAL-
ANCE TUNE mode. The mode selected
is shown on the display. After selecting
each mode, rotate the Audio control knob
clockwise or counterclockwise.
BASS Control
To increase the BASS, rotate the knob
clockwise, while to decrease the BASS,
rotate the knob counterclockwise.
Page 198 of 408
4119
Features of your vehicle
3. RANDOM Playback Button
Press the button for less than 0.8 second
to activate or deactivate the random play-
back of the songs within the current cat-
egory. Press the button for longer than
0.8 second to randomly play all songs in
the entire album of the iPod. Press the
button once again to cancel the mode.
4. REPEAT Button
Repeats the song currently played.
5. iPod Selection Button
If iPod is connected, it switches to the
iPod mode from the CD mode to play the
song files stored in the iPod. If no CD and
auxiliary device is not connected, it dis-
plays "NO Media" for 3 seconds and
returns to the previous mode.
6. Category Selection Button
Moves to the upper category from cur-
rently played category of the iPod.
To move to (play) the category (song)
displayed, MENU (preset6) You will be
able to search through the lower catego-
ry of the selected category. The order of
iPod's category is SONG, ALBUMES
ARTISTS, GENRES, and iPod.
7. Search/ENTER Button
When you turn the button clockwise, it
will display the songs (category) next to
the song currently played (category in
the same level).
Also, when you turn the button counter-
clockwise, it will display the songs (cate-
gory) before the song currently played
(category in the same level).
If you want to listen to the song displayed
in the song category, press the button,
then it will skip to the selected song and
play.