Page 13 of 312
Introduction
6
1
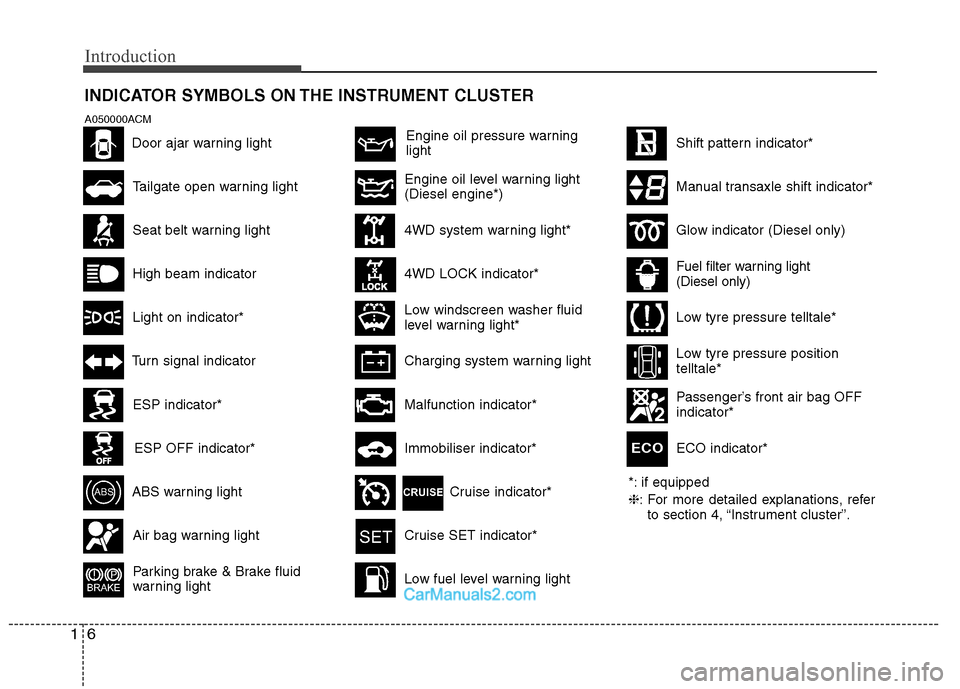
INDICATOR SYMBOLS ON THE INSTRUMENT CLUSTER
Engine oil pressure warning light
*: if equipped ❈: For more detailed explanations, refer
to section 4, “Instrument cluster”.
Passenger’s front air bag OFF indicator*
Seat belt warning light
Tailgate open warning light
High beam indicator
Light on indicator*
Turn signal indicator
ABS warning light
Parking brake & Brake fluid
warning light
4WD system warning light* 4WD LOCK indicator*
Malfunction indicator*
Air bag warning lightCruise SET indicator*
Low fuel level warning light
Shift pattern indicator*
Charging system warning light
Low windscreen washer fluid
level warning light*
Door ajar warning light
Glow indicator (Diesel only)
Fuel filter warning light (Diesel only)
ESP indicator*
ESP OFF indicator*Immobiliser indicator*
Low tyre pressure telltale*
Low tyre pressure position telltale*
A050000ACM
Manual transaxle shift indicator*Engine oil level warning light (Diesel engine*)
ECO indicator*
ECO
Cruise indicator*
Page 16 of 312
23
Your vehicle at a glance
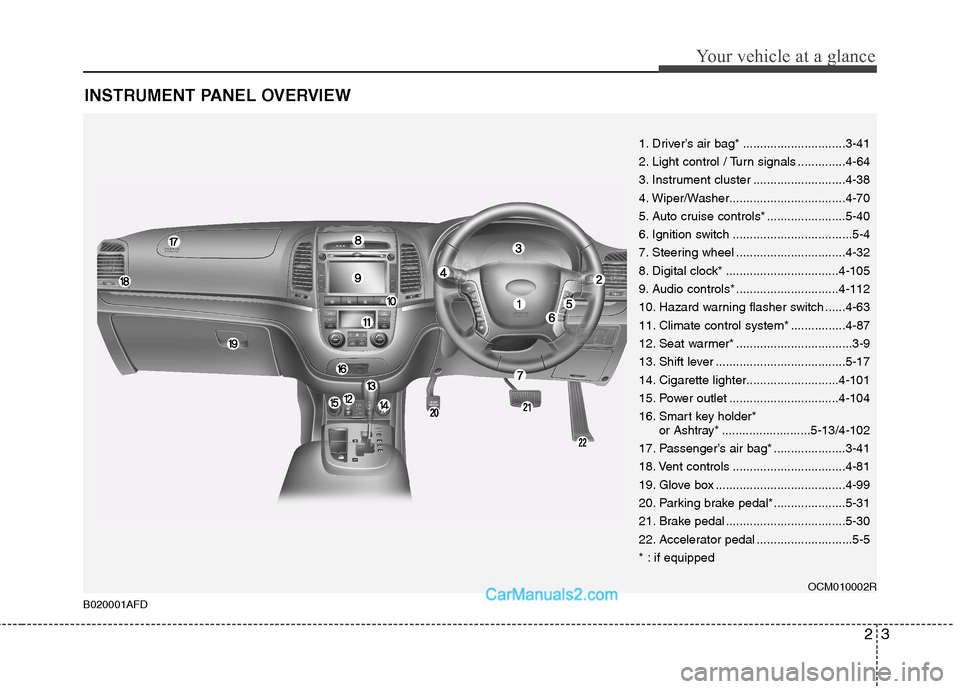
INSTRUMENT PANEL OVERVIEW
1. Driver’s air bag* ..............................3-41
2. Light control / Turn signals ..............4-64
3. Instrument cluster ...........................4-38
4. Wiper/Washer..................................4-70
5. Auto cruise controls* .......................5-40
6. Ignition switch ...................................5-4
7. Steering wheel ................................4-32
8. Digital clock* .................................4-105
9. Audio controls* ..............................4-112
10. Hazard warning flasher switch ......4-63
11. Climate control system* ................4-87
12. Seat warmer* ..................................3-9
13. Shift lever ......................................5-17
14. Cigarette lighter...........................4-101
15. Power outlet ................................4-10416.
Smart key holder*
or Ashtray*..........................5-13/4-102
17. Passenger’s air bag* .....................3-41
18. Vent controls .................................4-81
19. Glove box ......................................4-99
20. Parking brake pedal*.....................5-31
21. Brake pedal ...................................5-30
22. Accelerator pedal ............................5-5
* : if equipped
OCM010002R
B020001AFD
Page 76 of 312
4
Keys / 4-2
Remote keyless entry / 4-5
Smart key / 4-7
Theft-alarm system / 4-10
Door locks / 4-12
Tailgate / 4-16
Windows / 4-18
Bonnet / 4-22
Fuel filler lid / 4-24
Sunroof / 4-28
Steering wheel / 4-32
Mirrors / 4-34
Instrument cluster / 4-38
Rear parking assist system / 4-60
Rearview camera / 4-62
Hazard warning flasher / 4-63
Lighting / 4-64
Wipers and washers / 4-70
Interior light / 4-74
Defroster / 4-77
Manual climate control system / 4-78
Automatic climate control system / 4-87
Windscreen defrosting and defogging / 4-95
Storage compartment / 4-98
Interior features / 4-101
Exterior features / 4-110
Audio system / 4-111
Features of your vehicle
Page 114 of 312
439
Features of your vehicle
D150100AFD Instrument panel illumination (if equipped)
When the vehicle’s parking lights or head- lights are on, rotate the illumination con-
trol knob to adjust the instrument panel
illumination intensity.
The instrument cluster illumination intensitycan be adjusted by rotating the control knobwith the headlight switch in any positionwhen the ignition switch is in ON position.
Gauges
D150201AUN
Speedometer
The speedometer indicates the forward
speed of the vehicle.
The speedometer is calibrated in miles
per hour and kilometers per hour.D150202AFD
Tachometer
The tachometer indicates the approxi-
mate number of engine revolutions per
minute (rpm). Use the tachometer to select the correct
shift points and to prevent lugging and/or
over-revving the engine.
OCM052056ROCM040053A
OCM040055
OCM040055L
Type A
PetrolDiesel
Type B
Petrol Diesel
Page 121 of 312
Features of your vehicle
46
4
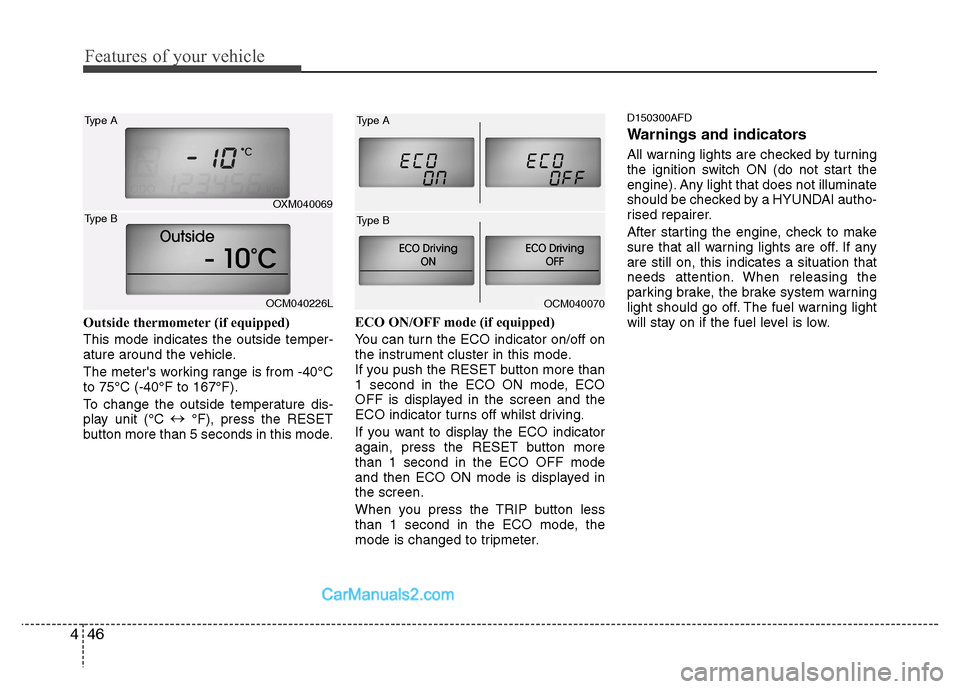
Outside thermometer (if equipped)
This mode indicates the outside temper-
ature around the vehicle.
The meter's working range is from -40°C to 75°C (-40°F to 167°F).
To change the outside temperature dis-
play unit (°C �
°F), press the RESET
button more than 5 seconds in this mode. ECO ON/OFF mode (if equipped)
You can turn the ECO indicator on/off on
the instrument cluster in this mode.
If you push the RESET button more than
1 second in the ECO ON mode, ECO
OFF is displayed in the screen and the
ECO indicator turns off whilst driving.
If you want to display the ECO indicator
again, press the RESET button morethan 1 second in the ECO OFF mode
and then ECO ON mode is displayed inthe screen.
When you press the TRIP button less
than 1 second in the ECO mode, the
mode is changed to tripmeter.D150300AFD
Warnings and indicators
All warning lights are checked by turning
the ignition switch ON (do not start the
engine). Any light that does not illuminate
should be checked by a HYUNDAI autho-
rised repairer.
After starting the engine, check to make
sure that all warning lights are off. If anyare still on, this indicates a situation that
needs attention. When releasing the
parking brake, the brake system warning
light should go off. The fuel warning light
will stay on if the fuel level is low.
OCM040070
OXM040069
Type A
OCM040226L
Type B
Type A
Type B
Page 126 of 312
451
Features of your vehicle
D150308AFD
Parking brake & brakefluid warning
Parking brake warning
This light is illuminated when the parking
brake is applied with the ignition switch in
the START or ON position. The warning
light should go off when the parking
brake is released.
Low brake fluid level warning
If the warning light remains on, it may
indicate that the brake fluid level in the
reservoir is low.
If the warning light remains on:
1. Drive carefully to the nearest safe location and stop your vehicle.
2. With the engine stopped, check the brake fluid level immediately and add
fluid as required. Then check all brake
components for fluid leaks.
3. Do not drive the vehicle if leaks are found, the warning light remains on or
the brakes do not operate properly.
Have it towed to any HYUNDAI autho-
rised repairer for a brake system
inspection and necessary repairs. Your vehicle is equipped with dual-diago-
nal braking systems. This means you still
have braking on two wheels even if one
of the dual systems should fail. With only
one of the dual systems working, more
than normal pedal travel and greaterpedal pressure are required to stop the
car. Also, the car will not stop in as short
a distance with only a portion of the
brake system working. If the brakes fail
whilst you are driving, shift to a lower
gear for additional engine braking and
stop the car as soon as it is safe to do so.
To check bulb operation, check whether
the parking brake and brake fluid warning
light illuminates when the ignition switchis in the ON position.
TPMS (Tyre Pressure Monitoring
System) indicator (if equipped)
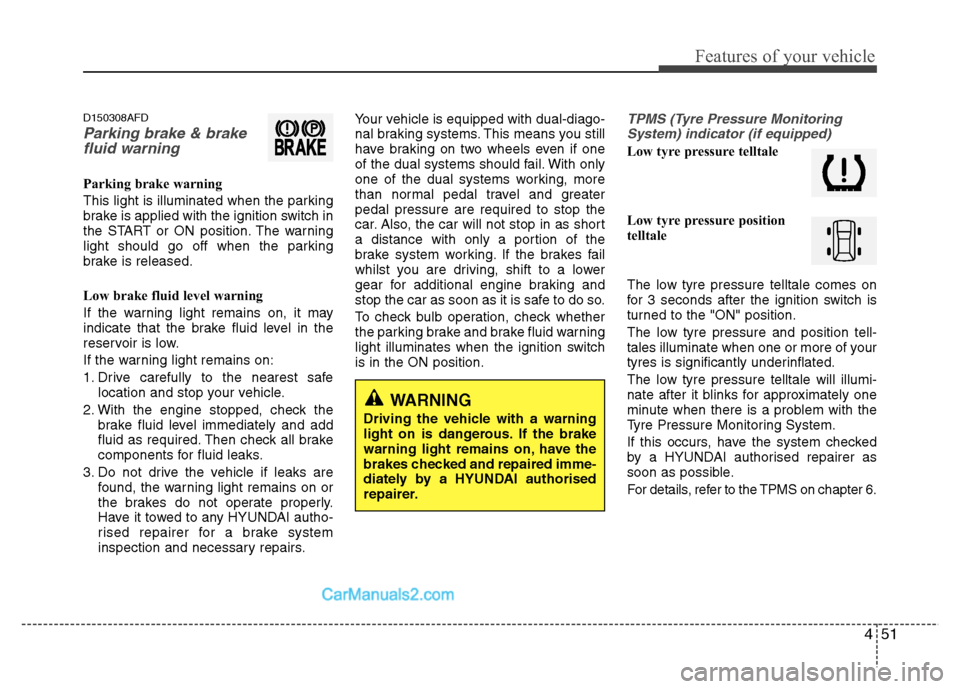
Low tyre pressure telltale
Low tyre pressure position
telltale
The low tyre pressure telltale comes on
for 3 seconds after the ignition switch is
turned to the "ON" position.
The low tyre pressure and position tell-
tales illuminate when one or more of your
tyres is significantly underinflated.
The low tyre pressure telltale will illumi-
nate after it blinks for approximately one
minute when there is a problem with the
Tyre Pressure Monitoring System.
If this occurs, have the system checked
by a HYUNDAI authorised repairer as
soon as possible.
For details, refer to the TPMS on chapter 6.
WARNING
Driving the vehicle with a warning
light on is dangerous. If the brake
warning light remains on, have the
brakes checked and repaired imme-
diately by a HYUNDAI authorised
repairer.
Page 139 of 312
Features of your vehicle
64
4
D190100BUN
Battery saver function
The purpose of this feature is to pre-
vent the battery from being dis-
charged. The system automatically
turns off the parking lights when the
driver removes the ignition key and
opens the driver- side door.
With this feature, the parking lights will be turned off automatically if the driver
parks on the side of road at night.
If necessary, to keep the lights on
when the ignition key is removed, per-
form the following :
1) Open the driver-side door.
2) Turn the parking lights OFF and ON
again using the light switch on the
steering column. D190400AUN
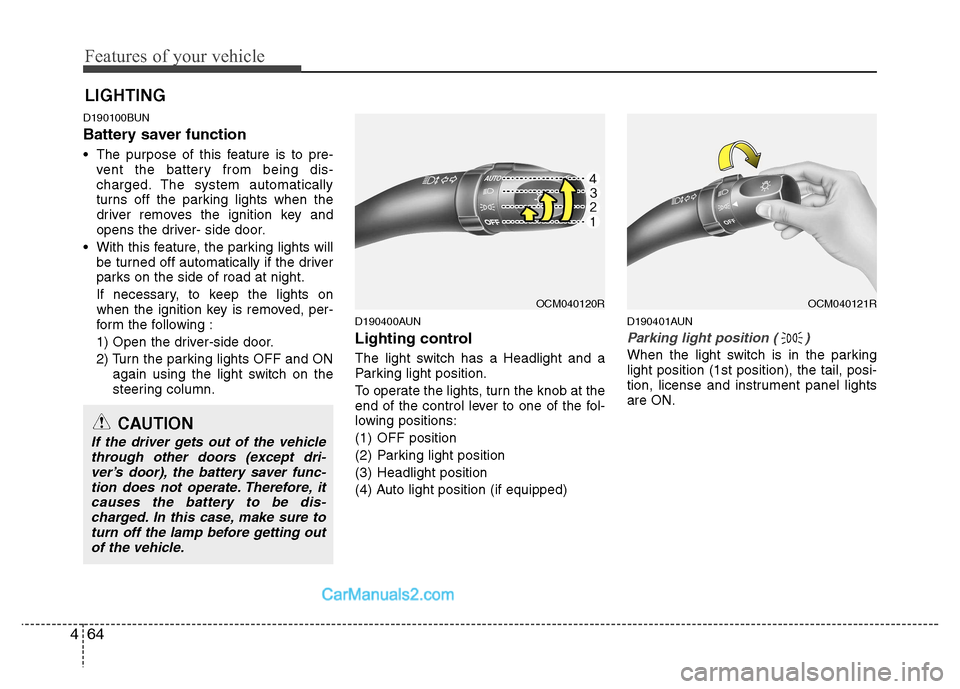
Lighting control
The light switch has a Headlight and a
Parking light position.
To operate the lights, turn the knob at the
end of the control lever to one of the fol-
lowing positions:
(1) OFF position
(2) Parking light position
(3) Headlight position
(4) Auto light position (if equipped) D190401AUN
Parking light position ( )
When the light switch is in the parking light position (1st position), the tail, posi-
tion, license and instrument panel lightsare ON.
LIGHTING
OCM040120ROCM040121R
CAUTION
If the driver gets out of the vehicle
through other doors (except dri-ver’s door), the battery saver func-tion does not operate. Therefore, it
causes the battery to be dis-charged. In this case, make sure toturn off the lamp before getting out of the vehicle.
Page 151 of 312
Features of your vehicle
76
4
D210500AUN
Glove box lamp (if equipped)
The glove box lamp comes on when the
glove box is opened.
The parking lights or headlights must be
ON for the glove box lamp to function. D210600AUN
Vanity mirror lamp (if equipped)
Opening the lid of the vanity mirror will
automatically turn on the mirror light.
OEN046081/HOCM040179/H