2011 Hyundai Santa Fe warning
[x] Cancel search: warningPage 285 of 312
617
What to do in an emergency
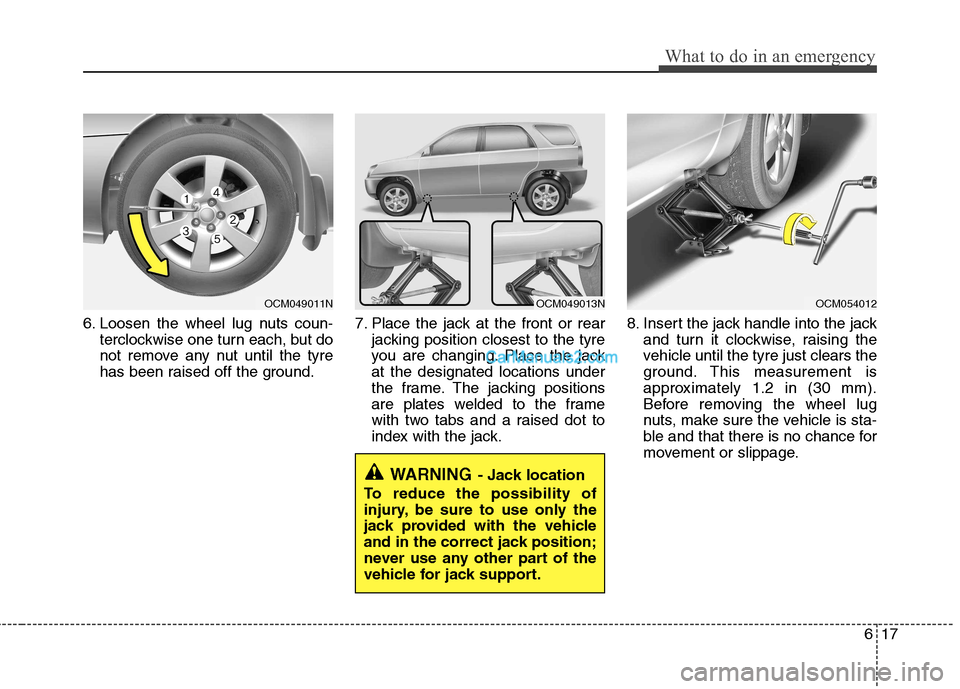
6. Loosen the wheel lug nuts coun-terclockwise one turn each, but do
not remove any nut until the tyre
has been raised off the ground. 7. Place the jack at the front or rear
jacking position closest to the tyre
you are changing. Place the jackat the designated locations under
the frame. The jacking positions
are plates welded to the frame
with two tabs and a raised dot to
index with the jack. 8. Insert the jack handle into the jack
and turn it clockwise, raising the
vehicle until the tyre just clears the
ground. This measurement is
approximately 1.2 in (30 mm).
Before removing the wheel lug
nuts, make sure the vehicle is sta-
ble and that there is no chance for
movement or slippage.
WARNING - Jack location
To reduce the possibility of
injury, be sure to use only the
jack provided with the vehicle
and in the correct jack position;
never use any other part of the
vehicle for jack support.
OCM049011NOCM049013NOCM054012
Page 286 of 312
What to do in an emergency
18
6
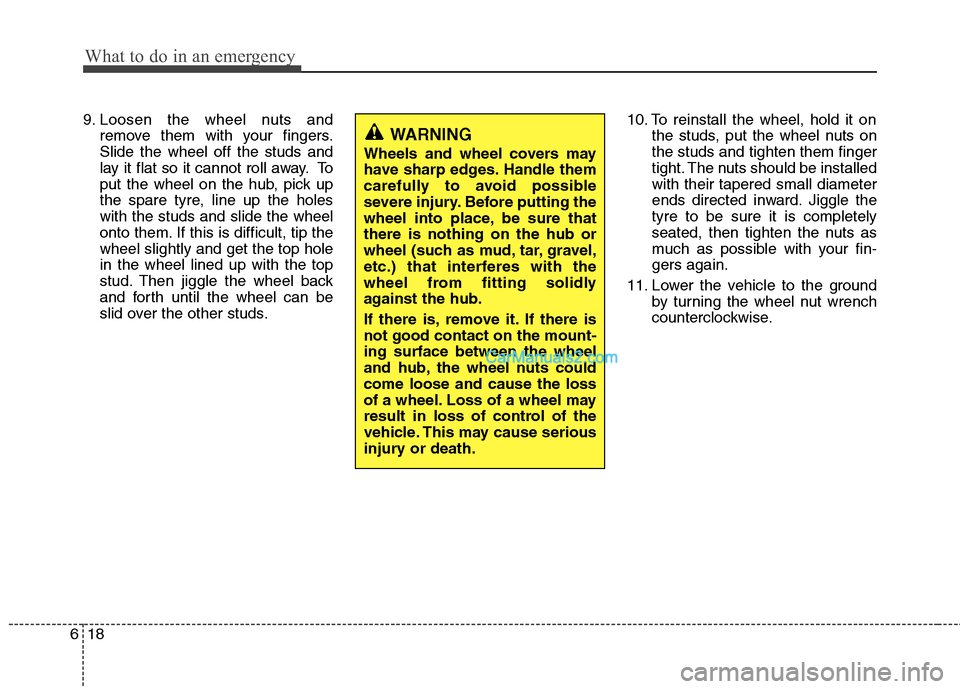
9. Loosen the wheel nuts and
remove them with your fingers. Slide the wheel off the studs and
lay it flat so it cannot roll away. To
put the wheel on the hub, pick up
the spare tyre, line up the holeswith the studs and slide the wheel
onto them. If this is difficult, tip thewheel slightly and get the top holein the wheel lined up with the top
stud. Then jiggle the wheel back
and forth until the wheel can be
slid over the other studs. 10. To reinstall the wheel, hold it on
the studs, put the wheel nuts onthe studs and tighten them finger
tight. The nuts should be installedwith their tapered small diameter
ends directed inward. Jiggle thetyre to be sure it is completely
seated, then tighten the nuts as
much as possible with your fin-gers again.
11. Lower the vehicle to the ground by turning the wheel nut wrench
counterclockwise.
WARNING
Wheels and wheel covers may
have sharp edges. Handle them
carefully to avoid possible
severe injury. Before putting the
wheel into place, be sure thatthere is nothing on the hub or
wheel (such as mud, tar, gravel,
etc.) that interferes with the
wheel from fitting solidly
against the hub.
If there is, remove it. If there is not good contact on the mount-ing surface between the wheel
and hub, the wheel nuts couldcome loose and cause the loss
of a wheel. Loss of a wheel may
result in loss of control of the
vehicle. This may cause serious
injury or death.
Page 288 of 312
What to do in an emergency
20
6
To prevent the jack, jack handle,
wheel lug nut wrench and spare tyre
from rattling whilst the vehicle is in
motion, store them properly. F070301AUN
Important - use of compact spare
tyre (if equipped)
Your vehicle is equipped with a com-
pact spare tyre. This compact spare
tyre takes up less space than a reg-
ular-size tyre. This tyre is smaller
than a conventional tyre and is
designed for temporary use only.
The compact spare should be inflat-
ed to 60 psi (420 kPa).
✽✽NOTICE
Check the inflation pressure after
installing the spare tyre. Adjust it to
the specified pressure, as necessary.
WARNING - Wheel studs
If the studs are damaged, they
may lose their ability to retain
the wheel. This could lead to theloss of the wheel and a collisionresulting in serious injuries.
WARNING - Inadequate
spare tyre pressure
Check the inflation pressures as
soon as possible after installing
the spare tyre. Adjust it to the
specified pressure, if necessary.
Refer to “Tyres and wheels” insection 8.
CAUTION
You should drive carefully
when the compact spare is inuse. The compact spare should be replaced by theproper conventional tyre andrim at the first opportunity.
The operation of this vehicle is not recommended withmore than one compact sparetyre in use at the same time.
WARNING
The compact spare tyre is for
emergency use only. Do not
operate your vehicle on this
compact spare at speeds over
80 km/h (50 mph). The originaltyre should be repaired or
replaced as soon as is possible
to avoid failure of the spare
possibly leading to personal
injury or death.
Page 290 of 312
What to do in an emergency
22
6
TOWING
F080100AFD
Towing service
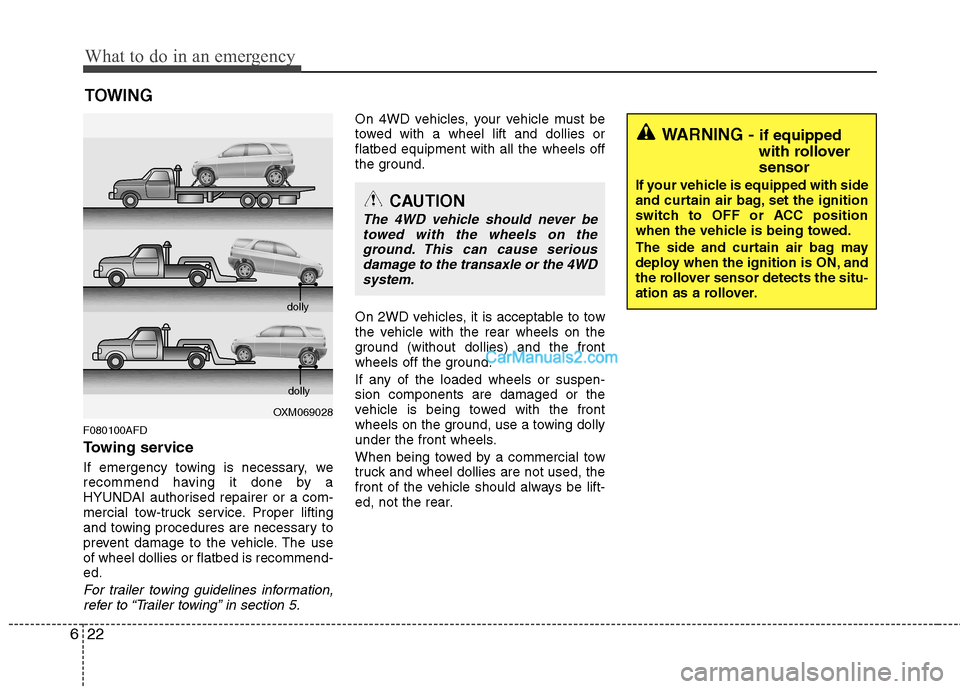
If emergency towing is necessary, we
recommend having it done by a
HYUNDAI authorised repairer or a com-
mercial tow-truck service. Proper lifting
and towing procedures are necessary to
prevent damage to the vehicle. The useof wheel dollies or flatbed is recommend-ed.
For trailer towing guidelines information, refer to “Trailer towing” in section 5.
On 4WD vehicles, your vehicle must be
towed with a wheel lift and dollies orflatbed equipment with all the wheels off
the ground.
On 2WD vehicles, it is acceptable to tow
the vehicle with the rear wheels on the
ground (without dollies) and the front
wheels off the ground.
If any of the loaded wheels or suspen- sion components are damaged or the
vehicle is being towed with the front
wheels on the ground, use a towing dolly
under the front wheels.
When being towed by a commercial tow
truck and wheel dollies are not used, the
front of the vehicle should always be lift-
ed, not the rear.
OXM069028 dolly
dolly
CAUTION
The 4WD vehicle should never be
towed with the wheels on theground. This can cause seriousdamage to the transaxle or the 4WD
system.
WARNING - if equipped
with rollover sensor
If your vehicle is equipped with side
and curtain air bag, set the ignition
switch to OFF or ACC position
when the vehicle is being towed.
The side and curtain air bag may
deploy when the ignition is ON, and
the rollover sensor detects the situ-
ation as a rollover.
Page 293 of 312
625
What to do in an emergency
Before emergency towing, check thatthe hook is not broken or damaged.
Fasten the towing cable or chain securely to the hook.
Do not jerk the hook. Apply steady and even force.
To avoid damaging the hook, do not pull from the side or at a vertical angle.
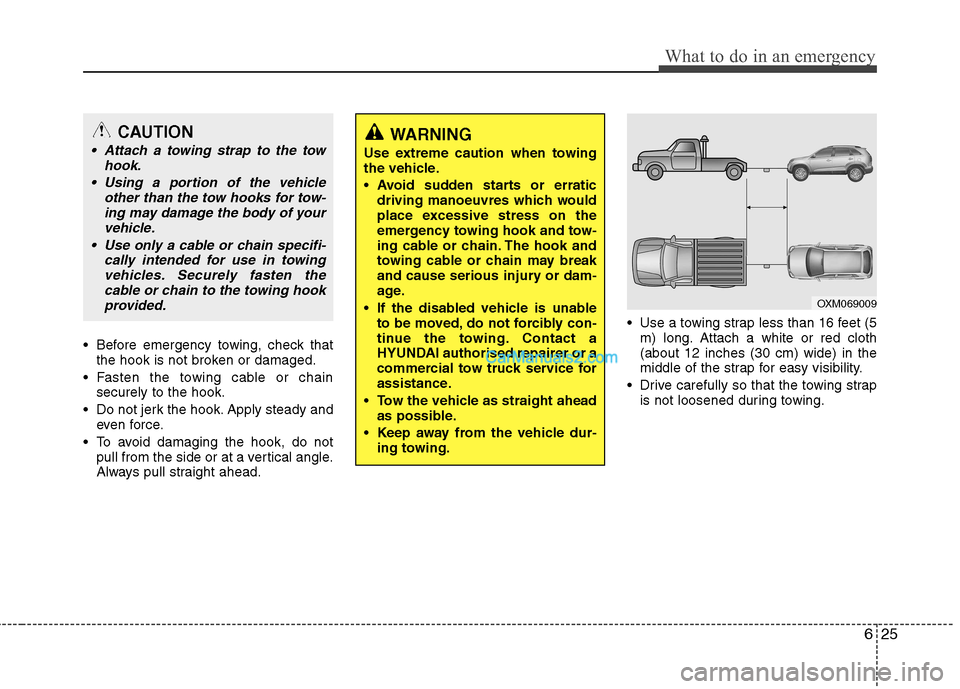
Always pull straight ahead. Use a towing strap less than 16 feet (5
m) long. Attach a white or red cloth(about 12 inches (30 cm) wide) in the
middle of the strap for easy visibility.
Drive carefully so that the towing strap is not loosened during towing.
WARNING
Use extreme caution when towing
the vehicle.
driving manoeuvres which would
place excessive stress on the
emergency towing hook and tow-
ing cable or chain. The hook and
towing cable or chain may break
and cause serious injury or dam-
age.
If the disabled vehicle is unable to be moved, do not forcibly con-
tinue the towing. Contact a
HYUNDAI authorised repairer or a
commercial tow truck service for
assistance.
Tow the vehicle as straight ahead as possible.
Keep away from the vehicle dur- ing towing.
OXM069009
CAUTION
Attach a towing strap to the tow
hook.
Using a portion of the vehicle other than the tow hooks for tow-ing may damage the body of yourvehicle.
Use only a cable or chain specifi- cally intended for use in towingvehicles. Securely fasten thecable or chain to the towing hook provided.
Page 294 of 312
What to do in an emergency
26
6
F080301BUN
Emergency towing precautions
Turn the ignition switch to ACC so the
steering wheel isn’t locked.
Place the transaxle shift lever in N (Neutral).
Release the parking brake.
Press the brake pedal with more force than normal since you will have
reduced brake performance.
More steering effort will be required because the power steering system
will be disabled.
If you are driving down a long hill, the brakes may overheat and brake per-
formance will be reduced. Stop often
and let the brakes cool off. F080400AFD
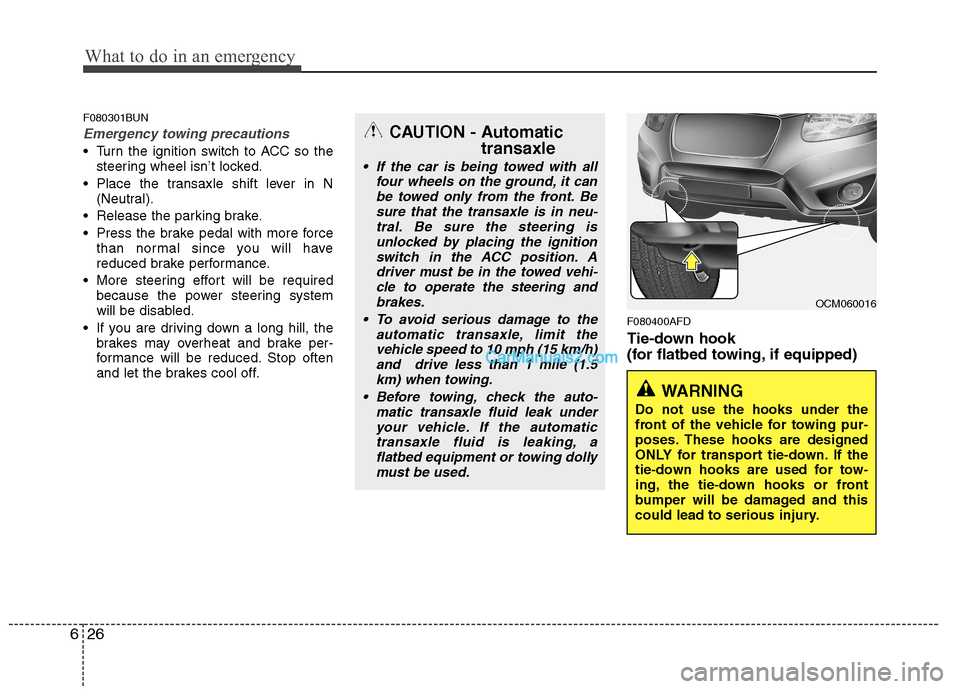
Tie-down hook
(for flatbed towing, if equipped)
OCM060016
WARNING
Do not use the hooks under the
front of the vehicle for towing pur-
poses. These hooks are designed
ONLY for transport tie-down. If the
tie-down hooks are used for tow-
ing, the tie-down hooks or front
bumper will be damaged and this
could lead to serious injury.
CAUTION - Automatic transaxle
If the car is being towed with allfour wheels on the ground, it can
be towed only from the front. Besure that the transaxle is in neu-tral. Be sure the steering is unlocked by placing the ignition
switch in the ACC position. Adriver must be in the towed vehi-cle to operate the steering and
brakes.
To avoid serious damage to the automatic transaxle, limit thevehicle speed to 10 mph (15 km/h)and drive less than 1 mile (1.5
km) when towing.
Before towing, check the auto- matic transaxle fluid leak underyour vehicle. If the automatic transaxle fluid is leaking, a
flatbed equipment or towing dollymust be used.
Page 304 of 312
Index
2
I
Active ECO system ·························································5-45
Air bags ···········································································3-37
Air bag warning label................................................3-58
Air bag warning light ................................................3-56
Curtain air bag ..........................................................3-47
Driver's and passenger's front air bag ......................3-41
Passenger’s front air bag ON/OFF switch ................3-43
Side impact air bag....................................................3-45
Air cleaner·······································································7-20
Alarm system ··································································4-10
All wheel drive (AWD), see four wheel drive (4WD) ···5-23
Antenna ·········································································4-111
Anti-lock brake system (ABS)········································5-33
Appearance care······························································7-60 Exterior care ······························································7-60
Interior care ·······························································7-65
Armrest ···········································································3-13
Ashtray ··········································································4-101
Audio system ································································4-111 Antenna ···································································4-111
Aux, USB and iPod ·················································4-106
Steering wheel audio control ··································4-112
Automatic climate control system ··································4-87 Air conditioning ························································4-93
Automatic heating and air conditioning····················4-88 Manual heating and air conditioning ························4-89
Outside thermometer ·················································4-91
3rd row air conditioning············································4-94
Automatic transaxle ························································5-17 Ignition key interlock system ····································5-21
Shift lock system ·······················································5-20
Sports mode·······························································5-20
Battery ·············································································7-27
Before driving ···································································5-3
Bonnet ·············································································4-22
Bottle holders, see cup holders ·····································4-102
Brake system ···································································5-30 Anti-lock brake system (ABS) ··································5-33
Electronic stability program (ESP) ···························5-35
Parking brake·····························································5-31
Power brakes ·····························································5-30
Brakes fluid ·····································································7-16
Bulb replacement ····························································7-50 Door courtesy lamp bulb replacement ······················7-58
Front fog light bulb replacement ·····················7-51, 7-54
Headlight bulb replacement ·····························7-51, 7-54
High mounted stop light replacement ·······················7-57
Interior light bulb replacement··································7-59
License plate light bulb replacement ························7-58
A
B
Page 307 of 312
I5
Index
Floor mat anchor(s) ·····················································4-107 Fluid
Washer fluid ·····························································7-18
Brakes fluid ······························································7-16
Power steering fluid ··················································7-17
Folding the rear seat ······················································3-13
Four wheel drive (4WD) ················································5-23
Front fog light bulb replacement ··························7-51, 7-54Front seat adjustment - manual ········································3-4
Front seat adjustment - power ·········································3-5
Fuel filler lid ··································································4-24
Fuel filter(for diesel) ······················································7-19
Fuel gauge ······································································4-41
Fuel requirements ····························································1-2Fuses ··············································································7-40 Fuse/relay panel description ····································7-44
Main fuse···································································7-43
Memory fuse ·····························································7-42
Gauge Engine temperature gauge ·········································4-40
Fuel gauge ································································4-41
Glassroof, see panorama sunroof····································4-28
Glove box ·······································································4-99 Hazard warning flasher ··················································4-63
Hazardous driving conditions ········································5-48
Headlight bulb replacement ·································7-51, 7-54
Headlight leveling device ··············································4-68
Headlight washer ····························································4-69
Head restraint ··························································3-7, 3-11
Heating and air conditioning ·········································4-79High mounted stop light replacement ····························7-57
Horn ················································································4-33
How to use this manual ···················································1-2
Ignition key interlock system··········································5-21
ISOFIX system ······························································3-34
Immobilizer system ·························································4-3
Indicators and warnings ·················································4-46
Indicator symbols on the instrument cluster ····················1-6
Instrument cluster ··························································4-38
Engine temperature gauge ········································4-40
Fuel gauge ································································4-41
Instrument panel illumination ··································4-39Odometer ··································································4-42Speedometer ·····························································4-39
Tachometer ·······························································4-39
G
H
I